Wait… What Happens When my React Native Application Starts? — An In-depth Look Inside React Native
Discover how React Native functions internally, and what it does for you without you knowing it.
Disclaimer: this articles assumes a (very) basic understanding of React Native and Native Modules. If you have never played around with them, I’d recommend getting a look at the official documentation first.
Edit: This article is based on a talk I’ve given in London for the ReactFestconference in March 2018. You can see me talk over here!
As I started using React Native, something quickly bugged me: what’s happening there? Indeed, from the standpoint of someone who simply uses React Native to build (great) applications, things can sometimes look magical. Want to make some native code usable from Javascript? Simply use @ReactMethod (or RCT_EXPORT_METHOD on iOS)! Want to send an event over from native to Javascript? No problem, just grab the appropriate Javascript module and call it like you would do for any native method! Not to mention, the same Javascript code will run on both iOS and Android…
As one might guess, these things are not trivial. Fairly complex, in fact. So what enables React Native to achieve such feats? The easy and commonly given answer is:
The React Native “Bridge”, duh!
In other words:
 Some React Native explanations…
But who wants easy answers? This time around we will go into details. But be warned: things might get messy.
The React Native Infrastructure
Let’s get straight to the point: in order to function, React Native relies on a full infrastructure built at runtime. Ta-da!
Wait… didn’t you just give us another cryptic explanation?
I did? But there are two things to note here. First, infrastructure: the famous “bridge” is just a part of it — and not the most incredible, I dare say. Second, runtime: the above infrastructure is being built every single time you launch a React Native application, before any custom code is executed. In other words, before your application comes online and becomes visible, it goes through a transitional state where React Native is busy building your application’s foundations for you.
What does this so-called infrastructure looks like, you say? Well, let us draw a map, showing various parts (linked by arrows roughly meaning “stores a reference to”).
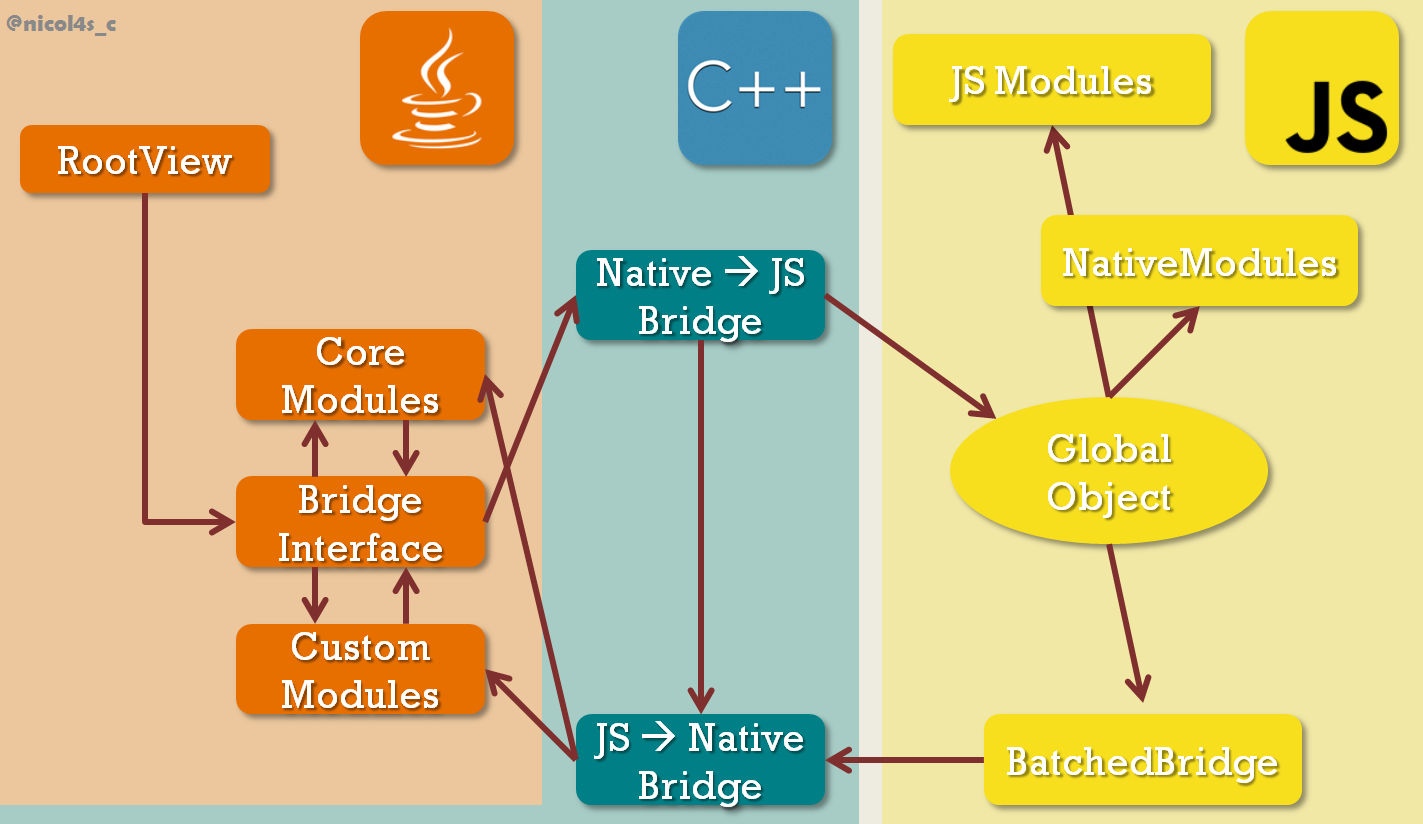 React Native Infrastructure — the Java logo could be replaced with an Objective-C one in the case of iOS
Woops, that got a little complex, didn’t it? And this is a simplified version… In order to understand this mess, we will describe its parts one by one, in the order in which they are created at launch. Let’s go!
Starting a React Native Application
Remember that the whole thing is built whenever a React Native application starts? Let us go through the multiple steps that separate the instant when you press your application’s logo on your phone from the moment everything becomes visible.
First, your application only has two things to work with:
- The application’s code,
- A unique thread, the main thread* , that is automatically assigned to it by the phone’s operating system.
To simplify explanations, we are going to conceptually split the code in two: the framework code — the one you do not have to write every time — and the _custom code _— that actually describes your application. Both being distributed over Javascript and native, this gives us a total of four parts of code to go through. The first thing that will get processed — on the main thread — is the native part of the framework code.
*also called UI Thread_, as — outside of initialization — it will mainly be responsible of UI-related work_
Creating the Native Foundations
One important thing to realize is that, although most of the UI code — <View>, <Text>… — is written in Javascript, what will in the end be rendered are only native views. That’s it. This means that the React Native framework needs to:
- create native views and map their connections to Javascript components,
- store these natives views and display them.
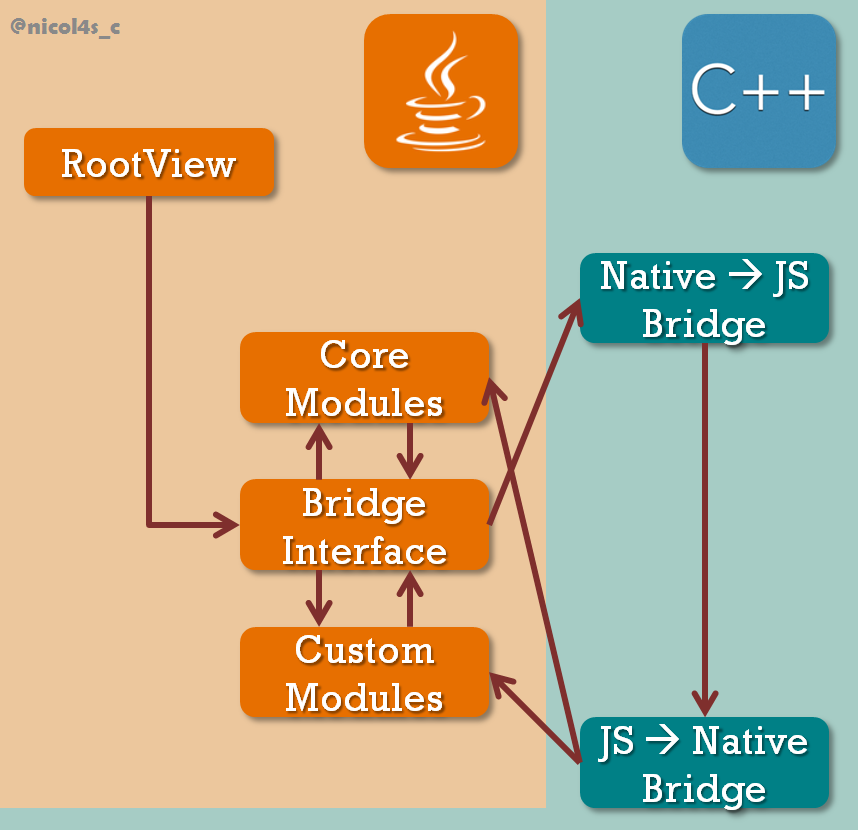
While the first step will be handled by the UIManagerModule (which we will describe a little later), the RootView will take care of the second one. The RootView is more or less a container in which native views are organized in a big tree — a native representation of the Javascript component tree, if you like — and everything that will show up on the phone’s screen will be stored in there.
Back to our initializing process: everything starts with the creation of the above RootView— an empty container for now — before moving on to the Bridge Interface.
Wasn’t the bridge supposed to be between native and Javascript? Why would you need an interface there?
It is! But although most of the native side — including the RootView — is written in a platform-specific language (Objective-C or Java), the bridge is entirely implemented in C++ . The Bridge Interface therefore acts as an API, allowing the former to interact with the latter. The bridge itself is made up of two ends, native to Javascript, and vice versa.
The bridge, however, would be nothing without endpoints to dispatch calls to. These endpoints are Native Modules and will, in the end, be the only things available to the Javascript environment. In other words, everything but Native Modules will be eventually invisible to your Javascript application. For this reason, aside from the Custom Modules that you may or may not decide to create, the framework also includes Core Modules. One example of the latter would be the UIManagerModule , which stores a map of all Javascript UI Components and their associated native views. Every time a Javascript UI Component is created, updated or deleted, the UIManagerModule will use this map to accordingly create, update or delete the corresponding native view. It will also forward changes to the native view tree stored in the RootView in order to make them visible.
From the standpoint of initialization, all Native Modules are treated the same: for each module, an instance is created, and a reference to that instance is stored on the Javascript to native bridge — so that they can later be called from Javascript. In addition, a reference to the Bridge Interface is also passed to each Native Module, allowing them to call Javascript directly. Finally, two additional threads will be created: the JS Thread and the NativeModulesThread*.
*strictly speaking, it is not a unique thread but a pool of threads in the case of the iOS implementation of React Native.
Intermezzo: Setting Up the Javascript Engine
Before moving on, let’s make a quick summary of what has happened so far:
- a bunch of native stuff has been created on the main thread,
- we now have three threads to work with,
- absolutely no Javascript has been processed yet.
Referring back to our initial map, what we have is this:
 React Native’s native side
Meaning it is now time to load the Javascript bundle — framework and custom code alike!
Being an interpreted scripting language, Javascript cannot be run as is: it needs to be converted to bytecode, then be executed. This is the job of the Javascript virtual machine (a.k.a. Javascript engine). There are many Javascript engines out there, including Chrome’s V8, Mozilla’s SpiderMonkey and Safari’s JavaScriptCore… If in debug mode, React Native will use V8 and directly run in the browser, otherwise, it defaults to JavaScriptCore and runs on the device. As a side note, JavaScriptCore is not included in Android by default (while it is in iOS), so React Native automatically bundles a copy of it in the Android application — making Android applications slightly heavier than their iOS counterparts.
In any case, before effectively kicking off the Javascript engine, React Native has to give it a Context representing the execution environment. That includes the Javascript global object, and means that this global object is in fact created and stored on the C++ bridge. Why is that so important? Because the global object is then not only reachable from within the Javascript environment, but also from outside. It is therefore the primary means of communication between C++ (native) and Javascript, as it is through the global object that some native functions will be made available to Javascript — functions that will in turn be used to pass back data from Javascript to native.
Many things are stored on the global object, but the ModuleConfig array and the flushQueue() function are especially important. Each element of the ModuleConfig array describes a Native Module (be it Core or Custom), including its name, its exported constants, methods… The flushQueue()function plays a critical role in assuring communication between the Javascript and native environment, as it it will be used periodically to pass calls from the first back to the second.
Once the Javascript Context has been fully created and filled, it is fed to the Javascript engine that starts loading the React Native Javascript bundle on theJS Thread.
Loading the Javascript Bundle
As the virtual machine begins processing the Javascript part of the framework code, it will create the BatchedBridge. That name might ring a bell as it sometimes pops up in error messages! Despite its fancy denomination, it is but a simple queue, that stores “calls from Javascript to native”. A “call” is an object containing a native module ID, a method ID (for the specified native module), along with arguments that the native method is to be called with. Periodically (every 5 milliseconds by default), the BatchedBridge will call on global.flushQueue(), passing its content — an array of “calls” — to the Javascript to native end of the C++ bridge. Know as batches , these small arrays are indexed so as to ensure that all UI changes contained in one batch are made visible at the same time (this is necessary because the entire process is asynchronous). The Javascript to native end of the bridge will finally iterate over each call in a batch and dispatch them to the appropriate native module using the specified module ID — which it can do because it has a reference pointing to each and any native module, remember?
The next step is creating the NativeModules object — yes, the very object that has to be imported from ‘react-native’ each time you want to call a native module. The NativeModules object will be filled using the ModuleConfigarray mentioned earlier. I will not go into the details of this process here, but it is roughly equivalent to doing NativeModules[module_name]={} for each module_name contained in the ModuleConfig, then NativeModules[module_name][method_name]=fillerMethod for each exported native method of the given module. fillerMethod is simply there to store all arguments it receives on the BatchedBridge , along with the method and module ID (something like fillerMethod = function(...args) { BatchedBridge.enqueueNativeCall(moduleID, methodID, args)} ), effectively creating a “call” from Javascript to native. That being said, what is fired when you later write MyNativeModule.myMethod(args) is actually the abovefillerMethod !
We’re almost there. The last thing that needs to be done is creating the core JS Modules, among which the DeviceEventEmitter— that will be used to send events from native to Javascript — or the AppRegistry, that stores a reference to the main components of your app. In order to be callable from native, these modules are registered on the Javascript global object…
…and with that, the full React Native infrastructure has been built!
Making the React Native Application Visible
Despite the initialization being all but complete, our application is still invisible at this stage! Indeed, the loading of the Javascript bundle happened on the JS thread, which is independent of the main (a.k.a. UI) thread. The JS thread thus has to warn the main thread about the completion of its task, and in response, the main thread uses the AppRegistry (JS module) to ask the JS thread to process the main custom component — usually App.js .
To sum it up from a threading perspective, a React Native application’s launch process looks like this:
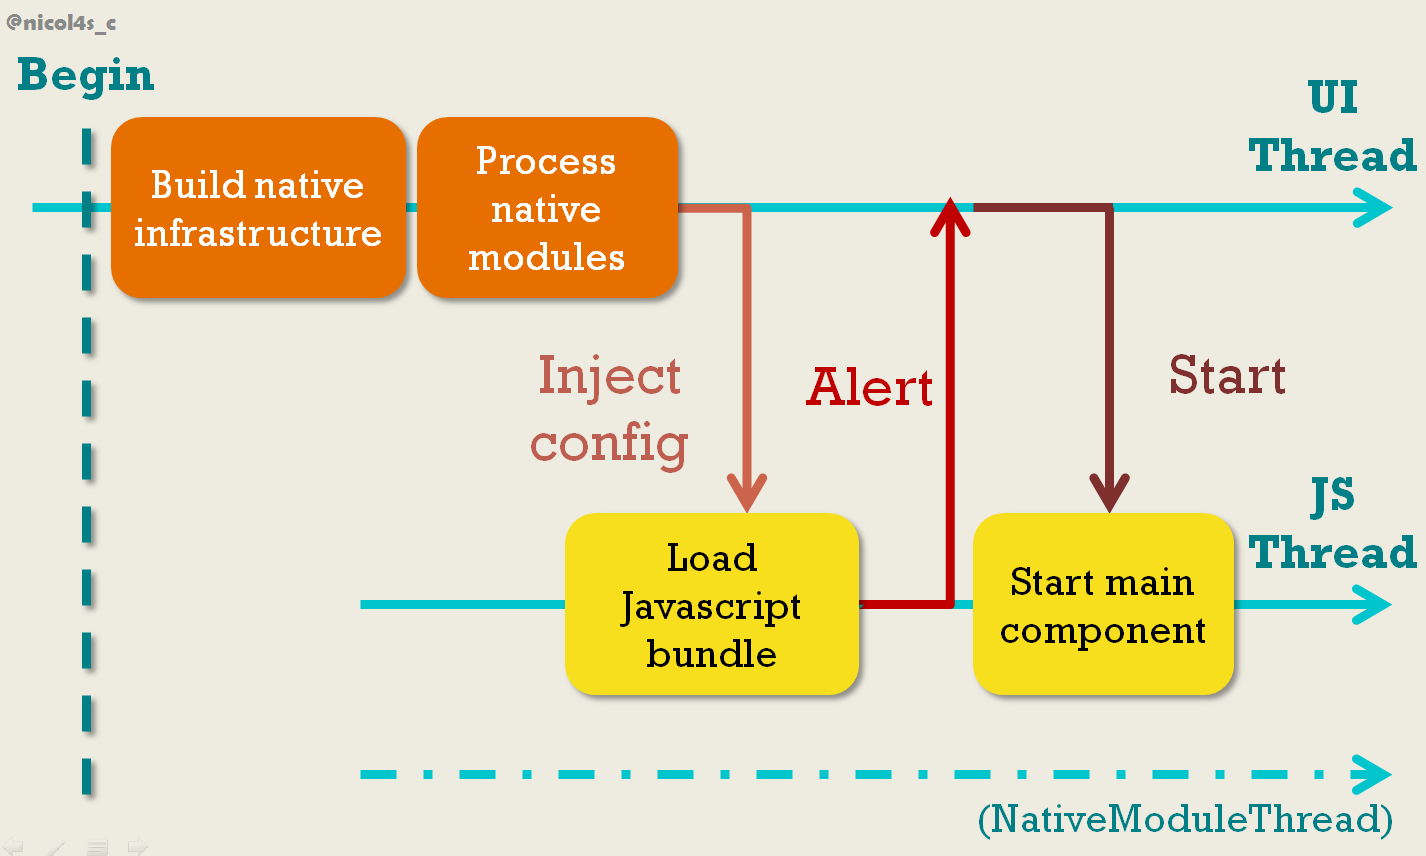 React Native’s starting routine
The Javascript component tree contained in your application’s main component will be traversed, calling the UIManagerModule every time a UI component is encountered. The UIManagerModule (on the UI thread) will in turn take care of creating native views and storing them in the RootView : congratulations, your application is now visible!
Wait… What Happens When my React Native Application Starts? — An In-depth Look Inside React Native的更多相关文章
- Native Application 开发详解(直接在程序中调用 ntdll.dll 中的 Native API,有内存小、速度快、安全、API丰富等8大优点)
文章目录: 1. 引子: 2. Native Application Demo 展示: 3. Native Application 简介: 4. Native Ap ...
- 微软推出了Cloud Native Application Bundles和开源ONNX Runtime
微软的Microsoft Connect(); 2018年的开发者大会 对Azure和IoT Edge服务进行了大量更新; Windows Presentation Foundation,Window ...
- react系列笔记1 用npx npm命令创建react app
react系列笔记1 用npx npm命令创建react app create-react-app my-app是开始构建新的 React 单页应用程序的最佳方式.它已经为你设置好了开发环境,以便您可 ...
- 关于React.PropTypes的废除,以及新版本下的react的验证方式
React.PropTypes是React用来typechecking的一个属性.要在组件的props上运行typechecking,可以分配特殊的propTypes属性: class Greetin ...
- react全家桶从0搭建一个完整的react项目(react-router4、redux、redux-saga)
react全家桶从0到1(最新) 本文从零开始,逐步讲解如何用react全家桶搭建一个完整的react项目.文中针对react.webpack.babel.react-route.redux.redu ...
- React实战教程之从零开始手把手教你使用 React 最新特性Hooks API 打造一款计算机知识测验App
项目演示地址 项目演示地址 项目代码结构 前言 React 框架的优雅不言而喻,组件化的编程思想使得React框架开发的项目代码简洁,易懂,但早期 React 类组件的写法略显繁琐.React Hoo ...
- React Native 开发之 (02) 用Sublime 3作为React Native的开发IDE
Sublime Text是一个代码编辑器.也是HTML和散文先进的文本编辑器.漂亮的用户界面和非凡的功能,例如:迷你地图,多选择Python插件,代码段等等.完全可自定义键绑定,菜单和工具栏等等.漂亮 ...
- How to debug Android Native Application with eclipse
This blog is inspired by this tutorial http://mhandroid.wordpress.com/2011/01/23/using-eclipse-for-a ...
- [React] Configure a React & Redux Application For Production Deployment and Deploy to Now
In this lesson, we’ll make a few small changes to our scripts and add some environment variables tha ...
随机推荐
- liteos队列(五)
1. 概述 队列又称消息队列,是一种常用于任务间通信的数据结构,实现了接收来自任务或中断的不固定长度的消息,并根据不同的接口选择传递消息是否存放在自己空间.任务能够从队列里面读取消息,当队列中的消息是 ...
- STM32F4 串口IAP程序要点
1. IAP(bootloader)程序 1.1 内部Flash地址分配 /* Start of the Flash address */ #define STM32_FLASH_BASE 0x080 ...
- va_list 、va_start、 va_arg、 va_end 使用说明【转】
转自:https://blog.csdn.net/f110300641/article/details/83822290 在ANSI C中,这些宏的定义位于stdarg.h中: typedef cha ...
- 2.4 Scala函数式编程
一.函数定义与使用 1.函数的定义 2.匿名函数 举例: Scala自动推断变量类型,不用声明: 一个下划线只能表示这一个参数的一次出现 二.高阶函数 定义:函数定义的括号里仍然是个函数的函数,叫作高 ...
- 01day-微信小程序 表单组件 动态绑定变量 导航组件 地图组件 view text button 上下滚动组件
04-开发者环境搭建(下载安装开发者工具) 01==>微信开发工具的下载 安装 微信小程序的工具是 下载稳定版本的 安装的时候 直接下一步就可以了 02==>项目名陈随便输入 目录 App ...
- ConcurrentSkipListMap的常用方法
package com.geo.map; import java.util.Iterator;import java.util.Map.Entry;import java.util.Set;impo ...
- 维护带修改区间 K 小值
就是在原来的主席树模板上加上一条将x上的值修改为k 待我们仔细想想之前静态的区间Kth怎么实现的... 我们仍然需要维护前缀和,而只是在以前的代码里面加上单点修改的操作,那么你要每次要修改的前缀和就有 ...
- MP的自动填充功能
用来进行自动填充时间. 使用注解@TableTield(fill=FieldFill.insert)插入时进行性填充 使用注解@TableTield(fill=FieldFill.Update)更新时 ...
- 201871010109-胡欢欢《面向对象程序设计(java)》第6-7周学习总结
实验六 继承定义与使用 实验时间 2019-9-29 第一部分:理论部分. 1.继承:已有类来构建新类的一种机制.档定义了一个新类继承另一个类时,这个新类就继承了这个类的方法和域,同时在新类中添加新的 ...
- day9_7.9 函数的定义
一.基础 1.什么是函数? 函数就是工具,方便开发人员开发软件,非常简洁的工具. 函数的关键字是def 在函数的编写阶段,只检验其语法是否正确,不检验代码. 在函数的调用阶段,可以通过函数名+()来调 ...