大型运输行业实战_day08_1_memcache缓存生产应用
1.memcache使用环境搭建
1.安装memcached服务器

安装方法 以管理员身份打开cmd,在cmd中执行如下命令:

注意:在执行该命令时必须在memcached.exe文件下执行.
2.开启服务
注意:要重新打开cmd控制台,再执行开启服务命令

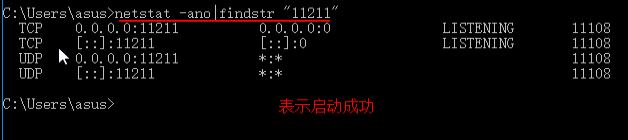
3.查看是否启动成功
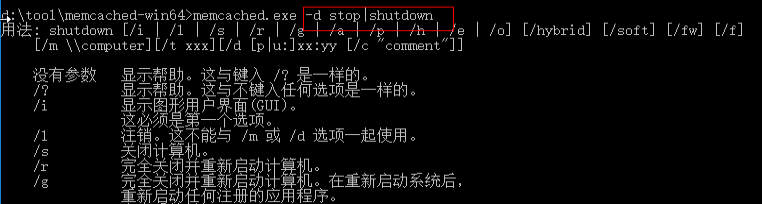
4.关闭memcache缓存服务器
到此安装\启动\查看是否启动成功\关闭服务完成!
2.memcached与spring整合并使用
1.拷贝jar包

注意:如果项目中没有日志包必须拷贝日志包
2.编写与spring整合的配置文件: spring-memcached.xml
 <?xml version="1.0" encoding="UTF-8"?>

 <beans xmlns="http://www.springframework.org/schema/beans"

        xmlns:xsi="http://www.w3.org/2001/XMLSchema-instance"

        xsi:schemaLocation="http://www.springframework.org/schema/beans

         http://www.springframework.org/schema/beans/spring-beans.xsd">

     <!-- XMemcachedClientFactoryBean工厂配置-->

     <bean id="memcachedClient" class="net.rubyeye.xmemcached.utils.XMemcachedClientFactoryBean">

         <property name="servers" value="${memcache.servers}"/>

         <property name="weights" value="${memcache.servers.weight}"/>

         <property name="sessionLocator">

             <bean class="net.rubyeye.xmemcached.impl.KetamaMemcachedSessionLocator"/>

         </property>

         <property name="transcoder">

             <bean class="net.rubyeye.xmemcached.transcoders.SerializingTranscoder"/>

         </property>

         <property name="bufferAllocator">

             <bean class="net.rubyeye.xmemcached.buffer.SimpleBufferAllocator"/>

         </property>

     </bean>

     <!--自己封装的api类-->

     <bean class="com.day02.sation.map.MemcachedAccess">

         <property name="memcachedClient" ref="memcachedClient"/>

     </bean>

 </beans>
使用到的服务器参数配置:
memcache.servers=127.0.0.1:11211
memcache.servers.weight=
3.编写封装的API类 MemcachedAccess.java
 package com.day02.sation.map;

 import net.rubyeye.xmemcached.MemcachedClient;

 import net.rubyeye.xmemcached.exception.MemcachedException;

 import java.util.concurrent.TimeoutException;

 /**

  * Created by Administrator on 1/4.

  */

 public class MemcachedAccess {

     private MemcachedClient memcachedClient;

     /**

      * 缓存时间

      * @param key

      * @param time

      * @param value

      * @return

      */

     public boolean put(String key,Integer time,String value){

         try {

             boolean add = memcachedClient.add(key, time, value);

             return add;

         } catch (TimeoutException e) {

             e.printStackTrace();

         } catch (InterruptedException e) {

             e.printStackTrace();

         } catch (MemcachedException e) {

             e.printStackTrace();

         }

         return false;

     }

     /**

      *添加

      * @param key

      * @param value

      * @return

      */

     public boolean put(String key,String value){

         try {

             boolean add = memcachedClient.add(key, 1*24*60, value);

             return add;

         } catch (TimeoutException e) {

             e.printStackTrace();

         } catch (InterruptedException e) {

             e.printStackTrace();

         } catch (MemcachedException e) {

             e.printStackTrace();

         }

         return false;

     }

     /**

      * 获取

      * @param key

      * @return

      */

     public String get(String key){

         try {

             String value= (String)memcachedClient.get(key);

             return value;

         } catch (TimeoutException e) {

             e.printStackTrace();

         } catch (InterruptedException e) {

             e.printStackTrace();

         } catch (MemcachedException e) {

             e.printStackTrace();

         }

         return null;

     }

     /**

      * 清除缓存

      */

     public void flushAll(){

         try {

             memcachedClient.flushAll();

         } catch (TimeoutException e) {

             e.printStackTrace();

         } catch (InterruptedException e) {

             e.printStackTrace();

         } catch (MemcachedException e) {

             e.printStackTrace();

         }

     }

     public MemcachedClient getMemcachedClient() {

         return memcachedClient;

     }

     public void setMemcachedClient(MemcachedClient memcachedClient) {

         this.memcachedClient = memcachedClient;

     }

 }
4.将spring-memcached.xml于spring主配置文件进行关联
<!--引入memcached.xml文件-->
<import resource="classpath:spring/spring-memcached.xml"/>
5..测试MemcachedAccess.java是否可用
 package com.day02.sation.test;

 import com.day02.sation.map.MemcachedAccess;

 import org.junit.Test;

 import org.junit.runner.RunWith;

 import org.springframework.beans.factory.annotation.Autowired;

 import org.springframework.test.context.ContextConfiguration;

 import org.springframework.test.context.junit4.SpringJUnit4ClassRunner;

 /**

  * Created by Administrator on 12/27.

  */

 @RunWith(SpringJUnit4ClassRunner.class)

 @ContextConfiguration("classpath:spring-config.xml")

 public class TestMemcache {

     @Autowired

     private MemcachedAccess memcachedAccess;

     @Test

     public void testGetList() {

         //添加一对值

         memcachedAccess.put("name", "wuji");

         //取出缓存中的值

         String name = memcachedAccess.get("name");

         System.out.println("name=  " + name);

         //清除所有缓存

         memcachedAccess.flushAll();

         //再次获取值,检查是否已经清除

         String name2 = memcachedAccess.get("name");

         System.out.println("name2=  " + name2);

     }

 }
6.memcache在实际生产中做数据字典缓存使用案例
package com.day02.sation.map; import com.day02.sation.dao.IDicDao;
import com.day02.sation.model.Dic;
import org.springframework.context.ApplicationContext;
import org.springframework.context.support.ClassPathXmlApplicationContext; import java.util.List; /**
* Created by Administrator on 1/3.
*/ public class DicMemcache {
private static IDicDao dicDao;
private static MemcachedAccess memcachedAccess;
static {
//获取应用上下文对象
ApplicationContext ctx = new ClassPathXmlApplicationContext("spring-config.xml");
//获取dicDao实例
dicDao = ctx.getBean(IDicDao.class);
//获取MemcachedAccess实例
memcachedAccess = ctx.getBean(MemcachedAccess.class);
//调用方法初始化字典
addMapValue();
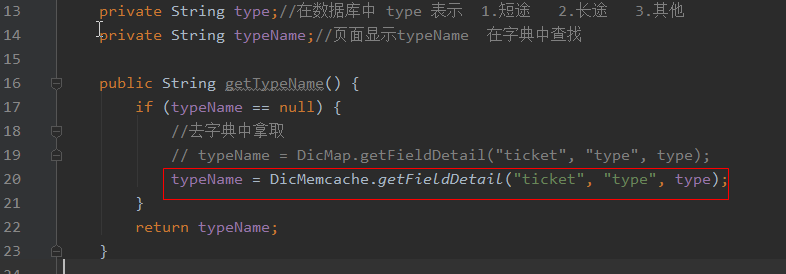
} public static String getFieldDetail(String tableName, String fieldName, String filedValue) {
String key = tableName + "_" + fieldName + "_" + filedValue;
String value = memcachedAccess.get(key);
if (value == null) { //如果 value 为空 重新查询数据库
Dic dicQuery = new Dic();
dicQuery.setTableName(tableName);
dicQuery.setFieldName(fieldName);
dicQuery.setFieldValue(filedValue); Dic dic = dicDao.getDic(dicQuery);
if (dic != null) {//数据有该值
String fieldDescribe = dic.getFieldDescribe();
memcachedAccess.put(key, fieldDescribe);
return fieldDescribe;
}
value = "暂无";
}
return value;
} /**
* 初始化字典数据
*/
private static void addMapValue() {
List<Dic> list = dicDao.getList();
for (int i = 0; i < list.size(); i++) {
Dic dic = list.get(i);
String tableName = dic.getTableName();
String fieldName = dic.getFieldName();
String fieldValue = dic.getFieldValue();
String key = tableName + "_" + fieldName + "_" + fieldValue;
String fieldDescribe = dic.getFieldDescribe();
memcachedAccess.put(key, fieldDescribe);
} }
}
7.调用获取值
到此memcache的使用到此结束!
大型运输行业实战_day08_1_memcache缓存生产应用的更多相关文章
- 大型运输行业实战_day11_2_事务理论与实际生产配置事务管理
1.什么是事务(Transaction:tx) 数据库的某些需要分步完成,看做是一个整体(独立的工作单元),不能分割,要么整体成功,要么整体生效.“一荣俱荣,一损俱损”,最能体现事务的思想.案例:银行 ...
- 大型运输行业实战_day12_1_权限管理实现
1.业务分析 权限说的是不同的用户对同一个系统有不同访问权限,其设计的本质是:给先给用户分配好URL,然后在访问的时候判断该用户是否有当前访问的URL. 2.实现 2.1数据库设计标准5表权限结构 2 ...
- 大型运输行业实战_day01_1_业务分析
1.业务分析 发展历史: 上车收费-->车站买票(相当于先收钱后上车)-->站务系统--->联网售票 2.项目结构 3.开发流程分析 1.业务分析 图文并茂 ...
- 大型运输行业实战_day15_1_全文检索之Lucene
1.引入 全文检索简介: 非结构化数据又一种叫法叫全文数据.从全文数据(文本)中进行检索就叫全文检索. 2.数据库搜索的弊端 案例 : select * from product whe ...
- 大型运输行业实战_day14_1_webserivce简单入门
1.简单使用 1.1.服务端 1.编写接口 package com.day02.sation.ws; /** * Created by Administrator on 1/12. */ public ...
- 大型运输行业实战_day13_1_定时任务spring-quartz
1.jar包 拷贝quartz-2.2.3.jar包到项目 2.编写定时任务类TicketQuart.java package com.day02.sation.task; import com.da ...
- 大型运输行业实战_day11_1_aop理论与aop实际业务操作
1.aop概述 Spring的AOP:什么叫做AOP:Aspect oritention programming(面向切面编程)什么是切面:看图,业务方法 执行前后.AOP的目的:AOP能够将那些与业 ...
- 大型运输行业实战_day01_2_需求文档
1.文档格式 (见模板文件) 2.Axure简单使用 2.1安装Axure傻瓜式安装 2.2简单使用axure 3.总结 需求文件完成后应该包括三种文件: 1.axure文件 2.axure生成的ht ...
- 大型运输行业实战_day10_1_自定义事务管理类
1.创建事务管理类 TransactionManager.java package com.day02.sation.transaction; import com.day02.sation.uti ...
随机推荐
- JavaScript if(x),==和===解析(翻译整理)
一.if()中的布尔判断 if ( Expression ) 表达式会通过ES5定义的ToBoolean方法强制把Expression 转换成布尔值. 数据类型 转换结果 Undefined fals ...
- 硬盘安装雨林木风Win7旗舰版系统教程
硬盘安装雨林木风Win7旗舰版系统教程 安装完成,登录后报administrator无权限, F8 进入安全模式,修改administrator的权限.
- 接口测试3-4使用csv进行接口测试
参照前面的例子 向URL发送corpid和corsecret2个参数,可以获取正确的tokenid https://qyapi.weixin.qq.com/cgi-bin/gettoken 数据 场景 ...
- Unreal Engine 4(虚幻UE4)GameplayAbilities 插件入门教程(五)技能属性集(AttributeSet)
如果没有完成前面的教程,请前往学习.先上一段理论介绍(源于https://wiki.unrealengine.com/GameplayAbilities_and_You#GameplayTasks): ...
- HttpURLConnection连接超时问题
1.问题描述 这几天测试重构后的下载框架,发现在下载过程中如果网络中断或网络较差,个别应用的下载就会阻塞卡住,一直卡在 “正在下载 xx%”. 2.问题排查和定位 思考:网络差不应该报网络异常的错 ...
- Solr Web增加Basic安全性验证
Solr在5.0版本后,不再提供war包部署的方式,取而代之的是内置了jetty服务, 但是我们发现其中并没有内置任何安全性相关检查,任何人如果知道了我们的外网地址就能直接访问并修改其中的索引 ...
- javascript面向对象之Object.defineProperty(a,b,c)
/* Object.defineProperty(a,b,c);介绍 a:需要属性设置的对象 b:需要设置的属性名,(键值) c:是一个用于描述属性值得json数据.这个json数据有configur ...
- 小朋友学C++(1)
Hello World! 在学C++之前,最好先学习一下C语言 让我们先运行一段简单的代码,编译器可以使用 在线C++编译器 或 Xcode(苹果系统) 或Dev C++(Windows系统). #i ...
- 【转载】全栈工程师-Hadoop, HBase, Hive, Spark
学习参考这篇文章: http://www.shareditor.com/blogshow/?blogId=96 机器学习.数据挖掘等各种大数据处理都离不开各种开源分布式系统, hadoop用于分布式存 ...
- [Flutter] 一些面试可能会问基础知识
1. Flutter 是什么? Flutter是谷歌的移动UI框架,可以快速在iOS和Android上构建高质量的原生用户界面. Flutter可以与现有的代码一起工作.在全世界,Flutter正在被 ...