
DEXSeq
1)Introduction
DEXSeq是一种在多个比较RNA-seq实验中,检验差异外显子使用情况的方法。 通过差异外显子使用(DEU),我们指的是由实验条件引起的外显子相对使用的变化。 外显子的相对使用定义为:
number of transcripts from the gene that contain this exon / number of all transcripts from the gene
大致思想:. For each exon (or part of an exon) and each sample, we count how many reads map to this exon and how many reads map to any of the other exons of the same gene. We consider the ratio of these two counts, and how it changes across conditions, to infer changes in the relative exon usage
2)安装
if("DEXSeq" %in% rownames(installed.packages()) == FALSE) {source("http://bioconductor.org/biocLite.R");biocLite("DEXSeq")}

suppressMessages(library(DEXSeq))

ls('package:DEXSeq')

pythonScriptsDir = system.file( "python_scripts", package="DEXSeq" )

list.files(pythonScriptsDir)

## [1] "dexseq_count.py" "dexseq_prepare_annotation.py"  #查看是否含有这两个脚本

python dexseq_prepare_annotation.py Drosophila_melanogaster.BDGP5.72.gtf Dmel.BDGP5.25.62.DEXSeq.chr.gff #GTF转化为GFF with collapsed exon counting bins.

python dexseq_count.py Dmel.BDGP5.25.62.DEXSeq.chr.gff untreated1.sam untreated1fb.txt #count
3) 用自带实验数据集(数据预处理)
suppressMessages(library(pasilla))

inDir = system.file("extdata", package="pasilla")

countFiles = list.files(inDir, pattern="fb.txt$", full.names=TRUE)  #countfile(如果不是自带数据集,可以由dexseq_count.py脚本生成)

basename(countFiles)

flattenedFile = list.files(inDir, pattern="gff$", full.names=TRUE)

basename(flattenedFile)                                       #gff文件(如果不是自带数据集,可以由dexseq_prepare_annotation.py脚本生成)

########构造数据框sampleTable,包含sample名字,实验,文库类型等信息#######################

sampleTable = data.frame(

  row.names = c( "treated1", "treated2", "treated3",

                 "untreated1", "untreated2", "untreated3", "untreated4" ),

  condition = c("knockdown", "knockdown", "knockdown",

                "control", "control", "control", "control" ),

  libType = c( "single-end", "paired-end", "paired-end",

               "single-end", "single-end", "paired-end", "paired-end" ) )

sampleTable

##############构建 DEXSeqDataSet object#############################

dxd = DEXSeqDataSetFromHTSeq(

  countFiles,

  sampleData=sampleTable,

  design= ~ sample + exon + condition:exon,

  flattenedfile=flattenedFile )   #四个参数
4)Standard analysis work-flow
########以下是简单的实验设计#####
genesForSubset = read.table(file.path(inDir, "geneIDsinsubset.txt"),stringsAsFactors=FALSE)[[1]] #基因子集ID

dxd = dxd[geneIDs( dxd ) %in% genesForSubset,]     #取子集,减少运行量

head(colData(dxd))

head( counts(dxd), 5 )

split( seq_len(ncol(dxd)), colData(dxd)$exon )

sampleAnnotation( dxd )

############# dispersion estimates and the size factors#############

dxd = estimateSizeFactors( dxd )  ##Normalisation

dxd = estimateDispersions( dxd )

plotDispEsts( dxd )  #图1

#################Testing for differential exon usage############

dxd = testForDEU( dxd )

dxd = estimateExonFoldChanges( dxd, fitExpToVar="condition")

dxr1 = DEXSeqResults( dxd )

dxr1

mcols(dxr1)$description

table ( dxr1$padj < 0.1 )

table ( tapply( dxr1$padj < 0.1, dxr1$groupID, any ) )

plotMA( dxr1, cex=0.8 )  #图2

To see how the power to detect differential exon usage depends on the number of reads that map to an exon, a so-called MA plot is useful, which plots the logarithm of fold change versus average normalized count per exon and marks by red colour the exons which are considered significant; here, the exons with an adjusted p values of less than 0.1

############以下是更复杂的实验设计##################

formulaFullModel = ~ sample + exon + libType:exon + condition:exon

formulaReducedModel = ~ sample + exon + libType:exon

dxd = estimateDispersions( dxd, formula = formulaFullModel )

dxd = testForDEU( dxd,

                  reducedModel = formulaReducedModel,

                  fullModel = formulaFullModel )

dxr2 = DEXSeqResults( dxd )

table( dxr2$padj < 0.1 )

table( before = dxr1$padj < 0.1, now = dxr2$padj < 0.1 )##和简单的实验设计比较
5)Visualization
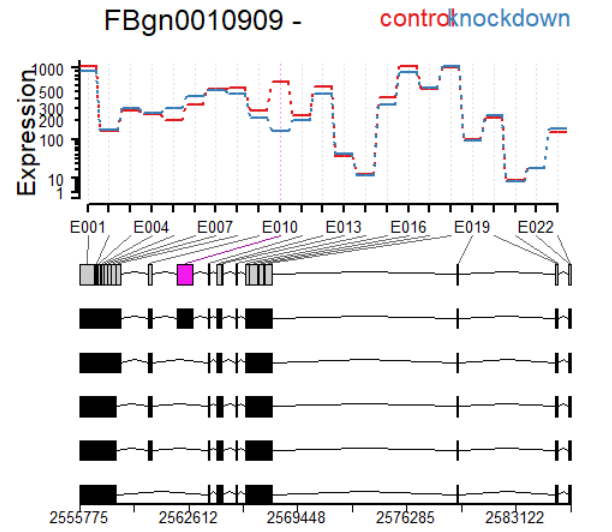
plotDEXSeq( dxr2, "FBgn0010909", legend=TRUE, cex.axis=1.2, cex=1.3,

            lwd=2 )

plotDEXSeq( dxr2, "FBgn0010909", displayTranscripts=TRUE, legend=TRUE,

            cex.axis=1.2, cex=1.3, lwd=2 )

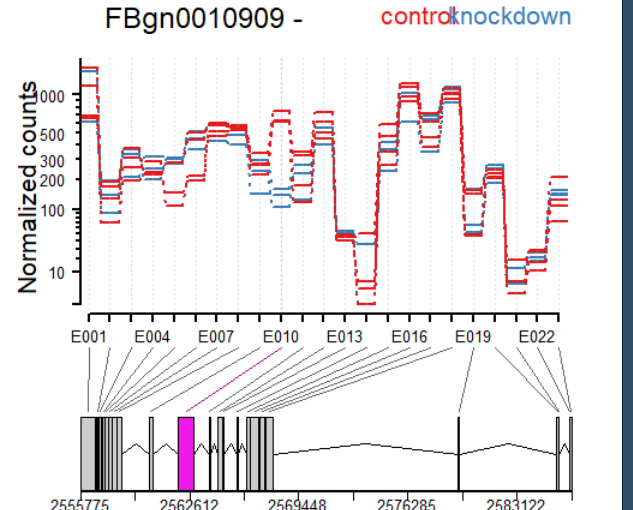
plotDEXSeq( dxr2, "FBgn0010909", expression=FALSE, norCounts=TRUE,

            legend=TRUE, cex.axis=1.2, cex=1.3, lwd=2 )

plotDEXSeq( dxr2, "FBgn0010909", expression=FALSE, splicing=TRUE,

            legend=TRUE, cex.axis=1.2, cex=1.3, lwd=2 )

DEXSeqHTML( dxr2, FDR=0.1, color=c("#FF000080", "#0000FF80") )


DEXSeq的更多相关文章
- 【转录组入门】6:reads计数
作业要求: 实现这个功能的软件也很多,还是烦请大家先自己搜索几个教程,入门请统一用htseq-count,对每个样本都会输出一个表达量文件. 需要用脚本合并所有的样本为表达矩阵.参考:生信编程直播第四 ...
- Bulk RNA-Seq转录组学习
与之对应的是single cell RNA-Seq,后面也会有类似文章. 参考:https://github.com/xuzhougeng/Learn-Bioinformatics/ 作业:RNA-s ...
- Bioconductor应用领域之基因芯片
引用自https://mp.weixin.qq.com/s?__biz=MzU4NjU4ODQ2MQ==&mid=2247484662&idx=1&sn=194668553f9 ...
随机推荐
- MySQL数据库函数
一:字符串函数: 1.concat(); concat(S1,S2,S3,......Sn); 把传入参数链接 成一个字符串; 2.insert(); insert(str,x,y,insert); ...
- dede 添加自定义函数
include/extend.func.php里添加函数 function GetTopTags($str){$dsql = new Dedesql(false);$row = $dsql->G ...
- 解决EF一对一或多对一的删除
people 类中有 zhengshu类 且是一对一,现在要删除people类中的zhengshu 网上看了N多办法,什么更新外键什么滴. 其实方法简单极了 using (KJExamEntity c ...
- asp.net web api 授权功能
1.重写授权方法 using System; using System.Collections.Generic; using System.Linq; using System.Net; using ...
- bzoj4236 JOIJOI
Description JOIOJI桑是JOI君的叔叔.“JOIOJI”这个名字是由“J.O.I”三个字母各两个构成的. 最近,JOIOJI桑有了一个孩子.JOIOJI桑想让自己孩子的名字和自己一样由 ...
- 2018-2019 20165226 网络对抗 Exp1 PC平台逆向破解
2018-2019 20165226 网络对抗 Exp1 PC平台逆向破解 目录 一.逆向及Bof基础实践说明 二.直接修改程序机器指令,改变程序执行流程 三.通过构造输入参数,造成BOF攻击,改变程 ...
- [UE4]崩溃的原因收录
UTool tool; 这样声明可以编译通过,但是UE4 Editor会直接崩溃. 应该改成这样: UTool* tool;
- ThinkPHP 5使用 Composer 组件名称可以从https://packagist.org/ 搜索到
http://www.phpcomposer.com/ 1 这个是国内的composer网站 thinkphp5自带了composer.phar组件,如果没有安装,则需要进行安装 以下命令全部在项目目 ...
- 被折腾的sql编程
- Frequently Asked Questions
转自:http://www.tornadoweb.org/en/stable/faq.html Frequently Asked Questions Why isn’t this example wi ...