Nginx 笔记与总结(3)配置虚拟主机
Nginx 重启的另外一种方式,相当于 kill -HUP `cat /usr/local/nginx/logs/nginx.pid`:
/usr/local/nginx/sbin/nginx -s reload
停止 Nginx 的另外一种方式:
/usr/local/nginx/sbin/nginx -s stop
重读日志文件的另一种方式,相当于 kill -USR1 `cat /usr/local/nginx/logs/nginx.pid`:
/usr/local/nginx/sbin/nginx -s reopen
测试配置文件是否正确:
/usr/local/nginx/sbin/nginx -t
如果配置正确,则会提示 successful:

虚拟主机的管理
vim /usr/local/nginx/conf/nginx.conf
全局区:
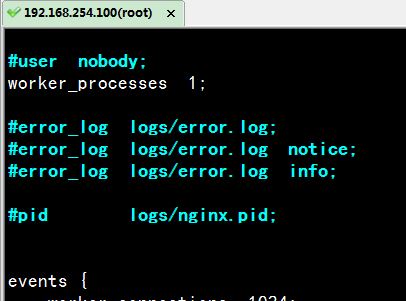
worker_processes 1 表示有 1 个工作的子进程,可以进行修改,但是过大没有意义,因为需要占用更多的 CPU 资源,一般设置为 CPU 数 * 核数
events 区:
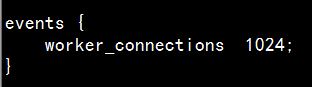
一般配置 Nginx 进程与连接的特性。worker_connections 1024 表示 1 个子进程(worker)最多允许 1024 个连接。
http 段:
 http {

     include       mime.types;

     default_type  application/octet-stream;

     #log_format  main  '$remote_addr - $remote_user [$time_local] "$request" '

     #                  '$status $body_bytes_sent "$http_referer" '

     #                  '"$http_user_agent" "$http_x_forwarded_for"';

     #access_log  logs/access.log  main;

     sendfile        on;

     #tcp_nopush     on;

     #keepalive_timeout  ;

     keepalive_timeout  ;

     #gzip  on;

     server {

         listen       ;

         server_name  localhost;

         #charset koi8-r;

         #access_log  logs/host.access.log  main;

         location / {

             root   html;

             index  index.html index.htm;

         }

         #error_page                /.html;

         # redirect server error pages to the static page /50x.html

         #

         error_page        /50x.html;

         location = /50x.html {

             root   html;

         }

         # proxy the PHP scripts to Apache listening on 127.0.0.1:

         #

         #location ~ \.php$ {

         #    proxy_pass   http://127.0.0.1;

         #}

         # pass the PHP scripts to FastCGI server listening on 127.0.0.1:

         #

         #location ~ \.php$ {

         #    root           html;

         #    fastcgi_pass   127.0.0.1:;

         #    fastcgi_index  index.php;

         #    fastcgi_param  SCRIPT_FILENAME  /scripts$fastcgi_script_name;

         #    include        fastcgi_params;

         #}

         # deny access to .htaccess files, if Apache's document root

         # concurs with nginx's one

         #

         #location ~ /\.ht {

         #    deny  all;

         #}

     }

     # another virtual host using mix of IP-, name-, and port-based configuration

     #

     #server {

     #    listen       ;

     #    listen       somename:;

     #    server_name  somename  alias  another.alias;

     #    location / {

     #        root   html;

     #        index  index.html index.htm;

     #    }

     #}

     # HTTPS server

     #

     #server {

     #    listen        ssl;

     #    server_name  localhost;

     #    ssl_certificate      cert.pem;

     #    ssl_certificate_key  cert.key;

     #    ssl_session_cache    shared:SSL:1m;

     #    ssl_session_timeout  5m;

     #    ssl_ciphers  HIGH:!aNULL:!MD5;

     #    ssl_prefer_server_ciphers  on;

     #    location / {

     #        root   html;

     #        index  index.html index.htm;

     #    }

     #}

 }
配置 http 服务器的主要的段。
http 段中的 server 段:
    server {

        listen       80;

        server_name  localhost;

        #charset koi8-r;

        #access_log  logs/host.access.log  main;

        location / {

            root   html;

            index  index.html index.htm;

        }

        #error_page  404              /404.html;

        # redirect server error pages to the static page /50x.html

        #

        error_page   500 502 503 504  /50x.html;

        location = /50x.html {

            root   html;

        }

        # proxy the PHP scripts to Apache listening on 127.0.0.1:80

        #

        #location ~ \.php$ {

        #    proxy_pass   http://127.0.0.1;

        #}

        # pass the PHP scripts to FastCGI server listening on 127.0.0.1:9000

        #

        #location ~ \.php$ {

        #    root           html;

        #    fastcgi_pass   127.0.0.1:9000;

        #    fastcgi_index  index.php;

        #    fastcgi_param  SCRIPT_FILENAME  /scripts$fastcgi_script_name;

        #    include        fastcgi_params;

        #}

        # deny access to .htaccess files, if Apache's document root

        # concurs with nginx's one

        #

        #location ~ /\.ht {

        #    deny  all;

        #}

    }
server 就是虚拟主机。
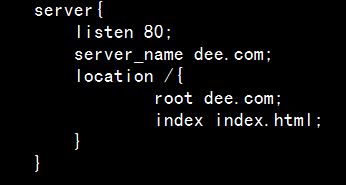
【例1】基于域名的虚拟主机
添加 server 段:
    server{

        listen 80;

        server_name dee.com;

        location /{

                root dee.com;

                index index.html;

        }

    }
保存退出;
location 可以使用绝对路径,也可以使用相对路径,相对路径是相对于 nginx 的根目录:/usr/local/nginx
在 /usr/local/nginx 目录下创建目录 dee.com,在其下创建 index.html:
[root@localhost ~]# cd /usr/local/nginx/

[root@localhost nginx]# mkdir dee.com

[root@localhost nginx]# vim dee.com/index.html
index.html:
<!DOCTYPE html>
<html>
<head>
<meta charset="utf-8">
<title>dee.com</title>
<body>
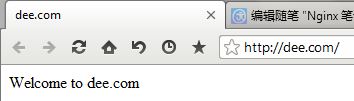
Welcome to dee.com
</body>
</head>
</html>
重新读取配置文件:
/usr/local/nginx/sbin/nginx -s reload
配置 hosts:
192.168.254.100 dee.com
访问 dee.com:
【例2】基于 ip 的虚拟主机
编辑配置文件:
vim /usr/local/nginx/conf/nginx.conf
添加 server 段:
    server{

        listen ;

        server_name 192.168.254.100;

        location /{

                root ip;

                index index.html;

        }

    }
在 /usr/local/nginx 目录下新建 ip 目录:
[root@localhost nginx]# mkdir ip

[root@localhost nginx]# vim ip/index.html
index.html:
<!DOCTYPE html>

<html>

<head>

<meta charset="utf-8">

<title>dee.com</title>

<body>

ip test

</body>

</head>

</html>
访问 http://192.168.254.100/

【例3】基于端口的虚拟主机
编辑配置文件(vim 查看行号 :set nu):
vim /usr/local/nginx/conf/nginx.conf
添加 server 段:
    server{

        listen 2022;

        server_name dee.com;

        location /{

                root /var/www;

                index index.html;

        }

    }
这时配置 location 使用绝对路径;
在 /var 下新建 www 目录,在其下新建 index.html 文件:
[root@localhost nginx]# mkdir /var/www
[root@localhost nginx]# vim /var/www/index.html
<!DOCTYPE html>
<html>
<head>
<meta charset="utf-8">
<title>dee.com</title>
<body>
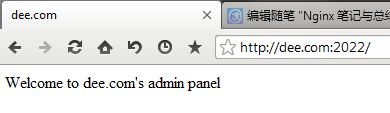
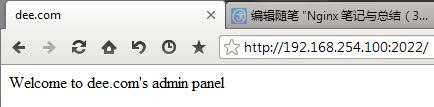
Welcome to dee.com's admin panel
</body>
</head>
</html>
重新读取配置文件:
/usr/local/nginx/sbin/nginx -s reload
访问 http://dee.com:2022/
或者访问 http://192.168.254.100:2022/
附:如果需要启用目录浏览,只需要在 Server 段中加入 autoindex on;
Nginx 笔记与总结(3)配置虚拟主机的更多相关文章
- Nginx学习笔记(二)--- 配置虚拟主机
Linux下安装Nginx https://www.cnblogs.com/dddyyy/p/9780705.html 1.虚拟主机介绍 一台服务器分成多个"独立"的主机,每台虚 ...
- Nginx笔记总结五:Nginx配置虚拟主机
upstream proxy1 { server ; } upstream proxy2 { server ; } server { listen ; server_name www1.dlab.co ...
- nginx 配置虚拟主机
文章转载自:http://www.ttlsa.com/html/1571.html 上篇说道我们的nginx是安装在/usr/local/nginx/ cd conf 我们现在把所有的虚拟主机放在一个 ...
- Nginx安装及配置虚拟主机
nginx安装部分 依赖环境 yum -y install gcc zlib openssl-devel zlib-devel 1. 下载好下面两个包:nginx-1.8.1.tar.gz pcre- ...
- 快速掌握Nginx(一) —— 安装Nginx和简单配置虚拟主机
Nginx安装和简单配置虚拟主机 1 Nginx简介 Nginx是近几年最火热的http.反向代理服务器,百度阿里等互联网公司也都在使用Nginx,它也可以用作邮件代理服务器.TCP/UDP代理服务器 ...
- Nginx下配置虚拟主机的三种方法
Nginx下,一个server标签就是一个虚拟主机. 1.基于域名的虚拟主机,通过域名来区分虚拟主机——应用:外部网站 2.基于端口的虚拟主机,通过端口来区分虚拟主机——应用:公司内部网站,外部网站的 ...
- nginx配置虚拟主机vhost的方法详解
Nginx vhost配置,可实现基于ip.端口号.servername的虚拟主机,同时可避免直接修改主配置文件.在nginx下配置虚拟主机vhost非常方便.这篇文章主要介绍了nginx配置虚拟主机 ...
- Nginx安装、配置虚拟主机、反向代理、负载均衡
1. nginx安装 下载nginx: 官方网站: http://nginx.org/ 使用的版本是1.8.0版本. Nginx提供的源码. 1.1. 要求的安装环境 1.需要安装gcc的环境.y ...
- nginx 配置虚拟主机的三种方法
nginx,一个server标签就是一个虚拟主机. 1.基于域名的虚拟主机,通过域名来区分虚拟主机——应用:外部网站 2.基于端口的虚拟主机,通过端口来区分虚拟主机——应用:公司内部网站,外部网站的管 ...
- nginx配置虚拟主机之不同端口和不同IP地址
配置nginx虚拟主机不同端口和不同ip地址,和上编nginx基于域名配置虚拟主机博文类似,请先参考. zxl.com域名不同端口,配置文件内容如下: 1 2 3 4 5 6 7 8 9 10 11 ...
随机推荐
- 查看LINUX当前负载
Linux的负载高,主要是由于CPU使用.内存使用.IO消耗三部分构成.任意一项使用过多,都将导致服务器负载的急剧攀升. [root@ok Desktop]# w 20:41:47 up 2:48, ...
- IBM V7000
IBM_V7000 http://www.tuicool.com/articles/7vI7ja http://www.ibm.com/support/knowledgecenter/en/ST3FR ...
- wp8 --未找到与约束ContractName Microsoft.VisualStudio.Text.ITextDocumentFactoryService...匹配的导出
今天打算用VisualStudio2012做一个js效果页面测试的时候,打开VS2012新建项目,但是并没有像之前那样顺利的创建页面,而是弹出了一个错误窗口. 我的系统是win8专业版 64位 ,同时 ...
- Harris角点
1. 不同类型的角点 在现实世界中,角点对应于物体的拐角,道路的十字路口.丁字路口等.从图像分析的角度来定义角点可以有以下两种定义: 角点可以是两个边缘的角点: 角点是邻域内具有两个主方向的特征点: ...
- ajax请求成功后打开新窗口地址
转自:http://www.cnblogs.com/linjiqin/p/3148205.html jQuery.ajax({ "type":"post&qu ...
- yuv rgb 像素格式1
===========大小============= 一般,直接采集到的视频数据是RGB24的格式 RGB24一帧的大小size=width×heigth×3 Byte, RGB32的size=wid ...
- SU suspecfk命令学习
用suplane生成平面,并查看其FK谱, 水平反射界面经FK变换后,波数为0, 正好处于临界,乃奎斯特频率, 有空间假频, Over,不足之处,欢迎批评指正.
- spring实战三装配bean之Bean的作用域以及初始化和销毁Bean
1.Bean的作用域 所有的spring bean默认都是单例.当容器分配一个Bean时,不论是通过装配还是调用容器的getBean()方法,它总是返回Bean的同一个实例.有时候需要每次请求时都获得 ...
- 矩阵连乘积 ZOJ 1276 Optimal Array Multiplication Sequence
题目传送门 /* 题意:加上适当的括号,改变计算顺序使得总的计算次数最少 矩阵连乘积问题,DP解决:状态转移方程: dp[i][j] = min (dp[i][k] + dp[k+1][j] + p[ ...
- LIS(nlogn) POJ 3903 Stock Exchange
题目传送门 题意:LIS最长递增子序列 O(nlogn) 分析:设当前最长递增子序列为len,考虑元素a[i]; 若d[len]<a[i],则len++,并使d[len]=a[i]; 否则,在d ...