Android蓝牙实例(和单片机蓝牙模块通信)
最近做毕设,需要写一个简单的蓝牙APP进行交互,在网上也找了很多资料,终于给搞定了,这里分享一下^_^。
1、Android蓝牙编程
蓝牙3.0及以下版本编程需要使用UUID,UUID是通用唯一识别码(Universally Unique Identifier),这是一个软件构建的标准,也是被开源基金会组织应用在分布式计算环境领域的一部分。在蓝牙3.0及下一版本中,UUID被用于唯一标识一个服务,比如文件传输服务,串口服务、打印机服务等,如下:
#蓝牙串口服务
SerialPortServiceClass_UUID = '{00001101-0000-1000-8000-00805F9B34FB}'
LANAccessUsingPPPServiceClass_UUID = '{00001102-0000-1000-8000-00805F9B34FB}'
#拨号网络服务
DialupNetworkingServiceClass_UUID = '{00001103-0000-1000-8000-00805F9B34FB}'
#信息同步服务
IrMCSyncServiceClass_UUID = '{00001104-0000-1000-8000-00805F9B34FB}'
SDP_OBEXObjectPushServiceClass_UUID = '{00001105-0000-1000-8000-00805F9B34FB}'
#文件传输服务
OBEXFileTransferServiceClass_UUID = '{00001106-0000-1000-8000-00805F9B34FB}'
IrMCSyncCommandServiceClass_UUID = '{00001107-0000-1000-8000-00805F9B34FB}'
蓝牙的连接有主从设备,提供服务的可以认为是从设备。主设备通过UUID访问从设备提供具有相同UUID的服务,从而建立客服端—服务器(C/S)模式。
2、编程步骤
Android使用蓝牙,需要获得权限,蓝牙权限获得代码如下:
<!-- 蓝牙权限 -->

<uses-permission android:name="android.permission.BLUETOOTH"/>

<uses-permission android:name="android.permission.BLUETOOTH_ADMIN"/>
获取本地蓝牙适配器,如果蓝牙未开启,开启蓝牙设备:
bluetoothAdapter = BluetoothAdapter.getDefaultAdapter();

    if (bluetoothAdapter == null) {

    // Device does not support Bluetooth

    return;

}

// 开启蓝牙

int REQUEST_ENABLE_BT = 1;

if (!bluetoothAdapter.isEnabled()) {

    Intent intent = new Intent(BluetoothAdapter.ACTION_REQUEST_ENABLE);

    startActivityForResult(intent, REQUEST_ENABLE_BT);

}
搜索已配对的蓝牙设备,并添加到已配对列表中:
// 查询配对设备

List<String> devices = new ArrayList<String>();

Set<BluetoothDevice> bondedDevices = bluetoothAdapter.getBondedDevices();

for (BluetoothDevice device : bondedDevices) {

    devices.add(device.getName() + "-" + device.getAddress());

}
搜索未配对蓝牙设备,并添加到未配对列表:
mBluetoothAdapter.startDiscovery();

//开始收索 搜索接收函数:

final BroadcastReceiver mReceiver = new BroadcastReceiver() {

    public void onReceive(Context context, Intent intent) {

       String action = intent.getAction();                   // When discovery finds a device

       if (BluetoothDevice.ACTION_FOUND.equals(action)) {

           // Get the BluetoothDevice object from the Intent

           BluetoothDevice device =  intent.getParcelableExtra(BluetoothDevice.EXTRA_DEVICE);

           // Add the name and address to an array adapter to show  in a ListView

           mArrayAdapter.add(device.getName() + "\n" + device.getAddress());

       }

    }

};

// 收索接收函数需要注册:

// Register the BroadcastReceiver

IntentFilter filter = new IntentFilter(BluetoothDevice.ACTION_FOUND);

registerReceiver(mReceiver, filter); // Don't forget to unregister  during onDestroy
如果是服务器端,需要建立监听,注意监听的是某个服务的UUID,服务器监听类如下:
private class ConnectThread extends Thread {

    private final String MY_UUID = "00001101-0000-1000-8000-00805F9B34FB";

    private final BluetoothSocket socket;

    private final BluetoothDevice device;

    public ConnectThread(BluetoothDevice device) {

        this.device = device;

        BluetoothSocket tmp = null;

        try {

            tmp = device.createRfcommSocketToServiceRecord(UUID.fromString(MY_UUID));

        } catch (IOException e) {

            e.printStackTrace();

        }

        this.socket = tmp;

    }

    public void run() {

        bluetoothAdapter.cancelDiscovery();

        try {

            socket.connect();

            connectedThread = new ConnectedThread(socket);

            connectedThread.start();

        } catch (IOException e) {

            try {

                socket.close();

            } catch (IOException ee) {

                ee.printStackTrace();

            }

            return;

        }

        //manageConnectedSocket(socket);

    }

    public void cancel() {

        try {

            socket.close();

        } catch (IOException e) {

            e.printStackTrace();

        }

    }

}
客户端与服务器端建立连接成功后,需要ConnectedThread类接收发送数据:
// 客户端与服务器建立连接成功后,用ConnectedThread收发数据

private class ConnectedThread extends Thread {

    private final BluetoothSocket socket;

    private final InputStream inputStream;

    private final OutputStream outputStream;

    public ConnectedThread(BluetoothSocket socket) {

        this.socket = socket;

        InputStream input = null;

        OutputStream output = null;

        try {

            input = socket.getInputStream();

            output = socket.getOutputStream();

        } catch (IOException e) {

            e.printStackTrace();

        }

        this.inputStream = input;

        this.outputStream = output;

    }

    public void run() {

        byte[] buff = new byte[1024];

        int bytes;

        while (true) {

            try {

                bytes = inputStream.read(buff);

                String str = new String(buff, "ISO-8859-1");

                str = str.substring(0, bytes);

                Log.e("recv", str);

            } catch (IOException e) {

                e.printStackTrace();

                break;

            }

        }

    }

    public void write(byte[] bytes) {

        try {

            outputStream.write(bytes);

        } catch (IOException e) {

            e.printStackTrace();

        }

    }

    public void cancel() {

        try {

            socket.close();

        } catch (IOException e) {

            e.printStackTrace();

        }

    }

}
到此为止就是蓝牙开发的大致步骤,其中没有涉及到蓝牙客户端建立连接类,不过可查阅BLE和经典蓝牙Android开发。
3、毕设蓝牙APP介绍
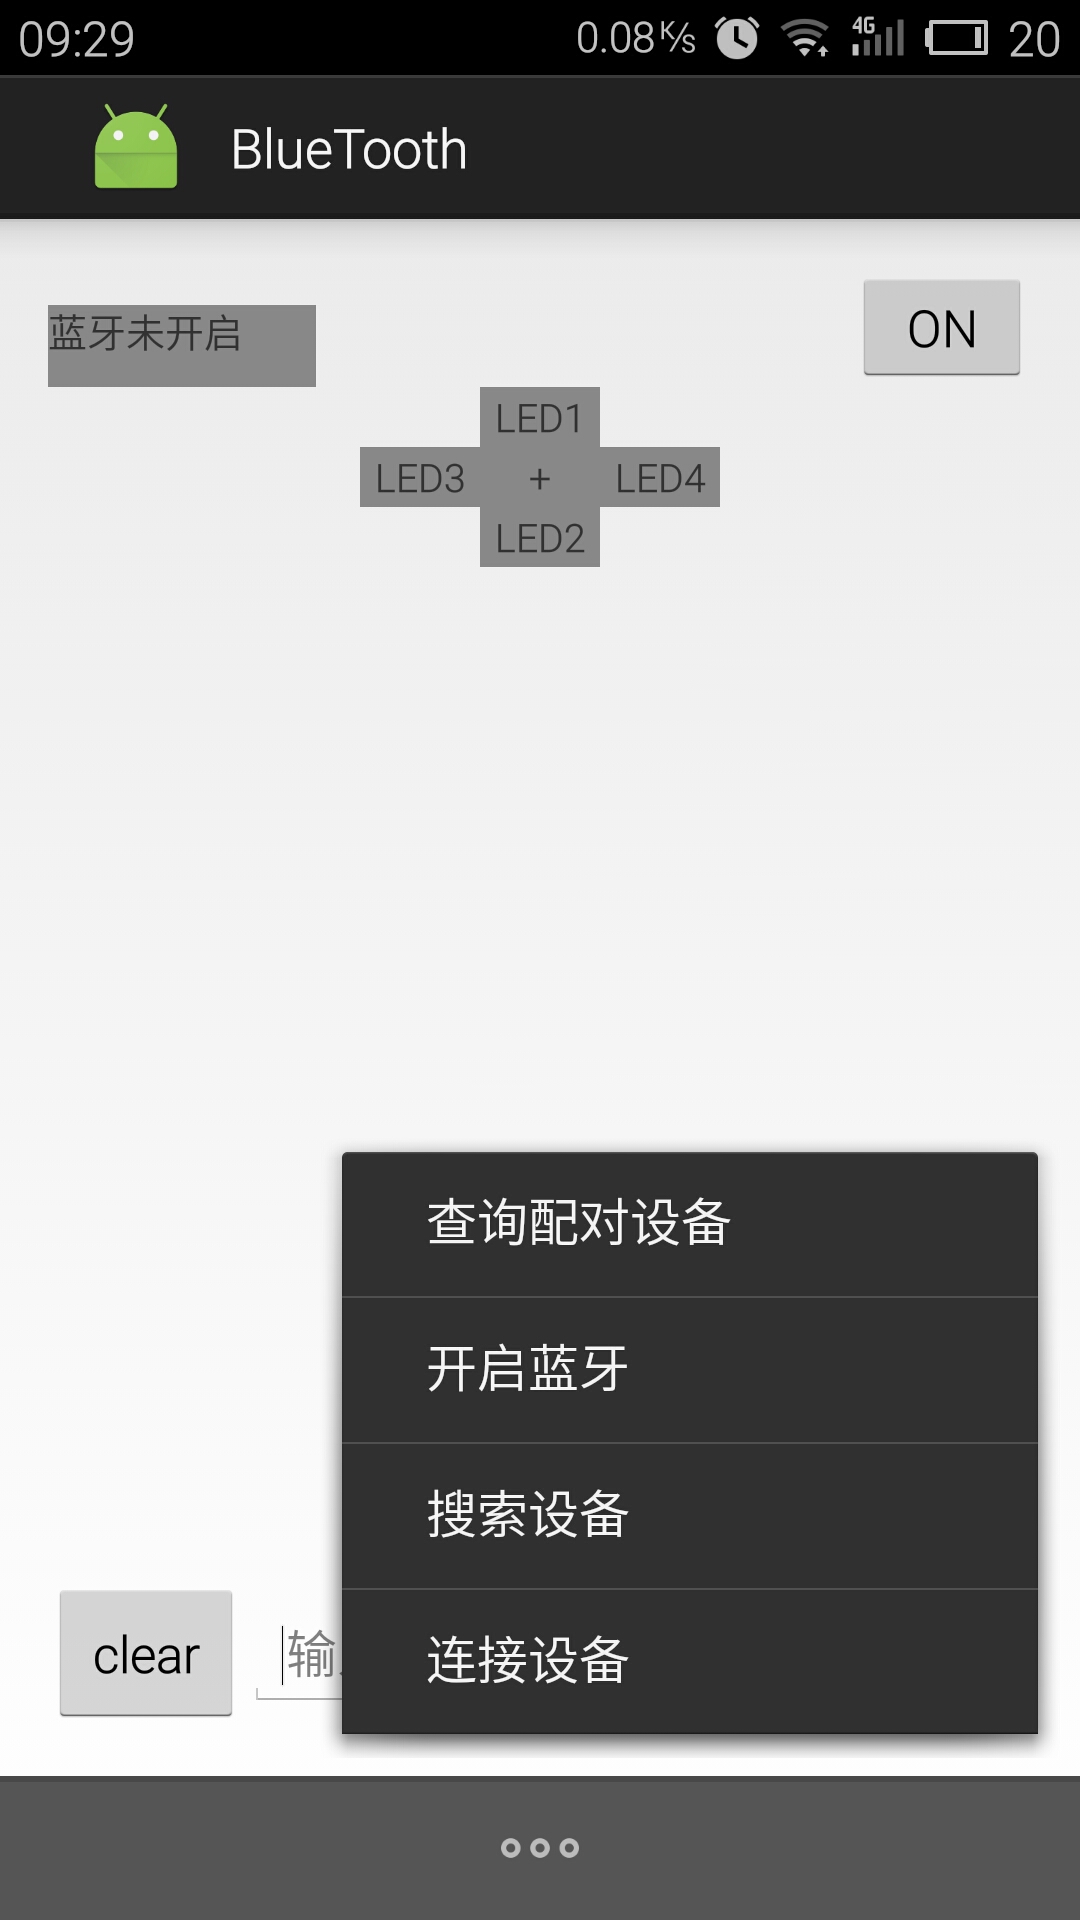
毕设蓝牙APP需要接收单片机通过蓝牙模块发送上来的数据,并且蓝牙APP也可以给单片机发送数据来进行控制。页面布局如下,一个是整体页面,一个是设置页面,测试手机是魅蓝note。因为毕设做的是十字路口红绿灯控制系统,所有页面布局有4个LED灯,分别代表路口的4个红绿灯,会根据时间不同显示不同的颜色(红/绿/黄),并且会显示倒计时,最后来一张红绿灯系统整体图。


activity_main.xml文件如下:
<?xml version="1.0" encoding="utf-8"?>

<RelativeLayout xmlns:android="http://schemas.android.com/apk/res/android"

    xmlns:tools="http://schemas.android.com/tools" android:layout_width="match_parent"

    android:layout_height="wrap_content" android:paddingLeft="@dimen/activity_horizontal_margin"

    android:paddingRight="@dimen/activity_horizontal_margin"

    android:paddingTop="@dimen/activity_vertical_margin"

    android:paddingBottom="@dimen/activity_vertical_margin" tools:context=".MainActivity">

    <LinearLayout

        android:id="@+id/linear_layout_top"

        android:layout_alignParentTop="true"

        android:layout_width="match_parent"

        android:layout_height="40dp">

        <TextView

            android:id="@+id/notice_view"

            android:layout_width="0dp"

            android:layout_height="40dp"

            android:text="蓝牙未开启"

            android:layout_weight="3"/>

        <TextView

            android:id="@+id/notice_recv_view"

            android:layout_width="0dp"

            android:layout_height="30dp"

            android:layout_weight="3"/>

        <TextView

            android:id="@+id/notice_send_view"

            android:layout_width="0dp"

            android:layout_height="30dp"

            android:layout_weight="3"/>

        <Button

            android:id="@+id/turn_on_off"

            android:layout_width="0dp"

            android:layout_height="40dp"

            android:layout_weight="2"

            android:text="ON"/>

    </LinearLayout>

    <TextView

        android:id="@+id/led1"

        android:layout_centerHorizontal="true"

        android:layout_below="@+id/linear_layout_top"

        android:layout_width="40dp"

        android:layout_height="20dp"

        android:gravity="center"

        android:text="LED1"/>

    <TextView

        android:id="@+id/led0"

        android:layout_centerHorizontal="true"

        android:layout_below="@+id/led1"

        android:layout_width="40dp"

        android:layout_height="20dp"

        android:gravity="center"

        android:text="+"/>

    <TextView

        android:id="@+id/led3"

        android:layout_below="@+id/led1"

        android:layout_toLeftOf="@+id/led1"

        android:layout_width="40dp"

        android:layout_height="20dp"

        android:gravity="center"

        android:text="LED3"/>

    <TextView

        android:id="@+id/led2"

        android:layout_centerHorizontal="true"

        android:layout_below="@+id/led3"

        android:layout_width="40dp"

        android:layout_height="20dp"

        android:gravity="center"

        android:text="LED2"/>

    <TextView

        android:id="@+id/led4"

        android:layout_below="@+id/led1"

        android:layout_toRightOf="@+id/led1"

        android:layout_width="40dp"

        android:layout_height="20dp"

        android:gravity="center"

        android:text="LED4"/>

    <ScrollView

        android:id="@+id/scroll_view"

        android:layout_below="@+id/led2"

        android:layout_above="@+id/linear_layout_bottom"

        android:layout_width="match_parent"

        android:layout_height="match_parent">

        <TextView

            android:id="@+id/recv_view"

            android:text=""

            android:layout_width="wrap_content"

            android:layout_height="wrap_content" />

    </ScrollView>

    <LinearLayout

        android:id="@+id/linear_layout_bottom"

        android:layout_alignParentBottom="true"

        android:layout_width="match_parent"

        android:layout_height="50dp">

        <Button

            android:id="@+id/clear_recv_view"

            android:layout_width="0dp"

            android:layout_height="match_parent"

            android:layout_weight="1"

            android:text="clear" />

        <EditText

            android:id="@+id/send_text"

            android:layout_width="0dp"

            android:layout_height="wrap_content"

            android:layout_weight="3"

            android:hint="输入框,默认@#结尾"/>

        <Button

            android:id="@+id/send"

            android:layout_width="0dp"

            android:layout_height="match_parent"

            android:layout_weight="1"

            android:text="send" />

    </LinearLayout>

</RelativeLayout>
MainActivity.java文件如下:
package com.luoxn28.bluetooth; import android.bluetooth.BluetoothAdapter;
import android.bluetooth.BluetoothDevice;
import android.bluetooth.BluetoothSocket;
import android.content.Intent;
import android.graphics.Color;
import android.os.Bundle;
import android.os.Message;
import android.support.v7.app.ActionBarActivity;
import android.view.Menu;
import android.view.MenuItem;
import android.view.View;
import android.widget.Button;
import android.widget.EditText;
import android.widget.ScrollView;
import android.widget.TextView;
import android.widget.Toast; import java.io.IOException;
import java.io.InputStream;
import java.io.OutputStream;
import java.util.ArrayList;
import java.util.List;
import java.util.Set;
import java.util.UUID; public class MainActivity extends ActionBarActivity implements View.OnClickListener {
public static final int RECV_VIEW = 0;
public static final int NOTICE_VIEW = 1; private BluetoothAdapter bluetoothAdapter = null; private ConnectThread connectThread = null;
private ConnectedThread connectedThread = null; private TextView noticeView = null;
private Button turnOnOff = null;
private TextView led0, led1, led2, led3, led4;
ScrollView scrollView = null;
private TextView recvView = null;
private Button clearRecvView = null;
private EditText sendText = null;
private Button send = null; @Override
protected void onCreate(Bundle savedInstanceState) {
super.onCreate(savedInstanceState);
setContentView(R.layout.activity_main); // 获取BluetoothAdapter
bluetoothAdapter = BluetoothAdapter.getDefaultAdapter();
if (bluetoothAdapter == null) {
// Device does not support Bluetooth
return;
} // 注册监听事件
noticeView = (TextView) findViewById(R.id.notice_view);
turnOnOff = (Button) findViewById(R.id.turn_on_off); led0 = (TextView) findViewById(R.id.led0);
led1 = (TextView) findViewById(R.id.led1);
led2 = (TextView) findViewById(R.id.led2);
led3 = (TextView) findViewById(R.id.led3);
led4 = (TextView) findViewById(R.id.led4);
scrollView = (ScrollView) findViewById(R.id.scroll_view);
recvView = (TextView) findViewById(R.id.recv_view);
clearRecvView = (Button) findViewById(R.id.clear_recv_view);
sendText = (EditText) findViewById(R.id.send_text);
send = (Button) findViewById(R.id.send); turnOnOff.setOnClickListener(this);
clearRecvView.setOnClickListener(this);
send.setOnClickListener(this); if (!bluetoothAdapter.isEnabled()) {
noticeView.setText("蓝牙未开启");
}
else {
noticeView.setText("蓝牙已开启");
}
noticeView.setBackgroundColor(Color.GRAY);
led0.setBackgroundColor(Color.GRAY);
led1.setBackgroundColor(Color.GRAY);
led2.setBackgroundColor(Color.GRAY);
led3.setBackgroundColor(Color.GRAY);
led4.setBackgroundColor(Color.GRAY);
} private boolean isOn = false;
@Override
public void onClick(View view) {
switch (view.getId()) {
case R.id.turn_on_off: // 发送'0'或者'1'都可以
if (bluetoothAdapter == null || !bluetoothAdapter.isEnabled()) {
Toast.makeText(this, "蓝牙未开启", Toast.LENGTH_SHORT).show();
break;
}
if (connectedThread == null) {
Toast.makeText(this, "未连接设备", Toast.LENGTH_SHORT).show();
break;
} String turn_string = "1@#";
connectedThread.write(turn_string.getBytes());
if (isOn == false) {
isOn = true; // 打开了
turnOnOff.setText("OFF");
led1.setText("");
led2.setText("");
led3.setText("");
led4.setText("");
}
else {
isOn = false; // 关闭了
turnOnOff.setText("ON");
led1.setText("LED1");
led2.setText("LED2");
led3.setText("LED3");
led4.setText("LED4");
}
break; case R.id.clear_recv_view: // 清空接收框
recvView.setText("");
break; case R.id.send: // 发送数据,默认以"@#"结尾
if (bluetoothAdapter == null || !bluetoothAdapter.isEnabled()) {
Toast.makeText(this, "蓝牙未开启", Toast.LENGTH_SHORT).show();
return;
}
if (connectedThread == null) {
Toast.makeText(this, "未连接设备", Toast.LENGTH_SHORT).show();
break;
}
String inputText = sendText.getText().toString() + "@#"; // 发送给单片机数据以"@#结尾",这样单片机知道一条数据发送结束
//Toast.makeText(MainActivity.this, inputText, Toast.LENGTH_SHORT).show();
connectedThread.write(inputText.getBytes());
break; default:
break;
}
} private android.os.Handler handler = new android.os.Handler() {
public void handleMessage(Message msg) {
Bundle bundle = null;
switch (msg.what) {
case RECV_VIEW:
if (isOn == false) {
isOn = true;
turnOnOff.setText("OFF");
}
bundle = msg.getData();
String recv = bundle.getString("recv");
recvView.append(recv + "\n");
scrollView.fullScroll(ScrollView.FOCUS_DOWN); // 滚动到底部 if (recv.isEmpty() || recv.contains(" ") || recv.contains("#")) {
break;
}
int num = Integer.valueOf(recv) / 2; // 0-60s
if (num <= 20) {
led1.setText("");
led2.setText("");
led3.setText("");
led4.setText("");
led1.setBackgroundColor(Color.RED);
led2.setBackgroundColor(Color.RED);
led3.setBackgroundColor(Color.GREEN);
led4.setBackgroundColor(Color.GREEN);
}
else if (num < 30) {
int n = 30 - num;
led1.setText("" + n);
led2.setText("" + n);
if (num < 28) {
led3.setBackgroundColor(Color.GREEN);
led4.setBackgroundColor(Color.GREEN);
}
else {
led3.setBackgroundColor(Color.YELLOW);
led4.setBackgroundColor(Color.YELLOW);
}
}
else if (num <= 50) {
led1.setText("");
led2.setText("");
led3.setText("");
led4.setText("");
led1.setBackgroundColor(Color.GREEN);
led2.setBackgroundColor(Color.GREEN);
led3.setBackgroundColor(Color.RED);
led4.setBackgroundColor(Color.RED);
}
else {
int n = 60 - num;
led3.setText("" + n);
led4.setText("" + n); if (num < 58) {
led1.setBackgroundColor(Color.GREEN);
led2.setBackgroundColor(Color.GREEN);
}
else {
led1.setBackgroundColor(Color.YELLOW);
led2.setBackgroundColor(Color.YELLOW);
}
}
break; case NOTICE_VIEW:
bundle = msg.getData();
String notice = bundle.getString("notice");
noticeView.setText(notice);
break; default:
break;
}
}
}; @Override
public boolean onCreateOptionsMenu(Menu menu) {
// Inflate the menu; this adds items to the action bar if it is present.
getMenuInflater().inflate(R.menu.menu_main, menu);
return true;
} @Override
public boolean onOptionsItemSelected(MenuItem item) {
int id = item.getItemId(); if (id == R.id.start_bluetooth) {
if (bluetoothAdapter != null) {
// 开启蓝牙
int REQUEST_ENABLE_BT = 1;
if (!bluetoothAdapter.isEnabled()) {
Intent intent = new Intent(BluetoothAdapter.ACTION_REQUEST_ENABLE);
startActivityForResult(intent, REQUEST_ENABLE_BT);
noticeView.setText("开启蓝牙成功");
//Toast.makeText(this, "开启蓝牙成功", Toast.LENGTH_SHORT).show();
} else {
Toast.makeText(this, "蓝牙已开启", Toast.LENGTH_SHORT).show();
}
} return true;
}
else if (id == R.id.show_devices) {
if (bluetoothAdapter != null) {
if (!bluetoothAdapter.isEnabled()) {
Toast.makeText(this, "蓝牙未开启", Toast.LENGTH_SHORT).show();
return true;
} // 查询配对设备
List<String> devices = new ArrayList<String>();
Set<BluetoothDevice> bondedDevices = bluetoothAdapter.getBondedDevices();
for (BluetoothDevice device : bondedDevices) {
devices.add(device.getName() + "-" + device.getAddress());
}
StringBuilder text = new StringBuilder();
for (String device : devices) {
text.append(device + "\n");
}
Toast.makeText(this, text, Toast.LENGTH_SHORT).show();
}
return true;
}
else if (id == R.id.find_devices) {
Toast.makeText(this, "该功能暂时不可用", Toast.LENGTH_SHORT).show();
}
else if (id == R.id.connect_devices) {
if (bluetoothAdapter == null || !bluetoothAdapter.isEnabled()) {
Toast.makeText(this, "蓝牙未开启", Toast.LENGTH_SHORT).show();
return true;
} // 查询配对设备 建立连接,只能连接第一个配对的设备
List<String> devices = new ArrayList<String>();
Set<BluetoothDevice> bondedDevices = bluetoothAdapter.getBondedDevices();
for (BluetoothDevice device : bondedDevices) {
connectThread = new ConnectThread(device);
connectThread.start();
//Toast.makeText(this, "连接成功", Toast.LENGTH_SHORT).show();
break;
}
} return super.onOptionsItemSelected(item);
} private class ConnectThread extends Thread {
private final String MY_UUID = "00001101-0000-1000-8000-00805F9B34FB";
private final BluetoothSocket socket;
private final BluetoothDevice device; public ConnectThread(BluetoothDevice device) {
this.device = device;
BluetoothSocket tmp = null; try {
tmp = device.createRfcommSocketToServiceRecord(UUID.fromString(MY_UUID));
} catch (IOException e) {
e.printStackTrace();
}
this.socket = tmp;
} public void run() {
bluetoothAdapter.cancelDiscovery();
try {
socket.connect();
connectedThread = new ConnectedThread(socket);
connectedThread.start();
} catch (IOException e) {
try {
socket.close();
} catch (IOException ee) {
ee.printStackTrace();
}
return;
}
//manageConnectedSocket(socket);
} public void cancel() {
try {
socket.close();
} catch (IOException e) {
e.printStackTrace();
}
}
} // 客户端与服务器建立连接成功后,用ConnectedThread收发数据
private class ConnectedThread extends Thread {
private final BluetoothSocket socket;
private final InputStream inputStream;
private final OutputStream outputStream; public ConnectedThread(BluetoothSocket socket) {
this.socket = socket;
InputStream input = null;
OutputStream output = null; try {
input = socket.getInputStream();
output = socket.getOutputStream();
} catch (IOException e) {
e.printStackTrace();
}
this.inputStream = input;
this.outputStream = output;
} public void run() {
StringBuilder recvText = new StringBuilder();
byte[] buff = new byte[1024];
int bytes; Bundle tmpBundle = new Bundle();
Message tmpMessage = new Message();
tmpBundle.putString("notice", "连接成功");
tmpMessage.what = NOTICE_VIEW;
tmpMessage.setData(tmpBundle);
handler.sendMessage(tmpMessage);
while (true) {
try {
bytes = inputStream.read(buff);
String str = new String(buff, "ISO-8859-1");
str = str.substring(0, bytes); // 收到数据,单片机发送上来的数据以"#"结束,这样手机知道一条数据发送结束
//Log.e("read", str);
if (!str.endsWith("#")) {
recvText.append(str);
continue;
}
recvText.append(str.substring(0, str.length() - 1)); // 去除'#' Bundle bundle = new Bundle();
Message message = new Message(); bundle.putString("recv", recvText.toString());
message.what = RECV_VIEW;
message.setData(bundle);
handler.sendMessage(message);
recvText.replace(0, recvText.length(), "");
} catch (IOException e) {
e.printStackTrace();
break;
}
}
} public void write(byte[] bytes) {
try {
outputStream.write(bytes);
} catch (IOException e) {
e.printStackTrace();
}
} public void cancel() {
try {
socket.close();
} catch (IOException e) {
e.printStackTrace();
}
}
}
}
menu_main.xml文件如下:
<menu xmlns:android="http://schemas.android.com/apk/res/android"

    xmlns:app="http://schemas.android.com/apk/res-auto"

    xmlns:tools="http://schemas.android.com/tools" tools:context=".MainActivity">

    <item

        android:id="@+id/show_devices"

        android:title="@string/show_devices"

        android:orderInCategory="100"

        app:showAsAction="never" />

    <item

        android:id="@+id/start_bluetooth"

        android:title="@string/start_bluetooth"

        android:orderInCategory="100"

        app:showAsAction="never" />

    <item

        android:id="@+id/find_devices"

        android:title="@string/find_devices"

        android:orderInCategory="100"

        app:showAsAction="never" />

    <item

        android:id="@+id/connect_devices"

        android:title="@string/connect_devices"

        android:orderInCategory="100"

        app:showAsAction="never" />

</menu>
strings.xml文件如下:
<resources>

    <string name="app_name">BlueTooth</string>

    <string name="action_settings">Settings</string>

    <string name="start_bluetooth">开启蓝牙</string>

    <string name="show_devices">查询配对设备</string>

    <string name="find_devices">搜索设备</string>

    <string name="connect_devices">连接设备</string>

</resources>
到这里整个APP已经开发完成,亲测可用,如果有什么错误,欢迎评论指正谈论^_^。
参考资料
2、http://developer.android.com/intl/zh-cn/guide/topics/connectivity/bluetooth.html
3、《Android第一行代码》
Android蓝牙实例(和单片机蓝牙模块通信)的更多相关文章
- Android单片机与蓝牙模块通信实例代码
Android单片机与蓝牙模块通信实例代码 参考路径:http://www.jb51.net/article/83349.htm 啦啦毕业了,毕业前要写毕业设计,需要写一个简单的蓝牙APP进行交互,通 ...
- #51单片机#蓝牙模块(ATK-SPP-HC06从机串口)的使用方法
#include <AT89X51.H> #include <intrins.h> // 函数原形定义 #define uchar unsigned char #define ...
- Android 蓝牙实例【转】
本文转自:http://www.yiibai.com/android/android_bluetooth.html 在很多方面,蓝牙是一种能够发送或接受两个不同的设备之间传输的数据. Android平 ...
- 小白转行入门STM32----手机蓝牙控制STM32单片机点亮LED
@ 目录 引言导读 一.通信基础知识 1.1 通信到底传输的是什么? 1.2 比特率和波特率 习题 1.1 双工和单工 习题 1.2 串行和并行 1.3 异同通信和同步通信 习题 二.连接STM32单 ...
- 蓝牙协议 基于TI cc2540 模块的理解(转)
源:蓝牙协议 基于TI cc2540 模块的理解 Bluetooth 4.0开发 Platform:TI IC:cc2540 Environment:windows 7 tools:IAR 8.20. ...
- 《安卓网络编程》之第六篇 Android中的WIFI和蓝牙
关于WIFI就不多介绍啦,直接来个段子吧. 问:“WiFi对人体有伤害么?” 答:“不清楚,反正没有WiFi我就浑身不舒服. 比较重要的一点就是WifiManager wm=(WifiManager ...
- android 基于wifi模块通信开发
这篇文章主要是我写完手机与wifi模块通信后所用来总结编写过程的文章,下面,我分几点来说一下编写的大概流程. 一.拉出按钮控件并设置它的点击事件 二.设置wifi权限 三.打开和关闭wifi 四.扫描 ...
- Android:状态栏禁用时蓝牙多文件传输弹窗及进度显示
一.蓝牙文件传输弹窗 Android原生蓝牙传输文件时,会弹出蓝牙文件接收的确认框且默认是以notification的形式显示在状态栏,当用户点击之后才会弹出一个dialog.那么当状态栏被禁用时,如 ...
- 基于pythonselect.select模块通信的实例讲解
基于python select.select模块通信的实例讲解 要理解select.select模块其实主要就是要理解它的参数, 以及其三个返回值. select()方法接收并监控3个通信列表, 第一 ...
随机推荐
- SQL Server数据类型转换
在SQL Server日常的函数.存储过程和SQL语句中,经常会用到不同数据类型的转换.在SQL Server有两种数据转换类型:一种是显性数据转换:另一种是隐性数据转换.下面分别对这两种数据类型转换 ...
- 详解Javascript 函数声明和函数表达式的区别
Javascript Function无处不在,而且功能强大!通过Javascript函数可以让JS具有面向对象的一些特征,实现封装.继承等,也可以让代码得到复用.但事物都有两面性,Javascrip ...
- 使用 jQuery & CSS3 实现优雅的手风琴效果
手风琴效果常用于切换显示一组内容,这种方式既可以节省网页空间又可以有动画效果.今天,我们将创造一个优雅的手风琴内容效果.这个想法是有悬停时滑出一些垂直手风琴标签.我们将添加一些 CSS3 属性来提升外 ...
- 15款优雅的 WordPress 电子商务网站主题
WordPress 电子商务网站主题今年非常流行,特别是对那些想要在几分钟内创建一个在线商店,但又没有掌握网络开发的很多知识的人来说.WordPress 是一个功能强大的 CMS,它的灵活性和可用性是 ...
- 如何用JavaScript探测CSS动画是否已经完成
不啰嗦上代码: WN:(function(){ var el = $('<fakeelement>'), transition="transition", transi ...
- 百度编辑器 UEditor 报错汇总
1,编辑文本时使用js将需要编辑内容setContent到编辑器里,总是报(IE8及IE11):'this.body' 为空或不是对象,详细如下,其实报这样的错除多半是加载先后或加载不完全导致的: 消 ...
- SAP中禁止特定用户更改密码
在SAP管理中,有时一些账号因为是提供给大家作查询用的,受密码强度策略限制,密码不能为空.故密码设为通用后在公司内发布,为避免有些用户更改后造成其他用户无法登陆,我们可在使用TC-SU01,在登录数据 ...
- 连接QuickBooks Online实现于IOS App数据同步功能的个人记录
公司项目需要用WebService与QBO实现后台数据同步,由于国内没有做过类似第三方产品接口的资料,前前后后找了N久,终于实现功能,现把实现功能步骤贴上来分享: QBO开发者地址(主要用于创建QBO ...
- 制作CocoaPods依赖库最后步骤修改
我是看这篇博客http://blog.csdn.net/wzzvictory/article/details/20067595 做的,但是CocoaPods 2015年4月份有了更新,出现了一个tru ...
- 新版微耕软件(N3000)与旧版2000的实体功能区别
更多细节请参阅其软件操作说明书. 建议:基于安全的应用始终变化不断,软件投入一直无法满足客户的定制化要求.不如提供基本的SDK,接口,允许第三方以插件的形式开发控制界面.报表. 软件只提供核心的界面. ...