CS144 计算机网络 Lab1:Stream Reassembler
前言
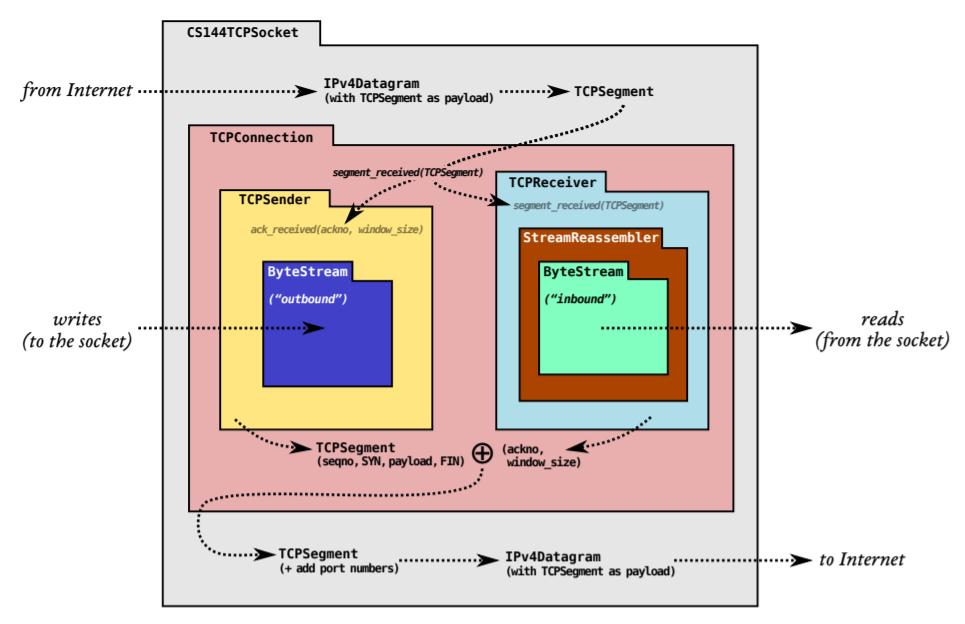
上一篇博客中我们完成了 Lab0,使用双端队列实现了一个字节流类 ByteStream,可以向字节流中写入数据并按写入顺序读出数据。由于网络环境的变化,发送端滑动窗口内的数据包到达接收端时可能失序,所以接收端收到数据之后不能直接写入 ByteStream 中,而是应该缓存下来并按照序号重组成正确的数据。这篇博客所介绍的 Lab1 将实现一个字节流重组器 StreamReassambler 来完成上述任务。
实验要求
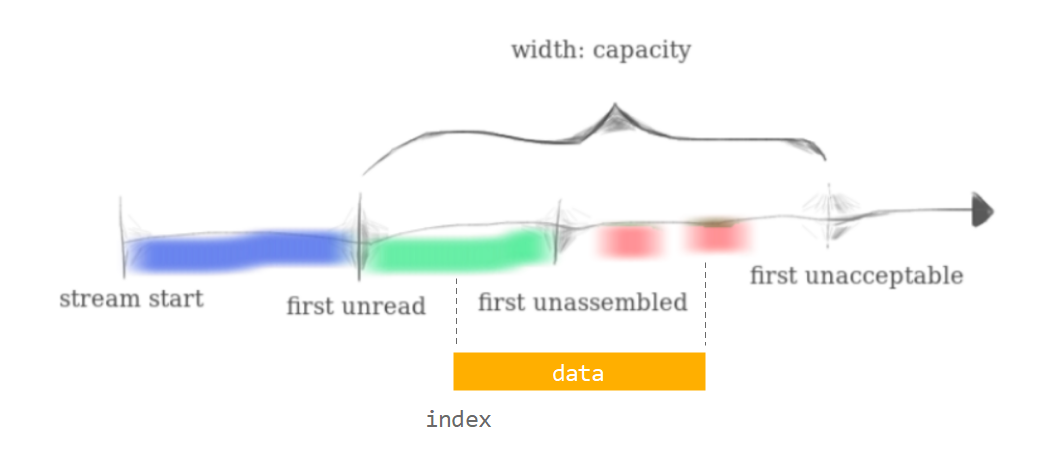
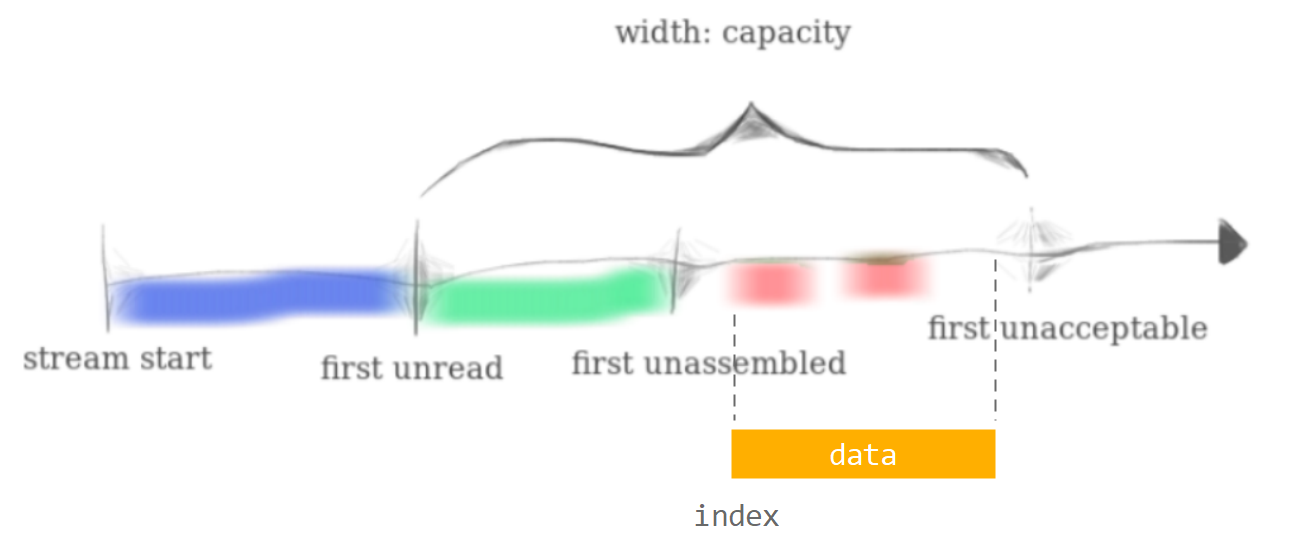
接收方的数据情况如下图所示,蓝色部分表示已消费的数据,绿色表示已正确重组但是还没消费的数据,红色则是失序到达且还没重组的数据:

由于接收端缓冲区大小 capacity 有限,超出容量的数据(first unacceptable 之后的数据)将被丢弃,这些被丢弃的数据包将起到流量控制的作用,可以限制发送端滑动窗口的大小。
流重组器的接口如下所示:
StreamReassembler(const size_t capacity);

//! \brief Receives a substring and writes any newly contiguous bytes into the stream.

//!

//! If accepting all the data would overflow the `capacity` of this

//! `StreamReassembler`, then only the part of the data that fits will be

//! accepted. If the substring is only partially accepted, then the `eof`

//! will be disregarded.

//!

//! \param data the string being added

//! \param index the index of the first byte in `data`

//! \param eof whether or not this segment ends with the end of the stream

void push_substring(const std::string &data, const uint64_t index, const bool eof);

//! Access the reassembled byte stream

const ByteStream &stream_out() const { return _output; }

ByteStream &stream_out() { return _output; }

//! The number of bytes in the substrings stored but not yet reassembled

size_t unassembled_bytes() const;

//! Is the internal state empty (other than the output stream)?

bool empty() const;
其中最重要的函数就是 StreamReassambler::push_substring(),接收方收到数据之后就会调用此函数将数据保存起来。此函数接受三个参数:
data: 接收到的数据index: 数据的第一个字节的索引,由于原始数据可能很大,超过了 TCPSegment 的容量,所以会将原始数据切分成多个片段,每个片段的第一个字节的索引就是index,最小值为 0eof:是不是最后一个数据包
三个参数中,最耐人寻味的就是 index 参数,如果只是单纯的失序到达,数据之间没有发生重叠,Lab1 就比较好做了,但是实验指导书中明确指出
May substrings overlap? Yes
这就比较难搞了,因为重叠分成两种:
前面一部分与已重组的数据发生重叠
前面不与已重组的数据发生重叠
实际上由于 data 的末尾可能超出 first unacceptable,需要对超出部分进行截断,这可能导致 eof 标志失效,但是问题不大,发送方之后会重新发送这个数据包。
代码实现
为了处理上述重叠情况,需要一个 _next_index 成员代表 first unassembled 索引,一个 _unassembles 双端队列代表 first unassembled 到 first unacceptable 之间的数据,由于里面可能只有一部分数据是有效的,所以用一个遮罩 _unassembled_mask 指出哪些数据是有效但是还没重组的。
class StreamReassembler {

  private:

    ByteStream _output;  //!< The reassembled in-order byte stream

    size_t _capacity;    //!< The maximum number of bytes

    std::deque<char> _unassembles{};

    std::deque<bool> _unassemble_mask{};

    size_t _unassambled_bytes{0};

    uint64_t _next_index{0};

    bool _is_eof{false};

    /** @brief 将数据写入未重组队列中

     * @param data 将被写入的字符串

     * @param dstart 字符串开始写入的位置

     * @param len 写入的长度

     * @param astart 队列中开始写入的位置

     */

    void write_unassamble(const std::string &data, size_t dstart, size_t len, size_t astart);

    /** @brief 重组数据

     */

    void assemble();

  public:

    StreamReassembler(const size_t capacity);

    //! \brief Receives a substring and writes any newly contiguous bytes into the stream.

    void push_substring(const std::string &data, const uint64_t index, const bool eof);

    //! \name Access the reassembled byte stream

    const ByteStream &stream_out() const { return _output; }

    ByteStream &stream_out() { return _output; }

    //! The number of bytes in the substrings stored but not yet reassembled

    size_t unassembled_bytes() const;

    bool empty() const;

};
收到数据时,先将不重叠的数据写入 _unassembles 队列中,之后调用 StreamReassabler::assemble() 函数重组队列中的连续数据,并更新 _next_index:
StreamReassembler::StreamReassembler(const size_t capacity)

    : _output(capacity), _capacity(capacity), _unassembles(capacity, '\0'), _unassemble_mask(capacity, false) {}

//! \details This function accepts a substring (aka a segment) of bytes,

//! possibly out-of-order, from the logical stream, and assembles any newly

//! contiguous substrings and writes them into the output stream in order.

void StreamReassembler::push_substring(const string &data, const size_t index, const bool eof) {

    if (index > _next_index + _capacity)

        return;

    if (eof)

        _is_eof = true;

    if (eof && empty() && data.empty()) {

        _output.end_input();

        return;

    }

    auto end_index = data.size() + index;

    // 新数据在后面

    if (index >= _next_index) {

        auto astart = index - _next_index;

        auto len = min(_output.remaining_capacity() - astart, data.size());

        if (len < data.size())

            _is_eof = false;

        write_unassamble(data, 0, len, astart);

    }

    // 新数据与已重组的数据部分重叠

    else if (end_index > _next_index) {

        auto dstart = _next_index - index;

        auto len = min(_output.remaining_capacity(), data.size() - dstart);

        if (len < data.size() - dstart)

            _is_eof = false;

        write_unassamble(data, dstart, len, 0);

    }

    // 最后合并数据

    assemble();

    if (_is_eof && empty())

        _output.end_input();

}

void StreamReassembler::write_unassamble(const string &data, size_t dstart, size_t len, size_t astart) {

    for (size_t i = 0; i < len; ++i) {

        if (_unassemble_mask[i + astart])

            continue;

        _unassembles[i + astart] = data[dstart + i];

        _unassemble_mask[i + astart] = true;

        _unassambled_bytes++;

    }

}

void StreamReassembler::assemble() {

    string s;

    while (_unassemble_mask.front()) {

        s.push_back(_unassembles.front());

        _unassembles.pop_front();

        _unassemble_mask.pop_front();

        _unassembles.push_back('\0');

        _unassemble_mask.push_back(false);

    }

    if (s.empty())

        return;

    _output.write(s);

    _next_index += s.size();

    _unassambled_bytes -= s.size();

}

size_t StreamReassembler::unassembled_bytes() const { return _unassambled_bytes; }

bool StreamReassembler::empty() const { return _unassambled_bytes == 0; }
在命令行中输入:
cd build
make -j8
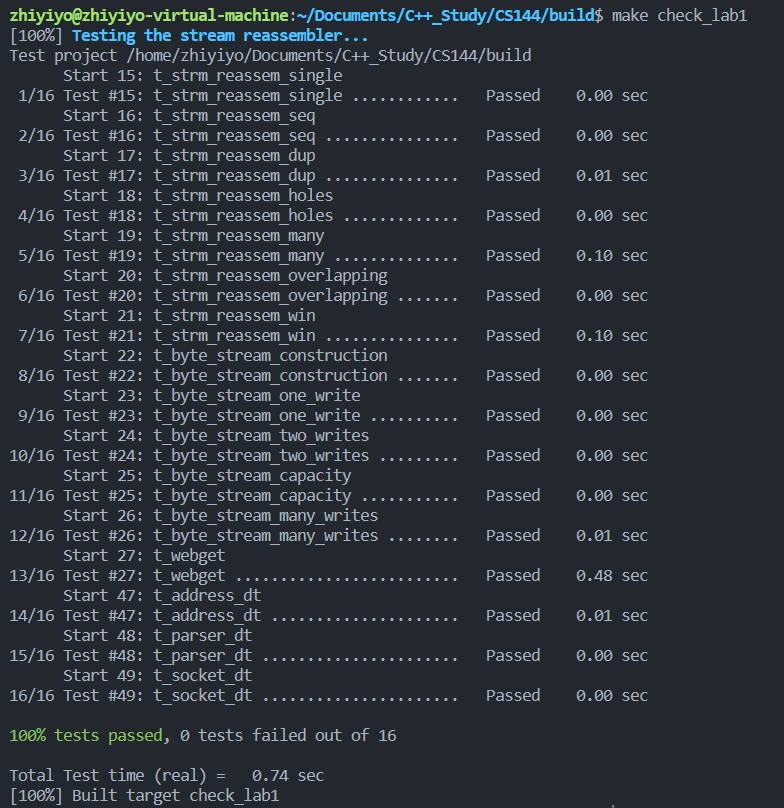
make check_lab1
可以看到测试用例也全部通过了:
调试代码
由于使用代码编辑器的是 VSCode,所以这里给出在 VSCode 中调试项目代码的方式。
tasks.json
首先在项目目录下创建 .vscode 文件夹,并新建一个 tasks.json 文件,在里面写入下述内容:
{

    "tasks": [

        {

            "type": "shell",

            "label": "cmake",

            "command": "cd build && cmake .. -DCMAKE_BUILD_TYPE=Debug",

            "detail": "CMake 生成 Makefile",

            "args": [],

            "problemMatcher": "$gcc"

        },

        {

            "type": "shell",

            "label": "build",

            "command": "cd build && make -j8",

            "detail": "编译项目",

            "args": [],

            "problemMatcher": "$gcc"

        },

    ],

    "version": "2.0.0"

}
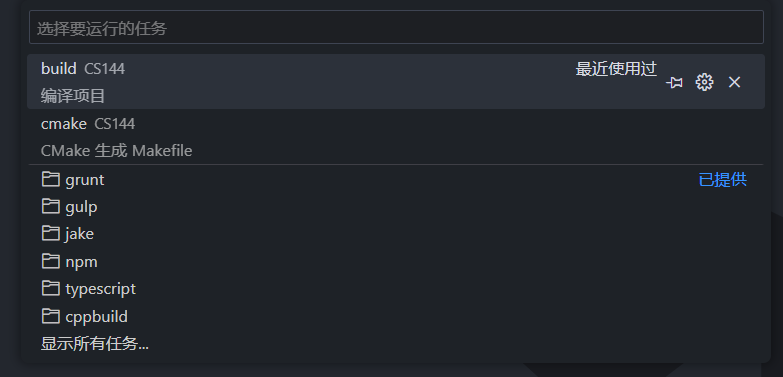
这里主要配置了两个任务,一个调用 CMake 生成 Makefile,一个编译 Makefile。在 VSCode 中按下 Alt + T + R,就能在任务列表中看到这两个任务,点击之后就能执行。
launch.json
在 .vscode 文件夹中新建 launch.json,并写入下述内容:
{

    // Use IntelliSense to learn about possible attributes.

    // Hover to view descriptions of existing attributes.

    // For more information, visit: https://go.microsoft.com/fwlink/?linkid=830387

    "version": "0.2.0",

    "configurations": [

        {

            "name": "debug lab test",

            "type": "cppdbg",

            "request": "launch",

            "program": "${workspaceFolder}/build/tests/${fileBasenameNoExtension}",

            "args": [],

            "stopAtEntry": false,

            "cwd": "${workspaceFolder}",

            "environment": [],

            "externalConsole": false,

            "MIMode": "gdb",

            "setupCommands": [

                {

                    "description": "Enable pretty-printing for gdb",

                    "text": "-enable-pretty-printing",

                    "ignoreFailures": true

                }

            ],

            "miDebuggerPath": "/usr/bin/gdb"

        },

        {

            "name": "debug current file",

            "type": "cppdbg",

            "request": "launch",

            "program": "${fileDirname}/${fileBasenameNoExtension}",

            "args": [],

            "stopAtEntry": false,

            "cwd": "${workspaceFolder}",

            "environment": [],

            "externalConsole": false,

            "MIMode": "gdb",

            "setupCommands": [

                {

                    "description": "Enable pretty-printing for gdb",

                    "text": "-enable-pretty-printing",

                    "ignoreFailures": true

                }

            ],

            "preLaunchTask": "C/C++: g++ build active file",

            "miDebuggerPath": "/usr/bin/gdb"

        }

    ]

}
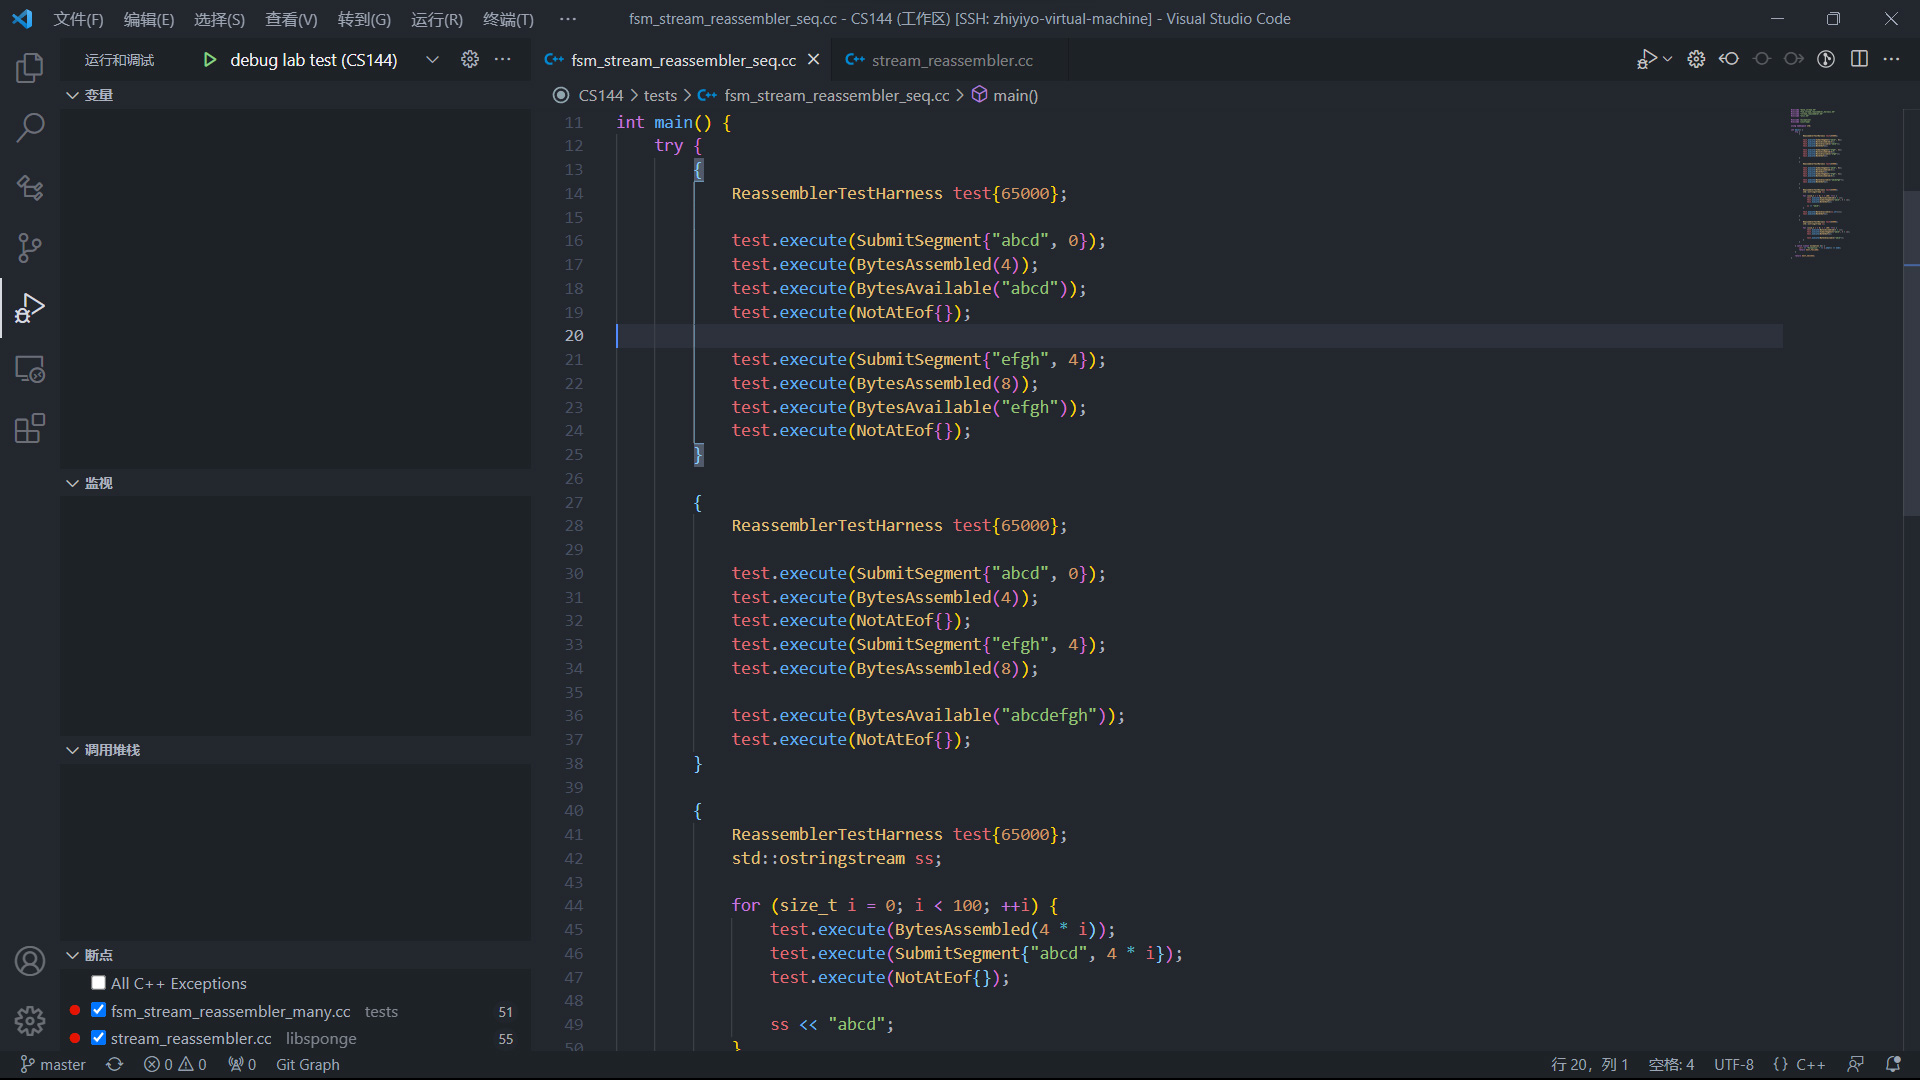
之后打开一个测试用例,比如 tests/fsm_stream_reassembler_seq.cc,转到 debug 标签页,在代码中打下断点, 点击绿色按钮就能开始调试了:
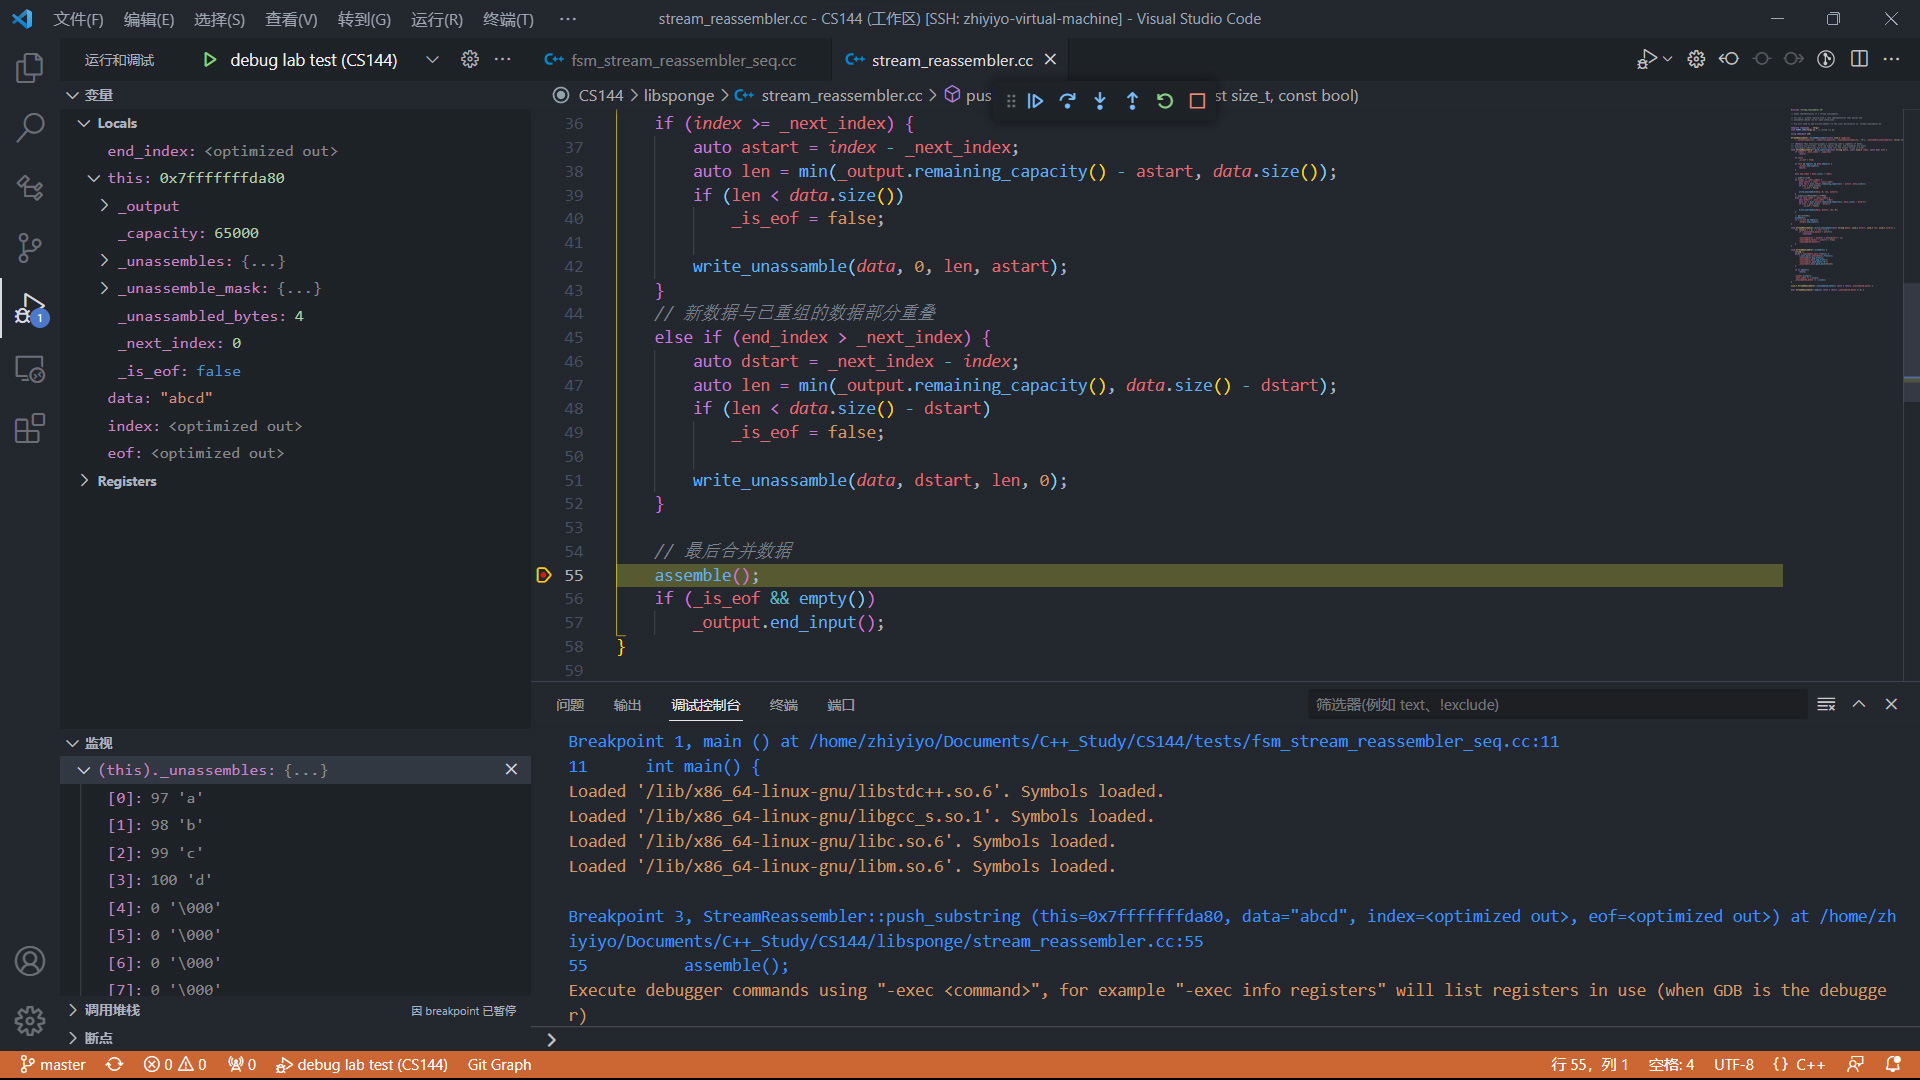
调试效果如下图所示:
后记
通过这次实验,可以加深对接收端数据重组和分组序号的了解,期待后面的几个实验,以上~~
CS144 计算机网络 Lab1:Stream Reassembler的更多相关文章
- cs144 lab0 lab1记录
这个叫什么?Write Up吗 lab0 lab0要做的事,实现buffer部分的功能,要自己写变量以及实现接口. 成员函数 write()向buffer内写数据,peek_out() pop_ou ...
- 【计算机网络】Stanford CS144 Lab Assignments 学习笔记
本文为我的斯坦福计算机网络课的编程实验(Lab Assignments)的学习总结.课程全称:CS 144: Introduction to Computer Networking. 事情发生于我读了 ...
- 《计算机组成原理 》& 《计算机网络》& 《数据库》 Roadmap for self-taugh student
计算机组成原理: UCB的这门课绝对是不错的资源. Great Ideas in Computer Architecture (Machine Structures) B站:https://www.b ...
- CS144学习(1)Lab 0: networking warmup
CS144的实验就是要实现一个用户态TCP协议,对于提升C++的水平以及更加深入学习计算机网络还是有很大帮助的. 第一个Lab是环境配置和热身,环境按照文档里的配置就行了,前面两个小实验就是按照步骤来 ...
- 计算机网络中的帧封装(C实现)
这段时间开始复习计算机网络,看到帧封装这一节,结合以前的课程设计,就用C写了个帧封装的程序,说实话C学的确实不怎么样,实现的时候对于文件操作那部分查了好多资料,下面说说帧封装是啥情况. 学过计算机网络 ...
- 计算机网络(7)-----TCP协议概述
传输控制协议(Transmission Control Protocol) 概念 一种面向连接的.可靠的.基于字节流的传输层通信协议,由IETF的RFC 793定义.在简化的计算机网络OSI模型中,它 ...
- MIT 6.824 lab1:mapreduce
这是 MIT 6.824 课程 lab1 的学习总结,记录我在学习过程中的收获和踩的坑. 我的实验环境是 windows 10,所以对lab的code 做了一些环境上的修改,如果你仅仅对code 感兴 ...
- 哈工大计算机网络Week2-网络应用数据交换
目录 网络应用数据交换 P2P应用:原理与文件分发 纯P2P架构 文件分发:客户机/服务器 vs. P2P CS 为什么是这样的?不应该传送和发出难道是并行的??? P2P P2P文件分发典型例子:B ...
- 计算机网络基础之TCP/IP 协议栈
计算机网络基础之TCP/IP 协议栈 作者:尹正杰 版权声明:原创作品,谢绝转载!否则将追究法律责任. 一.TCP/IP 协议栈概述 1>.什么是TCP/IP协议栈 Transmission C ...
- 【计算机网络】-网络层-Internet的网络层
[计算机网络]-网络层-Internet的网络层 Internet是一组相互连接的网络或者自治系统的集合 Internet 1.存在几个主要骨干网络,骨干网络是由高带宽的线路和快速路由器构成 2.这些 ...
随机推荐
- 记安装MySQL数据库
记录一次自己动手安装MySQL数据库所踩的坑 MySQL安装包与操作系统匹配 安装包有amd和Intel,32位.64位多种组合需要确认仔细使用者操作系统和CPU型号 例如我使用的是CentOS ...
- java 循环删除数据写法
import java.util.ArrayList;import java.util.ConcurrentModificationException;import java.util.List;// ...
- python求列表中n个最大或最小的值
import heapq #y为结果列表,n为所求的n个值,x为来源列表 y=heapq.nsmallest(n,x) y=heapq.nlargest(n,x)
- new Date()在IOS中的坑(转)
原文地址:https://www.cnblogs.com/zjjDaily/p/8963327.html 第一次遇到,记录一下 要创建一个指定时间的new Date对象时,通常的做法是: new Da ...
- java8 stream按某个字段分组,允许分组字段是null
Map<String, List<Dto>> deviceMap = deviceList.stream().collect(Collectors.groupingBy(Dto ...
- 【StoneDB 模块介绍】服务器模块
[StoneDB 模块介绍]服务器模块 一.介绍 客户端程序和服务器程序本质上都是计算机上的一个进程,客户端进程向服务器进程发送请求的过程本质上是一种进程间通信的过程,StoneDB 数据库服务程序作 ...
- 老系统的奇葩问题-tomcat7启动失败
好多年的tomcat7系统了 当时部署安装为了服务 直接启动 就这么简单 好多年没动过了 这次修改了些东西 需要重启 却报错了... 解决: 把服务删除 使用bat启动 成功. 原因:可能是多个 ...
- 基于leaflet地图可视化(一)
最近,在学习地图可视化是基于公司的项目.但公司在项目上居然用图片来代替.无语~~~项目效果图(第一版)如下: 突发奇想,2016年自己就接触过地图可视化.但那是没有深入研究.只会用R语言来实现点基础. ...
- JDK 7 HashMap 并发情况下的死锁问题
目录 问题描述 详细解释 问题描述 JDK7的 HashMap 解决冲突用的是链表,在插入链表的时候用的是头插法,每次在链表的头部插入新元素.resize() 的时候用的依然是头插,头插的话,如果某个 ...
- Java-10接口与抽象类
Java-10接口与抽象类 抽象方法 abstract method机制 这是一个不完整的方法,它只有一个声明,没有方法体 abstract void f(); 包含抽象方法的类被称为抽象类:如果一个 ...