OpenLayers地图标注及弹窗实现
1. 引言
地图标注是在地图中进行文字或图标的标注,从而显示对应的信息
本文基于OpenLayers实现地图上图文的标注与弹窗显示
OpenLayers官网:OpenLayers - Welcome
OpenLayers的GitHub站点:openlayers/openlayers: OpenLayers (github.com)
OpenLayers API文档:OpenLayers v6.15.1 API - Index
2. 图文标注实现
本文实现图文标注的实质就是添加点时设置点要素(Point)的Style
设置图片标注就是在Style中添加Image
设置文字标注就是在Style中添加Text
以下是实现图文标注的核心代码:
const feature = new ol.Feature({

    geometry: new ol.geom.Point(evt.coordinate)

});

feature.setStyle(new ol.style.Style({

    text: new ol.style.Text({

        text: evt.coordinate[0].toFixed(4) + ',' + evt.coordinate[1].toFixed(4),

        offsetY: 30,

        font: '12px Calibri,sans-serif',

        fill: new ol.style.Fill({

            color: '#000'

        }),

        stroke: new ol.style.Stroke({

            color: '#fff',

            width: 3

        })

    }),

    image: new ol.style.Icon({

        src: './images/blueIcon.png',

        scale: 0.5,

        anchor: [0.5, 0.5],

        rotateWithView: true,

        rotation: 0,

        opacity: 0.5,

        color: '#0000ff'

    })

}));

vectorSource.addFeature(feature);
完整代码如下:
<!DOCTYPE html>

<html lang="en">

<head>

    <meta charset="UTF-8">

    <meta http-equiv="X-UA-Compatible" content="IE=edge">

    <meta name="viewport" content="width=device-width, initial-scale=1.0">

    <title>Document</title>

    <link rel="stylesheet"

        href="https://cdn.jsdelivr.net/gh/openlayers/openlayers.github.io@master/en/v6.14.1/css/ol.css" type="text/css">

    <script src="https://cdn.jsdelivr.net/gh/openlayers/openlayers.github.io@master/en/v6.14.1/build/ol.js"></script>

    <style>

        html,

        body,

        #map {

            padding: 0;

            margin: 0;

            height: 100%;

            width: 100%;

        }

        #button {

            position: absolute;

            top: 80px;

            left: 10px;

            z-index: 100;

        }

    </style>

</head>

<body>

    <div id="map"></div>

    <div id="button">

        <button onclick="active()">激活</button>

        <button onclick="deactive()">反激活</button>

    </div>

    <script>

        function active() {

            map.on('click', onClick);

        }

        function deactive() {

            map.un('click', onClick);

        }

    </script>

    <script>

        const map = new ol.Map({

            target: 'map',

            layers: [

                new ol.layer.Tile({

                    source: new ol.source.OSM()

                })

            ],

            view: new ol.View({

                center: [128, 31.5],

                zoom: 5,

                projection: 'EPSG:4326'

            })

        });

        const vectorSource = new ol.source.Vector({

            features: []

        });

        const vectorLayer = new ol.layer.Vector({

            source: vectorSource,

            style: new ol.style.Style({

            })

        });

        map.addLayer(vectorLayer);

        function onClick(evt) {

            console.log(evt.coordinate);

            const feature = new ol.Feature({

                geometry: new ol.geom.Point(evt.coordinate)

            });

            feature.setStyle(new ol.style.Style({

                text: new ol.style.Text({

                    text: evt.coordinate[0].toFixed(4) + ',' + evt.coordinate[1].toFixed(4),

                    offsetY: 30,

                    font: '12px Calibri,sans-serif',

                    fill: new ol.style.Fill({

                        color: '#000'

                    }),

                    stroke: new ol.style.Stroke({

                        color: '#f00',

                        width: 3

                    })

                }),

                image: new ol.style.Icon({

                    src: './images/blueIcon.png',

                    scale: 0.5,

                    anchor: [0.5, 0.5],

                    rotateWithView: true,

                    rotation: 0,

                    opacity: 0.5,

                    color: '#0000ff'

                })

            }));

            vectorSource.addFeature(feature);

        }

    </script>

</body>

</html>
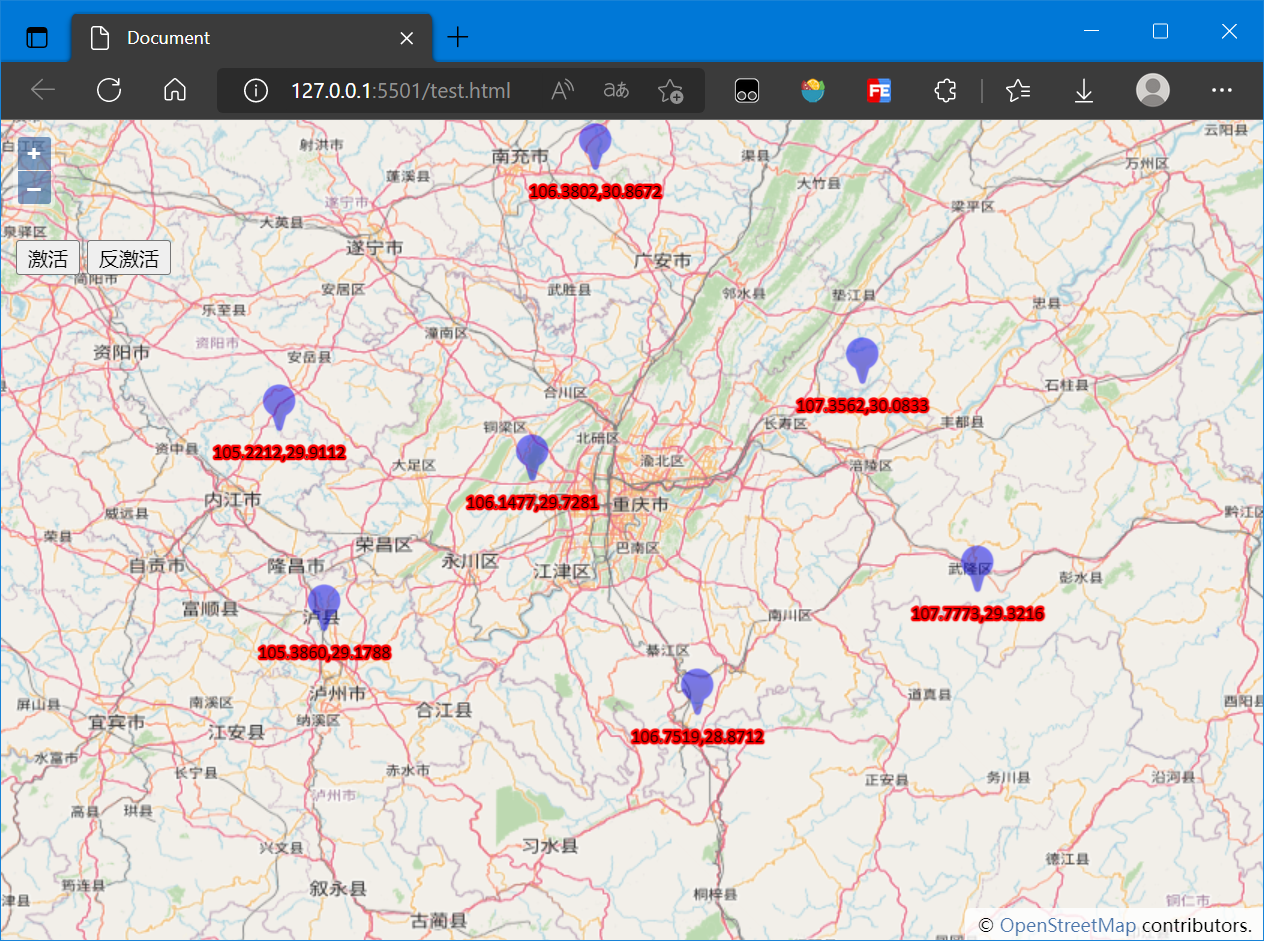
实现效果如下:
3. Popup弹窗
当我们点击某个要素时,希望在这个要素附近显示其具体信息,这个时候往往使用Popup弹出框实现
本文的Popup弹出框的实现实质就是在OpenLayers中创建一个Overlay,其实现流程为:
- 创建DOM元素(通常为div及包含的子元素)
- 创建Overlay并将DOM元素挂载
- 监听地图点击事件
- 点击地图中的要素时读取要素信息并向地图(Map)中添加Overlay
具体实现流程如下:
创建DOM元素
<div id="popup" class="ol-popup">

    <a href="#" id="popup-closer" class="ol-popup-closer"></a>

    <div id="popup-content"></div>

</div>
创建Overlay并将DOM元素挂载
const popup = new ol.Overlay({

    element: document.getElementById('popup')

});
监听事件,读取要素信息并向地图中添加Overlay
map.on('click', popupFunc)

function popupFunc(evt) {

    var feature = map.forEachFeatureAtPixel(evt.pixel, function (feature, layer) {

        return feature

    })

    if (feature) {

        console.log(evt.coordinate);

        const content = feature.getGeometry().getCoordinates();

        popup.setPosition(content);

        map.addOverlay(popup);

        document.getElementById('popup-content').innerHTML = `

            <p>lng: ${content[0].toFixed(4)}</p>

            <p>lat: ${content[1].toFixed(4)}</p>

            `;

        document.querySelector('#popup-closer').addEventListener('click', function () {

            map.removeOverlay(popup);

        });

    }

}
完整代码如下:
<!DOCTYPE html>

<html lang="en">

<head>

    <meta charset="UTF-8">

    <meta http-equiv="X-UA-Compatible" content="IE=edge">

    <meta name="viewport" content="width=device-width, initial-scale=1.0">

    <title>Document</title>

    <link rel="stylesheet"

        href="https://cdn.jsdelivr.net/gh/openlayers/openlayers.github.io@master/en/v6.14.1/css/ol.css" type="text/css">

    <script src="https://cdn.jsdelivr.net/gh/openlayers/openlayers.github.io@master/en/v6.14.1/build/ol.js"></script>

    <style>

        html,

        body,

        #map {

            padding: 0;

            margin: 0;

            height: 100%;

            width: 100%;

        }

        #button {

            position: absolute;

            top: 80px;

            left: 10px;

            z-index: 100;

        }

        .ol-popup {

            position: absolute;

            background-color: white;

            -webkit-filter: drop-shadow(0 1px 4px rgba(0, 0, 0, 0.2));

            filter: drop-shadow(0 1px 4px rgba(0, 0, 0, 0.2));

            padding: 15px;

            border-radius: 10px;

            border: 1px solid #cccccc;

            bottom: 10px;

            left: -50px;

        }

        .ol-popup:after,

        .ol-popup:before {

            top: 100%;

            border: solid transparent;

            content: ' ';

            height: 0;

            width: 0;

            position: absolute;

            pointer-events: none;

        }

        .ol-popup:after {

            border-top-color: white;

            border-width: 10px;

            left: 48px;

            margin-left: -10px;

        }

        .ol-popup:before {

            border-top-color: #cccccc;

            border-width: 11px;

            left: 48px;

            margin-left: -11px;

        }

        .ol-popup-closer {

            text-decoration: none;

            position: absolute;

            top: 2px;

            right: 8px;

        }

        .ol-popup-closer:after {

            content: '';

        }

        #popup-content {

            font-size: 14px;

            font-family: '微软雅黑';

        }

        #popup-content .markerInfo {

            font-weight: bold;

        }

    </style>

</head>

<body>

    <div id="map"></div>

    <div id="popup" class="ol-popup">

        <a href="#" id="popup-closer" class="ol-popup-closer"></a>

        <div id="popup-content"></div>

    </div>

    <div id="button">

        <button onclick="active()">激活</button>

        <button onclick="deactive()">反激活</button>

    </div>

    <script>

        function active() {

            map.addInteraction(draw);

            map.un('click', popupFunc);

        }

        function deactive() {

            map.removeInteraction(draw);

            map.on('click', popupFunc)

        }

    </script>

    <script>

        const map = new ol.Map({

            target: 'map',

            layers: [

                new ol.layer.Tile({

                    source: new ol.source.OSM()

                })

            ],

            view: new ol.View({

                center: [100.2382, 30.0207],

                zoom: 12,

                projection: 'EPSG:4326'

            })

        });

        const popup = new ol.Overlay({

            element: document.getElementById('popup')

        });

        const source = new ol.source.Vector({

            features: []

        });

        const vector = new ol.layer.Vector({

            source: source

        });

        map.addLayer(vector);

        const draw = new ol.interaction.Draw({

            source: source,

            type: 'Point'

        })

        function popupFunc(evt) {

            var feature = map.forEachFeatureAtPixel(evt.pixel, function (feature, layer) {

                return feature

            })

            if (feature) {

                console.log(evt.coordinate);

                const content = feature.getGeometry().getCoordinates();

                popup.setPosition(content);

                map.addOverlay(popup);

                document.getElementById('popup-content').innerHTML = `

            <p>lng: ${content[0].toFixed(4)}</p>

            <p>lat: ${content[1].toFixed(4)}</p>

            `;

                document.querySelector('#popup-closer').addEventListener('click', function () {

                    map.removeOverlay(popup);

                });

            }

        }

        draw.on('drawend', function (evt) {

            const feature = evt.feature;

            const coordinates = feature.getGeometry().getCoordinates();

            console.log(coordinates);

            feature.setStyle(new ol.style.Style({

                image: new ol.style.Icon({

                    src: './images/blueIcon.png'

                }),

                text: new ol.style.Text({

                    text: coordinates[0].toFixed(4) + ',' + coordinates[1].toFixed(4),

                    offsetY: 30,

                    fill: new ol.style.Fill({

                        color: '#f00'

                    })

                })

            }))

        });

    </script>

</body>

</html>
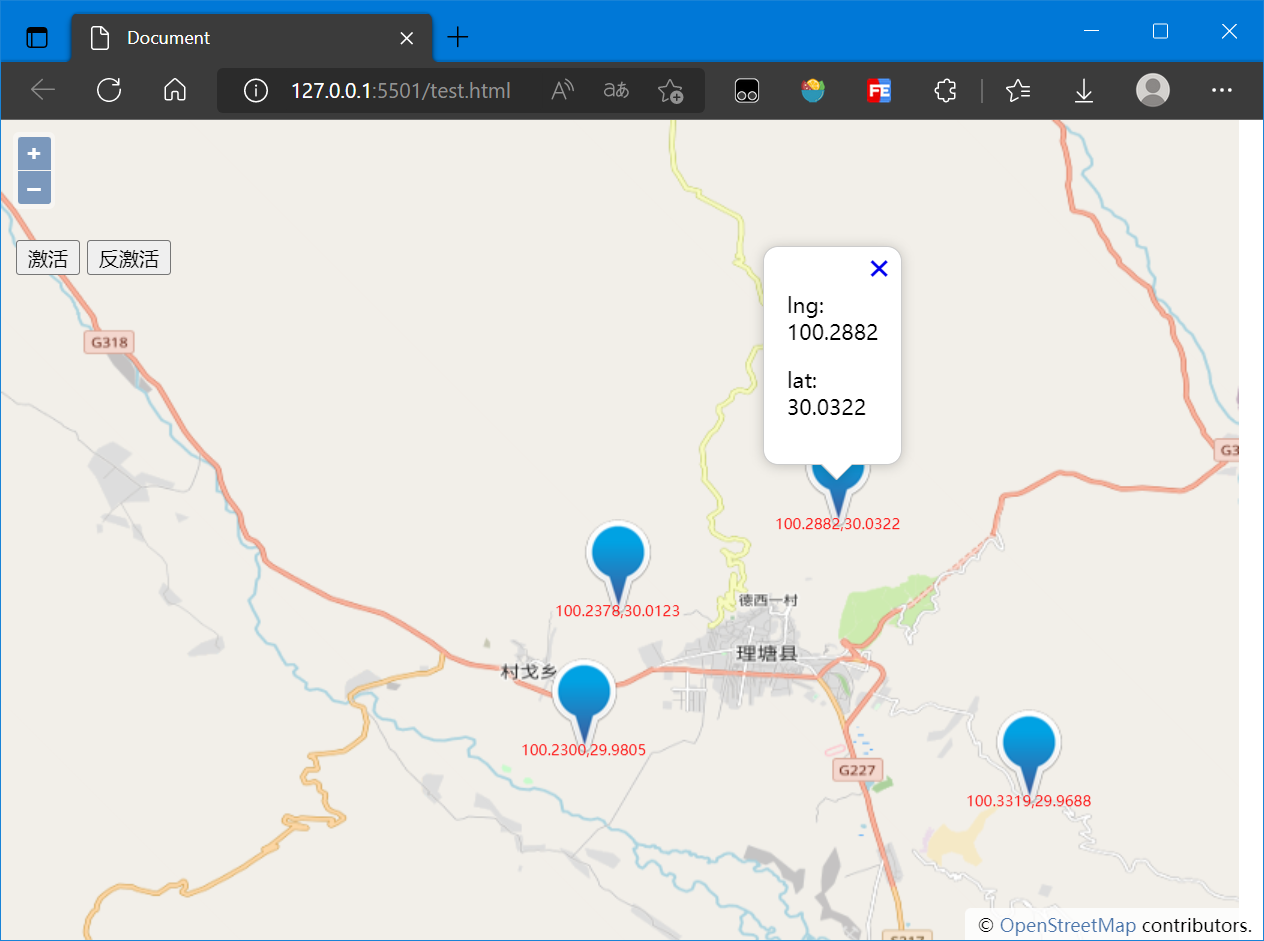
最后的结果如下图:
4. 参考资料
[1]OpenLayers v6.15.1 API - Index
OpenLayers地图标注及弹窗实现的更多相关文章
- iOS开发之百度地图的集成——地图标注&POI检索
本篇分为两部分: 一.地图标注 第一步:首先创建 BMKMapView 视图 第二步:在视图完全显示出来后设置,并实现代理方法 第三步:运行程序,此时大头针效果可以正常显示 二.POI检索 第一步:延 ...
- [转] 基于ArcGISServer实现活动地图标注
——王嘉彬(Esri中国上海分公司) 1.背景 1.1.主流互联网地图应用的现状 在目前主流的互联网地图应用中,如 Google Map(图 1).搜狗地图(图2),POI 兴趣点的文字标注越来越多的 ...
- ios开发,地图标注聚集。搜索标注title功能
最近在做地图功能,要实现的就是地图标注聚集,还有搜索地图 地图标注通常都是大头针.如果地图缩小到一定范围的时候,会显示密密麻麻的大头针.这样会显的难看 所以设计了一定区域范围内的大头针,缩小的时候给聚 ...
- 一款基于jQuery的图片场景标注提示弹窗特效
今天给大家分享一款基于jQuery的图片场景标注提示弹窗特效,这款实例适合在图片上标注某个物件,单击弹出详情说明,兼容360.FireFox.Chrome.Safari.Opera.傲游.搜狗.世界之 ...
- 51地图标注接口(EZMarker API)
功能 在很多时候,您需要您的用户标出一个位置,比如:一个房地产网站,用户在登记新楼盘的时候,就需要在地图上标出这个楼盘的位置,这个时候就可以用到本接口. 地图标注接口(EZMarker API)是我要 ...
- Vue中使用百度地图——设置地图标注
知识点:创建Map实例,为指定的位置设置标注 参考博客:https://www.cnblogs.com/liuswi/p/3994757.html 1.效果图:初始化地图,设置指定经纬度为地图中心点坐 ...
- 百度地图标注及结合ECharts图谱数据可视化
本示例中根据企业位置经纬度,在页面右侧百度地图中标注企业名称.同时页面左侧ECharts图谱饼状图用于统计企业行业与注册资本.当右侧百度地图缩放拖拽,左侧ECharts图谱根据右侧地图上出现的企业动态 ...
- vue项目使用openlayers来添加地图标注,标注样式设置的简要模板
先把代码贴出来,注释以后有时间再写(需要留意一下这里图标的引入方式,函数内相同路径无法找到图片) import sk from "../../assets/img/home/sk-activ ...
- openlayers 添加标记点击弹窗 定位图标闪烁
环境vue3.0 ,地图为公用组件,将添加图标标记的方法放在公共地图的初始化方法里 同一时间弹窗和定位标识都只有一个,因而我把弹窗和定位标记的dom预先写好放到了页面 //矢量标注样式设置函数,设置i ...
- 百度地图Api详解之地图标注
标注概述 标注(Marker)是用来表示一个点位置的可见元素,每个标注自身都包含地理信息.比如你在西单商场位置添加了一个标注,不论地图移动.缩放,标注都会跟随一起移动,保证其始终指向正确的地理位置. ...
随机推荐
- 单一JVM同步锁实现
同步锁实现 一.背景 在并发场景下,需要单一线程或限定并发数操作某些逻辑,这时候就需要用到一个锁来保证线程安全. 二.思路 使用ConcurrentHashMap实现,但只支持同一个jvm下的线程(暂 ...
- IdentityServer4的最佳使用
简介 本人做微服务项目也有一段时间了,在微服务中让我感触颇深的就是这个IdentityServer4了,ID4(IdentityServer4的简称)中涉及的概念颇多,本文不谈概念(我怕读者没耐心 ...
- before-after-hook钩子函数
before-after-hook 最近看别人的代码,接触到一个插件,before-after-hook,百度搜一圈也没有看到什么地方有教程,看这个字面意思是一个hook,和axios里面的拦截器,v ...
- 认识一下 Mobx
我们是袋鼠云数栈 UED 团队,致力于打造优秀的一站式数据中台产品.我们始终保持工匠精神,探索前端道路,为社区积累并传播经验价值. 本文作者:霜序(掘金) 前言 在之前的文章中,我们讲述了 React ...
- Dubbo架构设计与源码解析(三)责任链模式
作者:周可强 一.责任链模式简介 1.责任链模式定义 责任链(Chain of Responsibility)模式的定义:为了避免请求发送者与多个请求处理者耦合在一起,于是将所有请求的处理者通过前一对 ...
- MongoDB 索引原理与索引优化
转载请注明出处: 1.MongoDB索引 索引通常能够极大的提高查询的效率, 如果没有索引, MongoDB 在读取数据时必须扫描集合中的每个文件并选取那些符合查询条件的记录.这种扫描全集合的查询效率 ...
- Window注册表的学习记录
注册表的结构: 概述:注册表是一种树状结构,在很早之前是系统的其他配置信息存放的文件,通常以.ini结尾的文件,因为数量太多不方便管理,后来就整合在一起形成了注册表.你可以按住键盘win+r,然后输入 ...
- 【博学谷学习记录】超强总结,用心分享|前端开发HTML知识总结
HTML知识总结 字体加粗标签 注释快捷键 Ctrl + / 代码后缩进:shift + tad 1HTML标签 1.1排版标签介绍 1.1.1标题标签 <h1>1级标题<h1/&g ...
- python之路45 初识django框架
纯手撸web框架 1.web框架的本质 理解1:连接前端与数据库的中间介质 理解2:socket服务端 2.手写web框架 1.编写socket服务端代码 2.浏览器访问响应无效>>> ...
- 企业应用架构研究系列二十五:IdentityServer4 认证服务搭建
IdentityServer4 更新了开源协议,曾经想替换它,不在使用IdentityServer4 ,但是后来,研究来研究去,发现IdentityServer4 的功能实在是强大,设计体系完整,随着 ...