selenium web控件的交互进阶
Action
ActionChains: 执行PC端的鼠标点击,双击,右键,拖曳等事件
TouchActions: 模拟PC和移动端的点击,滑动,拖曳,多点触控等多种手势操作
动作链接 ActionChains
执行原理:
调用 ActionChains 方法的时候,不会立刻执行,而是将所有的操作放到一个队列里面,当调用 perform() 方法的时候,队列的事件就会依次执行
基本用法:
- 生成一个动作 actions =ActionChains(driver)
- 动作添加方法1 actions.move_to_element(menu)
- 动作添加方法2 actions.click(hidden_submenu)
- 调用 actions.perform() 方法执行
具体写法:
- 链式写法
ActionChains(driver).move_to_element(menu).click(hidden_submenu).perform()
- 分布写法
actions =ActionChains(driver)

actions.move_to_element(menu)

actions.click(hidden_submenu)

actions.perform()
ActionChains 具体用法
用法一: 点击,右键,双击操作
actions =ActionChains(driver)

actions.click(element)

actions.double_click(element)

actions.context_click(element)

actions.perform()
测试网站: https://sahitest.com/demo/clicks.htm
#!/usr/bin/env python

# -*- encoding: utf-8 -*-

'''

@File        :test_02.py

@Describe    :

@Create      :2021/06/23 00:16:26

@Author      :od

'''

import pytest

import time

from selenium import webdriver

from selenium.webdriver.chrome.options import Options

from selenium.webdriver.support.wait import WebDriverWait

from selenium.webdriver.support import expected_conditions

from selenium.webdriver.common.by import By

from selenium.webdriver import ActionChains

class TestActions:

    def setup(self):

        self.chrome_options = Options()

        self.chrome_options.add_experimental_option("debuggerAddress", "127.0.0.1:9222")  # 指定配置好的 chrom

        self.chrome_driver = r"./chromedriver.exe"  # 驱动路径

        self.driver = webdriver.Chrome(self.chrome_driver, chrome_options=self.chrome_options)  # 加入驱动设置

        # self.driver.get('https://sahitest.com/demo/clicks.htm')  # 发起请求

        # self.driver.maximize_window()  # 设置为最大化

        self.driver.implicitly_wait(3)  # 添加一个隐式等待默认等待3秒

    def teardown(self):

        print('关闭浏览器')

        time.sleep(1)

        # self.driver.quit()

    # 测试用例如果不加sleep的话,元素如果没加载出来,是会报错的,所以我们要加个隐式等待

    def test_clicks(self):

        print('go')

        dbl_click_me = self.driver.find_element_by_xpath("//input[@value='dbl click me']")  # 双击

        click_me = self.driver.find_element_by_xpath("//input[@value='click me']")  # 单击

        right_me = self.driver.find_element_by_xpath("// input[ @ value='right click me']")  # 右键

        action = ActionChains(self.driver)  # 初始化

        action.click(click_me)  # 点击一次

        action.double_click(dbl_click_me)  # 双击两次

        action.context_click(right_me)  # 右键一次

        action.perform()  # 启动

if __name__ == '__main__':

    pytest.main(['-vs', "test_action.py::TestActions"])
用法2
鼠标移动到某个元素上面
action = ActionChains(self.driver)

action.move_to_element(element)

action.perform()
增加一个移动的测试用例, 测试网址为 百度 移动鼠标到百度的设置,会出现下拉框
#!/usr/bin/env python

# -*- encoding: utf-8 -*-

import pytest

import time

from selenium import webdriver

from selenium.webdriver.chrome.options import Options

from selenium.webdriver.support.wait import WebDriverWait

from selenium.webdriver.support import expected_conditions

from selenium.webdriver.common.by import By

from selenium.webdriver import ActionChains

class TestActions:

    def setup(self):

        self.chrome_options = Options()

        self.chrome_options.add_experimental_option("debuggerAddress", "127.0.0.1:9222")  # 指定配置好的 chrom

        self.chrome_driver = r"./chromedriver.exe"  # 驱动路径

        self.driver = webdriver.Chrome(self.chrome_driver, chrome_options=self.chrome_options)  # 加入驱动设置

        # self.driver.get('https://sahitest.com/demo/clicks.htm')  # 发起请求

        # self.driver.maximize_window()  # 设置为最大化

        self.driver.implicitly_wait(3)  # 添加一个隐式等待默认等待3秒

    def teardown(self):

        print('关闭浏览器')

        time.sleep(1)

        # self.driver.quit()

    # 测试用例如果不加sleep的话,元素如果没加载出来,是会报错的,所以我们要加个隐式等待

    @pytest.mark.skip  # 不想执行这个测试用例可以加这个装饰器跳过

    def test_clicks(self):

        print('go')

        dbl_click_me = self.driver.find_element_by_xpath("//input[@value='dbl click me']")  # 双击

        click_me = self.driver.find_element_by_xpath("//input[@value='click me']")  # 单击

        right_me = self.driver.find_element_by_xpath("// input[ @ value='right click me']")  # 右键

        action = ActionChains(self.driver)  # 初始化

        action.click(click_me)  # 点击一次

        action.double_click(dbl_click_me)  # 双击两次

        action.context_click(right_me)  # 右键一次

        action.perform()  # 启动

    def test_movie(self):

        self.driver.get('https://www.baidu.com/')  # 发起请求

        move_mouse = self.driver.find_element_by_xpath("//span[@id='s-usersetting-top']")  # 定位移动u元素

        action = ActionChains(self.driver)  # 初始化

        action.move_to_element(move_mouse)   # 移动光到设置去

        action.perform()  # 启动

if __name__ == '__main__':

    pytest.main(['-vs', "test_action.py::TestActions"])
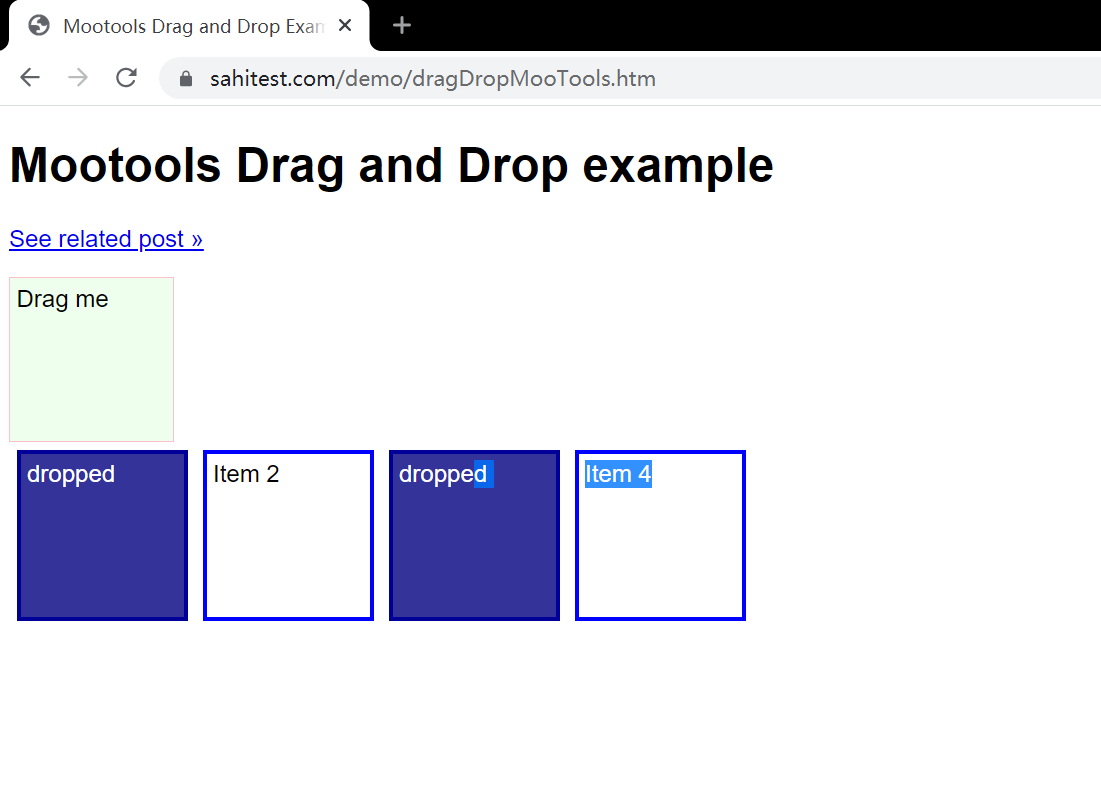
测试demo 2 网址为: https://sahitest.com/demo/dragDropMooTools.htm
代码大致同上, 增加一个跳过百度的装饰器,然后在下面新增一个方法 test_move2, 进行一个拖拽
   def test_movie2(self):

        self.driver.get('https://sahitest.com/demo/dragDropMooTools.htm')  # 发起请求

        drag_element = self.driver.find_element_by_xpath('//*[@id="dragger"]')  # 拿起元素

        drop_element1 = self.driver.find_element_by_xpath("/html/body/div[2]")  # 放下元素

        drop_element2 = self.driver.find_element_by_xpath('/html/body/div[3]')  # 放下元素

        drop_element3 = self.driver.find_element_by_xpath("/html/body/div[4]")  # 放下元素

        drop_element4 = self.driver.find_element_by_xpath("/html/body/div[5]")  # 放下元素

        action = ActionChains(self.driver)  # 初始化

        action.drag_and_drop(drag_element, drop_element1).drag_and_drop(drag_element, drop_element2).drag_and_drop(drag_element, drop_element3).drag_and_drop(drag_element,

        drop_element4).perform() #链式写法perform
但是,如果这样写会出现一个情况
查了很多帖子,也不知道为什么会这样,有个模糊点的答案就是
因为ActionChains这个方法的动作添加是添加到一个list中,重复使用可能会出一些不可预知的问题
所以需要每次最好遇到行不懂的情况就重新写实例一个action, 改写如下
    def test_movie2(self):

        self.driver.get('https://sahitest.com/demo/dragDropMooTools.htm')  # 发起请求

        drag_element = self.driver.find_element_by_xpath('//*[@id="dragger"]')  # 拿起元素

        drop_element1 = self.driver.find_element_by_xpath("/html/body/div[2]")  # 放下元素

        drop_element2 = self.driver.find_element_by_xpath('/html/body/div[3]')  # 放下元素

        drop_element3 = self.driver.find_element_by_xpath("/html/body/div[4]")  # 放下元素

        drop_element4 = self.driver.find_element_by_xpath("/html/body/div[5]")  # 放下元素

        action = ActionChains(self.driver)  # 初始化

        action.drag_and_drop(drag_element, drop_element1).perform()

        time.sleep(1)

        action2 = ActionChains(self.driver)  # 初始化

        action2.drag_and_drop(drag_element, drop_element2).perform()

        time.sleep(1)

        action3 = ActionChains(self.driver)  # 初始化

        action3.drag_and_drop(drag_element, drop_element3).perform()

        time.sleep(1)

        action4 = ActionChains(self.driver)  # 初始化

        action4.drag_and_drop(drag_element, drop_element4).perform()
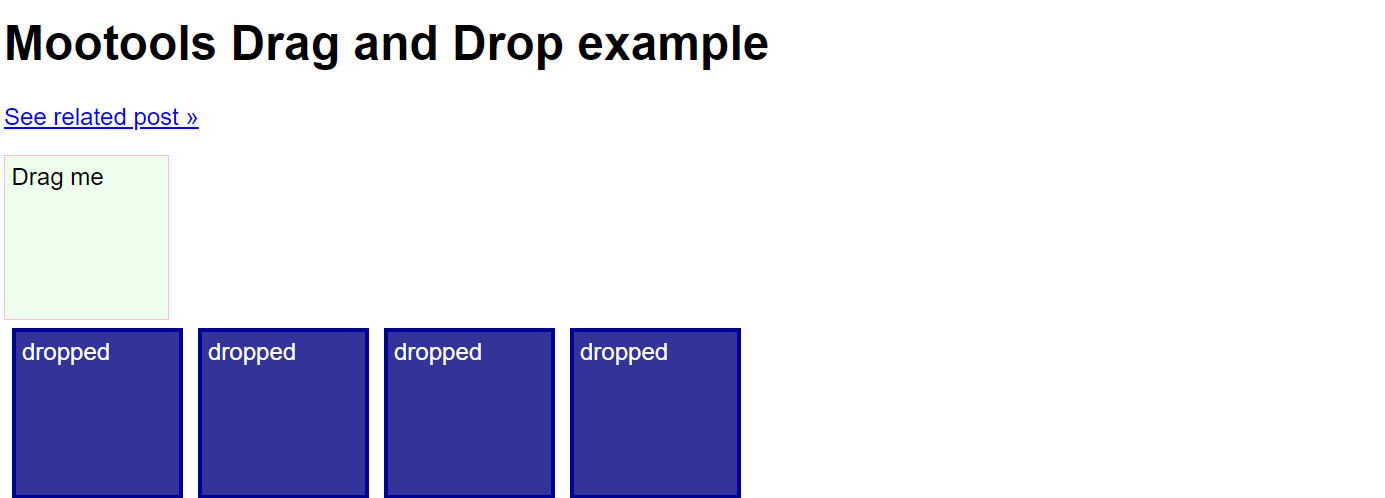
改三。。。发现是没有暂停时间的问题。。。以下代码也是可以的
def test_movie2(self):

        self.driver.get('https://sahitest.com/demo/dragDropMooTools.htm')  # 发起请求

        drag_element = self.driver.find_element_by_xpath('//*[@id="dragger"]')  # 拿起元素

        drop_element1 = self.driver.find_element_by_xpath("/html/body/div[2]")  # 放下元素

        drop_element2 = self.driver.find_element_by_xpath('/html/body/div[3]')  # 放下元素

        drop_element3 = self.driver.find_element_by_xpath("/html/body/div[4]")  # 放下元素

        drop_element4 = self.driver.find_element_by_xpath("/html/body/div[5]")  # 放下元素

        action = ActionChains(self.driver)  # 初始化

        action.drag_and_drop(drag_element, drop_element1).pause(1).drag_and_drop(drag_element, drop_element2).pause(1).drag_and_drop(drag_element, drop_element3).pause(1).drag_and_drop(drag_element, drop_element4).pause(1).perform() # pause(1) 代表暂停1秒
用法 三
使用ActionChains模拟按键方法。用法如下
action = ActionChains(self.driver)

action.send_keys(Keys.BACK_SPACE)

# 或者action.key_down(Keys.CONTROL).send_keys('a').key_up(Keys.CONTROL)

action.perform()
测试网址: https://sahitest.com/demo/label.htm
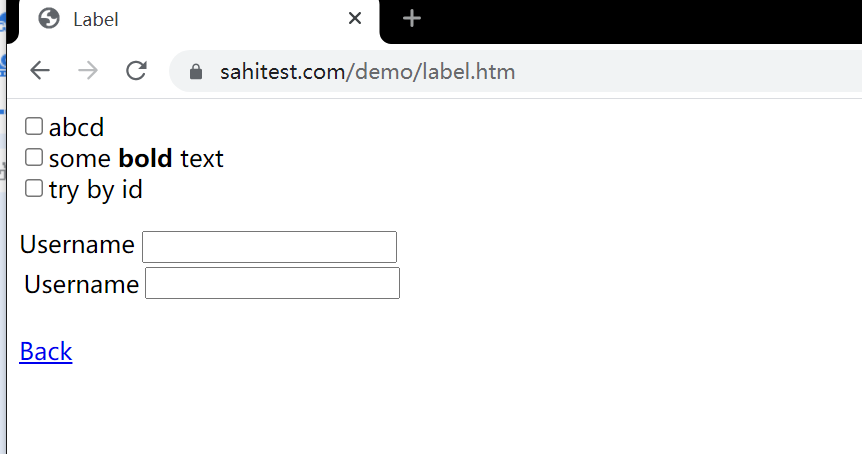
测试效果,
1、在第一个 Username 中填入 lakes james,
2、 在第二个输入框使用全选,复制,粘贴到输入框
def test_movie3(self):

        url = 'https://sahitest.com/demo/label.htm'

        usernames = 'lakes'

        passwds = 'james'

        self.driver.get(url)  # 发起请求

        click_element = self.driver.find_element_by_xpath("//label[contains(text(),'Username')]//input[@type='textbox']")  # 选中第一个框

        second_element = self.driver.find_element_by_xpath("/html/body/label[2]/table/tbody/tr/td[2]/input")

        action = ActionChains(self.driver)

        action.click(click_element).pause(1).send_keys(usernames).pause(0.5).send_keys(Keys.SPACE).pause(1).send_keys(f'{passwds}').pause(1).send_keys(        Keys.BACK_SPACE).pause(1).key_down(Keys.CONTROL).send_keys('a').pause(1).key_down(Keys.CONTROL).send_keys('c').pause(2).click(second_element).pause(1).key_down(Keys.CONTROL).send_keys('v').perform()

          # 1、点击第一个元素然后等待1秒然后发送username和空格然后发送密码过去然后发送一个删除1个字母,然后全选然后点击复制,然后点击第二个元素,然后粘贴上去

          # 2、ctrl + a 不能通过 action.send_keys(Keys.CONTROL, "a") 直接发送,需要 key_down之后再 send_keys再然后 key_up(Keys.CONTROL)

Keys 类键盘操作的常用方法:
Keys 类键盘操作的常用方法:

引入Keys类:

    from selenium.webdriver.common.keys import Keys

常用方法:

  send_keys(Keys.BACK_SPACE) 删除键(BackSpace)

  send_keys(Keys.SPACE)  空格键(Space)

  send_keys(Keys.TAB)  制表键(Tab)

  send_keys(Keys.ESCAPE)  回退键(Esc)

  send_keys(Keys.ENTER) 回车键(Enter)

  send_keys(Keys.CONTROL,'a') 全选(Ctrl+A)

  send_keys(Keys.CONTROL,'c') 复制(Ctrl+C)

  send_keys(Keys.CONTROL,'x') 剪切(Ctrl+X)

  send_keys(Keys.CONTROL,'v') 粘贴(Ctrl+V)

...

#输入框输入内容

driver.find_element_by_id("kw1").send_keys("seleniumm")

time.sleep(3)

#删除多输入的一个m

driver.find_element_by_id("kw1").send_keys(Keys.BACK_SPACE)

time.sleep(3)

...
TouchAction用法
ActionChains和TouchAction可以用来模拟点击、双击、滑动等事件。ActionChains用于执行PC端的鼠标移动、按键、拖拽等事件;TouchActions用法与ActionChains类似,可以用来模拟PC和移动端的点击、滑动、拖拽等手势操作。,
ActionChains和TouchAction都是将动作存储在队列中,然后执行perform()方法,按队列顺序执行动作。
手势控制方法
double_tap 双击

flick 滑动

flick_element 从某个元素位置开始滑动

long_press 长按

move 手势移动指定偏移

Perform 执行

release 释放手势

scroll 点击并滚动

scroll_from_element 从某个元素位置开始手势点击并滚动(向下滑动为负数,向上滑动为正数)

flick_element——从某个元素位置开始手势滑动(负数:向上滑动,正数:向下滑动)

tap 在指定元素上点击

tap_and_hold 在指定元素上点击但不释放
例子: 打开百度搜索然后搜索湖人,下拉滑动到尽头
from selenium.webdriver import TouchActions

def test_serarch(self):

        url = 'https://www.baidu.com/'

        kw = '湖人'

        self.driver.get(url)  # 发起请求

        input_element = self.driver.find_element_by_xpath("//input[@id='kw']")  # 选中输入框

        input_element.send_keys(kw)  # 对选中的输入文字

        search = self.driver.find_element_by_id("su")  # 点击搜索

        action = TouchActions(self.driver)  # 初始化一个action

        action.tap(search).perform()  # 点击确认等待2秒之后执行, 并执行

        action.scroll_from_element(input_element, 0, 10000).perform()  # 传入三个元素。第一个元素是选定的起点,x,y 是滚动的偏移量
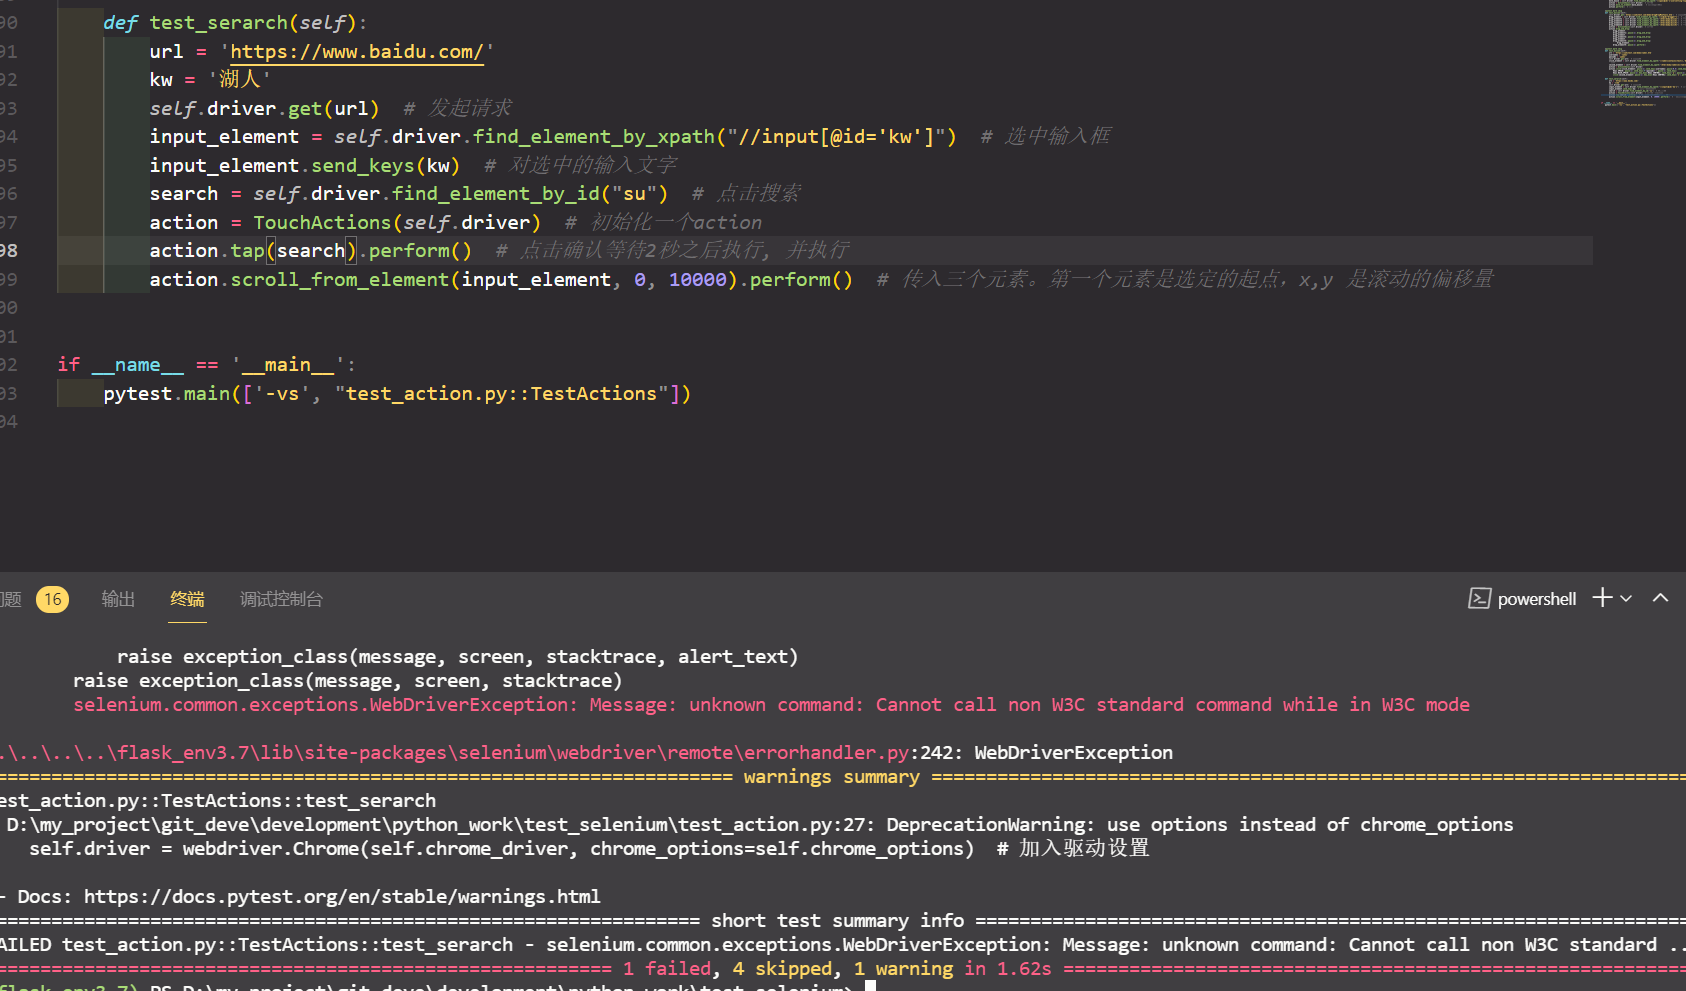
但是会报错,所以我们要对初始化的时候进行点修改
def setup(self):

        self.chrome_options = Options()

        self.chrome_options.add_experimental_option("debuggerAddress", "127.0.0.1:9222")  # 指定配置好的 chrom

        self.chrome_options.add_experimental_option("w3c", False) # 设置为w3c

        self.chrome_driver = r"./chromedriver.exe"  # 驱动路径

        self.driver = webdriver.Chrome(self.chrome_driver, chrome_options=self.chrome_options)  # 加入驱动设置

        # self.driver.get('https://sahitest.com/demo/clicks.htm')  # 发起请求

        # self.driver.maximize_window()  # 设置为最大化

        self.driver.implicitly_wait(3)  # 添加一个隐式等待默认等待3秒

    def teardown(self):

        print('关闭浏览器')

        # time.sleep(1)
selenium web控件的交互进阶的更多相关文章
- 2015.2.16 关于delphi web控件打开新网页时弹出关闭页面(js代码)出错的解决办法研究
参考网址1:http://www.csharpwin.com/csharpspace/2360.shtml...参考网址2:http://www.oschina.net/question/234345 ...
- 033. asp.netWeb用户控件之二将页面转换成web控件和使用Web控件显示热点新闻
访问Web用户控件的属性 ASP.NET提供的各种服务器控件都有其自身的属性和方法,程序开发人员可以灵活地使用服务器控件中的属性和方法开发程序.在用户控件中,程序开发人员也可以自行定义各种属性和方法, ...
- [MFC] MFC 打开HTML资源(用ID版,也可加载到自己的web控件上)
@ ^ @:如果是加载到web控件上,就把注释掉的解除注释(改为web控件点后面的函数),把下一句注释 BOOL Button::LoadFromResource(UINT nRes){//打开网页加 ...
- 译:c#生成条码的web控件
译文:http://www.codeproject.com/Tips/846860/Csharp-Barcode-Generator-Web-Control 在asp.net的web页用c#的web控 ...
- Javascript语法去控制Web控件的Enabled属性
Web控件当使用Enabled属性时,它生成html之后会变成了disabled了.我们为了能够在javascript去控制控件的禁用与启用,得从这个disabled入手.如:
- Web控件文本框Reset的功能
在前一篇中<怎样实现Web控件文本框Reset的功能>http://www.cnblogs.com/insus/p/4120889.html Insus.NET只实现了文本框的功能.单个或 ...
- 怎样实现Web控件文本框Reset的功能
在ASP.NET开发过程序,在数据插入之后,文本框TextBox控件需要Reset.如果只有一两个文件框也许没有什么问题,如果网页上有很多文本框,你就会有点问题了.再加上某一情形,一些文本框是有默认值 ...
- 基本的Web控件四
基本的Web控件用法二 ListBox控件 页面布局: <div> <h1>ListBox控件</h1> 学生列表: <br/> <asp:Lis ...
- 基本的Web控件三
基本的Web控件用法一 ListBox控件 页面布局: <div> <h1>ListBox控件</h1> 学生列表: <br/> <asp:Lis ...
- 基本的Web控件一
ASP.NET提供了与HTML元素相对应的基本Web控件,ASP.NET提供的基本的Web控件如下: 基本的Web控件 对应的HTML元素 Label ----------------- ...
随机推荐
- ArcEngine(平板电脑墨迹错误代码。多次调用 RtpEnabled (异常来自 HRESULT:0x80040239))问题未有效解决
测试数据库中的要素无法执行ITopologicOperater接口下的方法,错误如图 暂记,错误未解决 tip: 1.随便移动一个节点 也不报错/ 2.手动按照他的节点画一个也不报错 3.bufer参 ...
- 登录:ORA-12504:TNS:监听程序在CONNECT_DATA中未获得SERVICE_NAME
问题描述:在用pl/sql登录soctt用户时,显示: 解决办法:在tnsnames.ora文件中添加(文件位置的查找方法见文章末尾) ORCL = (DESCRIPTION = (ADDRESS = ...
- Unity打Android包报错总结 长期更新
报错1 Failed to compile resources with the following parameters: -bootclasspath "E:\software\And ...
- 远程云服务器上docker安装redis的过程
首先明确一点,云服务环境你已经安装好了docker 1.进入docker hub官网查看你所需要的redis的版本信息 https://registry.hub.docker.com/
- celery介绍安装以及基本使用步骤
目录 一.关于celery 二.celery架构的构成 1 任务中间件 Broker, 2 任务执行单元 worker 3 结果存储 backend 三.celery的应用场景 1. 异步执行:解决耗 ...
- MAC范洪攻击-macof
macof 目的:攻击交换机的路由表,实现网络信息嗅探 macof是dsniff中的一个小工具 概要:交换机中存在着一个记录着MAC地址的表,为了完成数据的快速转发,这个表有着自动学习机制,学习后可以 ...
- MybatisPlus------代码生成器
快速开发: 代码生成器: (1)模版:MyBatisPlus提供 (2)数据库相关配置:读取数据库获取信息 (3)开发者自定义配置:手工配置 package com.ithema; import co ...
- 《操作系统导论》读书笔记1——CPU虚拟化,进程
系列文章目录和关于我 一丶CPU的虚拟化 一个桃子,我们称之为物理(physical)桃子.但有很多想吃这个桃子的 人,我们希望向每个想吃的人提供一个属于他的桃子,这样才能皆大欢喜.我们把给每个 人的 ...
- day08-自定义转换器&处理JSON&内容协商
自定义转换器&处理JSON&内容协商 1.自定义转换器 1.1基本介绍 SpringBoot 在响应客户端请求时,将提交的数据封装成对象时,使用了内置的转换器,也就是自动帮我们封装对象 ...
- Cesium官方教程——Fabric
1.简介 Fabric 是Cesium中定义的描述材质Material的JSON 结构体.Material代表了一个物体的外观. 材质Material可以是比较简单的,比如直接将一张图片赋予表面,或者 ...