KVM虚拟机的管理
1. 查看KVM虚拟机配置文件及运行状态
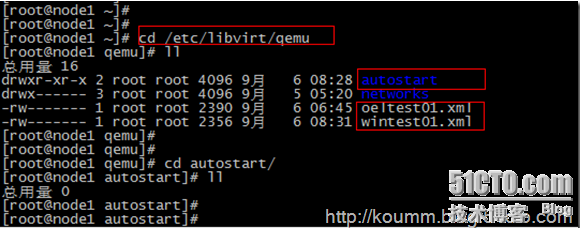
(1) KVM虚拟机默认配置文件位置: /etc/libvirt/qemu/
autostart目录是配置kvm虚拟机开机自启动目录
(2) virsh命令帮助
# virsh -help
或直接virsh命令和,再执行子命令。如下所示。
[root@node1 ~]# virsh
欢迎使用 virsh,虚拟化的交互式终端。
输入:'help' 来获得命令的帮助信息
'quit' 退出
virsh # help
……
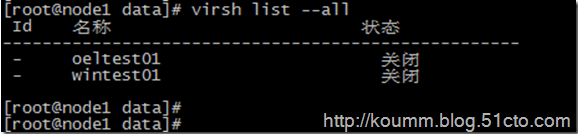
(3) 查看kvm虚拟机状态
# virsh list --all
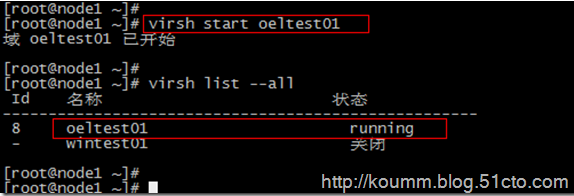
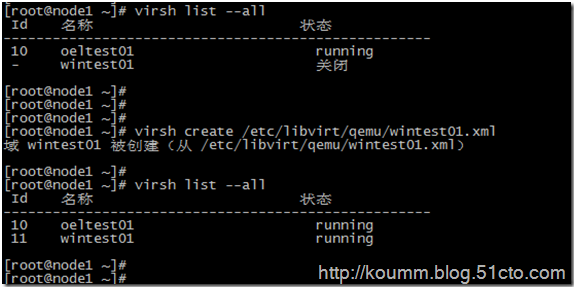
2. KVM虚拟机开机
# virsh start oeltest01
3. KVM虚拟机关机或断电
(1) 关机
默认情况下virsh工具不能对linux虚拟机进行关机操作,linux操作系统需要开启与启动acpid服务。在安装KVM linux虚拟机必须配置此服务。
# chkconfig acpid on
# service acpid restart
virsh关机
# virsh shutdown oeltest01

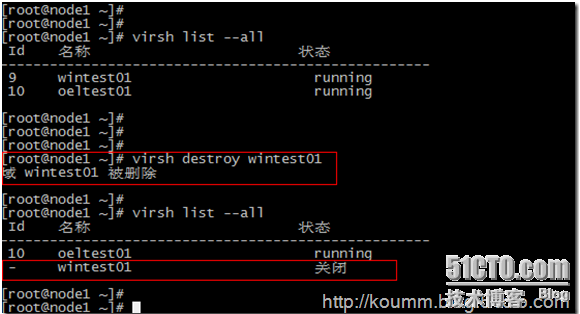
(2) 强制关闭电源
# virsh destroy wintest01
4. 通过配置文件启动虚拟机
# virsh create /etc/libvirt/qemu/wintest01.xml
5. 配置开机自启动虚拟机
# virsh autostart oeltest01

autostart目录是kvm虚拟机开机自启动目录,可以看到该目录中有KVM配置文件链接
6. 导出KVM虚拟机配置文件
# virsh dumpxml wintest01 > /etc/libvirt/qemu/wintest02.xml
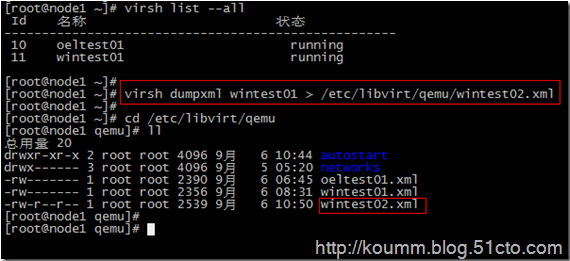
KVM虚拟机配置文件可以通过这种方式进行备份
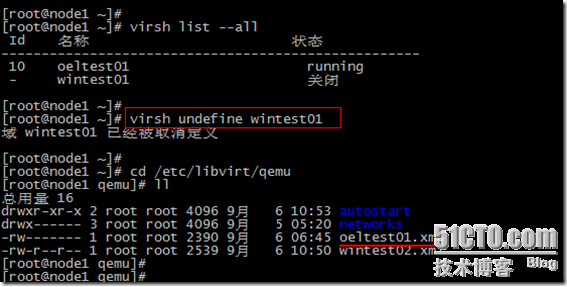
7. 添加与删除KVM虚拟机
(1) 删除kvm虚拟机
# virsh undefine wintest01
说明:该命令只是删除wintest01的配置文件,并不删除虚拟磁盘文件。如下图所示。
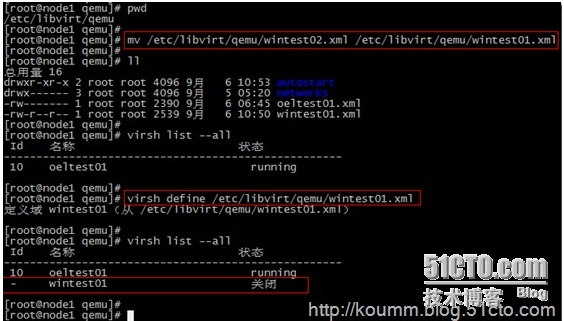
(2) 重新定义虚拟机配置文件
通过导出备份的配置文件恢复原KVM虚拟机的定义,并重新定义虚拟机。
# mv /etc/libvirt/qemu/wintest02.xml /etc/libvirt/qemu/wintest01.xml
# virsh define /etc/libvirt/qemu/wintest01.xml
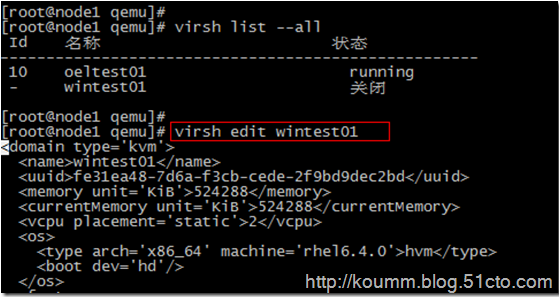
8. 编辑KVM虚拟机配置文件
# virsh edit wintest01
virsh edit将调用vi命令编辑/etc/libvirt/qemu/wintest01.xml配置文件。也可以直接通过vi命令进行编辑,修改,保存。
可以但不建议直接通过vi编辑
[root@node1 qemu]# vi /etc/libvirt/qemu/wintest01.xml
<!--

WARNING: THIS IS AN AUTO-GENERATED FILE. CHANGES TO IT ARE LIKELY TO BE

OVERWRITTEN AND LOST. Changes to this xml configuration should be made using:

virsh edit wintest01

or other application using the libvirt API.

-->

<domain type='kvm'>

<name>wintest01</name>

<uuid>fe31ea48-7d6a-f3cb-cede-2f9bd9dec2bd</uuid>

<memory unit='KiB'>524288</memory>

<currentMemory unit='KiB'>524288</currentMemory>

<vcpu placement='static'>2</vcpu>

<os>

<type arch='x86_64' machine='rhel6.4.0'>hvm</type>

<boot dev='hd'/>

</os>

<features>

<acpi/>

<apic/>

<pae/>

</features>

<clock offset='utc'/>

<on_poweroff>destroy</on_poweroff>

<on_reboot>restart</on_reboot>

<on_crash>restart</on_crash>

<devices>

<emulator>/usr/libexec/qemu-kvm</emulator>

<disk type='file' device='disk'>

<driver name='qemu' type='raw' cache='none'/>

<source file='/data/wintest01.img'/>

<target dev='hda' bus='ide'/>

<address type='drive' controller='0' bus='0' target='0' unit='0'/>

</disk>

<disk type='block' device='cdrom'>

<driver name='qemu' type='raw'/>

<target dev='hdc' bus='ide'/>

<readonly/>

<address type='drive' controller='0' bus='1' target='0' unit='0'/>

</disk>

<controller type='usb' index='0'>

<address type='pci' domain='0x0000' bus='0x00' slot='0x01' function='0x2'/>

</controller>

<controller type='ide' index='0'>

<address type='pci' domain='0x0000' bus='0x00' slot='0x01' function='0x1'/>

</controller>

<interface type='bridge'>

<mac address='52:54:00:2b:2f:fe'/>

<source bridge='br0'/>

<address type='pci' domain='0x0000' bus='0x00' slot='0x03' function='0x0'/>

</interface>

<serial type='pty'>

<target port='0'/>

</serial>

<console type='pty'>

<target type='serial' port='0'/>

</console>

<input type='mouse' bus='ps2'/>

<graphics type='vnc' port='5911' autoport='no' listen='0.0.0.0'>

<listen type='address' address='0.0.0.0'/>

</graphics>

<video>

<model type='cirrus' vram='9216' heads='1'/>

<address type='pci' domain='0x0000' bus='0x00' slot='0x02' function='0x0'/>

</video>

<memballoon model='virtio'>

<address type='pci' domain='0x0000' bus='0x00' slot='0x04' function='0x0'/>

</memballoon>

</devices>

<seclabel type='none'/>

</domain>
9. virsh console 控制台管理linux虚拟机
配置virsh console见下文
# virsh console oeltest01
10. 其它virsh命令
(1) 挂起服务器
# virsh suspend oeltest01

(2) 恢复服务器
# virsh resume oeltest01

virsh命令丰富。可以执行各种维护任务,本文只是从维护与管理的角度例举了常用的命令,为该命令的使用提供一个思路。
KVM虚拟机的管理的更多相关文章
- kvm虚拟机日常管理和配置操作命令梳理
KVM虚拟机的管理主要是通过virsh命令对虚拟机进行管理.1)查看KVM虚拟机配置文件及运行状态KVM虚拟机默认配置文件位置: /etc/libvirt/qemu/autostart目录是配置kvm ...
- kvm虚拟化学习笔记(四)之kvm虚拟机日常管理与配置
KVM虚拟化学习笔记系列文章列表----------------------------------------kvm虚拟化学习笔记(一)之kvm虚拟化环境安装http://koumm.blog.51 ...
- KVM 虚拟机基本管理及常用命令
KVM的基本管理 1.查看KVM虚拟机配置文件 #Kvm虚拟机默认配置文件位置 [root@kvm qemu]# pwd /etc/libvirt/qemu [root@kvm qemu]# ll t ...
- KVM -> 虚拟机磁盘管理_03
1.KVM磁盘管理 1.KVM qcow2.raw.vmdk等镜像格式说明:http://blog.csdn.net/zhengmx100/article/details/53887162 raw: ...
- Linux下KVM虚拟机基本管理及常用命令(转)
说明:可能有重复 一.KVM的基本管理 1.查看KVM虚拟机配置文件 #Kvm虚拟机默认配置文件位置 [root@kvm qemu]# pwd /etc/libvirt/qemu [root@kvm ...
- kvm虚拟机日常管理与配置
1. 查看KVM虚拟机配置文件及运行状态 (1) KVM虚拟机默认配置文件位置: /etc/libvirt/qemu/ autostart目录是配置kvm虚拟机开机自启动目录. (2) vir ...
- kvm虚拟机日常操作命令梳理
KVM虚拟机的管理主要是通过virsh命令对虚拟机进行管理.废话不多说,下面列出kvm日常管理中的命令 1)查看KVM虚拟机配置文件及运行状态 KVM虚拟机默认配置文件位置: /etc/libvirt ...
- kvm虚拟机不能使用virsh shutdownw命令关闭虚拟机的解决方法
今天笔者在对kvm虚拟机进行管理时,使用virsh shutdown命令关闭指定的虚拟机时,发现虽然有如下的提示,但其实虚拟机却一直不会真正的关闭. 经过查看virsh命令帮助和上网查询,才得知vir ...
- kvm虚拟化学习笔记(三)之windows kvm虚拟机安装
KVM虚拟化学习笔记系列文章列表----------------------------------------kvm虚拟化学习笔记(一)之kvm虚拟化环境安装http://koumm.blog.51 ...
随机推荐
- DevExpress v18.1 下载和教程文档
http://www.zdfans.com/html/18682.html 教程文档 https://blog.csdn.net/AABBbaby/article/details/81094482 下 ...
- 02点睛Spring4.1-Java Config
转载:https://www.iteye.com/blog/wiselyman-2210376 2.1 java config spring的java config主要使用@Configuration ...
- redis 队列模式
1.插入队列(生产者) private static RedisClient client = new RedisClient("127.0.0.1", 6379, null);c ...
- 查看Mysql是否开启binlog
show variables like 'log_bin';
- certutil在传输payload中的新奇技巧
好久没更新博客了,最近在实习的过程中还是见识到不少东西. 不多说,直接开始正文. 首先说一下certutil在渗透测试中用到的特别多,下载文件,计算hash,以及base64编码等等. 在这里介绍ba ...
- 原生js 实现better-scroll效果,饿了么菜单内容联动,即粘即用
<!DOCTYPE html> <html> <head> <meta http-equiv="Content-Type" content ...
- .NET Core 配置文件
老一代配置系统 1,XML格式 格式单一. 2,配置信息Kye,只能一维化配置 3,框架信息和应用程序信息混合到一起 应用程序中是 App.config web项目中 web.co ...
- PAT(B) 1062 最简分数(Java)
题目链接:1062 最简分数 (20 point(s)) 题目描述 一个分数一般写成两个整数相除的形式:N/M,其中 M 不为0.最简分数是指分子和分母没有公约数的分数表示形式. 现给定两个不相等的正 ...
- Python后台执行不启用缓存
1.运行时加-u参数,如 # python3 -u test.py >> test.log & 用man查看python的-u参数,说明如下: Force stdin, stdou ...
- Android studio 3.1.3真机调试报错,no target device found
Android studio 3.1.2 的 Android monitor 改为 Android profiler,直接点这个就可以真机调试,在手机安装相应app 如果不行,报错,"no ...