Spring Kafka和Spring Boot整合实现消息发送与消费简单案例
本文主要分享下Spring Boot和Spring Kafka如何配置整合,实现发送和接收来自Spring Kafka的消息。
先前我已经分享了Kafka的基本介绍与集群环境搭建方法。关于Kafka的介绍请阅读Apache Kafka简介与安装(一),关于Kafka安装请阅读Apache Kafka安装,关于Kafka集群环境搭建请阅读Apache Kafka集群环境搭建 。这里关于服务器环境搭建不在赘述。
Spring Kafka整合Spring Boot创建生产者客户端案例
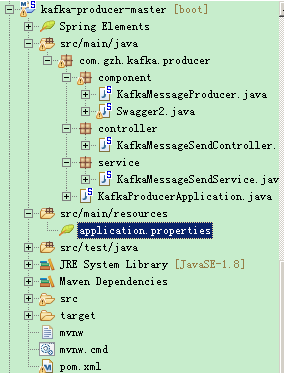
创建一个kafka-producer-master的maven工程。整个项目结构如下:
Maven的依赖
<?xml version="1.0" encoding="UTF-8"?>

<project xmlns="http://maven.apache.org/POM/4.0.0" xmlns:xsi="http://www.w3.org/2001/XMLSchema-instance"

    xsi:schemaLocation="http://maven.apache.org/POM/4.0.0 http://maven.apache.org/xsd/maven-4.0.0.xsd">

    <modelVersion>4.0.0</modelVersion>

    <groupId>com.gzh.kafka.producer</groupId>

    <artifactId>producer</artifactId>

    <version>0.0.1-SNAPSHOT</version>

    <packaging>jar</packaging>

    <name>kafka-producer-master</name>

    <description>demo project for kafka producer</description>

    <parent>

        <groupId>org.springframework.boot</groupId>

        <artifactId>spring-boot-starter-parent</artifactId>

        <version>1.5.9.RELEASE</version>

        <relativePath/> <!-- lookup parent from repository -->

    </parent>

    <properties>

        <project.build.sourceEncoding>UTF-8</project.build.sourceEncoding>

        <project.reporting.outputEncoding>UTF-8</project.reporting.outputEncoding>

        <spring-kafka.version>2.1.5.RELEASE</spring-kafka.version>

        <java.version>1.8</java.version>

    </properties>

    <dependencies>

        <dependency>

            <groupId>org.springframework.boot</groupId>

            <artifactId>spring-boot-starter</artifactId>

        </dependency>

        <!-- https://mvnrepository.com/artifact/org.springframework.kafka/spring-kafka -->

        <dependency>

            <groupId>org.springframework.kafka</groupId>

            <artifactId>spring-kafka</artifactId>

            <version>${spring-kafka.version}</version>

        </dependency>

        <dependency>

            <groupId>org.springframework.boot</groupId>

            <artifactId>spring-boot-starter-web</artifactId>

        </dependency>

        <dependency>

            <groupId>org.springframework.boot</groupId>

            <artifactId>spring-boot-starter-test</artifactId>

            <scope>test</scope>

        </dependency>

        <!-- https://mvnrepository.com/artifact/org.springframework.kafka/spring-kafka-test -->

        <dependency>

            <groupId>org.springframework.kafka</groupId>

            <artifactId>spring-kafka-test</artifactId>

            <version>${spring-kafka.version}</version>

            <scope>test</scope>

        </dependency>

        <!-- https://mvnrepository.com/artifact/io.springfox/springfox-swagger2 -->

        <dependency>

            <groupId>io.springfox</groupId>

            <artifactId>springfox-swagger2</artifactId>

            <version>2.8.0</version>

        </dependency>

        <!-- https://mvnrepository.com/artifact/io.springfox/springfox-swagger-ui -->

        <dependency>

            <groupId>io.springfox</groupId>

            <artifactId>springfox-swagger-ui</artifactId>

            <version>2.8.0</version>

        </dependency>

    </dependencies>

    <build>

        <plugins>

            <plugin>

                <groupId>org.springframework.boot</groupId>

                <artifactId>spring-boot-maven-plugin</artifactId>

            </plugin>

        </plugins>

    </build>

</project>
使用application.properties配置应用程序
当然,根据个人喜好,你也可以使用application.yml属性文件重写配置。Spring Boot会尝试根据pom.xml文件中指定的依赖关系自动配置应用程序,并设置合理的默认值。
server.port=8000

spring.application.name=kafka-producer

#kafka configuration

spring.kafka.producer.bootstrap-servers=192.168.1.130:9092,192.168.1.101:9093,192.168.1.101:9094

spring.kafka.producer.key-serializer=org.apache.kafka.common.serialization.StringSerializer

spring.kafka.producer.value-serializer=org.apache.kafka.common.serialization.StringSerializer

#topic

kafka.app.topic.foo=test20180430
在上面的配置中,我给生产者分配的端口号是8000,服务器有3台,采用先前window环境搭建zookeeper,kafka集群 中配置的服务器。想了解关于kafka生产者相关的更多配置的话,可以阅读关于Spring Boot Kafka Properties的配置信息。
使用Spring Boot发送Spring Kafka消息
SpringKafka提供了使用Producer的KafkaTemplate类发送消息,并提供将数据发送到Kafka主题的高级操作。 提供异步和同步方法,异步方法返回Future。Spring Boot根据application.properties属性文件中配置的属性自动配置并初始化KafkaTemplate。为了方便测试发送消息,使用了Spring的定时任务,在类上使用@EnableScheduling 注解开启定时任务,通过@Scheduled注解指定发送消息规则。
package com.gzh.kafka.producer.component;

import org.slf4j.Logger;

import org.slf4j.LoggerFactory;

import org.springframework.beans.factory.annotation.Autowired;

import org.springframework.beans.factory.annotation.Value;

import org.springframework.kafka.core.KafkaTemplate;

import org.springframework.kafka.support.SendResult;

import org.springframework.scheduling.annotation.EnableScheduling;

import org.springframework.scheduling.annotation.Scheduled;

import org.springframework.stereotype.Component;

import org.springframework.util.concurrent.ListenableFuture;

@Component

@EnableScheduling

public class KafkaMessageProducer {

    private static final Logger LOG = LoggerFactory.getLogger(KafkaMessageProducer.class);

    @Autowired

    private KafkaTemplate<String, String> kafkaTemplate;

    @Value("${kafka.app.topic.foo}")

    private String topic;

    @Scheduled(cron = "00/5 * * * * ?")

    public void send() {

        String message = "Hello World---" + System.currentTimeMillis();

        LOG.info("topic="+topic+",message="+message);

        ListenableFuture<SendResult<String, String>> future = kafkaTemplate.send(topic, message);

        future.addCallback(success -> LOG.info("KafkaMessageProducer 发送消息成功!"),

                fail -> LOG.error("KafkaMessageProducer 发送消息失败!"));

    }

}
创建消息生产者启动类
package com.gzh.kafka.producer;

import org.springframework.boot.SpringApplication;

import org.springframework.boot.autoconfigure.SpringBootApplication;

import org.springframework.boot.context.properties.EnableConfigurationProperties;

@SpringBootApplication

@EnableConfigurationProperties

public class KafkaProducerApplication{

    public static void main(String[] args) {

        SpringApplication.run(KafkaProducerApplication.class, args);

    }

}
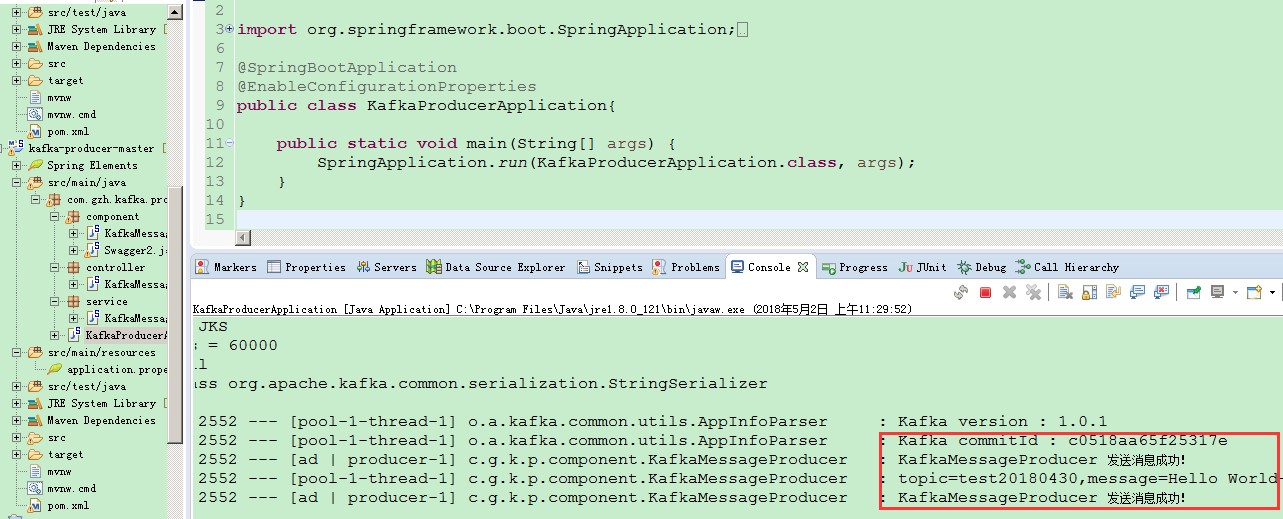
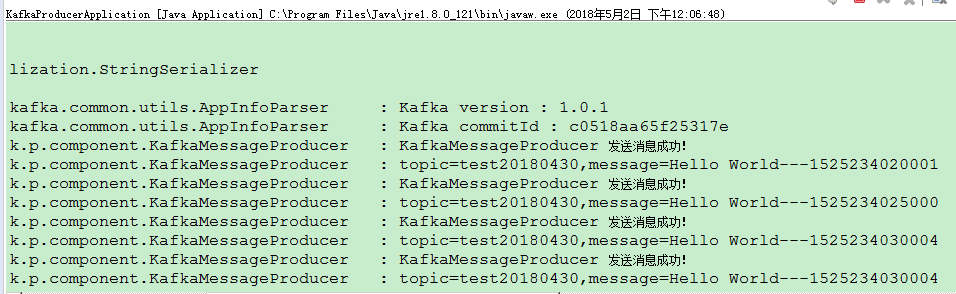
至此,Spring Boot整合Spring Kafka消息生产者应用已经整合完毕。启动zookeeper、kafka各个服务器。启动生产者应用,查看消息生产者应用控制台日志,如下图说明整合OK。
当然在创建消息生产者类时,我们可以更加灵活,可以不使用定时任务,通过界面请求的方式,发送我们想要发送的内容。简单案例如下:
- 消息发送者类
package com.gzh.kafka.producer.service;

import org.slf4j.Logger;

import org.slf4j.LoggerFactory;

import org.springframework.beans.factory.annotation.Autowired;

import org.springframework.beans.factory.annotation.Value;

import org.springframework.kafka.core.KafkaTemplate;

import org.springframework.kafka.support.SendResult;

import org.springframework.stereotype.Service;

import org.springframework.util.concurrent.ListenableFuture;

@Service

public class KafkaMessageSendService {

    private static final Logger LOG = LoggerFactory.getLogger(KafkaMessageSendService.class);

    @Autowired

    private KafkaTemplate<String, String> kafkaTemplate;

    @Value("${kafka.app.topic.foo}")

    private String topic;

    public void send(String message){

        LOG.info("topic="+topic+",message="+message);

        ListenableFuture<SendResult<String, String>> future = kafkaTemplate.send(topic, message);

        future.addCallback(success -> LOG.info("KafkaMessageProducer 发送消息成功!"),

                fail -> LOG.error("KafkaMessageProducer 发送消息失败!"));

    }

}
- 界面请求处理controller类
package com.gzh.kafka.producer.controller;

import org.springframework.beans.factory.annotation.Autowired;

import org.springframework.http.MediaType;

import org.springframework.web.bind.annotation.RequestMapping;

import org.springframework.web.bind.annotation.RequestMethod;

import org.springframework.web.bind.annotation.RequestParam;

import org.springframework.web.bind.annotation.RestController;

import com.gzh.kafka.producer.service.KafkaMessageSendService;

@RestController

@RequestMapping(value="send",produces=MediaType.APPLICATION_JSON_UTF8_VALUE)

public class KafkaMessageSendController {

    @Autowired

    private KafkaMessageSendService kafkaMessageSendService;

    @RequestMapping(value="/sendMessage",method=RequestMethod.POST)

    public String send(@RequestParam(required=true) String message){

        try {

            kafkaMessageSendService.send(message);

        } catch (Exception e) {

            return "send failed.";

        }

        return message;

    }

}
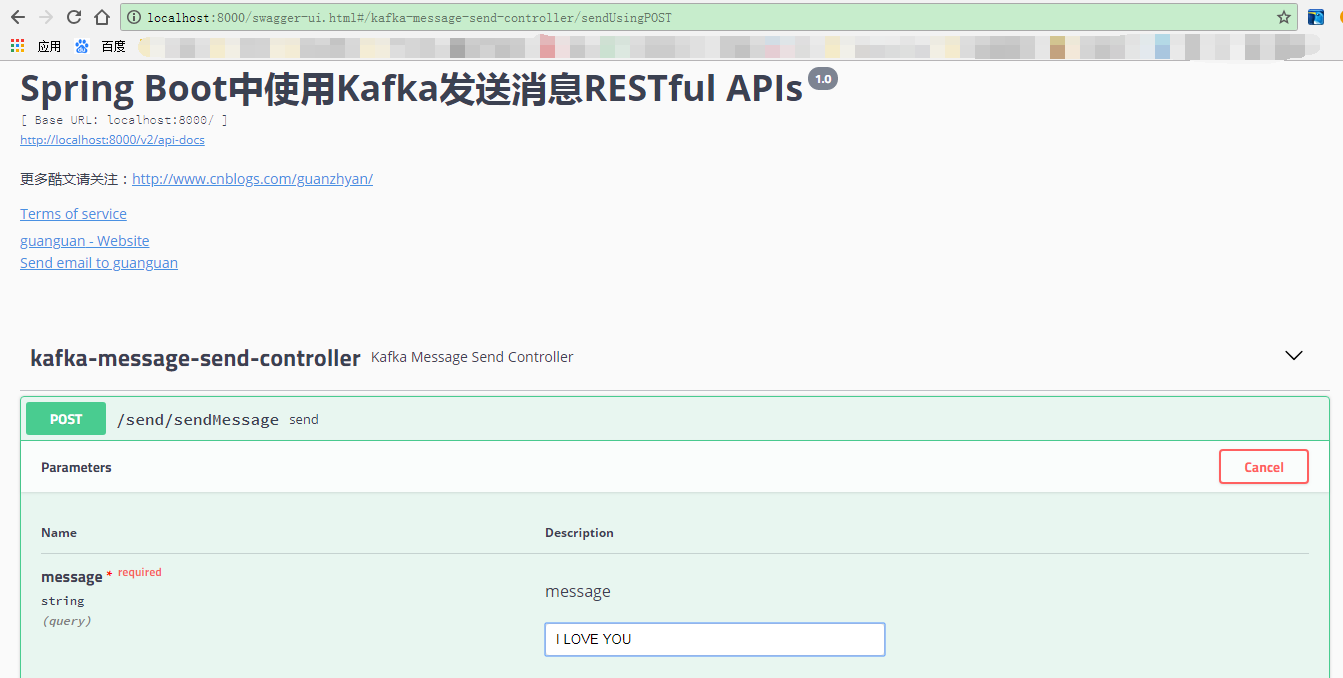
- 通过Swagger访问测试Controller服务请求
Spring Kafka整合Spring Boot创建消费者客户端案例:
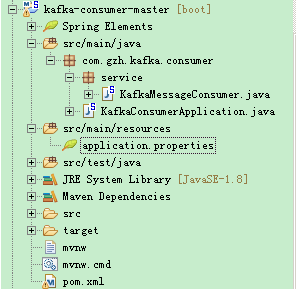
创建一个kafka-consumer-master的maven工程。整个项目结构如下:
Maven的依赖
<?xml version="1.0" encoding="UTF-8"?>

<project xmlns="http://maven.apache.org/POM/4.0.0" xmlns:xsi="http://www.w3.org/2001/XMLSchema-instance"

    xsi:schemaLocation="http://maven.apache.org/POM/4.0.0 http://maven.apache.org/xsd/maven-4.0.0.xsd">

    <modelVersion>4.0.0</modelVersion>

    <groupId>com.gzh.kafka.consumer</groupId>

    <artifactId>consumer</artifactId>

    <version>0.0.1-SNAPSHOT</version>

    <packaging>jar</packaging>

    <name>kafka-consumer-master</name>

    <description>demo project for kafka consumer</description>

    <parent>

        <groupId>org.springframework.boot</groupId>

        <artifactId>spring-boot-starter-parent</artifactId>

        <version>1.5.9.RELEASE</version>

        <relativePath/> <!-- lookup parent from repository -->

    </parent>

    <properties>

        <project.build.sourceEncoding>UTF-8</project.build.sourceEncoding>

        <project.reporting.outputEncoding>UTF-8</project.reporting.outputEncoding>

        <spring-kafka.version>1.3.4.RELEASE</spring-kafka.version>

        <java.version>1.8</java.version>

    </properties>

    <dependencies>

        <dependency>

            <groupId>org.springframework.boot</groupId>

            <artifactId>spring-boot-starter</artifactId>

        </dependency>

        <!-- https://mvnrepository.com/artifact/org.springframework.kafka/spring-kafka -->

        <dependency>

            <groupId>org.springframework.kafka</groupId>

            <artifactId>spring-kafka</artifactId>

            <version>${spring-kafka.version}</version>

        </dependency>

        <dependency>

            <groupId>org.springframework.boot</groupId>

            <artifactId>spring-boot-starter-web</artifactId>

        </dependency>

        <dependency>

            <groupId>org.springframework.boot</groupId>

            <artifactId>spring-boot-starter-test</artifactId>

            <scope>test</scope>

        </dependency>

        <!-- https://mvnrepository.com/artifact/org.springframework.kafka/spring-kafka-test -->

        <dependency>

            <groupId>org.springframework.kafka</groupId>

            <artifactId>spring-kafka-test</artifactId>

            <version>${spring-kafka.version}</version>

            <scope>test</scope>

        </dependency>

    </dependencies>

    <build>

        <plugins>

            <plugin>

                <groupId>org.springframework.boot</groupId>

                <artifactId>spring-boot-maven-plugin</artifactId>

            </plugin>

        </plugins>

    </build>

</project>
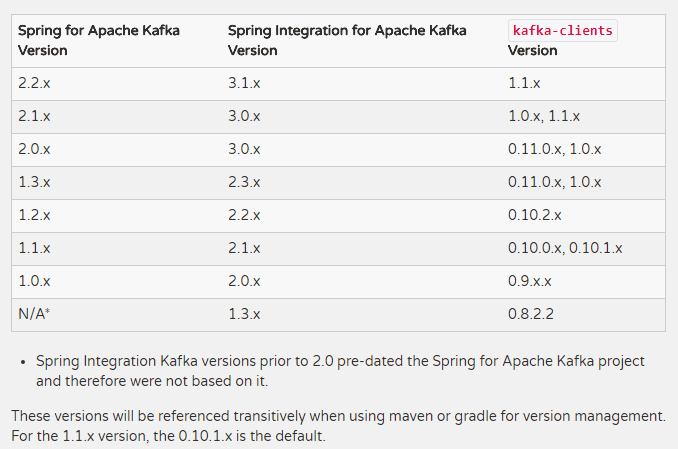
注意,这是使用Spring-Kafka时一定要注意版本问题,否则会报各种奇葩错误。Spring官方网站上给出了SpringKafka和kafka-client版本(它的版本号要和kafka服务器的版本保持一致)的对应关系:
使用application.properties配置应用程序
Spring Boot会尝试根据pom.xml文件中指定的依赖关系自动配置应用程序,并设置合理的默认值。
server.port=8001

spring.application.name=kafka-consumer

#kafka configuration

#指定消息被消费之后自动提交偏移量,以便下次继续消费

spring.kafka.consumer.enable-auto-commit=true

#指定消息组

spring.kafka.consumer.group-id=guan

#指定kafka服务器地址

spring.kafka.consumer.bootstrap-servers=192.168.1.130:9092,192.168.1.101:9093,192.168.1.101:9094

#指定从最近地方开始消费(earliest)

spring.kafka.consumer.auto-offset-reset=latest

spring.kafka.consumer.key-deserializer=org.apache.kafka.common.serialization.StringDeserializer

spring.kafka.consumer.value-deserializer=org.apache.kafka.common.serialization.StringDeserializer

#topic

kafka.app.topic.foo=test20180430
在上面的配置中,我给生产者分配的端口号是8000,服务器有3台,采用先前window环境搭建zookeeper,kafka集群 中配置的服务器。想了解关于kafka生产者相关的更多配置的话,可以阅读关于Spring Boot Kafka Properties的配置信息。
使用Spring Boot消费Spring Kafka消息
通过使用@KafkaListener来注解一个方法Spring Kafka会自动创建一个消息监听器容器。使用该注解,并指定要消费的topic(也可以指定消费组以及分区号,支持正则表达式匹配),这样,消费者一旦启动,就会监听kafka服务器上的topic,实时进行消费消息。
package com.gzh.kafka.consumer.service;

import org.slf4j.Logger;

import org.slf4j.LoggerFactory;

import org.springframework.kafka.annotation.KafkaListener;

import org.springframework.messaging.MessageHeaders;

import org.springframework.messaging.handler.annotation.Headers;

import org.springframework.messaging.handler.annotation.Payload;

import org.springframework.stereotype.Component;

@Component

public class KafkaMessageConsumer {

    private static final Logger LOG = LoggerFactory.getLogger(KafkaMessageConsumer.class);

    @KafkaListener(topics={"${kafka.app.topic.foo}"})

    public void receive(@Payload String message, @Headers MessageHeaders headers){

        LOG.info("KafkaMessageConsumer 接收到消息:"+message);

        headers.keySet().forEach(key->LOG.info("{}: {}",key,headers.get(key)));

    }

}
创建消息消费者启动类
package com.gzh.kafka.consumer;

import org.springframework.boot.SpringApplication;

import org.springframework.boot.autoconfigure.SpringBootApplication;

import org.springframework.boot.context.properties.EnableConfigurationProperties;

@SpringBootApplication

@EnableConfigurationProperties

public class KafkaConsumerApplication {

    public static void main(String[] args) {

        SpringApplication.run(KafkaConsumerApplication.class, args);

    }

}
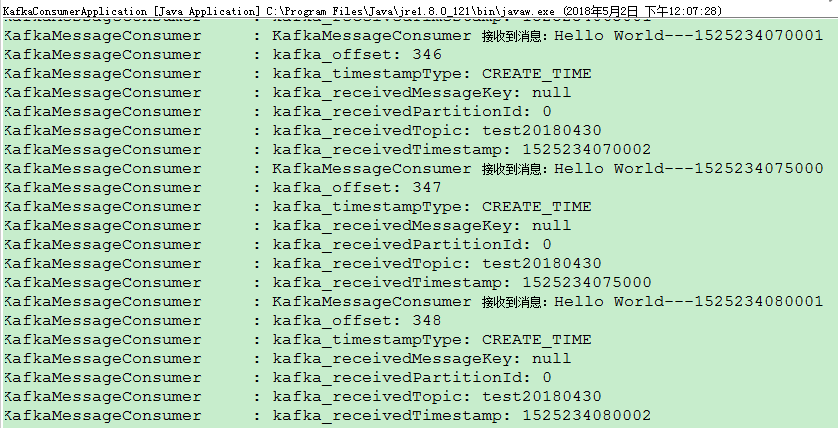
消费者应用已经完成,接下来让我们验证Spring Kafka消息发送和接收效果。先依次启动zookeeper、kafka服务器,然后在启动生产者(kafka-producer-master)应用,再启动消费者(kafka-consumer-master)应用,然后观察生产者和消费者启动类日志:
Spring Kafka和Spring Boot整合实现消息发送与消费简单案例的更多相关文章
- RocketMQ的消息发送及消费
RocketMQ消息支持的模式: 消息支持的模式分为三种:NormalProducer(普通同步),消息异步发送,OneWay. 消息同步发送: 普通消息的发送和接收在前面已经演示过了,在前面的案例中 ...
- Spring Boot 整合 Mybatis Annotation 注解的完整 Web 案例
摘要: 原创出处 www.bysocket.com 「泥瓦匠BYSocket 」欢迎转载,保留摘要,谢谢! 『 公司需要人.产品.业务和方向,方向又要人.产品.业务和方向,方向… 循环』 本文提纲一. ...
- 整合Spring Cloud Stream Binder与RabbitMQ进行消息发送与接收
我最新最全的文章都在南瓜慢说 www.pkslow.com,欢迎大家来喝茶! 1 前言 Spring Cloud Stream专门用于事件驱动的微服务系统,使用消息中间件来收发信息.使用Spring ...
- SpringBoot整合RabbitMQ,实现消息发送和消费以及多个消费者的情况
下载安装Erlang和RabbitMQ Erlang和RabbitMQ:https://www.cnblogs.com/theRhyme/p/10069611.html AMQP协议 https:// ...
- 微信发送模版消息,PHP代码简单案例
function http_request($url,$data=array()){ $ch = curl_init(); curl_setopt($ch, CURLOPT_URL, $url); c ...
- 整合Spring Cloud Stream Binder与GCP Pubsub进行消息发送与接收
我最新最全的文章都在南瓜慢说 www.pkslow.com,欢迎大家来喝茶! 1 前言 之前的文章<整合Spring Cloud Stream Binder与RabbitMQ进行消息发送与接收& ...
- 如何在优雅地Spring 中实现消息的发送和消费
本文将对rocktmq-spring-boot的设计实现做一个简单的介绍,读者可以通过本文了解将RocketMQ Client端集成为spring-boot-starter框架的开发细节,然后通过一个 ...
- Spring Kafka整合Spring Boot创建生产者客户端案例
每天学习一点点 编程PDF电子书.视频教程免费下载:http://www.shitanlife.com/code 创建一个kafka-producer-master的maven工程.整个项目结构如下: ...
- spring boot 2.x 系列 —— spring boot 整合 kafka
文章目录 一.kafka的相关概念: 1.主题和分区 2.分区复制 3. 生产者 4. 消费者 5.broker和集群 二.项目说明 1.1 项目结构说明 1.2 主要依赖 二. 整合 kafka 2 ...
随机推荐
- 6、Android Content Provider测试
如果你的应用中使用了Content Provider来与其他应用进行数据交互,你需要对Content Provider进行测试来确保正常工作. 创建Content Provider整合测试 在Andr ...
- MyBatis延迟加载及在spring中集成配置
当你要使用one to one,many to one 就会碰到N+1的问题.很明显,对象之间关联很多有A关联B,B关联C,C关联A这样的关系,如果不是采用延迟加载,很容易一下在出现成千上万对象 ...
- C++对象模型的那些事儿之二:对象模型(下)
前言 上一篇博客C++对象模型的那些事儿之一为大家讲解了C++对象模型的一些基本知识,可是C++的继承,多态这些特性如何体现在对象模型上呢?单继承.多重继承和虚继承后内存布局上又有哪些变化呢?多态真正 ...
- [学习笔记]java基础Java8SE开发环境搭建、第一个Java Hello World、Java程序的编译与执行
本文作者:sushengmiyan 本文地址:http://blog.csdn.net/sushengmiyan/article/details/25745945 内容简介: ------------ ...
- 【一天一道LeetCode】#191. Number of 1 Bits
一天一道LeetCode 本系列文章已全部上传至我的github,地址:ZeeCoder's Github 欢迎大家关注我的新浪微博,我的新浪微博 欢迎转载,转载请注明出处 (一)题目 Write a ...
- Java-IO之PrintWriter(字符打印输出流)
PrintWriter是字符类型的打印输出流,继承于Writer,用于向文本输出流打印对象的格式化表示形式. PrintWriter的主要函数: PrintWriter(OutputStream ou ...
- 1017. Queueing at Bank (25) - priority_queuet
题目如下: Suppose a bank has K windows open for service. There is a yellow line in front of the windows ...
- UNIX环境高级编程——I/O多路转接(select、pselect和poll)
I/O多路转接:先构造一张有关描述符的列表,然后调用一个函数,直到这些描述符中的一个已准备好进行I/O时,该函数才返回.在返回时,它告诉进程哪些描述符已准备好可以进行I/O. poll.pselect ...
- 类装载器DexClassLoader (android内核剖析)
在java环境中,有个概念叫做"类装载器",其作用是动态装载Class文件.标准的java SDK中有一个ClassLoader类,借助它可以装载 想要的Class文件,每个Cla ...
- 动态创建VIEW
很多人都应该知道 global temporary table 的用法,这里也提出一个动态VIEW的用法,在实际过程中有着很好的独特之处 具体如下: /***************创建PACKAGE ...