
Spring+Hibernate+Struts(SSH)框架整合
SSH框架整合
前言:有人说,现在还是流行主流框架,SSM都出来很久了,更不要说SSH。我不以为然。现在许多公司所用的老项目还是ssh,如果改成主流框架,需要成本。再说比如金融IT这一块,数据库dao层还是推荐使用的是hibernate,因为能够快速开发上手,除非是互联网,因涉及到高并发,dao层用的是mybatis,数据交互效率较快。所以,SSH不容忽略。
一、什么是SSH
SSH是 struts+spring+hibernate的一个集成框架,是目前比较流行的一种Web应用程序开源框架。
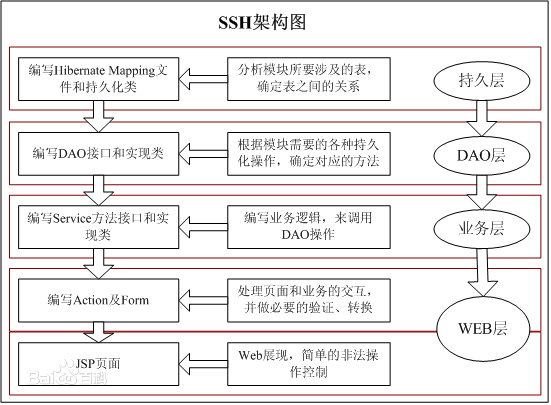
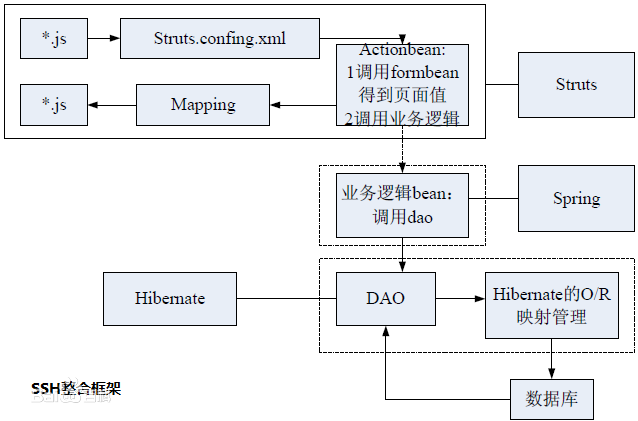
集成SSH框架的系统从职责上分为四层:表示层、业务逻辑层、数据持久层和域模块层,以帮助开发人员在短期内搭建结构清晰、可复用性好、维护方便的Web应用程序。其中使用Struts作为系统的整体基础架构,负责MVC的分离,在Struts框架的模型部分,控制业务跳转,利用Hibernate框架对持久层提供支持,Spring做管理,管理struts和hibernate。具体做法是:用面向对象的分析方法根据需求提出一些模型,将这些模型实现为基本的Java对象,然后编写基本的DAO(Data Access Objects)接口,并给出Hibernate的DAO实现,采用Hibernate架构实现的DAO类来实现Java类与数据库之间的转换和访问,最后由Spring做管理,管理struts和hibernate。
---------百度百科
二、SSH所涉及的部分
三、快速部署环境
这里利用保存客户的小Demo来演示整合SSH
1.导入所需jar包
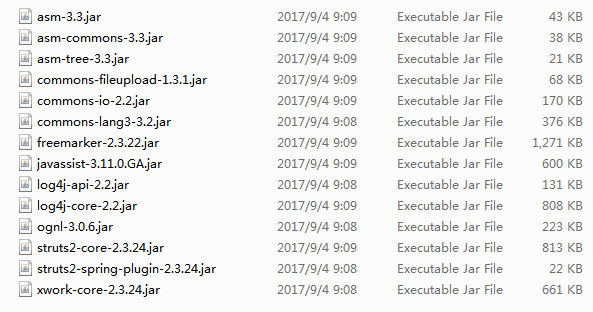
1). Struts2框架
* struts-2.3.24\apps\struts2-blank\WEB-INF\lib\*.jar -- Struts2需要的所有jar包
* struts2-spring-plugin-2.3.24.jar ---Struts2整合Spring的插件包
2). Hibernate框架
* hibernate-release-5.0.7.Final\lib\required\*.jar -- Hibernate框架需要的jar包
* slf4j-api-1.6.1.jar -- 日志接口
* slf4j-log4j12-1.7.2.jar -- 日志实现
* mysql-connector-java-5.1.7-bin.jar -- MySQL的驱动包

3). Spring框架
* IOC核心包
* AOP核心包
* JDBC模板和事务核心包
* Spring整合JUnit测试包
* Spring整合Hibernate核心包
* Spring整合Struts2核心包

2、在web.xml中配置spring与struts的相关代码
1)配置struts2核心过滤器
这里定义为拦截所有
 <!-- 配置核心过滤器 -->

    <filter>

        <filter-name>struts2</filter-name>

        <filter-class>org.apache.struts2.dispatcher.ng.filter.StrutsPrepareAndExecuteFilter</filter-class>

    </filter>

    <filter-mapping>

        <filter-name>struts2</filter-name>

        <url-pattern>/*</url-pattern>

</filter-mapping>
2)配置spring的监听器
当服务启动时,就会先加载spring的配置文件
 <!-- 配置Spring框架整合WEB的监听器 -->

     <listener>

           <listener-class>org.springframework.web.context.ContextLoaderListener</listener-class>

    </listener>
3)配置默认加载路径
 <!-- 监听器默认加载Web-INF文件下,需要配置参数来加载指定文件 -->

    <context-param>

         <param-name>contextConfigLocation</param-name>

         <param-value>classpath:applicationContext.xml</param-value>

</context-param>
总结:web.xml全部代码为
<!-- 配置Spring框架整合WEB的监听器 -->

     <listener>

           <listener-class>org.springframework.web.context.ContextLoaderListener</listener-class>

    </listener>

    <!-- 监听器默认加载Web-INF文件下,需要配置参数来加载指定文件 -->

    <context-param>

         <param-name>contextConfigLocation</param-name>

         <param-value>classpath:applicationContext.xml</param-value>

    </context-param>

  <!-- 配置核心过滤器 -->

    <filter>

        <filter-name>struts2</filter-name>

        <filter-class>org.apache.struts2.dispatcher.ng.filter.StrutsPrepareAndExecuteFilter</filter-class>

    </filter>

    <filter-mapping>

        <filter-name>struts2</filter-name>

        <url-pattern>/*</url-pattern>

    </filter-mapping>
2、src下编写相关配置文件
1)spring:applicationContext.xml
导入相关约束
<?xml version="1.0" encoding="UTF-8"?>

<beans xmlns="http://www.springframework.org/schema/beans"

    xmlns:xsi="http://www.w3.org/2001/XMLSchema-instance"

    xmlns:context="http://www.springframework.org/schema/context"

    xmlns:aop="http://www.springframework.org/schema/aop"

    xmlns:tx="http://www.springframework.org/schema/tx"

    xsi:schemaLocation="http://www.springframework.org/schema/beans

    http://www.springframework.org/schema/beans/spring-beans.xsd

    http://www.springframework.org/schema/context

    http://www.springframework.org/schema/context/spring-context.xsd

    http://www.springframework.org/schema/aop

    http://www.springframework.org/schema/aop/spring-aop.xsd

    http://www.springframework.org/schema/tx

    http://www.springframework.org/schema/tx/spring-tx.xsd">

</beans>
2)hibernate:hibernate.cfg.xml
导入相关约束,并配置数据库
<?xml version="1.0" encoding="UTF-8"?>

<!DOCTYPE hibernate-configuration PUBLIC

    "-//Hibernate/Hibernate Configuration DTD 3.0//EN"

    "http://www.hibernate.org/dtd/hibernate-configuration-3.0.dtd">

<hibernate-configuration>

    <session-factory>

        <!-- 必须配置 -->

        <property name="hibernate.connection.driver_class">com.mysql.jdbc.Driver</property>

        <property name="hibernate.connection.url">jdbc:mysql://192.168.174.130:3306/SSH</property>

        <property name="hibernate.connection.username">root</property>

        <property name="hibernate.connection.password">root</property>

        <property name="hibernate.dialect">org.hibernate.dialect.MySQLDialect</property>

        <!-- 可选配置 -->

        <property name="hibernate.show_sql">true</property>

        <property name="hibernate.format_sql">true</property>

        <property name="hibernate.hbm2ddl.auto">update</property>

        <!-- 配置C3P0的连接池 -->

        <property name="connection.provider_class">org.hibernate.connection.C3P0ConnectionProvider</property>

        <!-- 不能配置绑定当前的线程的操作 -->

        <!-- 映射配置文件 -->

        <mapping resource="com/clj/domain/Customer.hbm.xml"/>

    </session-factory>

</hibernate-configuration>
3)配置log4j.properties
### direct log messages to stdout ###

log4j.appender.stdout=org.apache.log4j.ConsoleAppender

log4j.appender.stdout.Target=System.err

log4j.appender.stdout.layout=org.apache.log4j.PatternLayout

log4j.appender.stdout.layout.ConversionPattern=%d{ABSOLUTE} %5p %c{1}:%L - %m%n

### direct messages to file mylog.log ###

log4j.appender.file=org.apache.log4j.FileAppender

log4j.appender.file.File=c\:mylog.log

log4j.appender.file.layout=org.apache.log4j.PatternLayout

log4j.appender.file.layout.ConversionPattern=%d{ABSOLUTE} %5p %c{1}:%L - %m%n

### set log levels - for more verbose logging change 'info' to 'debug' ###

log4j.rootLogger=info, stdout
4)struts2:struts.xml
导入相关约束
<?xml version="1.0" encoding="UTF-8" ?>

<!DOCTYPE struts PUBLIC

    "-//Apache Software Foundation//DTD Struts Configuration 2.1//EN"

    "http://struts.apache.org/dtds/struts-2.3.dtd">

<struts>

</struts>
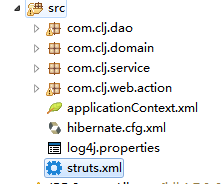
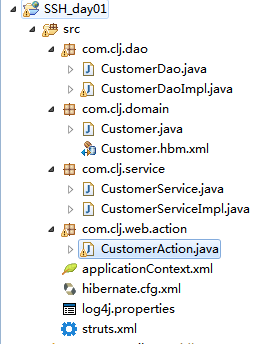
总结:src所需配置文件如图
3、配置dao层
定义一个接口和其实现类
public interface CustomerDao {

    public void save(Customer customer);

}
public class CustomerDaoImpl  implements CustomerDao {

    public void save(Customer customer) {

    }

}
4、定义业务层接口和实现类
package com.clj.service;

import com.clj.domain.Customer;

public interface CustomerService {

    public void save(Customer customer);

}
package com.clj.service;

import org.springframework.transaction.annotation.Transactional;

import com.clj.dao.CustomerDao;

import com.clj.domain.Customer;

/**

 * 客户的业务层

 * @author Administrator

 *

 */

public class CustomerServiceImpl implements CustomerService{//用来保存客户

    public void save(Customer customer) {

    }

}
5、定义pojo类
hibernate通过操作pojo类来操作数据库表,做到对象关系映射
package com.clj.domain;

public class Customer {

    private Long cust_id;

    private String cust_name;

    private Long cust_user_id;

    private Long cust_create_id;

    private String cust_source;

    private String cust_industry;

    private String cust_level;

    private String cust_linkman;

    private String cust_phone;

    private String cust_mobile;

    public Long getCust_id() {

        return cust_id;

    }

    public void setCust_id(Long cust_id) {

        this.cust_id = cust_id;

    }

    public String getCust_name() {

        return cust_name;

    }

    public void setCust_name(String cust_name) {

        this.cust_name = cust_name;

    }

    public Long getCust_user_id() {

        return cust_user_id;

    }

    public void setCust_user_id(Long cust_user_id) {

        this.cust_user_id = cust_user_id;

    }

    public Long getCust_create_id() {

        return cust_create_id;

    }

    public void setCust_create_id(Long cust_create_id) {

        this.cust_create_id = cust_create_id;

    }

    public String getCust_source() {

        return cust_source;

    }

    public void setCust_source(String cust_source) {

        this.cust_source = cust_source;

    }

    public String getCust_industry() {

        return cust_industry;

    }

    public void setCust_industry(String cust_industry) {

        this.cust_industry = cust_industry;

    }

    public String getCust_level() {

        return cust_level;

    }

    public void setCust_level(String cust_level) {

        this.cust_level = cust_level;

    }

    public String getCust_linkman() {

        return cust_linkman;

    }

    public void setCust_linkman(String cust_linkman) {

        this.cust_linkman = cust_linkman;

    }

    public String getCust_phone() {

        return cust_phone;

    }

    public void setCust_phone(String cust_phone) {

        this.cust_phone = cust_phone;

    }

    public String getCust_mobile() {

        return cust_mobile;

    }

    public void setCust_mobile(String cust_mobile) {

        this.cust_mobile = cust_mobile;

    }

    @Override

    public String toString() {

        return "Customer [cust_id=" + cust_id + ", cust_name=" + cust_name

                + ", cust_user_id=" + cust_user_id + ", cust_create_id="

                + cust_create_id + ", cust_source=" + cust_source

                + ", cust_industry=" + cust_industry + ", cust_level="

                + cust_level + ", cust_linkman=" + cust_linkman

                + ", cust_phone=" + cust_phone + ", cust_mobile=" + cust_mobile

                + "]";

    }

}
6、定义Customer.hbm.xml
此配置文件关乎Customer这个pojo类,此文件需放在Customer pojo类同个包下
<?xml version="1.0" encoding="UTF-8"?>

<!DOCTYPE hibernate-mapping PUBLIC

    "-//Hibernate/Hibernate Mapping DTD 3.0//EN"

    "http://www.hibernate.org/dtd/hibernate-mapping-3.0.dtd">

<hibernate-mapping>

    <class name="com.clj.domain.Customer" table="cst_customer">

        <id name="cust_id" column="cust_id">

            <generator class="native"/>

        </id>

        <property name="cust_name" column="cust_name"/>

        <property name="cust_user_id" column="cust_user_id"/>

        <property name="cust_create_id" column="cust_create_id"/>

        <property name="cust_source" column="cust_source"/>

        <property name="cust_industry" column="cust_industry"/>

        <property name="cust_level" column="cust_level"/>

        <property name="cust_linkman" column="cust_linkman"/>

        <property name="cust_phone" column="cust_phone"/>

        <property name="cust_mobile" column="cust_mobile"/>

    </class>

</hibernate-mapping>
项目构建大致图
四、demo之保存客户初步演示
这里先初略的定义持久层交给heibernate,业务层交个struts2,创建实例交给spring
1、定义一个保存客户的界面,利用form表单进行数据的提交
根据域名可知,这里利用的是struts2的通配符方式进行访问
<FORM id=form1 name=form1

        action="${pageContext.request.contextPath }/customer_add.action"

        method=post>

           <!--table部分省略-->

</FORM>
2、在struts.xml中配置接受请求,根据action名和方法跳转指定的action,执行指定的方法
spring整合struts2方式一:action由struts2框架管理
* 因为导入的struts2-spring-plugin-2.3.24.jar 包自带一个配置文件 struts-plugin.xml ,该配置文件中有如下代码
* <constant name="struts.objectFactory" value="spring" /> 开启一个常量,如果该常量开启,那么下面的常量就可以使用
* struts.objectFactory.spring.autoWire = name,该常量是可以让Action的类来自动装配Bean对象!
<?xml version="1.0" encoding="UTF-8" ?>

<!DOCTYPE struts PUBLIC

    "-//Apache Software Foundation//DTD Struts Configuration 2.1//EN"

    "http://struts.apache.org/dtds/struts-2.3.dtd">

<struts>

    <!-- 配置包结构 -->

        <package name="crm" extends="struts-default" namespace="/">

            <!-- 配置客户的Action -->

            <!--  方式一:aciton由struts2框架管理-->
      <action name="customer_*" class="com.clj.web.action.CustomerAction" method="{1}"/>
    </package>
 </struts>
3、在spring的applicationContext.xml中配置相对应的bean以及事务
这里利用spring中IOC(控制反转)的特性,将创建实例的任务交给spring框架管理
    <bean id="customerService" class="com.clj.service.CustomerServiceImpl">

        <property name="customerDao" ref="customerDao"></property>

    </bean>

    <bean id="customerDao" class="com.clj.dao.CustomerDaoImpl">

        <property name="hibernateTemplate" ref="hibernateTemplate"/>

    </bean>

    <bean id="hibernateTemplate" class="org.springframework.orm.hibernate5.HibernateTemplate">

        <!-- 注入sessionFactory  -->

        <property name="sessionFactory"/>

    </bean>

</beans>
4、编写持久层实现类相关代码
这里利用hibernate提供的模板类,内部封转了session,从而可以调用session中的方法
/**

 * 持久层

 *

 * @author Administrator

 *

 */

public class CustomerDaoImpl  implements CustomerDao {

    //将数据保存到数据库中(调用模板类(hibernate提供,内部封装了session))

    private HibernateTemplate hibernateTemplate;

    public void setHibernateTemplate(HibernateTemplate hibernateTemplate) {

        this.hibernateTemplate = hibernateTemplate;

    }

    /**

     * 保存客户

     */

    public void save(Customer customer) {

        System.out.println("持久层:保存客户");

        hibernateTemplate().save(customer);

    }

}
5、编写业务层实现类相关代码
package com.clj.service;

import org.springframework.transaction.annotation.Transactional;

import com.clj.dao.CustomerDao;

import com.clj.domain.Customer;

/**

 * 客户的业务层

 * @author Administrator

 *

 */

@Transactional

public class CustomerServiceImpl implements CustomerService{

    private CustomerDao customerDao;

    public void setCustomerDao(CustomerDao customerDao) {

        this.customerDao = customerDao;

    }

    //用来保存客户

    public void save(Customer customer) {

        System.out.println("业务层,保存客户");

        customerDao.save(customer);

    }

}
6、编写action相关代码
这里通过struts2的模板类
package com.clj.web.action;

import org.apache.struts2.ServletActionContext;

import org.springframework.web.context.WebApplicationContext;

import org.springframework.web.context.support.WebApplicationContextUtils;

import com.clj.domain.Customer;

import com.clj.service.CustomerService;

import com.opensymphony.xwork2.ActionSupport;

import com.opensymphony.xwork2.ModelDriven;

/**

 * 客户的控制层

 * @author Administrator

 *

 */

public class CustomerAction extends ActionSupport implements ModelDriven<Customer>{

    //不要忘记手动new

    private Customer customer=new Customer();

    public Customer getModel() {

        return customer;

    }

    //提供service成员属性,提供set方法

    private CustomerService customerService;

    public void setCustomerService(CustomerService customerService) {

        this.customerService = customerService;

    }

    /**

     * 保存客户

     * @return

     */

    public String add(){

        System.out.println("WEB层,保存客户");

        //方式一:创建web的工厂(action由struts2创建)

        WebApplicationContext context=WebApplicationContextUtils.getWebApplicationContext(ServletActionContext.getServletContext());

        CustomerService cs=(CustomerService) context.getBean("customerService");

        //调用方法

        cs.save(customer);return NONE;

    }

}
五、项目优化之整合
1、 spring整合struts2方式二:action由spring框架管理
把具体的Action类配置文件applicatonContext.xml的配置文件中,但是注意:struts.xml需要做修改
<struts>

    <!-- 配置包结构 -->

        <package name="crm" extends="struts-default" namespace="/">

            <!-- 配置客户的Action -->

            <!--  方式一:aciton由struts2框架管理

            <action name="customer_*" class="com.clj.web.action.CustomerAction" method="{1}"/>-->

            <!-- 方式二:action由spring管理,class标签上只需要编写srping配置bean的ID值既可以-->

             <action name="customer_*" class="customerAction" method="{1}"></action>

        </package>

</struts>
2、在applicationContext.xml中配置Action类
注意:1)Spring框架默认生成CustomerAction是单例的,而Struts2框架是多例的。所以需要配置 scope="prototype"
2)此时没有struts2的自动装配,在action需要手动配置customerService属性,并在action类中生成set方法
<!-- 配置客户模块 -->

    <!-- 强调:配置的Aciton,必须是多列的 -->

    <bean id="customerAction" class="com.clj.web.action.CustomerAction" scope="prototype">

        <!--注意:struts管理action时,基于其中有个struts-plugin的jar包,其中更改了一个

        常量struts.objectFactory.spring.autoWire = name将其打开了,可以自动装配,只需要提供set方法

        但是此时action由spring管理,自动装配失效,所以需要手动进行配置注入

        -->

        <property name="customerService" ref="customerService"></property>

</bean>
3、.配置事务
spring整合hibernate方式一:(带有hibernate.cfg.xml的配置文件。强调:不能加绑定当前线程的配置)
以前玩hibernate时,hibernate.cfg.xml都是由hibernate框架管理,其配置文件能生成sessionFactory,持久层加载此配置文件获取sessionFactory,从而创建工厂生成session,进行数据的增删改成,此时其配置文件应该交给spring管理,充分利用spring的IOC特性
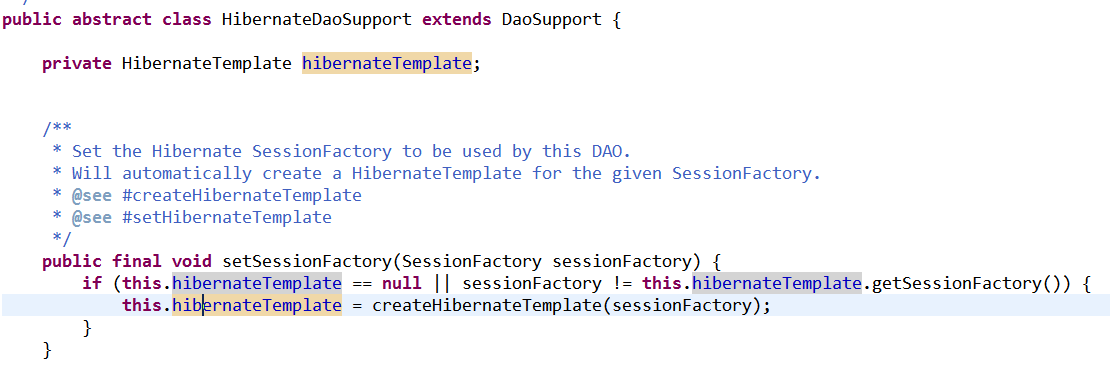
Spring框架提供了一个HibernateDaoSupport的工具类,以后DAO都可以继承该类!!在引入hibernate核心配置文件之前,得让dao层继承一个父类HibernateDaoSupport,此父类内部封装了事务模板
看源码:
1)修改相对应的持久层实现类,让他继承HibernateDaoSupport
package com.clj.dao;

import org.springframework.orm.hibernate5.HibernateTemplate;

import org.springframework.orm.hibernate5.support.HibernateDaoSupport;

import com.clj.domain.Customer;

/**

 * 持久层

 * 继承HibernateDaoSupport,内部封装了HibernateTemplate

 * @author Administrator

 *

 */

public class CustomerDaoImpl extends HibernateDaoSupport implements CustomerDao {

    //将数据保存到数据库中(调用模板类(hibernate提供,内部封装了session))

    /*private HibernateTemplate hibernateTemplate;

    public void setHibernateTemplate(HibernateTemplate hibernateTemplate) {

        this.hibernateTemplate = hibernateTemplate;

    }*/

    /**

     * 保存客户

     */

    public void save(Customer customer) {

        System.out.println("持久层:保存客户");

        this.getHibernateTemplate().save(customer);

    }

}
2)修改业务层让,开启事务注解
package com.clj.service;

import org.springframework.transaction.annotation.Transactional;

import com.clj.dao.CustomerDao;

import com.clj.domain.Customer;

/**

 * 客户的业务层

 * @author Administrator

 *

 */

@Transactional

public class CustomerServiceImpl implements CustomerService{

    private CustomerDao customerDao;

    public void setCustomerDao(CustomerDao customerDao) {

        this.customerDao = customerDao;

    }

    //用来保存客户

    public void save(Customer customer) {

        System.out.println("业务层,保存客户");

        customerDao.save(customer);

    }

}
3)修改applicationContext.xml文件
先引入hibernate配置文件
<!-- 编写bean,名称都是固定的,由spring提供,用来加载hibernate.cfg.xml的配置文件-->

    <bean id="sessionFactory" class="org.springframework.orm.hibernate5.LocalSessionFactoryBean">

    <!-- 配置路径:当启动服务器时 ,该对象就会被创建,从而加载hibernate.cfg.xml文件,从而生成sessionFactory对象-->

        <property name="configLocation" value="classpath:hibernate.cfg.xml"/>

</bean>
配置平台事务管理:用来管理事务,注意现在使用的是Hibernate框架,所以需要使用Hibernate框架的事务管理器
<!-- 先配置平台事务管理器 -->

    <bean id="transactionManager" class="org.springframework.orm.hibernate5.HibernateTransactionManager">

        <!-- 注入事务,session能够管理事务,工厂能够创建session -->

        <property name="sessionFactory" ref="sessionFactory"/>

    </bean>
开启事务注解
  <!-- 开启事务的注解 -->

    <tx:annotation-driven transaction-manager="transactionManager"/>
去除模板类配置,并为持久层配置sessionFactory
<!-- 以后,Dao都需要继承HibernateDaoSupport,注入sessionFactory -->

    <bean id="customerDao" class="com.clj.dao.CustomerDaoImpl">

        <!--<property name="hibernateTemplate" ref="hibernateTemplate"/>-->

        <!-- 这里不注入模板类,而是注入sessionFactory,因为模板需要session(封装了session)-->

        <property name="sessionFactory" ref="sessionFactory"/>

    </bean>
全部代码如下
<?xml version="1.0" encoding="UTF-8"?>

<beans xmlns="http://www.springframework.org/schema/beans"

    xmlns:xsi="http://www.w3.org/2001/XMLSchema-instance"

    xmlns:context="http://www.springframework.org/schema/context"

    xmlns:aop="http://www.springframework.org/schema/aop"

    xmlns:tx="http://www.springframework.org/schema/tx"

    xsi:schemaLocation="http://www.springframework.org/schema/beans

    http://www.springframework.org/schema/beans/spring-beans.xsd

    http://www.springframework.org/schema/context

    http://www.springframework.org/schema/context/spring-context.xsd

    http://www.springframework.org/schema/aop

    http://www.springframework.org/schema/aop/spring-aop.xsd

    http://www.springframework.org/schema/tx

    http://www.springframework.org/schema/tx/spring-tx.xsd">

    <!-- 编写bean,名称都是固定的,有spring提供,用来加载hibernate.cfg.xml的配置文件-->

    <bean id="sessionFactory" class="org.springframework.orm.hibernate5.LocalSessionFactoryBean">

    <!-- 配置路径:当启动服务器时 ,该对象就会被创建,从而加载hibernate.cfg.xml文件,从而生成sessionFactory对象-->

        <property name="configLocation" value="classpath:hibernate.cfg.xml"/>

    </bean>

    <!-- 先配置平台事务管理器 -->

    <bean id="transactionManager" class="org.springframework.orm.hibernate5.HibernateTransactionManager">

        <!-- 注入事务,session能够管理事务,工厂能够创建session -->

        <property name="sessionFactory" ref="sessionFactory"/>

    </bean>

    <!-- 开启事务的注解 -->

    <tx:annotation-driven transaction-manager="transactionManager"/>

    <!-- 配置客户模块 -->

    <!-- 强调:配置的Aciton,必须是多列的 -->

    <bean id="customerAction" class="com.clj.web.action.CustomerAction" scope="prototype">

        <!--注意:struts管理action时,基于其中有个struts-plugin的jar包,其中更改了一个

        常量struts.objectFactory.spring.autoWire = name将其打开了,可以自动装配,只需要提供set方法

        但是此时action由spring管理,自动装配失效,所以需要手动进行配置注入

        -->

        <property name="customerService" ref="customerService"></property>

    </bean>

    <bean id="customerService" class="com.clj.service.CustomerServiceImpl">

        <property name="customerDao" ref="customerDao"></property>

    </bean>

    <bean id="customerDao" class="com.clj.dao.CustomerDaoImpl">

        <!--<property name="hibernateTemplate" ref="hibernateTemplate"/>-->

        <!-- 这里不注入模板类,而是注入sessionFactory,因为模板需要session(封装了session)-->

        <property name="sessionFactory" ref="sessionFactory"/>

    </bean>

    <!-- 配置模板类(hibernate框架提供的,内部封装了session),此时交给spring管理,如果持久层继承了HibernateDaoSupport,则无需配置-->

    <!-- <bean id="hibernateTemplate" class="org.springframework.orm.hibernate5.HibernateTemplate">

        注入sessionFactory

        <property name="sessionFactory"/>

    </bean>-->

</beans>
4)修改action类
因为注入了业务层实现类,所以此时可以直接调用业务层方法,无须加载bean
package com.clj.web.action;

import org.apache.struts2.ServletActionContext;

import org.springframework.web.context.WebApplicationContext;

import org.springframework.web.context.support.WebApplicationContextUtils;

import com.clj.domain.Customer;

import com.clj.service.CustomerService;

import com.opensymphony.xwork2.ActionSupport;

import com.opensymphony.xwork2.ModelDriven;

/**

 * 客户的控制层

 * @author Administrator

 *

 */

public class CustomerAction extends ActionSupport implements ModelDriven<Customer>{

    //不要忘记手动new

    private Customer customer=new Customer();

    public Customer getModel() {

        return customer;

    }

    //提供service成员属性,提供set方法

    private CustomerService customerService;

    public void setCustomerService(CustomerService customerService) {

        this.customerService = customerService;

    }

    /**

     * 保存客户

     * @return

     */

    public String add(){

        System.out.println("WEB层,保存客户");

        //方式一:创建web的工厂(action由struts2创建)

        /*WebApplicationContext context=WebApplicationContextUtils.getWebApplicationContext(ServletActionContext.getServletContext());

        CustomerService cs=(CustomerService) context.getBean("customerService");

        //调用方法

        cs.save(customer);*/

        customerService.save(customer);

        return NONE;

    }

}
spring整合hibernate方式二:(不带有hibernate.cfg.xml的配置文件)
这里准备删除hibernate的核心配置文件,在删除之前,需要将其配置文件中的相关内容配置到spring的applicatioinContext.xml文件中取
1、查看hibernate.cfg.xml文件中的相关内容
* 数据库连接基本参数(4大参数)
* Hibernate相关的属性
* 连接池
* 映射文件
2、引入配置
引入连接池
<!-- 先配置C3p0的连接池 -->

    <bean id="dataSource" class="com.mchange.v2.c3p0.ComboPooledDataSource">

        <property name="driverClass" value="com.mysql.jdbc.Driver"/>

        <property name="jdbcUrl" value="jdbc:mysql://192.168.174.130:3306/SSH"/>

        <property name="user" value="root"/>

        <property name="password" value="root"/>

    </bean>
修改对应的sessionFactory:因为已经没有了hibernate.cfg.xml的配置文件,所以需要修改该配置,注入连接池
引入对象映射文件:因为已经没有了hibernate.cfg.xml的配置文件,不会扫描到该配置文件,需要注入
    <!-- 编写bean,名称都是固定的,有spring提供,用来加载hibernate.cfg.xml的配置文件-->

    <bean id="sessionFactory" class="org.springframework.orm.hibernate5.LocalSessionFactoryBean">

        <!--先加载连接池 -->

        <property name="dataSource" ref="dataSource"/>

        <!-- 加载方言,加载可选项 -->

        <property name="hibernateProperties">

            <props>

                <prop key="hibernate.dialect">org.hibernate.dialect.MySQLDialect</prop>

                <prop key="hibernate.show_sql">true</prop>

                <prop key="hibernate.format_sql">true</prop>

                <prop key="hibernate.hbm2ddl.auto">update</prop>

            </props>

        </property>

        <!-- 引入映射的配置文件 -->

        <property name="mappingResources">

            <list>

                <value>com/clj/domain/Customer.hbm.xml</value>

            </list>

        </property>

    </bean>
现在:applicationContext.xml全部代码如下
<?xml version="1.0" encoding="UTF-8"?>

<beans xmlns="http://www.springframework.org/schema/beans"

    xmlns:xsi="http://www.w3.org/2001/XMLSchema-instance"

    xmlns:context="http://www.springframework.org/schema/context"

    xmlns:aop="http://www.springframework.org/schema/aop"

    xmlns:tx="http://www.springframework.org/schema/tx"

    xsi:schemaLocation="http://www.springframework.org/schema/beans

    http://www.springframework.org/schema/beans/spring-beans.xsd

    http://www.springframework.org/schema/context

    http://www.springframework.org/schema/context/spring-context.xsd

    http://www.springframework.org/schema/aop

    http://www.springframework.org/schema/aop/spring-aop.xsd

    http://www.springframework.org/schema/tx

    http://www.springframework.org/schema/tx/spring-tx.xsd">

    <!-- 先配置C3p0的连接池 -->

    <bean id="dataSource" class="com.mchange.v2.c3p0.ComboPooledDataSource">

        <property name="driverClass" value="com.mysql.jdbc.Driver"/>

        <property name="jdbcUrl" value="jdbc:mysql://192.168.174.130:3306/SSH"/>

        <property name="user" value="root"/>

        <property name="password" value="root"/>

    </bean>

    <!-- 编写bean,名称都是固定的,有spring提供,用来加载hibernate.cfg.xml的配置文件-->

    <bean id="sessionFactory" class="org.springframework.orm.hibernate5.LocalSessionFactoryBean">

        <!--先加载连接池 -->

        <property name="dataSource" ref="dataSource"/>

        <!-- 加载方言,加载可选项 -->

        <property name="hibernateProperties">

            <props>

                <prop key="hibernate.dialect">org.hibernate.dialect.MySQLDialect</prop>

                <prop key="hibernate.show_sql">true</prop>

                <prop key="hibernate.format_sql">true</prop>

                <prop key="hibernate.hbm2ddl.auto">update</prop>

            </props>

        </property>

        <!-- 引入映射的配置文件 -->

        <property name="mappingResources">

            <list>

                <value>com/clj/domain/Customer.hbm.xml</value>

            </list>

        </property>

    </bean>

    <!-- 先配置平台事务管理器 -->

    <bean id="transactionManager" class="org.springframework.orm.hibernate5.HibernateTransactionManager">

        <!-- 注入事务,session能够管理事务,工厂能够创建session -->

        <property name="sessionFactory" ref="sessionFactory"/>

    </bean>

    <!-- 开启事务的注解 -->

    <tx:annotation-driven transaction-manager="transactionManager"/>

    <!-- 配置客户模块 -->

    <!-- 强调:配置的Aciton,必须是多列的 -->

    <bean id="customerAction" class="com.clj.web.action.CustomerAction" scope="prototype">

        <!--注意:struts管理action时,基于其中有个struts-plugin的jar包,其中更改了一个

        常量struts.objectFactory.spring.autoWire = name将其打开了,可以自动装配,只需要提供set方法

        但是此时action由spring管理,自动装配失效,所以需要手动进行配置注入

        -->

        <property name="customerService" ref="customerService"></property>

    </bean>

    <bean id="customerService" class="com.clj.service.CustomerServiceImpl">

        <property name="customerDao" ref="customerDao"></property>

    </bean>

    <!-- 以后,Dao都需要继承HibernateDaoSupport,注入sessionFactory -->

    <bean id="customerDao" class="com.clj.dao.CustomerDaoImpl">

        <!--<property name="hibernateTemplate" ref="hibernateTemplate"/>-->

        <!-- 这里不注入模板类,而是注入sessionFactory,因为模板需要session(封装了session)-->

        <property name="sessionFactory" ref="sessionFactory"/>

    </bean>

    <!-- 配置模板类(hibernate框架提供的,内部封装了session),此时交给spring管理,如果持久层继承了HibernateDaoSupport,则无需配置-->

    <!-- <bean id="hibernateTemplate" class="org.springframework.orm.hibernate5.HibernateTemplate">

        注入sessionFactory

        <property name="sessionFactory"/>

    </bean>-->

</beans>
此时可以安心的删除hibernate.cfg.xml文件了
这样SSH整合完毕
六、Hibernate模板常用方法
注意:以下代码省略了接口中的演示(偷了个懒,相信初学者不会看不懂)
1)插入:
持久层
package com.clj.dao;

import java.util.List;

import org.hibernate.criterion.DetachedCriteria;

import org.springframework.orm.hibernate5.HibernateTemplate;

import org.springframework.orm.hibernate5.support.HibernateDaoSupport;

import com.clj.domain.Customer;

/**

 * 持久层

 * 继承HibernateDaoSupport,内部封装了HibernateTemplate

 * @author Administrator

 *

 */

public class CustomerDaoImpl extends HibernateDaoSupport implements CustomerDao {

    @Override

    public void update(Customer customer) {

        // TODO Auto-generated method stub

        this.getHibernateTemplate().update(customer);

    }

}
业务层
package com.clj.service;

import java.util.List;

import org.springframework.transaction.annotation.Transactional;

import com.clj.dao.CustomerDao;

import com.clj.domain.Customer;

/**

 * 客户的业务层

 * @author Administrator

 *

 */

@Transactional

public class CustomerServiceImpl implements CustomerService{

    private CustomerDao customerDao;

    public void setCustomerDao(CustomerDao customerDao) {

        this.customerDao = customerDao;

    }

 @Override

    public void update(Customer customer) {

        // TODO Auto-generated method stub

        customerDao.update(customer);

    }

}
测试类
package com.clj.test;

import java.util.List;

import javax.annotation.Resource;

import org.junit.Test;

import org.junit.runner.RunWith;

import org.springframework.test.context.ContextConfiguration;

import org.springframework.test.context.junit4.SpringJUnit4ClassRunner;

import com.clj.domain.Customer;

import com.clj.service.CustomerService;

/**

 * 测试Hiberante模板类的简单方法

 * @author Administrator

 *

 */

@RunWith(SpringJUnit4ClassRunner.class)

@ContextConfiguration("classpath:applicationContext.xml")

public class Demo1 {

    @Resource(name="customerService")

    private CustomerService customerService;

    /**

     * 测试插入

     */

    @Test

    public void run1(){

        Customer customer=new Customer();

        customer.setCust_id(1L);

        customer.setCust_name("测试");

        customerService.update(customer);

    }

}
2)以下为指定查询、查询所有、离线查询代码
持久层
package com.clj.dao;

import java.util.List;

import org.hibernate.criterion.DetachedCriteria;

import org.springframework.orm.hibernate5.HibernateTemplate;

import org.springframework.orm.hibernate5.support.HibernateDaoSupport;

import com.clj.domain.Customer;

/**

 * 持久层

 * 继承HibernateDaoSupport,内部封装了HibernateTemplate

 * @author Administrator

 *

 */

public class CustomerDaoImpl extends HibernateDaoSupport implements CustomerDao {

    //将数据保存到数据库中(调用模板类(hibernate提供,内部封装了session))

    /*private HibernateTemplate hibernateTemplate;

    public void setHibernateTemplate(HibernateTemplate hibernateTemplate) {

        this.hibernateTemplate = hibernateTemplate;

    }*/

    /**

     * 保存客户

     */

    public void save(Customer customer) {

        System.out.println("持久层:保存客户");

        this.getHibernateTemplate().save(customer);

    }

    @Override

    public void update(Customer customer) {

        // TODO Auto-generated method stub

        this.getHibernateTemplate().update(customer);

    }

    /**

     * 通过主键查询

     */

    public Customer getById(Long id) {

        return this.getHibernateTemplate().get(Customer.class, id);

    }

    /**

     * 查询所有

     */

    @Override

    public List<Customer> findAll() {

        String sql="from Customer";

        List<Customer> list=(List<Customer>) this.getHibernateTemplate().find(sql);

        return list;

    }

    /**

     * QBC离线查询

     */

    @Override

    public List<Customer> findAllByQBC() {

        DetachedCriteria criteria=DetachedCriteria.forClass(Customer.class);

        List<Customer> list=(List<Customer>) this.getHibernateTemplate().findByCriteria(criteria);

        return list;

    }

}
业务层
package com.clj.service;

import java.util.List;

import org.springframework.transaction.annotation.Transactional;

import com.clj.dao.CustomerDao;

import com.clj.domain.Customer;

/**

 * 客户的业务层

 * @author Administrator

 *

 */

@Transactional

public class CustomerServiceImpl implements CustomerService{

    private CustomerDao customerDao;

    public void setCustomerDao(CustomerDao customerDao) {

        this.customerDao = customerDao;

    }

    //用来保存客户

    public void save(Customer customer) {

        System.out.println("业务层,保存客户");

        customerDao.save(customer);

    }

    @Override

    public void update(Customer customer) {

        // TODO Auto-generated method stub

        customerDao.update(customer);

    }

    @Override

    public Customer getById(Long id) {

        // TODO Auto-generated method stub

        return customerDao.getById(id);

    }

    @Override

    public List<Customer> findAll() {

        return customerDao.findAll();

    }

    @Override

    public List<Customer> findAllByQBC() {

        // TODO Auto-generated method stub

        return customerDao.findAllByQBC();

    }

}
测试类
package com.clj.test;

import java.util.List;

import javax.annotation.Resource;

import org.junit.Test;

import org.junit.runner.RunWith;

import org.springframework.test.context.ContextConfiguration;

import org.springframework.test.context.junit4.SpringJUnit4ClassRunner;

import com.clj.domain.Customer;

import com.clj.service.CustomerService;

/**

 * 测试Hiberante模板类的简单方法

 * @author Administrator

 *

 */

@RunWith(SpringJUnit4ClassRunner.class)

@ContextConfiguration("classpath:applicationContext.xml")

public class Demo1 {

    @Resource(name="customerService")

    private CustomerService customerService;

    /**

     * 测试插入

     */

    @Test

    public void run1(){

        Customer customer=new Customer();

        customer.setCust_id(1L);

        customer.setCust_name("测试");

        customerService.update(customer);

    }

    /**

     * 测试查询指定的客户

     */

    @Test

    public void run2(){

        Customer customer=customerService.getById(2L);

        System.out.println(customer);

    }

    /**

     * 查询所有的客户

     */

    @Test

    public void run3(){

        List<Customer> list=customerService.findAll();

        System.out.println(list);

    }

    /**

     * QBC(离线查询)

     */

    @Test

    public void run4(){

        List<Customer> list=customerService.findAllByQBC();

        System.out.println(list);

    }

}
七、关于SSH延迟加载问题
1. 使用延迟加载的时候,再WEB层查询对象的时候程序会抛出异常!
* 原因是延迟加载还没有发生SQL语句,在业务层session对象就已经销毁了,所以查询到的JavaBean对象已经变成了托管态对象!
* 注意:一定要先删除javassist-3.11.0.GA.jar包(jar包冲突了)
2. 解决办法
Spring框架提供了一个过滤器,让session对象在WEB层就创建,在WEB层销毁。只需要配置该过滤器即可
* 但是:要注意需要在struts2的核心过滤器之前进行,spring监听器之后配置
<!-- 解决延迟加载的问题 -->

         <filter>

            <filter-name>OpenSessionInViewFilter</filter-name>

            <filter-class>org.springframework.orm.hibernate5.support.OpenSessionInViewFilter</filter-class>

        </filter>

        <filter-mapping>

            <filter-name>OpenSessionInViewFilter</filter-name>

            <url-pattern>/*</url-pattern>

        </filter-mapping>
3、演示延迟加载
持久层:调用load方法,此方法时延迟加载的
/**

     * 延迟加载

     */

    @Override

    public Customer loadById(long id) {

        // TODO Auto-generated method stub

        return this.getHibernateTemplate().load(Customer.class, id);

    }
业务层
@Override

    public Customer loadById(long id) {

        // TODO Auto-generated method stub

        return customerDao.loadById(id);

    }
测试类
@Test

    public void run5(){

        Customer customer=customerService.loadById(2L);

        System.out.println(customer);

    }
Spring+Hibernate+Struts(SSH)框架整合的更多相关文章
- MVC+Spring.NET+NHibernate .NET SSH框架整合 C# 委托异步 和 async /await 两种实现的异步 如何消除点击按钮时周围出现的白线? Linq中 AsQueryable(), AsEnumerable()和ToList()的区别和用法
MVC+Spring.NET+NHibernate .NET SSH框架整合 在JAVA中,SSH框架可谓是无人不晓,就和.NET中的MVC框架一样普及.作为一个初学者,可以感受到.NET出了MV ...
- SSH框架整合
SSH框架整合 一.原理图 action:(struts2) 1.获取表单的数据 2.表单的验证,例如非空验证,email验证等 3.调用service,并把数据传递给service Service: ...
- SSH 框架整合总结
1. 搭建Struts2 环境 创建 struts2 的配置文件: struts.xml; 在 web.xml 中配置 struts2 的核心过滤器; // struts.xml <?xml v ...
- J2EE SSH框架整合教程
本文仅作为学习和研究的参考,与实际项目使用技术有所不同,由于作者水平有限,错误疏漏在所难免,请各位看官批评指教. 项目的源代码放在:https://github.com/Frank-Pei/SSHIn ...
- ssh框架整合之登录以及增删改查
1.首先阐述一下我用得开发工具,myeclipse2017+oracle,所以我的基本配置步骤可能不一样,下面我用几张图来详解我的开发步骤. ---1先配置structs (Target 选择apac ...
- SSH框架整合的其它方式
--------------------siwuxie095 SSH 框架整合的其它方式 1.主要是整合 Spring 框架和 Hibernate 框架时,可以不写 Hibernate 核心配置文件: ...
- SSH框架整合过程总结
---------------------siwuxie095 SSH 框架整合过程总结 (一)导入相关 jar 包(共 ...
- SSH框架整合思想
--------------------siwuxie095 SSH 框架整合思想 1.SSH 框架,即 Struts2 ...
- dwr与ssh框架整合教程
(1)dwr与ssh框架整合教程dwr框架介绍. DWR(Direct Web Remoting)是一个用于改善web页面与Java类交互的远程服务器端Ajax开源框架,可以帮助开 发人员开发包含AJ ...
随机推荐
- Python 终端输出字体颜色
终端的字符颜色是用转义序列控制的,是文本模式下的系统显示功能,和具体的语言无关. 转义序列是以ESC开头,即用\033来完成(ESC的ASCII码用十进制表示是27,用八进制表 ...
- Chrome 浏览器各版本下载大全【转载】
随着最近64位版本的 Chrome 浏览器正式版的推出,Chrome 浏览器再次受到广大浏览迷的重点关注,今天我们就整理一下各版本的 Chrome 浏览器 32位及64位的下载地址,方便各位浏览迷选择 ...
- ADS协议变量配置界面
ADS协议是倍福产品的通信协议,在双击ADS协议图标后打开如下图的配置窗口. 变量配置表中各列的含义: 报警类型: 脚本: 当设置了报类型时,在运行时如果变量值引发报警时将执行一次脚本.例如 大于报警 ...
- webuploader 上传文件 生成链接下载文件
最近 在asp.net MVC 项目 需要实现一个Excel和 图片上传功能.之前有使用过SWFUpload 做过上传图片功能,在本次实现过程中,有人推荐WebUploader 上传组件,因此采用we ...
- PHP中文关键词匹配
关键词匹配是比较常见的需求,如留言.弹幕及游戏聊天中的敏感词过滤,都需要对一段文字进行关键词匹配.提取到关键词后,再做进一步处理. 本类借助PHP高效的数组和mbstring扩展,来实现对中文关键词的 ...
- Centos网口流量实时监控
iptraf方式 [root@kazihuo ~]# yum -y install iptraf [root@kazihuo ~]# iptraf-ng-ng 开启服务日志: 进入细节监控后提示日志路 ...
- Algorithm --> 小于N的正整数含有1的个数
//https://leetcode.com/problems/number-of-digit-one/ Given an integer n, count the total number of d ...
- java.lang的详细解读
软件包 java.lang 提供java编程语言实现程序设计的基础类 接口摘要 1> appendable 提供被添加char序列和值的对象 2>charSquence char值 ...
- java必学的5种排序算法
第一种冒泡排序 第二种 选择排序 第三种.插入排序
- 如何图形化创建oracle数据库
需要注意的几点 1.如果用oracle客户端访问服务器的话必须把服务器的主机名写成(计算机的名称)Oracle创建数据库的方法 2.navigate如何远程oracle数据库 E:\app\lenov ...