nexus 搭建 maven 私服
本机环境
Win 8 JDK 7 Maven 3.2 Nexus 2.11
版本选择
http://www.sonatype.org/nexus/archived
nexus 2.6 及 2.6+ 版本要求 jdk 1.7 或 1.7+ 版本(jdk 1.6 请选择 nexus 2.5 及 以下版本)。根据你现有的环境来选择合适的版本。
这里选择 nexus-2.11.0 (如果无法打开下载, 可将新标签页地址栏中的地址复制到迅雷等下载工具中进行下载)。
下载得到 nexus-2.11.0-bundle.zip 压缩包。解压缩里面的 nexus-2.11.0-02 目录,如我的 E:\setup\dev\servers\nexus, 最终得到
的目录结构为 E:\setup\dev\servers\nexus\nexus-2.11.0-02。
配置 nexus 环境
NEXUS_HOME = E:\setup\dev\servers\nexus\nexus-2.11.0-02
Path = .;%NEXUS_HOME%\bin
安装 nexus 服务
如果你所使用的是 Win8 操作系统,以下操作需要管理员权限。在命令行中执行 nexus install(Win8 系统组合键为 Ctrl + X, A):
wrapper | nexus installed.
启动 nexus
在命令行中执行 nexus start:
wrapper | Starting the nexus service...
wrapper | Waiting to start...
wrapper | Waiting to start...
wrapper | Waiting to start...
wrapper | nexus started.
页面访问的入口地址:http://localhost:8081/nexus
登录 nexus
默认的管理员账号是:admin, 密码是:admin123
停止 nexus
在命令行中执行 nexus stop:
wrapper | Stopping the nexus service...
wrapper | Waiting to stop...
wrapper | nexus stopped.
修改 nexus 账号密码
nexus 的密码采用 SHA1 加密算法 ( 在线加密工具 ),将加密后的 SHA1 串(小写)拷贝覆盖原来的。重启 nexus:nexus restart 。
<id>admin</id>
<firstName>Administrator</firstName>
<lastName>User</lastName>
<password>2899441143e28aee7287e8da3d7211258f5edbd3</password>
<status>active</status>
<email>fanlychie@yeah.net</email>
</user>
修改 nexus 端口
打开 %NEXUS_HOME%\nexus-2.11.0-02\conf\nexus.properties, 修改 application-port 的值。重启 nexus:nexus restart 。
application-host=0.0.0.0
nexus-webapp=${bundleBasedir}/nexus
nexus-webapp-context-path=/nexus
仓库类型
打开 Views/Repositories --> Repositories 视图 
nexus 仓库分为 4 种,group(仓库组)、hosted(宿主仓库)、proxy(代理仓库)、virtual(虚拟仓库)。
我们自己开发的构件通常是发布到 hosted 仓库,proxy 用来代理远程的公共仓库,一个 group 可以包含多个 hosted/proxy 仓库。
仓库组
打开 Views/Repositories --> Repositories --> Public Repositories --> Configuration 视图 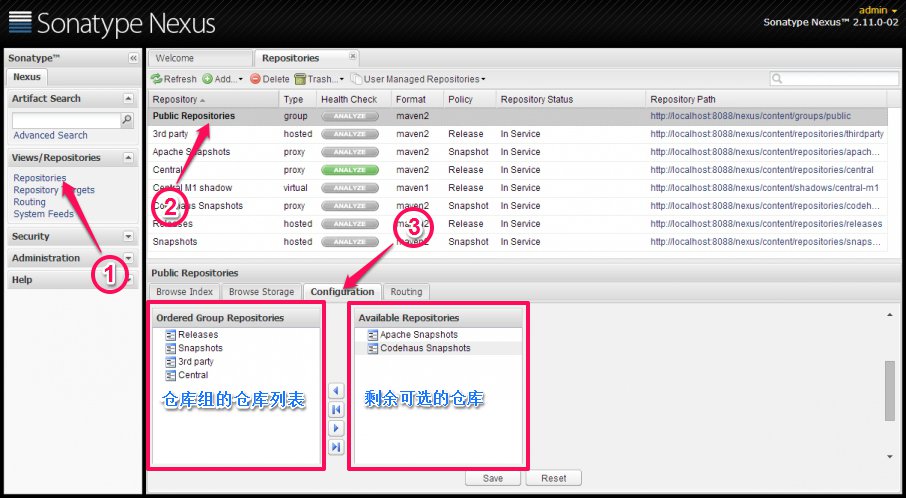
Configuration 栏的左边是仓库组仓库列表,右边是当前可选的仓库,可以从右边挑选合适的仓库加入到左边的仓库组,点击 Save 保存即可。
一个仓库组通常包含了多个仓库,仓库组中的仓库列表的顺序决定了构件下载时遍历的仓库的先后次序,因此,建议将远程中央仓库(Central)放
到仓库组的最后一项。
maven settings.xml 配置
在 settings.xml 配置文件中添加如下配置:
<server>
<id>releases</id>
<username>admin</username>
<password>admin123</password>
</server>
<server>
<id>snapshots</id>
<username>admin</username>
<password>admin123</password>
</server>
<server>
<id>thirdparty</id>
<username>admin</username>
<password>admin123</password>
</server>
</servers>
<mirrors>
<mirror>
<id>nexus</id>
<mirrorOf>*</mirrorOf>
<name>nexus public repositories</name>
<url>http://127.0.0.1:8088/nexus/content/groups/public</url>
</mirror>
</mirrors>
发布构件
在 nexus 中找到如下的视图页面: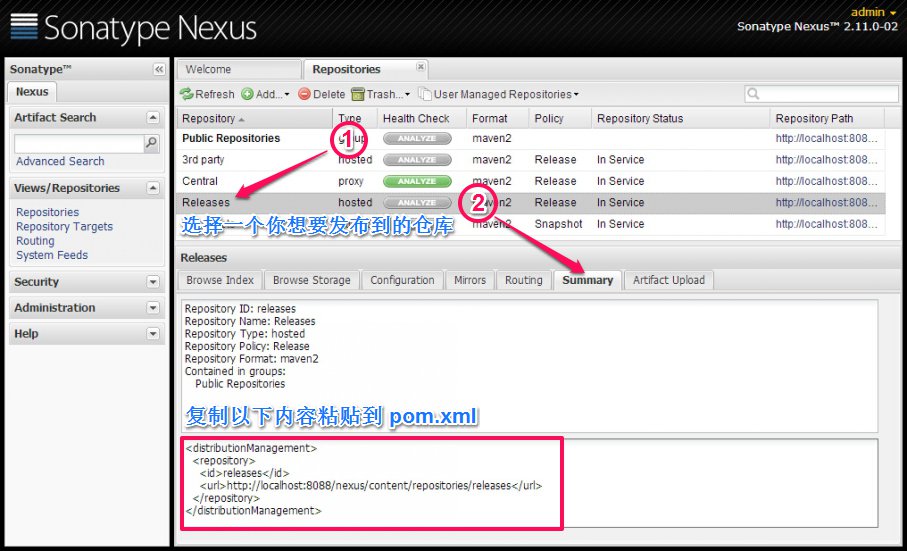
复制以上的配置,粘贴到你的 pom.xml 配置文件中:
xsi:schemaLocation="http://maven.apache.org/POM/4.0.0 http://maven.apache.org/xsd/maven-4.0.0.xsd">
<modelVersion>4.0.0</modelVersion>
<groupId>org.fanlychie</groupId>
<artifactId>proj</artifactId>
<version>1.0.0</version>
<packaging>jar</packaging>
<name>proj</name>
<url>http://maven.apache.org</url>
<distributionManagement>
<repository>
<id>releases</id>
<url>http://localhost:8088/nexus/content/repositories/releases</url>
</repository>
</distributionManagement>
</project>
这里需要注意的是,repository 节点的 id 需与 settings.xml 中配置的 server 节点的 id 相同,如果不相同,修改任意一方都可以,只
要让它们保持一致即可,否则,发布构件的时候会报 401,ReasonPhrase:Unauthorized 的错误,原因是无法认证用户的身份。
右键项目,Run As --> Maven build...,在 Goals 栏输入 deploy 或在命令行(cmd)执行 mvn deploy,在控制台若能看到
BUILD SUCCESS,表明构件发布成功。你可以在 nexus 的 Releases 仓库中找到这个构件:
发布构件的时候,如果想把源码也一起发布出去(执行 mvn dependency:sources 可获得源码),配置如下:
xsi:schemaLocation="http://maven.apache.org/POM/4.0.0 http://maven.apache.org/xsd/maven-4.0.0.xsd">
<modelVersion>4.0.0</modelVersion>
<groupId>org.fanlychie</groupId>
<artifactId>proj</artifactId>
<version>1.0.1</version>
<packaging>jar</packaging>
<name>proj</name>
<url>http://maven.apache.org</url>
<distributionManagement>
<repository>
<id>releases</id>
<url>http://localhost:8088/nexus/content/repositories/releases</url>
</repository>
</distributionManagement>
<build>
<plugins>
<plugin>
<groupId>org.apache.maven.plugins</groupId>
<artifactId>maven-source-plugin</artifactId>
<version>2.4</version>
<executions>
<execution>
<id>attach-sources</id>
<phase>install</phase>
<goals>
<goal>jar-no-fork</goal>
</goals>
</execution>
</executions>
</plugin>
</plugins>
</build>
</project>
同一个构件是不允许发布两次的,先修改一下构件的版本,然后 deploy,结果如图: 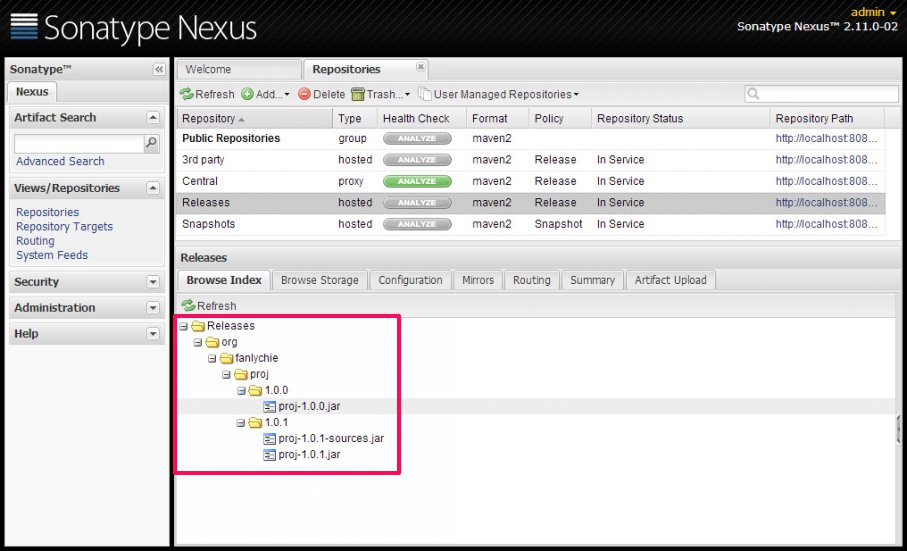
发布快照
快照用于区分稳定与不稳定的构件(发布的版本就是稳定的,快照版本是不稳定的)。构件的升级通常会带来许多的不稳定性,需要不断的修复,
快照可以避免由于升级带来的不稳定性迫使的不停的升级版本号,最终造成版本号的泛滥的问题。快照允许重新发布,而不需要变更构件的版本号。
在 nexus 中找到如下的视图页面: 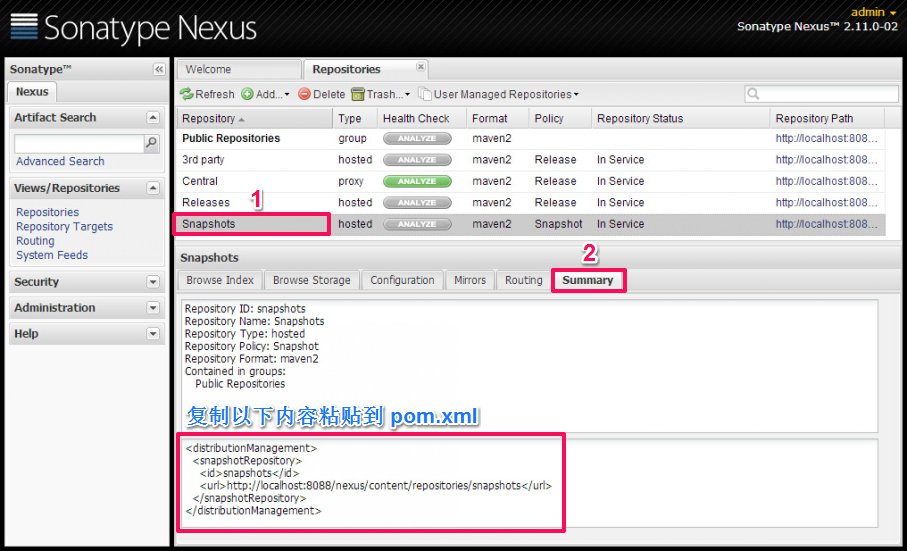
复制以上的配置,粘贴到你的 pom.xml 配置文件中:
xsi:schemaLocation="http://maven.apache.org/POM/4.0.0 http://maven.apache.org/xsd/maven-4.0.0.xsd">
<modelVersion>4.0.0</modelVersion>
<groupId>org.fanlychie</groupId>
<artifactId>proj</artifactId>
<version>2.0.0-SNAPSHOT</version>
<packaging>jar</packaging>
<name>proj</name>
<url>http://maven.apache.org</url>
<distributionManagement>
<repository>
<id>releases</id>
<url>http://localhost:8088/nexus/content/repositories/releases</url>
</repository>
<snapshotRepository>
<id>snapshots</id>
<url>http://localhost:8088/nexus/content/repositories/snapshots</url>
</snapshotRepository>
</distributionManagement>
<build>
<plugins>
<plugin>
<groupId>org.apache.maven.plugins</groupId>
<artifactId>maven-source-plugin</artifactId>
<version>2.4</version>
<executions>
<execution>
<id>attach-sources</id>
<phase>install</phase>
<goals>
<goal>jar-no-fork</goal>
</goals>
</execution>
</executions>
</plugin>
</plugins>
</build>
</project>
版本号含有 SNAPSHOT 的构件将发布到 Snapshots 仓库,否则,将发布到 Releases 仓库。执行发布命令:mvn deploy,结果如图: 
发布第三方构件
步骤见下图的标注: 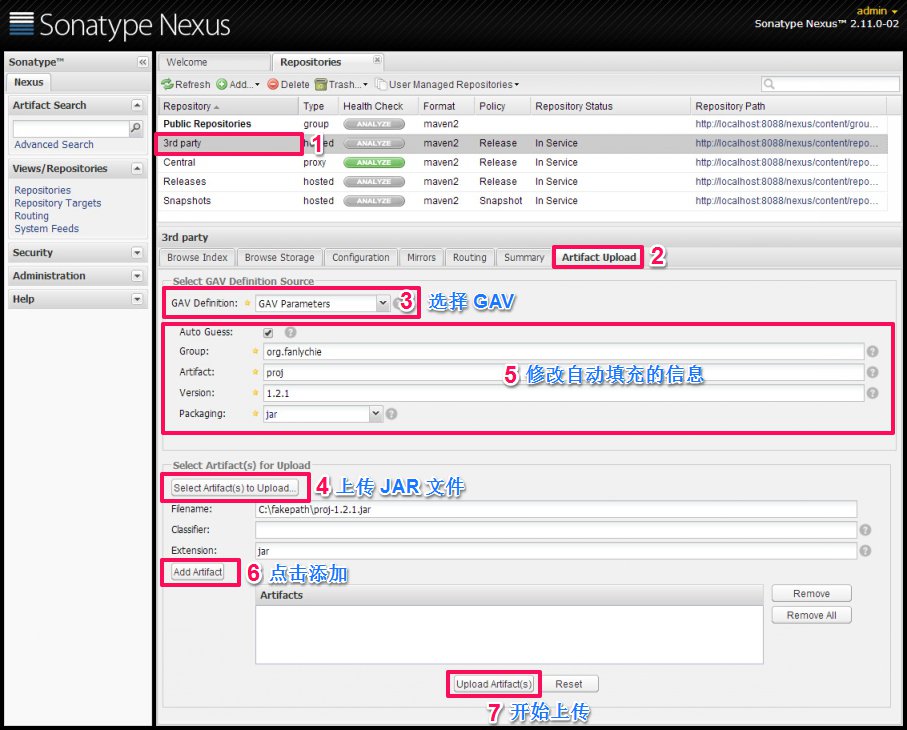
命令行方式发布:
-Dfile=JAR文件的路径 -Durl=http://127.0.0.1:8088/nexus/content/repositories/thirdparty -DrepositoryId=thirdparty
远程索引
在 nexus 中找到如下的视图页面: 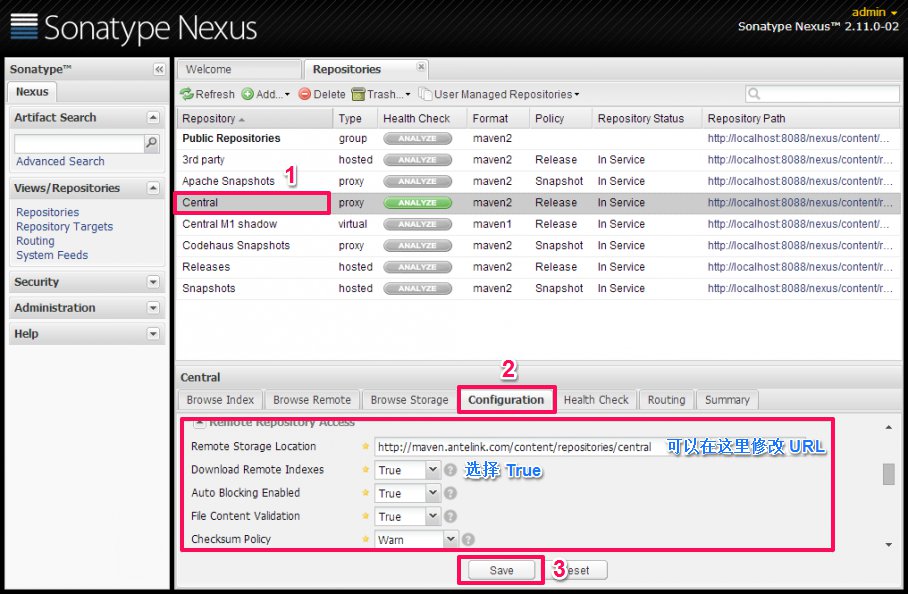
保存之后,在左侧面板中选择 Administration --> Scheduled Tasks,如下图: 
可以看到这里有一个 Repair Repositories Index 任务,任务完成之后会自动从面板中移除,点击左上角的 Refresh 按钮来查看。任务完成
之后回到 Repositories 面板,选择 Central 仓库右键,选择 Update Index,再回到 Scheduled Tasks 面板,可以看到有一个 Update
Repositories Index 任务,这个任务花时较长,任务完成之后,回到 Repositories 面板,在 Browse Index 中可以看到从远程仓库下载回
来的索引文件,有了索引,即使 nexus 私服还没有你想要构件,你也可以搜索出你想要查找的构件。 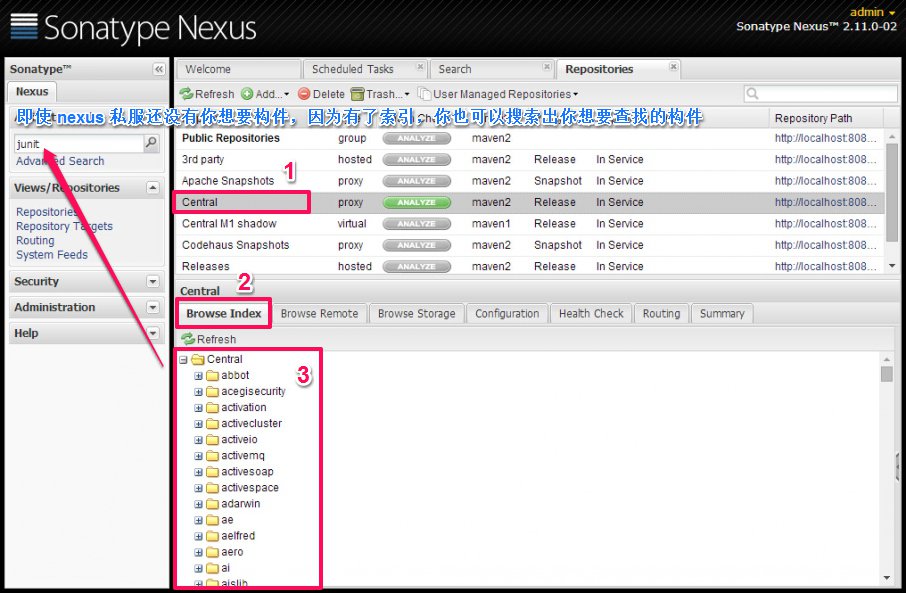
nexus 搭建 maven 私服的更多相关文章
- Maven-004-使用 Nexus 搭建 maven 私服
从去年至今,自己一直在学习自动化测试工具,想利用自动化工具尽可能的将重复的.关键的.耗时耗力的工作实现自动化,减轻日常测试工作,提升测试效率.在学习的过程中,将 maven 作为了项目开发管理工具,进 ...
- Maven使用笔记(五)Sonatype Nexus 搭建Maven 私服
1. 为什么使用Nexus 如果没有私服,我们所需的所有构件都需要通过maven的中央仓库和第三方的Maven仓库下载到本地, 而一个团队中的所有人都重复的从maven仓库下载构件无疑加大了仓库的负载 ...
- Maven——使用Nexus搭建Maven私服
原文:http://www.cnblogs.com/xdp-gacl/p/4068967.html Maven学习总结(九)--使用Nexus搭建Maven私服 一.搭建nexus私服的目的 为什么要 ...
- (转)Maven学习总结(九)——使用Nexus搭建Maven私服
孤傲苍狼只为成功找方法,不为失败找借口! Maven学习总结(九)——使用Nexus搭建Maven私服 一.搭建nexus私服的目的 为什么要搭建nexus私服,原因很简单,有些公司都不提供外网给项目 ...
- Maven学习二:使用Nexus搭建Maven私服及相关配置
处于安全等原因的考虑,一些企业内部网络是不允许访问外部网络的,但是项目内部搭建的项目又是Maven架构,这样就需要企业在内部网络中搭建自己的Maven仓库服务,再者一些大型企业或者内部模块化组件化划分 ...
- 使用Nexus搭建Maven私服问题总结
#业务场景 最近项目要交付给客户了,之前项目开发和测试一直都是使用公司内部的一套环境,项目交付后客户购置了大量服务器,也要将整套测试环境迁移至客户的服务器上,后续的需求变更以及新需求的开发都会在客户服 ...
- nexus搭建maven私服及私服jar包上传和下载
nexus搭建maven私服及私服jar包上传和下载 标签: nexus管理maven库snapshot 2017-06-28 13:02 844人阅读 评论(0) 收藏 举报 分类: Maven(1 ...
- ubuntu下使用Nexus搭建Maven私服
ubuntu下使用Nexus搭建Maven私服 1.私服简介: 私服是架设在局域网的一种特殊的远程仓库,目的是代理远程仓库及部署第三方构件.有了私服之后,当 Maven 需要下载构件时,直接请求私服, ...
- 使用Sonatype Nexus搭建Maven私服后,如何添加第三方JAR包
使用Sonatype Nexus搭建Maven私服后如何添加第三方JAR包 步骤如下 1.打开nexus地址,进行登录 2.登录Nexus后,点击右侧的“Repositories”,显示当前Nexus ...
随机推荐
- ubuntu搭建开发环境踩坑实录
谨以此文,记录和ubuntu系统不死不休的搏斗过程,后续待补. 1.双系统安装,windows采用uefi模式安装(优启通可制作uefi的win10安装盘),ubuntu不要划分boot区,而应该划分 ...
- bzoj1138
dp+spfa优化 最朴素的dp是dp[i][j]表示i->j的最短路,然后把所有pair(i,i)放到队列里跑spfa,但是这样被卡掉了,那么我们要优化一下 问题在于每次我们转移的时候要枚举i ...
- redis info 参数说明
原文: redis info 参数说明 redis 127.0.0.1:6381> info redis_version:2.4.16 # Redis 的版本redis_git_sha1:000 ...
- MVC接受JSON的一些注意事项
1.MVC接受前端传的JSON数据,相应的接受参数的位置使用@RequestBody注解进行标注 2.JSON传空字符串时,后台使用Integer进行接受时,会报for String ''一堆乱七八糟 ...
- 3 Java对象的内存布局以及对象的访问定位
先来看看Java对象在内存中的布局 一 Java对象的内存布局 在HotSpot虚拟机中,对象在内存中的布局分为3个区域 对象头(Header) Mark Word(在32bit和64bit虚拟机 ...
- python服务之flask
前言: 关于python flask 的介绍.指导.案例,网络上比比皆是.这里参考官网:http://www.pythondoc.com/flask/index.html 你可能不知道的flask服务 ...
- Hdu 5379 Mahjong tree (dfs + 组合数)
题目链接: Hdu 5379 Mahjong tree 题目描述: 给出一个有n个节点的树,以节点1为根节点.问在满足兄弟节点连续 以及 子树包含节点连续 的条件下,有多少种编号方案给树上的n个点编号 ...
- [ZPG TEST 110] 多边形个数【DP】
1. 多边形个数 (polygons.pas/c/cpp) [问题描述] 给定N线段,编号1到n.并给出这些线段的长度,用这些线段组成一个K边形,并且每个线段做多使用一次.若使用了一条不同编号的线段, ...
- 【洛谷4769】[NOI2018] 冒泡排序(动态规划_组合数学)
题目: 洛谷 4769 博客页面左下角的嘴嘴瓜封神之战中的题目 分析: 一个排列交换次数为 \(\frac{1}{2}\sum_{i=1}^{n}|i-p_i|\) 的充要条件是这个排列不存在长度为 ...
- 尺取法 POJ 3320 Jessica's Reading Problem
题目传送门 /* 尺取法:先求出不同知识点的总个数tot,然后以获得知识点的个数作为界限, 更新最小值 */ #include <cstdio> #include <cmath> ...