什么!你还不会写Vue组件,编写《功能级权限》匹配公式组件
说明
该文章是属于OverallAuth2.0系列文章,每周更新一篇该系列文章(从0到1完成系统开发)。
该系统文章,我会尽量说的非常详细,做到不管新手、老手都能看懂。
说明:OverallAuth2.0 是一个简单、易懂、功能强大的权限+可视化流程管理系统。
友情提醒:本篇文章是属于系列文章,看该文章前,建议先看之前文章,可以更好理解项目结构。
qq群:801913255,进群有什么不懂的尽管问,群主都会耐心解答。
有兴趣的朋友,请关注我吧(*^▽^*)。

关注我,学不会你来打我
前言
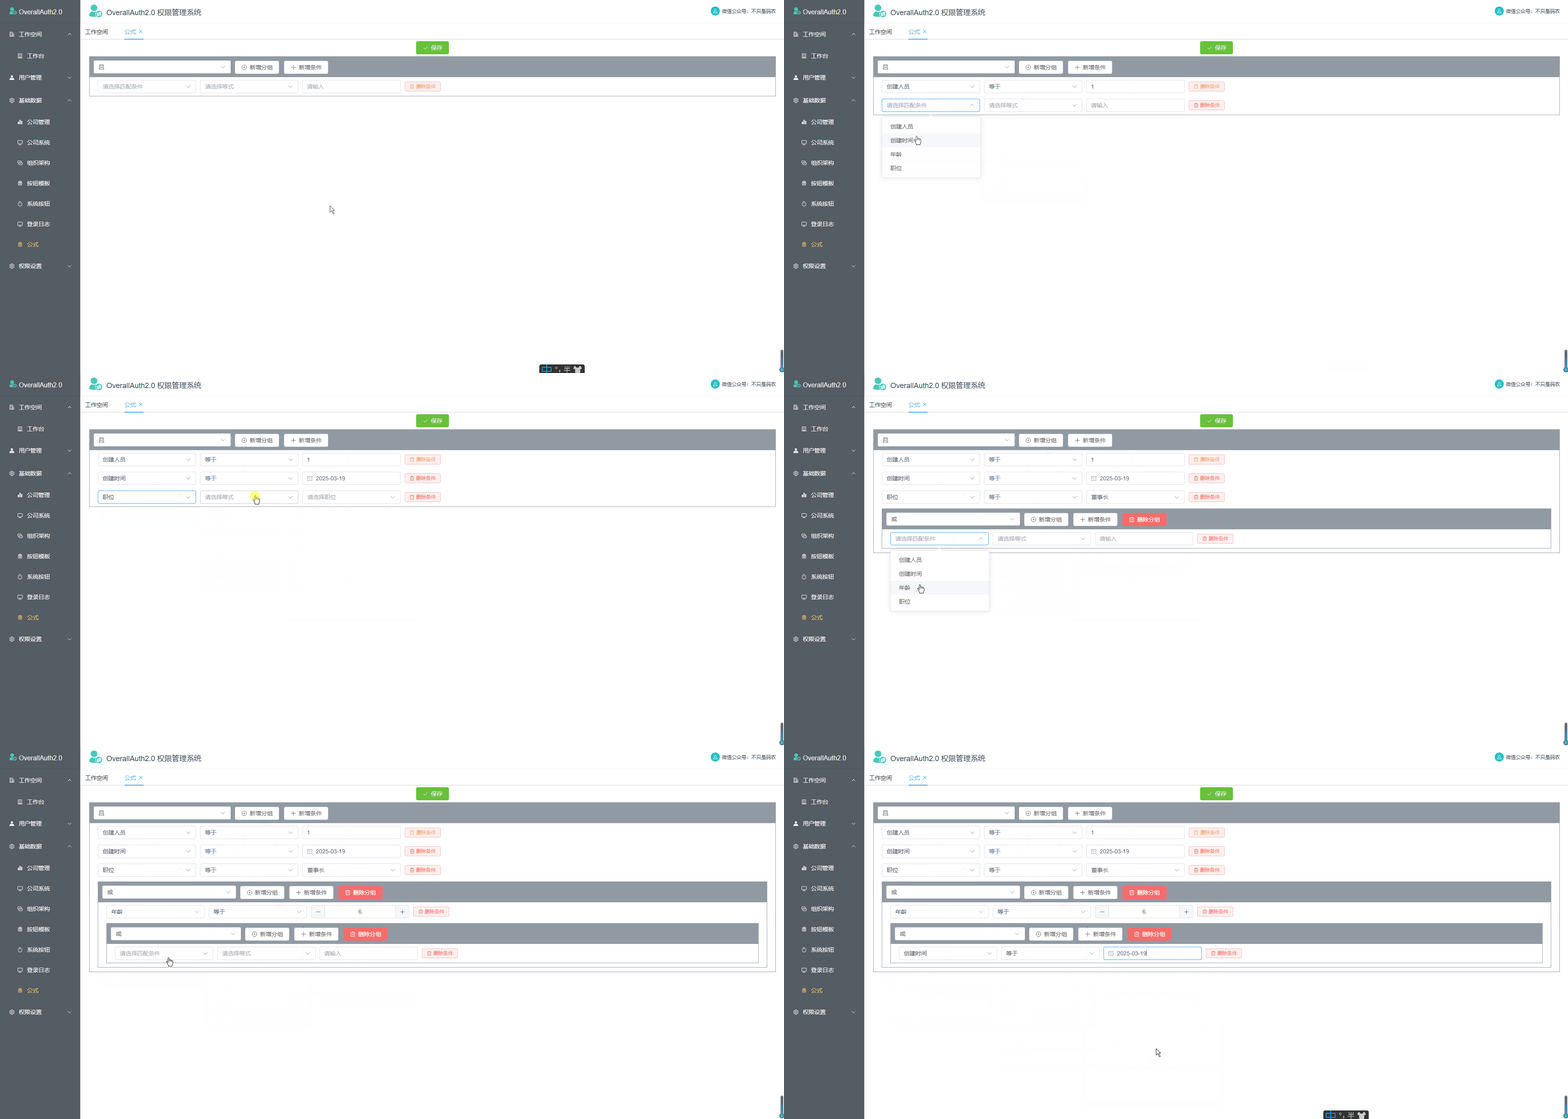
该篇文章是实现【功能级权限】的开篇文章,其主要实现内容如下图↓
该图为功能级权限匹配插件
创建模型和数据源
在实现组件前,先要使用TS把模型和数据源创建好
我的文档目录如:Src->model->match->index.ts 依托于开源项目OverallAuth2.0统一权限分发中心的系统架构
创建匹配条件的关系


//组条件

export const matchingGroup = [

    {

        label: '且',

        value: 'And',

        disabled: false

    },

    {

        label: '或',

        value: 'Or',

        disabled: false

    }

]
创建匹配组件模型


//公式匹配模型

export interface matchingData {

    id: string;

    // 父级id

    pid: string;

    //匹配组(and,or)

    matchGroup: string;

    //层级

    level: number;

    //匹配条件

    matchingWhere: matchingWhereData[];

    //子集

    children: matchingData[];

}

//匹配条件模型

export interface matchingWhereData {

    //主键

    id: string;

    //字段key(选中的字段)

    fieldKey: string;

    //等式符号key(选中的符号)

    matchEquationKey: string;

    //匹配数据key(选中的匹配值)

    matchDataKey: string;

}
创建生成随机id的方法


/* 生成随机不重复id */

export const randamId = function () {

    let n = 1;

    let arr = [];

    for (let i = 0; i < n; i++) {

        arr[i] = parseInt((Math.random() * 10000000000).toString());

    }

    for (let i = 0; i < n; i++) {

        for (let j = i + 1; j < n; j++) {

            if (arr[i] === arr[j]) {

                randamId();

                return false;

            }

        }

    }

    return ("Item-" + arr).toString();

};
编写组件
我的页面目录:Src->views->match->index.vue Src->views->match->match.vue
编写match.vue页面代码


<template>

  <div class="plandiv">

    <div v-for="item in data" :key="item.id" class="forDiv">

      <div class="groupDiv">

        <div class="groupBackColor">

          <div style="width: 20%">

            <el-select

              v-model="item.matchGroup"

              placeholder="请选择"

              style="

                float: left;

                margin-right: 10px;

                margin-left: 10px;

                min-width: 100px;

              "

            >

              <el-option

                v-for="group in matchingGroup"

                :key="group.value"

                :label="group.label"

                :value="group.value"

              />

            </el-select>

          </div>

          <div style="width: 80%">

            <div class="buttonStyle">这里放操作按钮</div>

          </div>

        </div>

      </div>

    </div>

  </div>

</template>

<script  lang="ts" >

import {

  matchingData,

  matchingGroup,

  matchingWhere,

  matchingEquation,

  positionList,

} from "@/model/match";

import { defineComponent, PropType } from "vue";

export default defineComponent({

  name: "xc-match",

  props: {

    data: {

      type: Object as PropType<matchingData[]>,

      required: true,

    },

  },

  setup() {

    return {

      matchingGroup,

      matchingWhere,

      matchingEquation,

      positionList,

    };

  },

  components: {},

});

</script>

<style  scoped>

/* 最外层样式 */

.plandiv {

  background-color: white;

  height: auto;

}

/* 循环层样式 */

.forDiv {

  overflow-y: auto;

}

/* 分组样式 */

.groupDiv {

  border: 1px solid #919aa3;

  width: auto;

  height: auto;

  margin-top: 5px;

  margin-right: 20px;

  margin-bottom: 10px;

  margin-left: 20px;

}

/* 组条件背景色 */

.groupBackColor {

  background-color: #919aa3;

  height: 50px;

  line-height: 50px;

  display: flex;

  width: 100%;

  justify-content: center;

  align-items: center;

}

/* 按钮样式 */

.buttonStyle {

  text-align: left;

  margin-left: 20px;

}

</style>
编写index.vue页面代码


<template>

    <match :data="pageList"></match>

</template>

<script lang="ts" setup>

import { matchingData, randamId } from "@/model/match";

import { ref } from "vue";

import match from "../match/match.vue";

const pageList = ref<matchingData[]>([

  {

    id: "Group-1",

    pid: "0",

    matchGroup: "And",

    level: 1,

    matchingWhere: [

      {

        id: randamId().toString(),

        fieldKey: "",

        matchEquationKey: "",

        matchDataKey: "",

      },

    ],

    children: [],

  },

]);

</script>
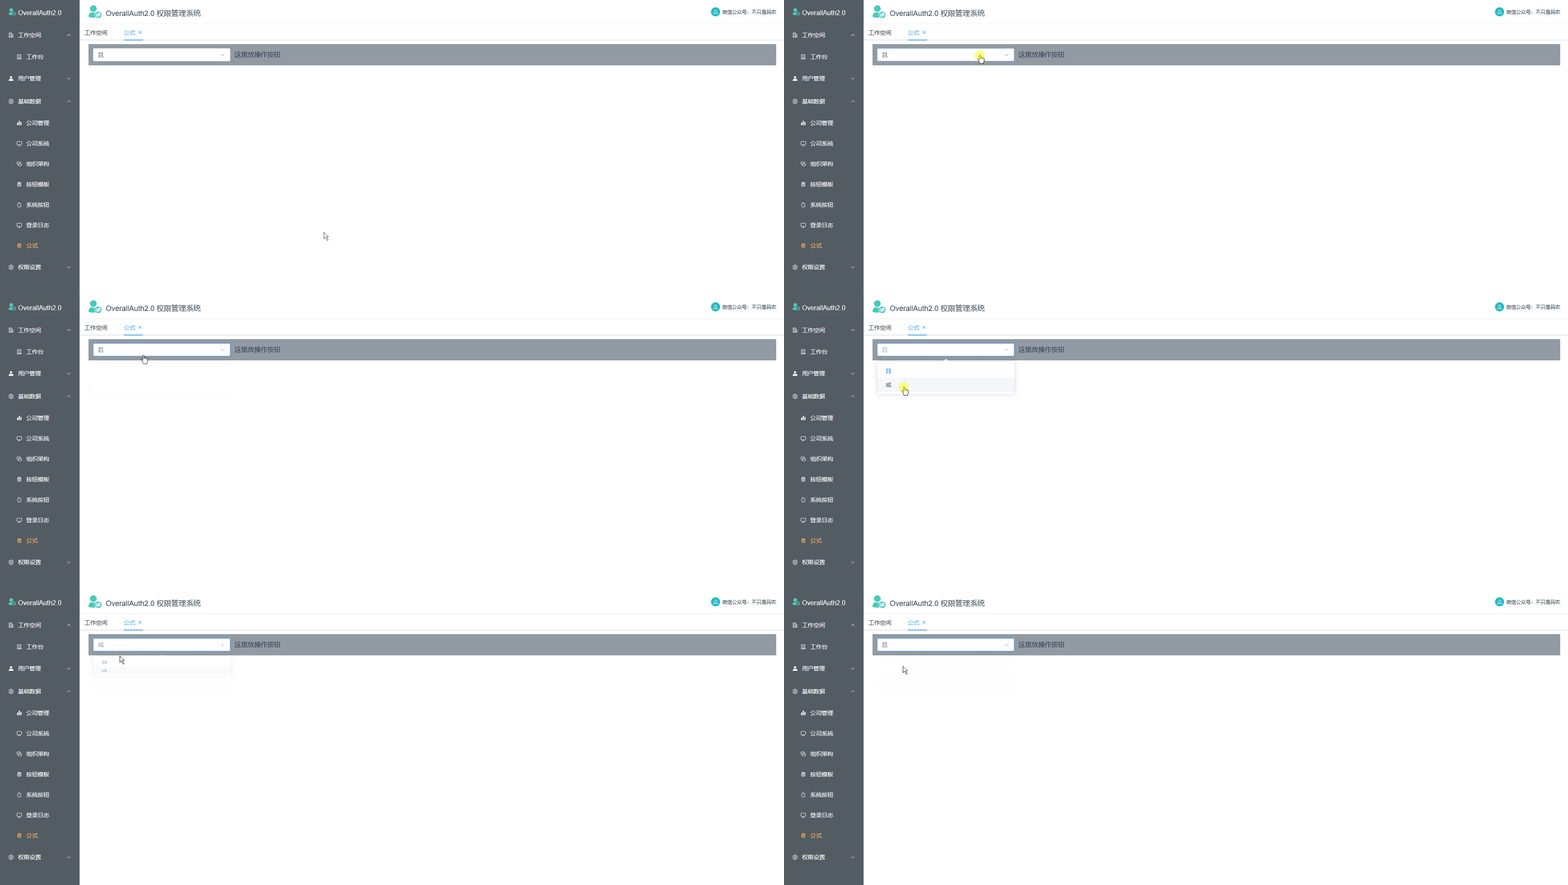
index.vue页面中,我们添加了一条分组的默认值。查看下效果
添加分组按钮
在class='buttonStyle' div中添加如下代码
<el-button icon="CirclePlus" plain @click="addGroup(item)"

                >新增分组</el-button

              >

              <el-button icon="Plus" plain @click="addItem(item)"

                >新增条件</el-button

              >

              <el-button

                v-if="item.level !== 1"

                type="danger"

                icon="Delete"

                @click="deleteGroup(item)"

                >删除分组</el-button

              >
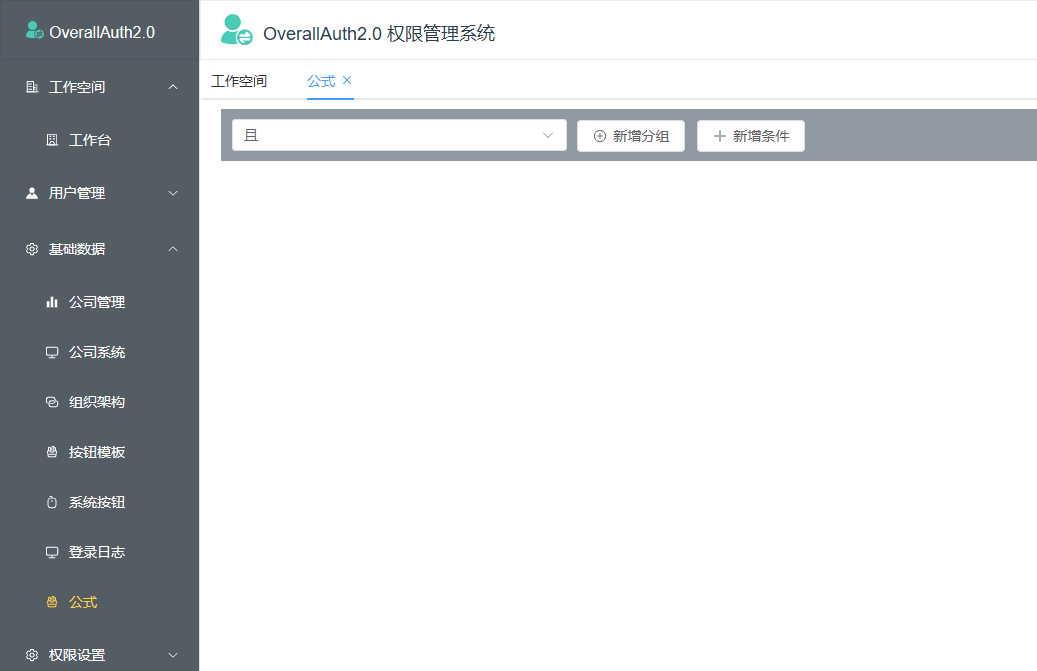
添加按钮事件
添加前,我们必须先安装一个插件:npm install number-precision
在setup(props)中添加如下代码,并retrun事件


//最多组

    const maxGroup = ref<number>(5);

    //最多层级

    const maxLevel = ref<number>(3);

    //最多条件

    const maxWhere = ref<number>(10);

    // 添加组事件

    const addGroup = function (item: matchingData) {

      //获取当前组的长度

      var listGroupLength = item.children.length;

      //添加前验证最多添加多少层级

      if (item.level >= maxLevel.value) {

        ElMessage({

          message: "最多添加" + maxLevel.value + "级",

          type: "warning",

        });

        return;

      }

      //添加前验证能添加多少组

      if (listGroupLength >= maxGroup.value) {

        ElMessage({

          message: "每层下最多添加" + maxGroup.value + "个组",

          type: "warning",

        });

        return;

      }

      //当前组必须要有条件才能添加下级组

      if (item.matchingWhere.length == 0) {

        ElMessage({

          message: "当前组下无任何条件,不能添加分组!",

          type: "warning",

        });

        return;

      }

      //组织要添加节点的数据

      var groupId = item.id + "-" + (listGroupLength + 1);

      var groupPid = item.id;

      var groupLevel = item.level + 1;

      //找到对应的下标

      const index = props.data.findIndex((s) => {

        if (s.id === item.id) {

          return true;

        }

      });

      //精确插入当前节点及插入位置

      var indexLength = listGroupLength + 1;

      item.children.splice(plus(...[index, indexLength]), 0, {

        id: groupId,

        pid: groupPid,

        matchGroup: "Or",

        level: groupLevel,

        matchingWhere: [],

        children: [],

      });

    };

    // 删除组

    const deleteGroup = function (item: matchingData) {

      GetGroupSpliceIndex(item.id, props.data);

    };

    //递归删除组

    const GetGroupSpliceIndex = (id: string, list: matchingData[]) => {

      //找到删除数据下标

      const index = list.findIndex((p: { id: string }) => {

        if (p.id === id) {

          return true;

        }

      });

      if (index === -1) GetGroupSpliceIndex(id, list[0].children);

      list.forEach((f: { id: string }) => {

        if (f.id == id) {

          list.splice(index, 1);

        }

      });

    };
这个时候,我们点击按钮,不会出现下级。因为递归的重要一步,并没有完成。
在match.vue 页面中找到有class="groupDiv" 的div,在div中的末尾添加如下代码
   <xc-match

          v-if="item.children && item.children.length"

          :data="item.children"

        />
以上代码是实现递归的关键,位置一定要准。
说明一点xc-match一定要和页面导出的名称一样。
看效果图
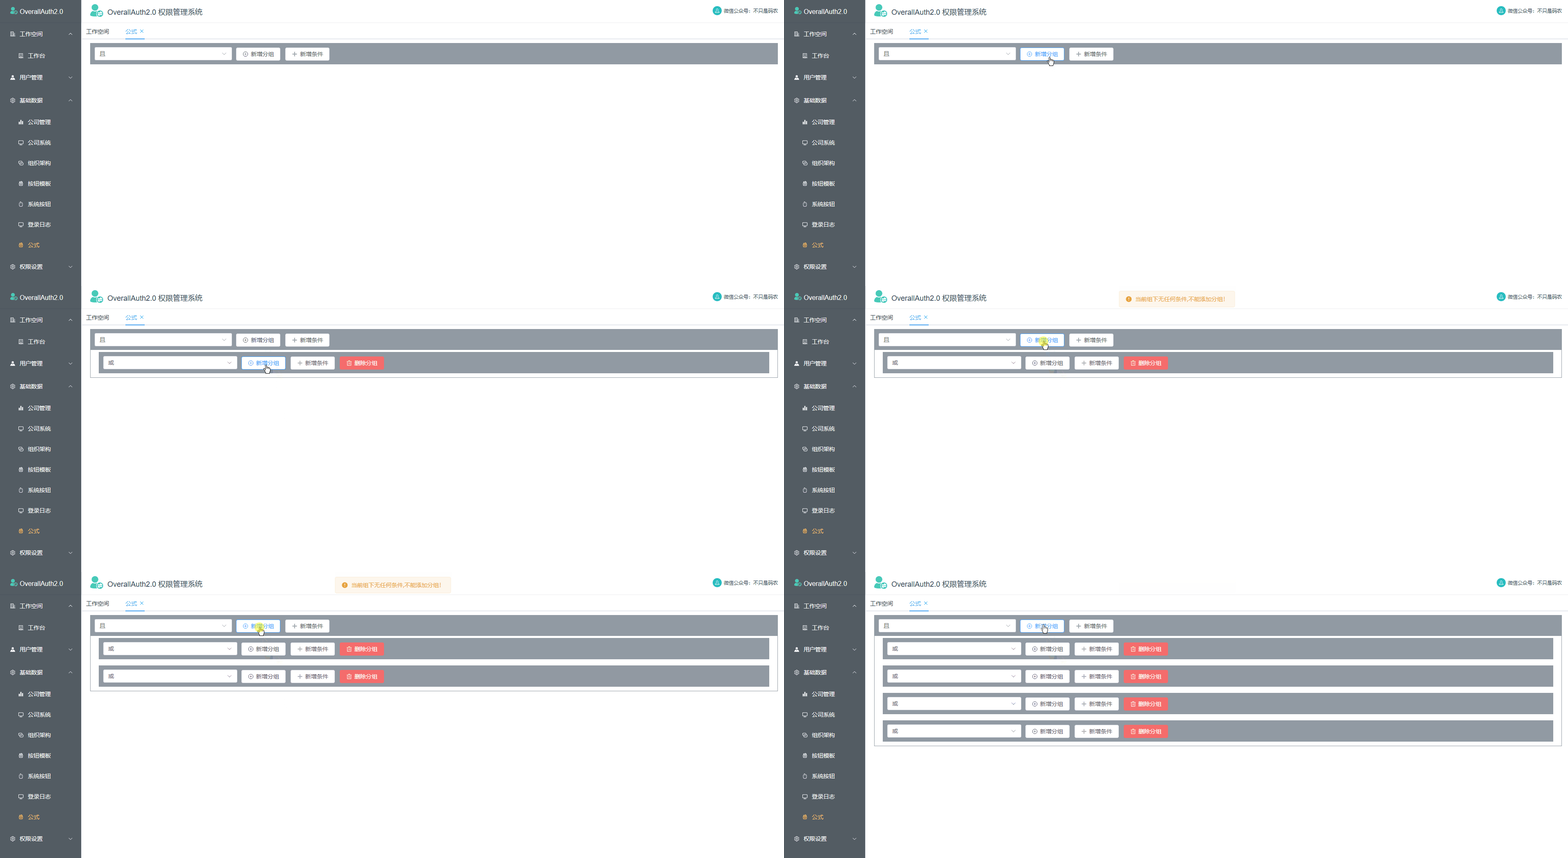
添加条件及条件按钮
添加条件项
在match.vue页面xc-match元素前,添加如下代码


 <div

          class="itemBackColor"

          v-for="whereItem in item.matchingWhere"

          :key="whereItem.id"

        >

          <!-- 匹配条件 -->

          <el-select

            v-model="whereItem.fieldKey"

            placeholder="请选择匹配条件"

            style="width: 240px"

          >

            <el-option

              v-for="where in matchingWhere"

              :key="where.value"

              :label="where.label"

              :value="where.value"

            />

          </el-select>

          <!-- 匹配等式 -->

          <el-select

            v-model="whereItem.matchEquationKey"

            placeholder="请选择等式"

            style="width: 240px"

          >

            <el-option

              v-for="equation in matchingEquation"

              :key="equation.value"

              :label="equation.label"

              :value="equation.value"

            />

          </el-select>

          <!-- 匹配值 -->

          <el-input-number

            v-model="whereItem.matchDataKey"

            :step="1"

            min="1"

            max="200"

            step-strictly

            style="width: 240px"

            v-if="whereItem.fieldKey === 'Age'"

          />

          <el-select

            v-else-if="whereItem.fieldKey === 'Position'"

            v-model="whereItem.matchDataKey"

            placeholder="请选择职位"

            style="width: 240px"

          >

            <el-option

              v-for="position in positionList"

              :key="position.value"

              :label="position.label"

              :value="position.value"

            />

          </el-select>

          <el-date-picker

            v-else-if="whereItem.fieldKey === 'CreateTime'"

            v-model="whereItem.matchDataKey"

            type="date"

            style="width: 240px"

            placeholder="请选择时间"

          />

          <el-input

            v-else

            v-model="whereItem.matchDataKey"

            style="width: 240px"

            placeholder="请输入"

            clearable

          />

          <el-button

            type="danger"

            icon="Delete"

            plain

            size="small"

            style="margin-left: 10px"

            @click="deleteItem(whereItem, item)"

            >删除条件</el-button

          >

          <!-- 当前项id:{{ whereItem.id }} -->

        </div>
css如下
/* 项背景色 */

.itemBackColor {

  height: 46px;

  display: -webkit-box;

  margin-left: 20px;

  margin-right: 20px;

  display: flex;

  align-items: center;

}

.itemBackColor > *:not(:first-child) {

  margin-left: 10px;

}
添加条件按钮事件


 //添加项事件

    const addItem = function (item: matchingData) {

      if (item.matchingWhere.length > maxWhere.value) {

        ElMessage({

          message: "每层下最多添加" + maxWhere.value + "组条件",

          type: "warning",

        });

        return;

      }

      item.matchingWhere.push({

        id: randamId().toString(),

        fieldKey: "",

        matchEquationKey: "",

        matchDataKey: "",

      });

    };

    // 删除项

    const deleteItem = function (item: matchingWhereData, data: matchingData) {

      GetItemSpliceIndex(item.id, data);

    };

    //递归删除项

    const GetItemSpliceIndex = (id: string, list: any) => {

      //找到删除数据下标

      const index = list.matchingWhere.findIndex((p: { id: string }) => {

        if (p.id === id) {

          return true;

        }

      });

      if (index === -1) GetItemSpliceIndex(id, list.children);

      list.matchingWhere.forEach((f: { id: string }) => {

        if (f.id == id) {

          //删除当前项

          list.matchingWhere.splice(index, 1);

          if (list.matchingWhere.length == 0) {

            var parentGroup = props.data.filter((s) => s.id == list.pid);

            //当前组下无任何项并且层级不等于1,删除当前组

            if (parentGroup.length == 0 && list.level !== 1) {

              GetGroupSpliceIndex(list.id, props.data);

            }

          }

        }

      });

    };
查看效果,如下图↓
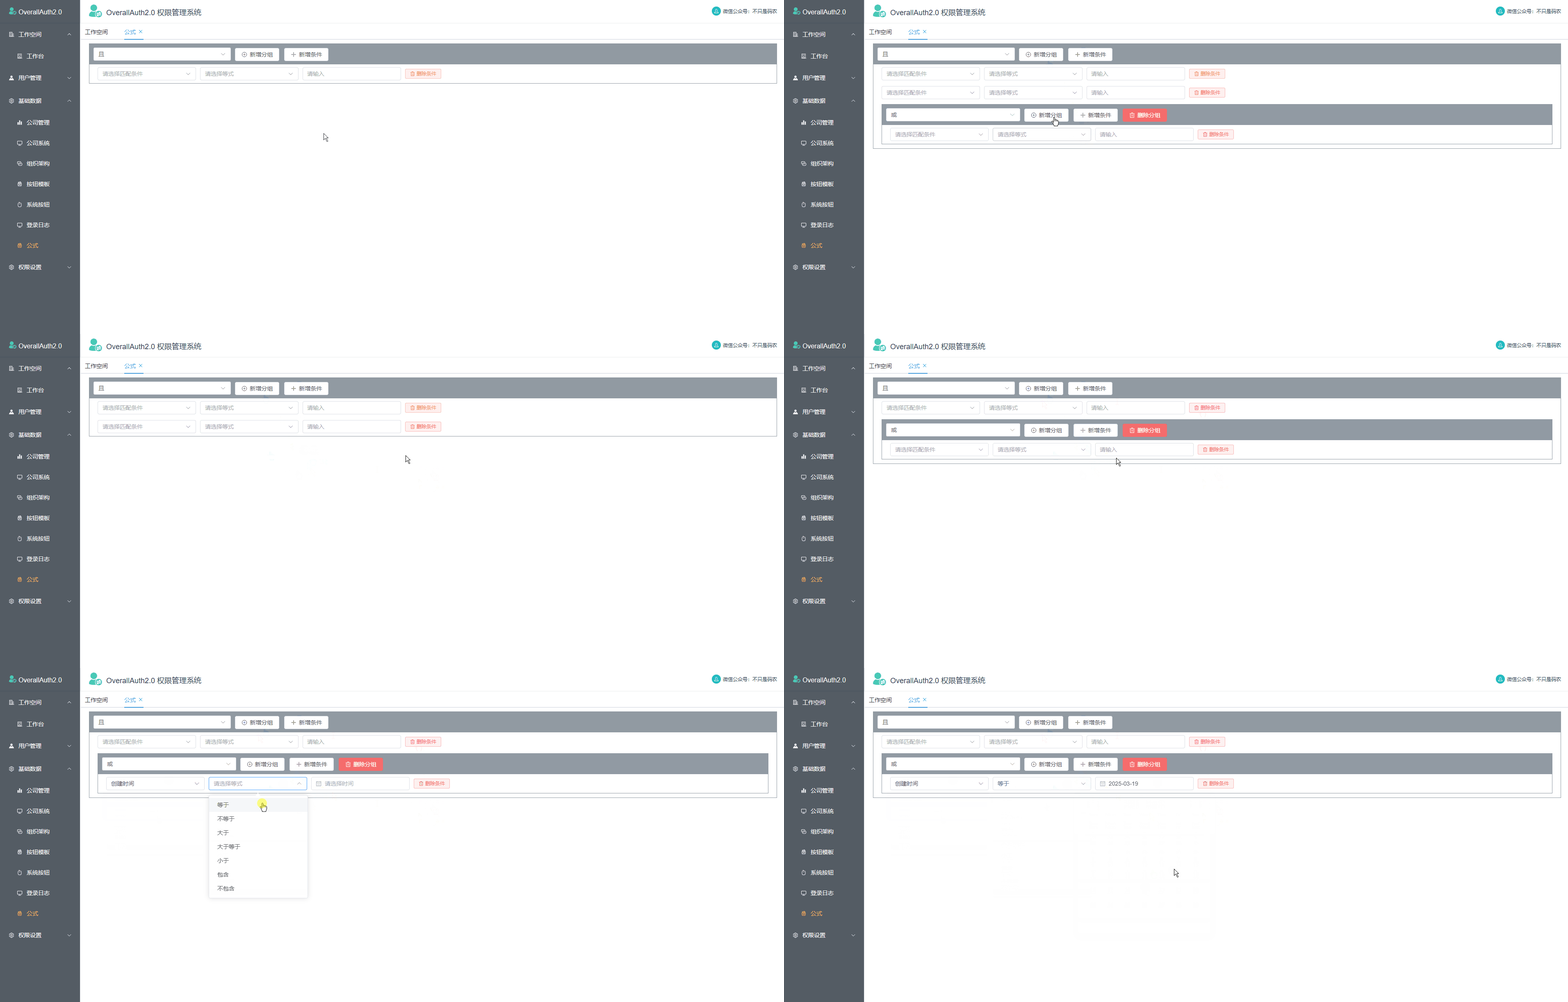
验证条件是否完整
编写验证方法


 //验证条件是否为空

    const VerifyWhereEmpty = function () {

      const isTrueArray = ref<boolean[]>([]);

      VerifyFunction(props.data, isTrueArray.value);

      const trueArray = isTrueArray.value?.filter((f) => f === true);

      if (trueArray.length === 0) {

        ElMessage({

          message: "成功",

          type: "warning",

        });

      } else {

        ElMessage({

          message: "匹配条件未填写完整",

          type: "warning",

        });

      }

    };

    //递归验证

    const VerifyFunction = function (

      list: matchingData[],

      isTrueArray: boolean[]

    ) {

      list.forEach((element) => {

        element.matchingWhere.forEach((w) => {

          if (

            w.matchEquationKey.length == 0 ||

            w.matchDataKey.length == 0 ||

            w.fieldKey.length == 0

          ) {

            isTrueArray.push(true);

            return;

          }

        });

        if (element.children.length > 0) {

          VerifyFunction(element.children, isTrueArray);

        }

      });

    };
在index.vue 页面调用


<template>

  <div>

    <el-button type="success" icon="Check" @click="submitForm">

      保存

    </el-button>

    <match :data="pageList" ref="childRef"></match>

  </div>

</template>

<script lang="ts" setup>

import { matchingData, randamId } from "@/model/match";

import { ref } from "vue";

import match from "../match/match.vue";

//样式

const emit = defineEmits(["validate"]);

const pageList = ref<matchingData[]>([

  {

    id: "Group-1",

    pid: "0",

    matchGroup: "And",

    level: 1,

    matchingWhere: [

      {

        id: randamId().toString(),

        fieldKey: "",

        matchEquationKey: "",

        matchDataKey: "",

      },

    ],

    children: [],

  },

]);

//保存

const childRef = ref();

const submitForm = function () {

  if (childRef.value != null) {

    childRef.value.VerifyWhereEmpty();

  }

};

</script>
做完这些就能达到最终效果
需要源码的,关注公众号,发送【权限】获取源码
以上就是本篇文章的全部内容,感谢耐心观看
后端WebApi 预览地址:http://139.155.137.144:8880/swagger/index.html
前端vue 预览地址:http://139.155.137.144:8881
关注公众号:发送【权限】,获取源码
有兴趣的朋友,请关注我微信公众号吧(*^▽^*)。

关注我:一个全栈多端的宝藏博主,定时分享技术文章,不定时分享开源项目。关注我,带你认识不一样的程序世界
什么!你还不会写Vue组件,编写《功能级权限》匹配公式组件的更多相关文章
- 【Vue】vue项目目录介绍 es6的导入导出语法 vue项目开发规范 Vue项目编写步骤
目录 昨日回顾 今日内容 0 vue-cli创建项目 node.js环境 创建vue-cli项目 1 vue项目目录介绍 node_modules index.html app.vue package ...
- React使用高阶组件与Hooks实现权限拦截教程
导读 高阶组件就是接受一个组件作为参数并返回一个新组件(功能增强的组件)的函数.这里需要注意高阶组件是一个函数,并不是组件,这一点一定要注意,本文给大家分享React高阶组件使用小结,一起看看吧 高阶 ...
- vue-class-component 以class的模式写vue组件
vue英文官网推荐了一个叫vue-class-component的包,可以以class的模式写vue组件.vue-class-component(以下简称Component)带来了很多便利: 1.me ...
- 仿写vue UI 组件总结 (自己练习,仿照现有的UI组件)
UI组件 Vue开发插件流程 本来是昨天要写总结的,感觉自己写不好,就放弃了.今天看到了iview和element有一些摩擦,是关于代码借鉴的问题(哈哈),不做评价.谁下生会写组件,我仿(chao)写 ...
- 手把手教你写 Vue UI 组件库
最近在研究 muse-ui 的实现,发现网上很少有关于 vue 插件具体实现的文章,官方的文档也只是一笔带过,对于新手来说并不算友好. 笔者结合官方文档,与自己的摸索总结,以最简单的 FlexBox ...
- Vue.js:轻量高效的前端组件化方案
转发一篇尤老师对vue.js的介绍,了解vue.js的来龙去脉.不过现在已经是2.0了,也有添加一些新的东西,当然有些东西也改了. Vue.js:轻量高效的前端组件化方案 Vue.js 是我在2014 ...
- Vue.js:轻量高效的前端组件化方案(转载)
摘要:Vue.js通过简洁的API提供高效的数据绑定和灵活的组件系统.在前端纷繁复杂的生态中,Vue.js有幸受到一定程度的关注,目前在GitHub上已经有5000+的star.本文将从各方面对Vue ...
- 【Vue】Vue中的父子组件通讯以及使用sync同步父子组件数据
前言: 之前写过一篇文章<在不同场景下Vue组件间的数据交流>,但现在来看,其中关于“父子组件通信”的介绍仍有诸多缺漏或者不当之处, 正好这几天学习了关于用sync修饰符做父子组件数据双向 ...
- Vue 爬坑之路(五)—— 组件进阶
组件(Component)是 Vue.js 最强大的功能之一,之前的文章都只是用到了基本的封装功能,这次将介绍一些更强大的扩展. 一.基本用法 在使用 vue-cli 创建的项目中,组件的创建非常方便 ...
- 如何通过 Vue+Webpack 来做通用的前端组件化架构设计
目录: 1. 架构选型 2. 架构目录介绍 3. 架构说明 4. 招聘消息 目前如果要说比较流行的前端架构哪家强,屈指可数:reactjs.angularjs.emberj ...
随机推荐
- Qt开源作品12-硬盘容量控件
一.前言 磁盘容量统计控件,说白了,就是用来统计本地盘符占用的容量,包括但不限于已用空间.剩余空间.总大小.已用百分比等,其中对应的百分比采用进度条显示,该进度条的前景色和背景色及文字颜色可以设置,在 ...
- 生产环境Sentinel改造实践(一):Sentinel核心概念
一.前言 本文主要是对sentinel-dashboard源码进行改造,用在生产环境保障其高可用,主要改造点如下: 接入nacos支持规则管理及推送 监控数据存入influxDb,后续可开发对应的监控 ...
- OGC——WMS服务
一.引言 一直用arcgis javascript的二次开发,经常使用它的一些服务WMS.WMTS.WFS.MapService等,并没有深入了解这些服务内部机制,直到最近学习了geoserver,由 ...
- Apgar score
Apgar score Apgar is a quick test performed on a baby at 1 and 5 minutes after birth. The 1-minute s ...
- linux下查看文件行数和列数
查看行数: wc -l 文件名 查看列数: cat 文件名 | awk '{print NF}' 注意:默认是\t分割 但是可以使用-F参数指定分隔符,例如以 | 进行分割: cat 文件名 | aw ...
- CDS标准视图:催款冻结描述 I_DunningBlockingReasonText
视图名称:催款冻结描述 I_DunningBlockingReasonText 视图类型:基础视图 视图代码: 点击查看代码 @EndUserText.label: 'Dunning Blocking ...
- ffmpeg 去除音频中的静音
去除音频中的静音 //去除所有超过0.3秒的静音部分 ffmpeg -i input.mp3 -af silenceremove=stop_periods=-1:stop_duration=0.3:s ...
- Kotlin:【定义类】field、计算属性、防态竞争条件
- 1.某道翻译js逆向sign值
首先找到这个请求接口 这个接口就是我们请求翻译的接口 发现有个sign值,这就是我们需要逆向的值 再看看这个接口的响应 可以发现这个响应是被加密的,我们还需要去逆向解密这个被加密的响应,这篇就单纯讲一 ...
- 个人数据保全计划:从印象笔记迁移到joplin
前言 最近在探索各种现代化的笔记工具时,刚好用上了Joplin这款应用,尽管界面没那么好看,但开源.支持markdown.功能完善,而且还支持很多导入方法(事实上很多开源笔记都支持). 其中的导入功能 ...
