Nginx (安装+ 配置域名+ 访问认证 +发布文件)
一、Nginx介绍:
Nginx是一款高性能的HTTP和反向代理服务器,能够选择高效的epoll(linux2.6内核)、kqueue(freebsd)、eventport(solaris10)作为网络I/O模型,能够支持高达50000个并发连接数的响应,而内存、CPU等系统资源消耗却非常低、运行非常稳定。
2008年12月:Nginx市场占有量为3354329、占有率为1.80%
1、选择Nginx的理由
- 1 支持高并发连接
通过top命令可以查看系统负载和CPU使用率,由于apache采用的是select网络I/O模型,处理大量连续的读写很低效
- 内存消耗少
在服务器3W并发连接下,开启10个Nginx进程消耗150MB内存(15MB*10),开启64个php-cgi进程消耗128MB内存(20MB*64),共消耗不到2GB内存,可以使用webbench做压力测试,运行依旧很快。
- 成本低廉
购买F5 BIG-IP、NetScaler等负载均衡交换机需要几十万RMB,而开源Nginx替代这些商业设备。
- 其他理由
网络配置简单,对比apache就知道了,支持rewrite重写规则,能够根据域名、URL的不同、将HTTP请求分到不同的后端服务器群组,内置的健康检查功能
节省带宽,支持GZIP压缩,可以添加浏览器本地缓存的Header头,支持热部署,能够在不间断服务的情况下、对软件版本进行升级
结论:Nginx在反向代理、rewrite规则、稳定性、静态文件处理、内存消耗等方面都表现出很强的优势。
安装环境
[root@ ~]# uname -a

Linux 10.0.0.10 2.6.-.el6.x86_64 # SMP Thu Jul  :: UTC  x86_64 x86_64 x86_64 GNU/Linux
[root@ ~]# cat /etc/redhat-release

CentOS release 6.7 (Final)
关闭防火墙,非正式环境可以关闭防火墙,便于学习调试Nginx服务。等掌握防火墙技术再开启
[root@ ~]# /etc/init.d/iptables stop

iptables: Setting chains to policy ACCEPT: filter          [  OK  ]

iptables: Flushing firewall rules:                         [  OK  ]

iptables: Unloading modules:                               [  OK  ]
关闭SElinux
[root@ ~]# setenforce

[root@ ~]#
yum 安装nginx—1.10
[root@10 ~]# wget http://mirrors.neusoft.edu.cn/epel/6/x86_64/epel-release-6-8.noarch.rpm
--2017-07-31 14:43:09-- http://mirrors.neusoft.edu.cn/epel/6/x86_64/epel-release-6-8.noarch.rpm
Resolving mirrors.neusoft.edu.cn... 219.216.128.25, 2001:da8:a0c4:200::ec43:7f59
Connecting to mirrors.neusoft.edu.cn|219.216.128.25|:80... connected.
HTTP request sent, awaiting response... 200 OK
Length: 14540 (14K) [application/x-redhat-package-manager]
Saving to: “epel-release-6-8.noarch.rpm”
100%[==================================================================================>] 14,540 28.8K/s in 0.5s
2017-07-31 14:43:11 (28.8 KB/s) - “epel-release-6-8.noarch.rpm” saved [14540/14540]
[root@10 ~]# yum install -y epel-release-6-8.noarch.rpm
Installed:
epel-release.noarch 0:6-8
Complete!
[root@10 ~]# yum install -y nginx
Dependency Installed:
GeoIP.x86_64 0:1.6.5-1.el6 GeoIP-GeoLite-data.noarch 0:2017.01-1.el6
GeoIP-GeoLite-data-extra.noarch 0:2017.01-1.el6 gd.x86_64 0:2.0.35-11.el6
geoipupdate.x86_64 0:2.2.1-2.el6 libXpm.x86_64 0:3.5.10-2.el6
nginx-all-modules.noarch 0:1.10.2-1.el6 nginx-filesystem.noarch 0:1.10.2-1.el6
nginx-mod-http-geoip.x86_64 0:1.10.2-1.el6 nginx-mod-http-image-filter.x86_64 0:1.10.2-1.el6
nginx-mod-http-perl.x86_64 0:1.10.2-1.el6 nginx-mod-http-xslt-filter.x86_64 0:1.10.2-1.el6
nginx-mod-mail.x86_64 0:1.10.2-1.el6 nginx-mod-stream.x86_64 0:1.10.2-1.el6
Complete!
安装完成
启动Nginx
[root@ ~]# /etc/init.d/nginx start

Starting nginx:                                            [  OK  ]
查看Nginx服务对应的端口是否启动成功
[root@ ~]# lsof -i :

COMMAND   PID  USER   FD   TYPE DEVICE SIZE/OFF NODE NAME

nginx     root    6u  IPv4        0t0  TCP *:http (LISTEN)

nginx     root    7u  IPv6        0t0  TCP *:http (LISTEN)

nginx    nginx    6u  IPv4        0t0  TCP *:http (LISTEN)

nginx    nginx    7u  IPv6        0t0  TCP *:http (LISTEN)
也可以通过 netstat -lnt | grep 80 查看
[root@ ~]# netstat -lnt | grep

tcp               0.0.0.0:                  0.0.0.0:*                   LISTEN

tcp               :::                    :::*                        LISTEN

tcp               :::                       :::*                        LISTEN
查看Nginx启动的实际效果
打开浏览器输入 http://10.0.0.12(安装Nginx服务器的IP地址),让后回车,如果显示
Welcome to nginx on EPEL!
表示Nginx已经启动成功
部署一个Web站点
Nginx 的默认站点目录在 /usr/share/nginx/html/下,如果要部署王者业务数据,只需把开发好的程序全部放到 /usr/share/nginx/html/目录下面即可
进入/usr/share/nginx/html/目录下
[root@10 ~]# cd /usr/share/nginx/html/
[root@10 html]# ll
total 20
-rw-r--r--. 1 root root 3652 Oct 31 2016 404.html
-rw-r--r--. 1 root root 3695 Oct 31 2016 50x.html
-rw-r--r--. 1 root root 3698 Oct 31 2016 index.html
-rw-r--r--. 1 root root 368 Oct 31 2016 nginx-logo.png
-rw-r--r--. 1 root root 2811 Oct 31 2016 poweredby.png
删掉Nginx默认的首页index.html(原始内容为 Welcome to nginx on EPEL)
[root@ html]# rm -f index.html
然后新建立一个index.html
[root@ html]# vim index.html
加入以下内容
<html>

<head><title>wanglan,s Nginx server blog .</title></head>

<body>

Hi, I am wanglan

</body>

</html>
打开浏览器输入http://10.0.0.12 让后回车,应该可以看到以下内容
Hi, I am wanglan
Nginx配置文件:nginx.conf
1. 配置基于域名的 nginx.conf 虚拟机主机
nginx.conf 文件默认在/etc/nginx 目录下
进入到nginx目录中
[root@10 ~]# cd /etc/nginx/
去掉所有的默认注释行空行,生成新文件nginx.conf
[root@ nginx]# egrep -v "#|^$" nginx.conf.default >nginx.conf
进入nginx.conf 文件
[root@ ~]# vim /etc/nginx/nginx.conf
更改前
worker_processes  ;

events {

    worker_connections  ;

}

http {

    include       mime.types;

    default_type  application/octet-stream;

    sendfile        on;

    keepalive_timeout  ;

    server {

        listen       ;

        server_name  localhost;

        location / {

            root   html;  域名访问的目录

            index  index.html index.htm;

        }

        error_page        /50x.html;

        location = /50x.html {

            root   html;

        }

    }

}
更改后
worker_processes  ;

events {

    worker_connections  ;

}

http {

    include       mime.types;

    default_type  application/octet-stream;

    sendfile        on;

    keepalive_timeout  ;

    server {

        listen       ;

        server_name  www.wanglan.com;

        location / {

            root   html/www;

            index  index.html index.htm;

        }

        error_page        /50x.html;

        location = /50x.html {

            root   html;

        }

    }

}
上面配置了一个基于www.wanglan.com 域名的站点,这里省略了一切无关的配置参数,虚拟机的关键部分在server{}标签大括号里的内容
2.创建域名对应的站点目录及文件
进入到 html 目录
[root@ ~]# cd /usr/share/nginx/html/
创建对应的目录
[root@ html]# mkdir www
进入目录创建 index.html 文件
[root@ html]# vim index.html
写入内容
www.wanglan10.com
查看index.html
[root@ nginx]# cat index.html

www.wanglan.com
3.检查语法并从新加载
先检查修改过的Nginx配置文件语法是否正确
[root@10 nginx]# nginx -t
nginx: the configuration file /etc/nginx/nginx.conf syntax is ok
nginx: configuration file /etc/nginx/nginx.conf test is successful
出现 “syntax is ok” 及 “successful” ,说明语法正确,如果有问题则需要调整配置,直到语法检查正确为止
平滑重启Nginx,即重新加载配置文件
[root@ nginx]# nginx -s reload
再检查Nginx重新加载后的情况,例如进程和端口是否OK
[root@10 nginx]# ps -ef|grep nginx
root 52257 1 0 15:10 ? 00:00:00 nginx: master process /usr/sbin/nginx -c /etc/nginx/nginx.conf
nginx 52397 52257 0 17:19 ? 00:00:00 nginx: worker process
root 52404 2134 0 17:22 pts/1 00:00:00 grep nginx
[root@ nginx]# netstat -lntp|grep

tcp               0.0.0.0:                  0.0.0.0:*                   LISTEN      /nginx

tcp               :::                    :::*                        LISTEN      /rpc.statd
在Windows客户端测试域名站点配置的访问结果
在客户端做hosts解析
win+ R 键,在运行窗口输入 %systemroot%\system32\drivers\etc\hosts ,选择记事本打开
添加所配置的机器的IP和域名,如下
10.0.0.10 www.wanglan.com
通过浏览器访问域名,查看访问结果

Nginx 虚拟机的别名设置
虚拟主机别名:虚拟主机设置除了主域名外的一个或多个域名名字,这样就能实现用户访问的多个域名对应同一个虚拟主机网站的功能
提示:仅在nginx.conf 文件中的server_name 所在的行尾增加另一个域名即可,例如增加wanglan.com 域名
worker_processes  ;

events {

    worker_connections  ;

}

http {

    include       mime.types;

    default_type  application/octet-stream;

    sendfile        on;

    keepalive_timeout  ;

    server {

        listen       ;

        server_name  www.wanglan.com wanglan.com;

        location / {

            root   html/www;

            index  index.html index.htm;

        }

        error_page        /50x.html;

        location = /50x.html {

            root   html;

        }

    }

}
重新加载配置并测试访问结果
[root@ nginx]# nginx -t

[root@ nginx]# nginx -s reload
在Windows客户端做hosts解析后,测试访问结果,如与原域名访问结果一样表示成功
Nginx访问认证
配置nginx.conf 文件
worker_processes  ;

events {

    worker_connections  ;

}

http {

    include       mime.types;

    default_type  application/octet-stream;

    sendfile        on;

    keepalive_timeout  ;

    server {

        listen       ;

        server_name  localhost;

        location / {

            root   html;

            index  index.html index.htm;

            auth_basic           "NginxStatus";

            auth_basic_user_file /usr/share/nginx/htpasswd;

         }

        error_page        /50x.html;

        location = /50x.html {

            root   html;

        }

    }

}
查看是否安装htpasswd
没有安装
[root@10 ~]# /usr/bin/htpasswd
-bash: /usr/bin/htpasswd: No such file or directory
安装htpasswd
yum -y install httpd
安装以后
[root@ ~]# which htpasswd

/usr/bin/htpasswd
创建账号与密码(路径直接复制)
root@ nginx]# htpasswd -c /usr/share/nginx/htpasswd wanglan
查看htpasswd文件内容
[root@ nginx]# cat /usr/share/nginx/htpasswd

wanglan:mLjtscIQMmq7I
检查nginx.conf 文件是否有错误,并平滑重启
[root@ nginx]# nginx -t

 nginx: the configuration file /etc/nginx/nginx.conf syntax is ok

 nginx: configuration file /etc/nginx/nginx.conf test is successful

[root@ nginx]# nginx -s reload
修改htpasswd文件权限
[root@10 nginx ~]# chmod /usr/share/nginx/htpasswd
修改htpasswd文件的用户组
[root@ ~]# chown nginx.nginx /usr/share/nginx/htpasswd
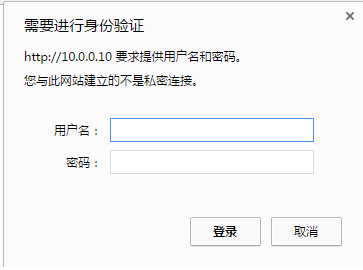
通过域名或IP访问
Nginx (安装+ 配置域名+ 访问认证 +发布文件)的更多相关文章
- nginx安装配置域名转发
1.安装pcre 1.[root@localhost home]# tar zxvf pcre-8.10.tar.gz //解压缩 2.[root@localhost home]# cd pcre-8 ...
- nginx安装,配置,并可以放静态文件教程
简单介绍一下:nginx是一个高性能的HTTP和反向代理的服务器.能有处理最高5,0000的并发量,是新兴的一个代理服务器.中国大陆使用nginx网站用户有:百度.京东.新浪.网易.腾讯.淘宝等. 安 ...
- centos nginx server_name 配置域名访问规则
今天配置Server_name时,希望禁用一些域名,应为这些域名我想让通过另外一个Server配置 server_name "~^((\w*[^w]{1}\w*)|w{1,2})\.hell ...
- Nginx安装配置(转)
Nginx 安装配置 Nginx("engine x")是一款是由俄罗斯的程序设计师Igor Sysoev所开发高性能的 Web和 反向代理 服务器,也是一个 IMAP/POP3/ ...
- Nginx 安装 配置 使用
Nginx 安装 配置 使用 基本的HTTP服务器特性 处理静态文件,索引文件以及自动索引:打开文件描述符缓存(缓存元数据和文件描述符,下一次可以直接从内存找到数据或者文件的位置): 使用缓存加速反向 ...
- Nginx安装配置|Nginx反向代理|Nginx支持HTTPS|Nginx重定向
Nginx安装配置 可以直接看到最下面的HTTPS. Nginx安装 我的系统如下: No LSB modules are available. Distributor ID: Ubuntu Desc ...
- nginx安装配置_runoob_阅读笔记_20190917
Nginx 安装配置_runoob菜鸟教程 Nginx 安装配置 Nginx("engine x")是一款是由俄罗斯的程序设计师Igor Sysoev所开发高性能的 Web和 反向 ...
- Nginx安装配置PHP(FastCGI)环境的教程
这篇是Nginx安装配置PHP(FastCGI)环境的教程.Nginx不支持对外部程序的直接调用或者解析,所有的外部程序(包括PHP)必须通过FastCGI接口来调用. 一.什么是 FastCGI F ...
- VMware Linux 下 Nginx 安装配置 - Tomcat 配置 (二)
准备工作 相关浏览: VMware Linux 下 Nginx 安装配置 (一) 1. 选在 /usr/local/ 下创建 softs 文件夹,通过 ftp 命令 把 apache-tomcat-7 ...
随机推荐
- 下载中间件--随机IP代理以及随机User_Agent
下载中间件随机IP代理以及随机User_Agent 1.在settings.py中设置开启代理功能 # 设置下载中间件 DOWNLOADER_MIDDLEWARES = { # 随机的 User-Ag ...
- openCV 备忘
yum install python-devel numpy cmake gcc gcc-c++yum install gtk2-devel libdc1394-devel libv4l-devel ...
- [转] js在浏览器端对二进制流进行AES加密和解密
开始解密 简单了解一下所用的的AES加密算法,我们用的是AES的CFB加密方式,服务端会提供给我一个key和iv的二进制字节串.密文也是二进制字节串. 我用的加密/解密插件: crypto-js 一般 ...
- JS高级程序设计3
PS:有一小部分写在了 JS 2017了 JSON <!DOCTYPE html> <html lang="en"> <head> <me ...
- javascript 列表定时滚动效果
HTML结构: <div style="width:200px;height:100px;overflow:hidden;border:1px solid #ddd;margin:20 ...
- C# 文件拖放到此程序的操作
问题描述: 怎么写代码可以实现指定类型的文件通过鼠标拖放显示在程序的文本框中,如:选中3个文件(3个文件的格式有MP3和wma)拖到程序,程序的文本框显示这三个文件的路径...解决代码: thi ...
- RocketMQ 启动停止命令
1.rocketmq的启动 进入rocketMQ解压目录下的bin文件夹 启动namesrv服务:nohup sh bin/mqnamesrv & 日志目录:{rocketMQ解压目录} ...
- 2018牛客网暑假ACM多校训练赛(第四场)C Chiaki Sequence Reloaded (组合+计数) 或 数位dp
原文链接https://www.cnblogs.com/zhouzhendong/p/NowCoder-2018-Summer-Round4-C.html 题目传送门 - https://www.no ...
- 三色抽卡游戏 博弈论nim
你的对手太坏了!在每年的年度三色抽卡游戏锦标赛上,你的对手总是能打败你,他的秘诀是什么? 在每局三色抽卡游戏中,有n个卡组,每个卡组里所有卡片的颜色都相同,且颜色只会是红(R).绿(G).蓝(B)中的 ...
- 054 kafka内部机制
一:数据格式与数据存储 1.总结 存储在磁盘文件中(index+log) 顺序读写的 基于offset偏移量来管理数据的(主要是读操作) 由分区器根据key值决定数据分布到哪个分区,默认使用hash ...