
启用CentOS6.5 64位安装时自带的MySQL数据库服务器
本人在虚拟机上又安装了一台linux机器,作为MySQL数据库服务器用,在安装时选择了系统自带的MySQL服务器端,以下是启用步骤。
首先开启mysqld服务
#service mysqld start
进入/usr/bin目录
#cd /usr/bin
设定mysql数据库root用户的密码
#mysqladmin -u root password '123456'
进入mysql数据库管理控制台
#./mysql -u root -p
Enter password:
Welcome to the MySQL monitor. Commands end with ; or \g.
Your MySQL connection id is 4
Server version: 5.0.67 Source distribution
Type 'help;' or '\h' for help. Type '\c' to clear the buffer.
mysql> grant all privileges on *.* to root@'%' identified by "root";
Query OK, 0 rows affected (0.00 sec)
mysql> flush privileges;
Query OK, 0 rows affected (0.00 sec)
mysql> grant select,update,insert,delete on *.* to root@192.168.0.100 identified by "root";
Query OK, 0 rows affected (0.00 sec)
mysql> flush privileges;
Query OK, 0 rows affected (0.00 sec)
mysql> quit
Bye
上面的步骤是进行授权
然后重启mysqld服务
# service mysqld restart
Stopping MySQL: [ OK ]
Starting MySQL: [ OK ]
再次进入mysql管理控制台
# mysql -u root -p
Enter password:
Welcome to the MySQL monitor. Commands end with ; or \g.
Your MySQL connection id is 2
Server version: 5.0.67 Source distribution
Type 'help;' or '\h' for help. Type '\c' to clear the buffer.
mysql> use mysql
Reading table information for completion of table and column names
You can turn off this feature to get a quicker startup with -A
Database changed
mysql> update user set password=password('12345678') where user='root';
Query OK, 5 rows affected (0.00 sec)
Rows matched: 5 Changed: 5 Warnings: 0
mysql> flush privileges;
Query OK, 0 rows affected (0.00 sec)
mysql> quit
Bye
以上步骤是修改root用户的密码
之后开启防火墙的3306端口
# vi /etc/sysconfig/iptables
以下是/etc/sysconfig/iptables的内容,其中蓝色一行是新加的。这一行可以由上一行复制得到,方法是在22哪行按下yy,然后按p,然后点insert键进入编辑模式,修改22为3306,然后点esc,输入wq保存退出。
# Firewall configuration written by system-config-firewall
# Manual customization of this file is not recommended.
*filter
:INPUT ACCEPT [0:0]
:FORWARD ACCEPT [0:0]
:OUTPUT ACCEPT [0:0]
-A INPUT -m state --state ESTABLISHED,RELATED -j ACCEPT
-A INPUT -p icmp -j ACCEPT
-A INPUT -i lo -j ACCEPT
-A INPUT -m state --state NEW -m tcp -p tcp --dport 22 -j ACCEPT
-A INPUT -m state --state NEW -m tcp -p tcp --dport 3306 -j ACCEPT
-A INPUT -j REJECT --reject-with icmp-host-prohibited
-A FORWARD -j REJECT --reject-with icmp-host-prohibited
COMMIT
防火墙重启
# service iptables restart
iptables: Flushing firewall rules: [ OK ]
iptables: Setting chains to policy ACCEPT: filter [ OK ]
iptables: Unloading modules: [ OK ]
iptables: Applying firewall rules: [ OK ]
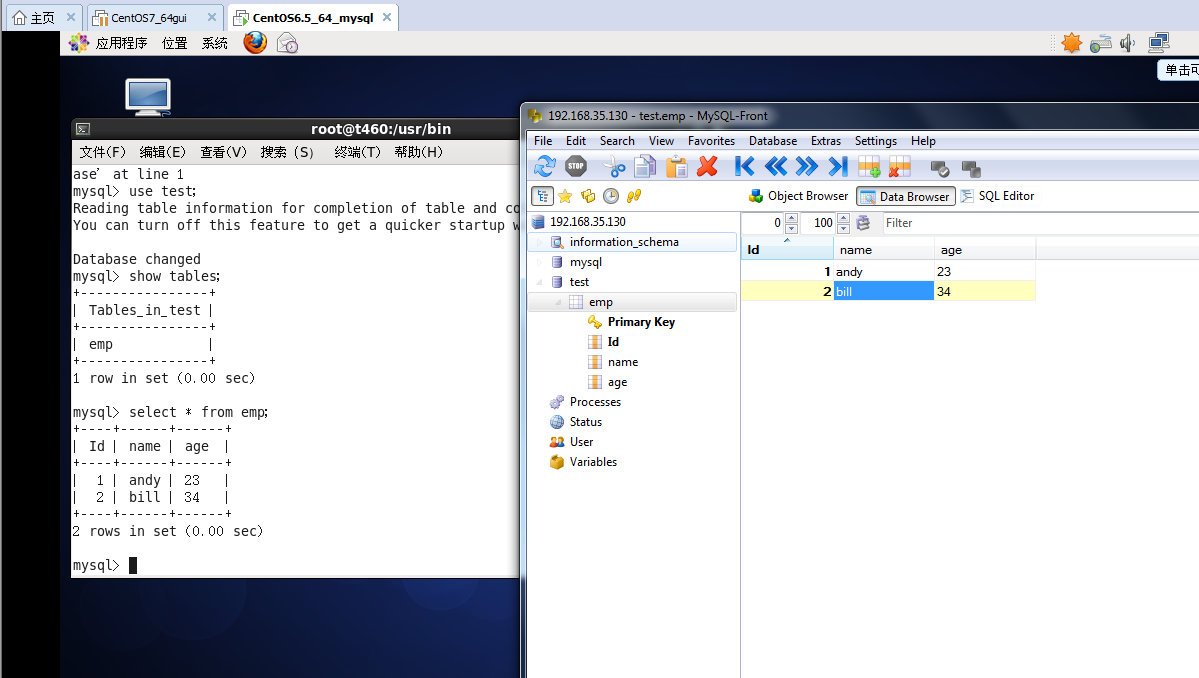
之后就可以在192.168.0.100上用mysqlfront连接数据库了。
2016年8月23日15:03:45
启用CentOS6.5 64位安装时自带的MySQL数据库服务器的更多相关文章
- 启用CentOS6.5 64位安装时自带的MySQL
#service mysqld start#cd /usr/bin#mysqladmin -u root password '123456'#./mysql -u root -pEnter passw ...
- CentOS6.0(64位)安装Apache+PHP+Mysql教程,安装Magento(解决DOM,Mcrypt,GD问题)完整教程
CentOS6.0(64位)安装Apache+PHP+Mysql教程,安装Magento(解决DOM,Mcrypt,GD问题)完整教程 0 Posted by :小黑 On : 2012 年 9 ...
- Oracle 11G R2 在windows server 2008 64位安装时提示:无法在windows "开始"菜单或桌面上创建项
错误代码及解释: 在windows server 2008 64 位操作系统中安装 oracle 11G R2 64位 版本时提示:无法在windows "开始"菜单或桌面上创建 ...
- Centos6.7 64位安装配置kvm虚拟化
首先,需要我们的cpu支持虚拟化,有的机器支持但是并未在bios开启,这个需要事先开启. 1. Dell R710安装centos6.7 64位 ,Dell R710在开机后按F2进入BIOS,Pro ...
- centos6.3(64位) 安装apr
安装apr来提高tomcat 的可伸缩性和性能 ? 1 cd /usr/local/ 1 下载apr 和 apr-util最新版 ? 1 2 3 wget http://apache.fayea. ...
- Centos6.x 64位 安装JDK
JDK下载地址: http://www.oracle.com/technetwork/cn/java/javase/downloads/jdk7-downloads-1880260-zhs.html ...
- centos vmware centos6.6 64位 kvm虚拟化安装配置 第四十二节课
centos vmware centos6.6 64位 kvm虚拟化安装配置 第四十二节课 上半节课 下半节课 f
- CentOS6.3(64位)下安装Oracle11gR2(64)服务器
安装环境 Linux服务器:Centos6.3 64位 Oracle服务器:Oracle11gR2 64位 系统要求 1.Linux安装Oracle系统要求 系统要求 说明 内存 必须高于1G的物理内 ...
- Linux中CentOS6.5 64位 系统下安装docker步骤
CentOS6.5 64位 (docker目前仅支持64位)内核必须在3.10及以上 1. uname -r 查看内核版本 2. 升级内核到3.10版本(带aufs模块) cd /etc ...
随机推荐
- html+css做的丝带标签
先上效果: HTML: <div class="tag"> <div class="tag-box"> <div class=&q ...
- iOS TabeView 头视图和尾视图不滑动的实现
因项目有需求不能让section中的头尾视图滑动,顾根据网上的一些资料和自己整理的思路,已实现了不滑动效果,上代码,啥都说了,搞了2个小时都是泪.... 1.创建一个tableview _mainTa ...
- LNMP平台搭建---PHP安装篇
在前面三篇中,我们安装了Linux系统.Web服务器Nginx.MySQL数据库服务器,这篇就来将搭建动态网站的最后一步:PHP安装. Nginx服务器只能响应静态资源请求,对于动态资源请求就不行了, ...
- oracle触发器与数据导入导出的简单使用
exp cjtxx/123456@192.168.80.231/orcl file=d:\cjtxx.dmp owner=cjtxx [tables=tablename] imp cjttest/12 ...
- jQuery插件(多级菜单)
<!DOCTYPE html PUBLIC "-//W3C//DTD XHTML 1.0 Transitional//EN" "http://www.w3.org/ ...
- C# Winform TreeView 的一些基本用法
下面是treeview的用法TreeView组件是由多个类来定义的,TreeView组件是由命名空间"System.Windows .Forms"中的"TreeView& ...
- 【原】iOS学习之极光推送
一.极光推送工程端 1.下载SDK 极光推送是一个推送消息的第三方,SDK下载:https://www.jpush.cn/common/products 集成压缩包内容:包名为JPush-iOS-SD ...
- PHP图片裁剪类
<?php class ImageTool { //以宽为标准,如果小于宽,则不剪裁 public static function thumb_img_by_width($src_path, $ ...
- 【BZOJ】3521: [Poi2014]Salad Bar
题意 长度为\(n(1 \le n \le 1000000)\)的\(01\)字符串.找一个最长的连续子串\(S\),使得不管是从左往右还是从右往左取,都保证每时每刻已取出的\(1\)的个数不小于\( ...
- C#中xml操作
序列化成一个字符串: public static string XMLSerialize<T>(T entity) { StringBuilder buffer = new StringB ...