
第四章 springboot + swagger(转载)
此篇博客转发自:http://www.cnblogs.com/java-zhao/p/5348113.html
swagger用于定义API文档。
好处:
- 前后端分离开发
- API文档非常明确
- 测试的时候不需要再使用URL输入浏览器的方式来访问Controller
- 传统的输入URL的测试方式对于post请求的传参比较麻烦(当然,可以使用postman这样的浏览器插件)
- spring-boot与swagger的集成简单的一逼
1、项目结构
和上一节一样,没有改变。
2、pom.xml
引入了两个jar。
        <dependency>

           <groupId>io.springfox</groupId>

           <artifactId>springfox-swagger2</artifactId>

           <version>2.2.2</version>

        </dependency>

        <dependency>

           <groupId>io.springfox</groupId>

           <artifactId>springfox-swagger-ui</artifactId>

           <version>2.2.2</version>

        </dependency>
3、Application.java
package com.xxx.firstboot;

import org.springframework.boot.SpringApplication;

import org.springframework.boot.autoconfigure.SpringBootApplication;

import springfox.documentation.swagger2.annotations.EnableSwagger2;

@SpringBootApplication        //same as @Configuration+@EnableAutoConfiguration+@ComponentScan

@EnableSwagger2             //启动swagger注解

public class Application {

    public static void main(String[] args) {

        SpringApplication.run(Application.class, args);

    }

}
说明:
- 引入了一个注解@EnableSwagger2来启动swagger注解。(启动该注解使得用在controller中的swagger注解生效,覆盖的范围由@ComponentScan的配置来指定,这里默认指定为根路径"com.xxx.firstboot"下的所有controller)
4、UserController.java
package com.xxx.firstboot.web;

import org.springframework.beans.factory.annotation.Autowired;

import org.springframework.web.bind.annotation.RequestHeader;

import org.springframework.web.bind.annotation.RequestMapping;

import org.springframework.web.bind.annotation.RequestMethod;

import org.springframework.web.bind.annotation.RequestParam;

import org.springframework.web.bind.annotation.RestController;

import com.xxx.firstboot.domain.User;

import com.xxx.firstboot.service.UserService;

import io.swagger.annotations.Api;

import io.swagger.annotations.ApiImplicitParam;

import io.swagger.annotations.ApiImplicitParams;

import io.swagger.annotations.ApiOperation;

import io.swagger.annotations.ApiResponse;

import io.swagger.annotations.ApiResponses;

@RestController

@RequestMapping("/user")

@Api("userController相关api")

public class UserController {

    @Autowired

    private UserService userService;

//    @Autowired

//    private MyRedisTemplate myRedisTemplate;

    @ApiOperation("获取用户信息")

    @ApiImplicitParams({

        @ApiImplicitParam(paramType="header",name="username",dataType="String",required=true,value="用户的姓名",defaultValue="zhaojigang"),

        @ApiImplicitParam(paramType="query",name="password",dataType="String",required=true,value="用户的密码",defaultValue="wangna")

    })

    @ApiResponses({

        @ApiResponse(code=400,message="请求参数没填好"),

        @ApiResponse(code=404,message="请求路径没有或页面跳转路径不对")

    })

    @RequestMapping(value="/getUser",method=RequestMethod.GET)

    public User getUser(@RequestHeader("username") String username, @RequestParam("password") String password) {

        return userService.getUser(username,password);

    }

//    @RequestMapping("/testJedisCluster")

//    public User testJedisCluster(@RequestParam("username") String username){

//        String value =  myRedisTemplate.get(MyConstants.USER_FORWARD_CACHE_PREFIX, username);

//        if(StringUtils.isBlank(value)){

//            myRedisTemplate.set(MyConstants.USER_FORWARD_CACHE_PREFIX, username, JSON.toJSONString(getUser()));

//            return null;

//        }

//        return JSON.parseObject(value, User.class);

//    }

}
说明:
- @Api:用在类上,说明该类的作用
- @ApiOperation:用在方法上,说明方法的作用
- @ApiImplicitParams:用在方法上包含一组参数说明
- @ApiImplicitParam:用在@ApiImplicitParams注解中,指定一个请求参数的各个方面
- paramType:参数放在哪个地方
- header-->请求参数的获取:@RequestHeader
- query-->请求参数的获取:@RequestParam
- path(用于restful接口)-->请求参数的获取:@PathVariable
- body(不常用)
- form(不常用)
- name:参数名
- dataType:参数类型
- required:参数是否必须传
- value:参数的意思
- defaultValue:参数的默认值
- paramType:参数放在哪个地方
- @ApiResponses:用于表示一组响应
- @ApiResponse:用在@ApiResponses中,一般用于表达一个错误的响应信息
- code:数字,例如400
- message:信息,例如"请求参数没填好"
- response:抛出异常的类
- @ApiModel:描述一个Model的信息(这种一般用在post创建的时候,使用@RequestBody这样的场景,请求参数无法使用@ApiImplicitParam注解进行描述的时候)
- @ApiModelProperty:描述一个model的属性
以上这些就是最常用的几个注解了。
需要注意的是:
- ApiImplicitParam这个注解不只是注解,还会影响运行期的程序,例子如下:
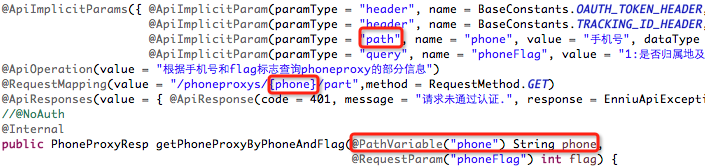
如果ApiImplicitParam中的phone的paramType是query的话,是无法注入到rest路径中的,而且如果是path的话,是不需要配置ApiImplicitParam的,即使配置了,其中的value="手机号"也不会在swagger-ui展示出来。
具体其他的注解,查看:
https://github.com/swagger-api/swagger-core/wiki/Annotations#apimodel
测试:
启动服务,浏览器输入"http://localhost:8080/swagger-ui.html"
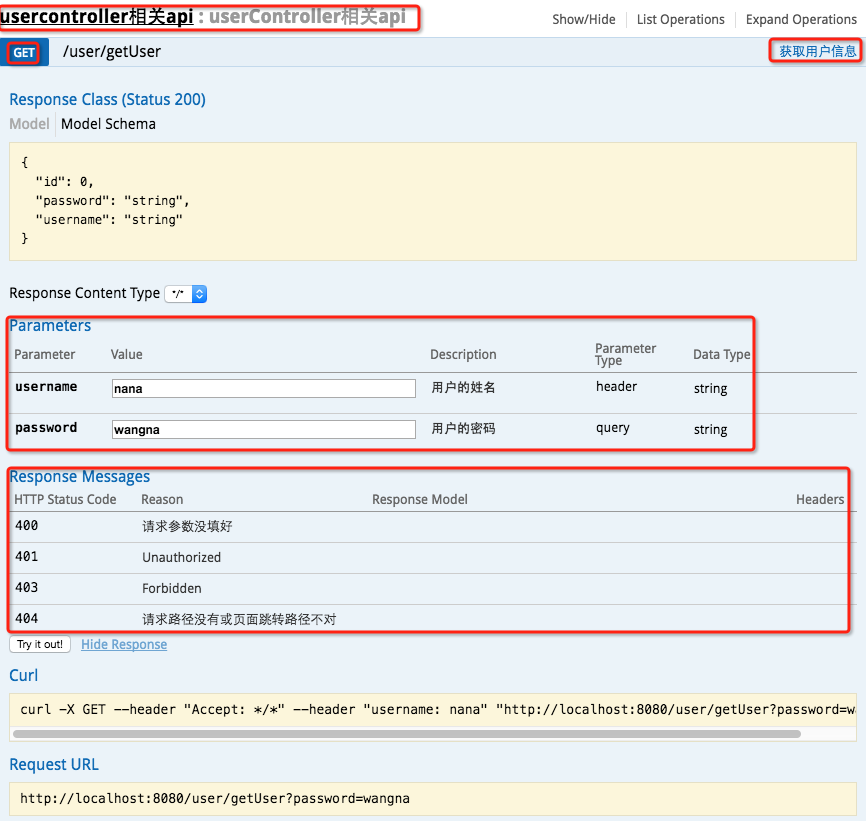
最上边一个红框:@Api
GET红框:method=RequestMethod.GET
右边红框:@ApiOperation
parameter红框:@ApiImplicitParams系列注解
response messages红框:@ApiResponses系列注解
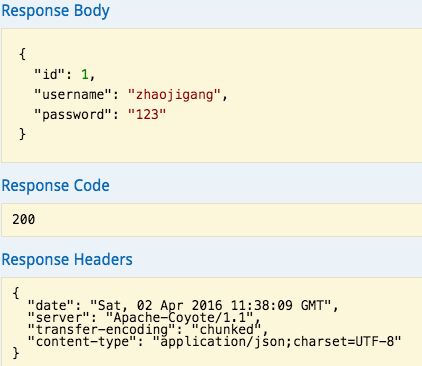
输入参数后,点击"try it out!",查看响应内容:
第四章 springboot + swagger(转载)的更多相关文章
- 第四章 springboot + swagger
http://www.cnblogs.com/java-zhao/p/5348113.html
- 第五章 springboot + mybatis(转载)
本编博客转发自:http://www.cnblogs.com/java-zhao/p/5350021.html springboot集成了springJDBC与JPA,但是没有集成mybatis,所以 ...
- 第七章 springboot + retrofit(转载)
本篇博客转发自:http://www.cnblogs.com/java-zhao/p/5350861.html retrofit:一套RESTful架构的Android(Java)客户端实现. 好处: ...
- 第六章 springboot + 事务(转载)
本篇博客转发自:http://www.cnblogs.com/java-zhao/p/5350106.html 在实际开发中,其实很少会用到事务,一般情况下事务用的比较多的是在金钱计算方面. myba ...
- 第三章 springboot + jedisCluster(转载)
本编博客转发自:http://www.cnblogs.com/java-zhao/p/5347703.html 如果使用的是redis2.x,在项目中使用客户端分片(Shard)机制. 如果使用的是r ...
- 第二十四章 springboot注入servlet
问:有了springMVC,为什么还要用servlet?有了servlet3的注解,为什么还要使用ServletRegistrationBean注入的方式? 使用场景:在有些场景下,比如我们要使用hy ...
- 第十四章 springboot + profile(不同环境读取不同配置)
具体做法: 不同环境的配置设置一个配置文件,例如:dev环境下的配置配置在application-dev.properties中:prod环境下的配置配置在application-prod.prope ...
- 第二十五章 springboot + hystrixdashboard
注意: hystrix基本使用:第十九章 springboot + hystrix(1) hystrix计数原理:附6 hystrix metrics and monitor 一.hystrixdas ...
- [Effective Java]第四章 类和接口
声明:原创作品,转载时请注明文章来自SAP师太技术博客( 博/客/园www.cnblogs.com):www.cnblogs.com/jiangzhengjun,并以超链接形式标明文章原始出处,否则将 ...
随机推荐
- Linux:添加永久路由
没有以下文件时,可创建 vim /etc/sysconfig/network-scripts/route-eth0添加如下信息:192.168.142.100/32 via 192.168.142.1 ...
- JS 中的事件绑定、事件监听、事件委托
事件绑定 要想让 JavaScript 对用户的操作作出响应,首先要对 DOM 元素绑定事件处理函数.所谓事件处理函数,就是处理用户操作的函数,不同的操作对应不同的名称. 在JavaScript中,有 ...
- web基础知识小记
- iOS中如何切换到发短信、打电话、发邮件
我们在做APP的时候,难免会遇到需要调用短信,电话等程序的时候.如美团. 当然,这些都只是一些简单的方法就可以实现,但是时间久了也会淡忘,所以想写这边博客.一是为了再捡起来复习一下,另一个相当于留个备 ...
- Notepad++根据语言类型自动选择对应编译器来编译代码
Notepad++的NppExec插件可以调用好多编译器来编译代码. 比如编译Java: NPP_SAVE javac "$(FULL_CURRENT_PATH)" java -c ...
- Image 抠图,背景透明处理
import java.awt.Graphics2D; import java.awt.image.BufferedImage; import java.io.File; import javax.i ...
- 最简单的Github入门基础
起因是小伙伴分享给我github上的一个FQ工具,让我看实现过程.于是,就由关键字"github"搜索开始. 一言之,是个开源的SVN.和CVS.SVN类似,但是,里面有千千万万程 ...
- web初学之request,session与application
request (1)request的setAttribute()与getAttribute()方法一般都是成对出现,首先通过setAttribute()方法设置属性与属性值,然后通过getAttri ...
- 通过JDBC进行简单的增删改查(以MySQL为例)
目录 前言:什么是JDBC 一.准备工作(一):MySQL安装配置和基础学习 二.准备工作(二):下载数据库对应的jar包并导入 三.JDBC基本操作 (1)定义记录的类(可选) (2)连接的获取 ( ...
- 基本TCP套接字编程
1.listen函数 将主动套接字转换成一个被动套接字 backlog指定相应套接字连接队列的大小. 监听套接字有2个队列: (1)未完成连接队列,接收客户SYN,发出SYN.ACK,等待完成三次握手 ...