
Spring Boot整合MyBatis(使用Spring Tool Suite工具)
1. 创建Spring Boot项目
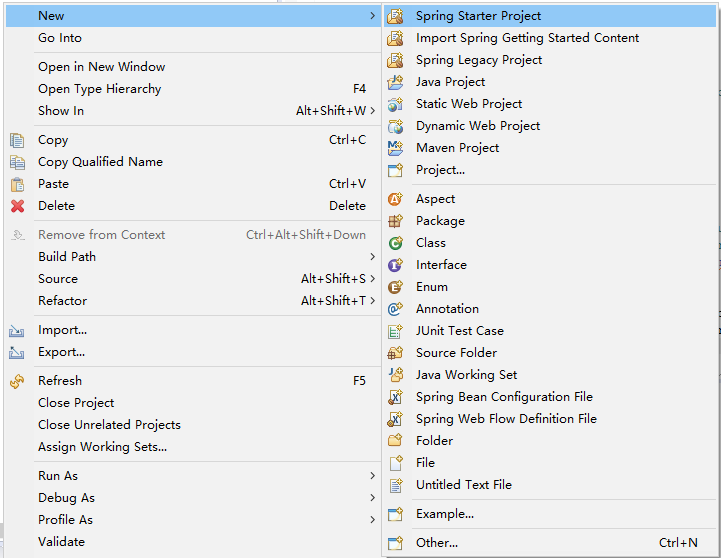
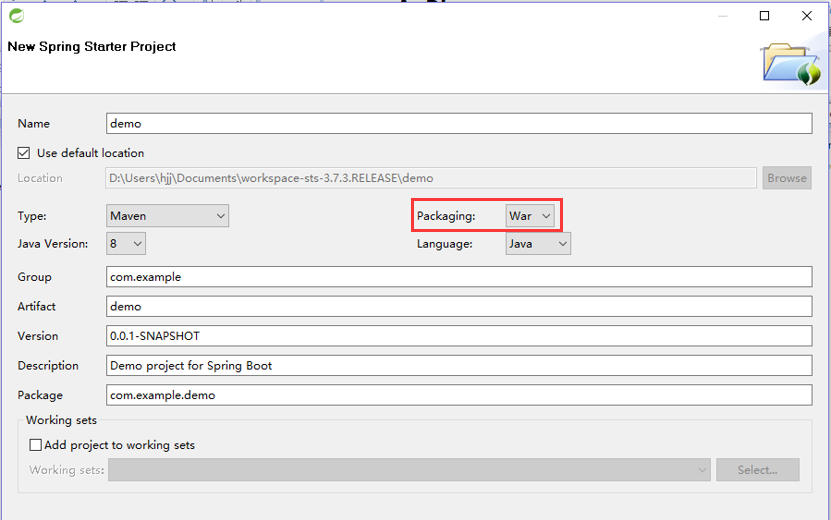
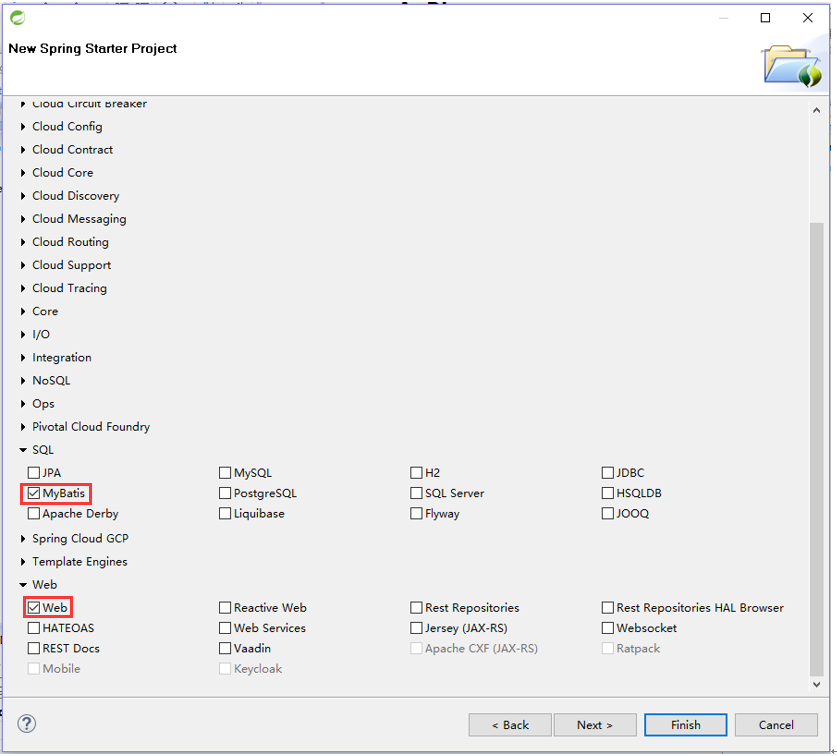
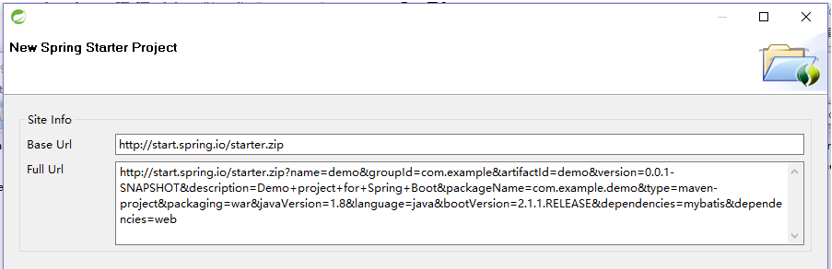
通过Spring Tool Suite的Spring Starter Project对话框,其实是把项目生成的工作委托http://start.spring.io上的Spring Initializr来做的,因此必须联网才能使用这一功能。
1.1 解决创建Spring Boot项目时遇到的问题
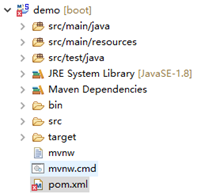

右键项目 --> Java EE Tools --> Generate Deployment Descriptor Stub

Help --> Install New SoftWare
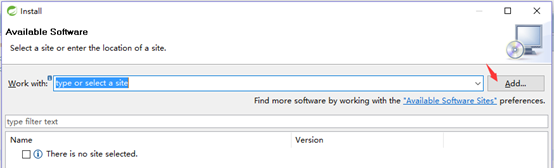
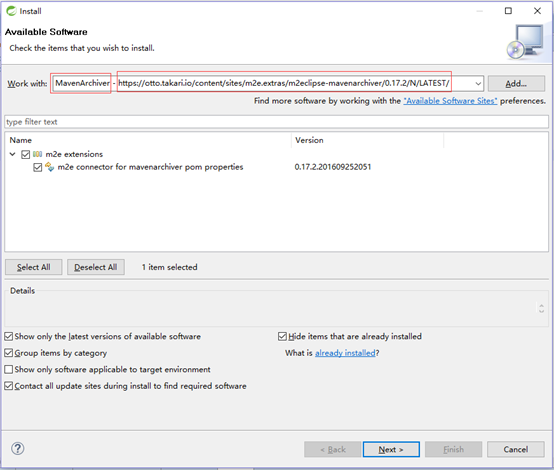
https://otto.takari.io/content/sites/m2e.extras/m2eclipse-mavenarchiver/0.17.2/N/LATEST/
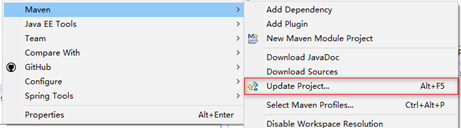
安装完成后就重启Spring Tool Suite,然后右键项目Maven --> Update Project。
2. 编写配置文件
package com.example.demo;

import org.springframework.boot.builder.SpringApplicationBuilder;

import org.springframework.boot.web.servlet.support.SpringBootServletInitializer;

public class ServletInitializer extends SpringBootServletInitializer {

	@Override

	protected SpringApplicationBuilder configure(SpringApplicationBuilder application) {

		return application.sources(DemoApplication.class);

	}

}
package com.example.demo;

import org.mybatis.spring.annotation.MapperScan;

import org.springframework.boot.SpringApplication;

//import org.springframework.boot.autoconfigure.EnableAutoConfiguration;

import org.springframework.boot.autoconfigure.SpringBootApplication;

import org.springframework.context.annotation.ComponentScan;

import com.alibaba.druid.spring.boot.autoconfigure.DruidDataSourceAutoConfigure;

@SpringBootApplication(exclude={DruidDataSourceAutoConfigure.class})

//@EnableAutoConfiguration(exclude={DruidDataSourceAutoConfigure.class})

@ComponentScan(basePackages="com.example")

@MapperScan(basePackages="com.example.mapper")

public class DemoApplication {

	public static void main(String[] args) {

		SpringApplication.run(DemoApplication.class, args);

	}

}
//我们需要类似于web.xml的配置方式来启动spring上下文了,在Application类的同级添加一个SpringBootStartApplication类

//参考:https://blog.csdn.net/liupantao/article/details/74942833

package com.example.demo;

import org.springframework.boot.builder.SpringApplicationBuilder;

import org.springframework.boot.web.servlet.support.SpringBootServletInitializer;

public class SpringBootStartApplication extends SpringBootServletInitializer {

	@Override

	protected SpringApplicationBuilder configure(SpringApplicationBuilder builder) {

		return builder.sources(DemoApplication.class);

	}

}
我们删除src/main/resources目录下的application.properties文件,新建一个application.yml文件。
相关阅读:Spring Boot的 yml和properties的对比
# application.yml

server:

  port: 8080

  servlet:

   context-path: /demo

spring:

  mvc:

    view:

      prefix: /WEB-INF/views/

      suffix: .jsp

  datasource:

    type: com.alibaba.druid.pool.DruidDataSource

    driver-class-name: com.mysql.jdbc.Driver

    url: jdbc:mysql://localhost:3306/demosql?useSSL=false

    username: root

    password: root

mybatis:

  config-location: classpath:mybatis-config.xml

  mapper-locations: classpath:mapping/*.xml

  type-aliases-package: com.example.entity
2.1 MyBatis自动生成代码
参考:Mybatis Generator最完整配置详解
在pom.xml文件中配置一下mybatis-generator-maven-plugin即可。
<?xml version="1.0" encoding="UTF-8"?>

<project xmlns="http://maven.apache.org/POM/4.0.0" xmlns:xsi="http://www.w3.org/2001/XMLSchema-instance"

	xsi:schemaLocation="http://maven.apache.org/POM/4.0.0 http://maven.apache.org/xsd/maven-4.0.0.xsd">

	<modelVersion>4.0.0</modelVersion>

	<parent>

		<groupId>org.springframework.boot</groupId>

		<artifactId>spring-boot-starter-parent</artifactId>

		<version>2.1.1.RELEASE</version>

		<relativePath/> <!-- lookup parent from repository -->

	</parent>

	<groupId>com.example</groupId>

	<artifactId>demo</artifactId>

	<version>0.0.1-SNAPSHOT</version>

	<packaging>war</packaging>

	<name>demo</name>

	<description>Demo project for Spring Boot</description>

	<properties>

		<java.version>1.8</java.version>

	</properties>

	<dependencies>

		<dependency>

			<groupId>org.springframework.boot</groupId>

			<artifactId>spring-boot-starter-web</artifactId>

			<!-- 打包的时候以war包形式,这里要把springboot集成的tomcat去除 -->

			<exclusions>

				<exclusion>

					<groupId>org.springframework.boot</groupId>

					<artifactId>spring-boot-starter-tomcat</artifactId>

				</exclusion>

			</exclusions>

		</dependency>

		<dependency>

			<groupId>org.mybatis.spring.boot</groupId>

			<artifactId>mybatis-spring-boot-starter</artifactId>

			<version>1.3.2</version>

		</dependency>

		<dependency>

			<groupId>org.springframework.boot</groupId>

			<artifactId>spring-boot-starter-tomcat</artifactId>

			<scope>provided</scope>

		</dependency>

		<dependency>

			<groupId>org.springframework.boot</groupId>

			<artifactId>spring-boot-starter-test</artifactId>

			<scope>test</scope>

		</dependency>

		<!-- mysql -->

		<dependency>

		    <groupId>mysql</groupId>

		    <artifactId>mysql-connector-java</artifactId>

		    <version>5.1.38</version><!--$NO-MVN-MAN-VER$-->

		</dependency>

		<!-- alibaba的druid数据库连接池 -->

		<dependency>

			<groupId>com.alibaba</groupId>

			<artifactId>druid-spring-boot-starter</artifactId>

			<version>1.1.0</version>

		</dependency>

		<!-- 热部署模块 -->

		<dependency>

		    <groupId>org.springframework.boot</groupId>

		    <artifactId>spring-boot-devtools</artifactId>

		    <optional>true</optional> <!-- 这个需要为 true 热部署才有效 -->

		</dependency>

	</dependencies>

	<build>

		<finalName>demo</finalName>

		<plugins>

			<plugin>

				<groupId>org.springframework.boot</groupId>

				<artifactId>spring-boot-maven-plugin</artifactId>

			</plugin>

			<!-- mybatis generator 自动生成代码插件 -->

			<plugin>

				<groupId>org.mybatis.generator</groupId>

				<artifactId>mybatis-generator-maven-plugin</artifactId>

				<version>1.3.2</version>

				<configuration>

					<configurationFile>${basedir}/src/main/resources/generator/generatorConfig.xml</configurationFile>

					<overwrite>true</overwrite>

					<verbose>true</verbose>

				</configuration>

			</plugin>

		</plugins>

	</build>

</project>
<!-- generatorConfig.xml -->

<?xml version="1.0" encoding="UTF-8"?>

<!DOCTYPE generatorConfiguration

        PUBLIC "-//mybatis.org//DTD MyBatis Generator Configuration 1.0//EN"

        "http://mybatis.org/dtd/mybatis-generator-config_1_0.dtd">

<generatorConfiguration>

    <!-- 数据库驱动:选择你的本地硬盘上面的数据库驱动包-->

    <classPathEntry  location="E:\RepMaven\mysql\mysql-connector-java\5.1.38\mysql-connector-java-5.1.38.jar"/>

    <context id="mysql"  targetRuntime="MyBatis3">

        <!--数据库链接URL,用户名、密码 -->

        <jdbcConnection driverClass="com.mysql.jdbc.Driver" connectionURL="jdbc:mysql:///demosql" userId="root" password="root">

        </jdbcConnection>

        <javaTypeResolver>

            <property name="forceBigDecimals" value="false"/>

        </javaTypeResolver>

        <!-- 生成模型的包名和位置-->

        <javaModelGenerator targetPackage="com.example.entity" targetProject="src/main/java">

            <property name="enableSubPackages" value="true"/>

            <property name="trimStrings" value="true"/>

        </javaModelGenerator>

        <!-- 生成映射文件的包名和位置-->

        <sqlMapGenerator targetPackage="com.example.mapper.mapping" targetProject="src/main/java">

            <property name="enableSubPackages" value="true"/>

        </sqlMapGenerator>

        <!-- 生成DAO的包名和位置-->

        <javaClientGenerator type="XMLMAPPER" targetPackage="com.example.mapper" targetProject="src/main/java">

            <property name="enableSubPackages" value="true"/>

        </javaClientGenerator>

        <!-- 要生成的表 tableName是数据库中的表名或视图名 domainObjectName是实体类名-->

        <table tableName="t_user" domainObjectName="User" enableCountByExample="false" enableUpdateByExample="false" enableDeleteByExample="false" enableSelectByExample="false" selectByExampleQueryId="false"></table>

    </context>

</generatorConfiguration>
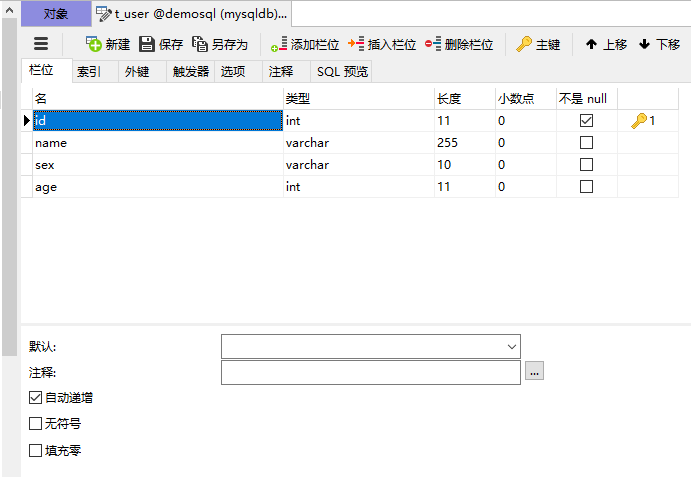
创建数据库和表(手动创建- -)。
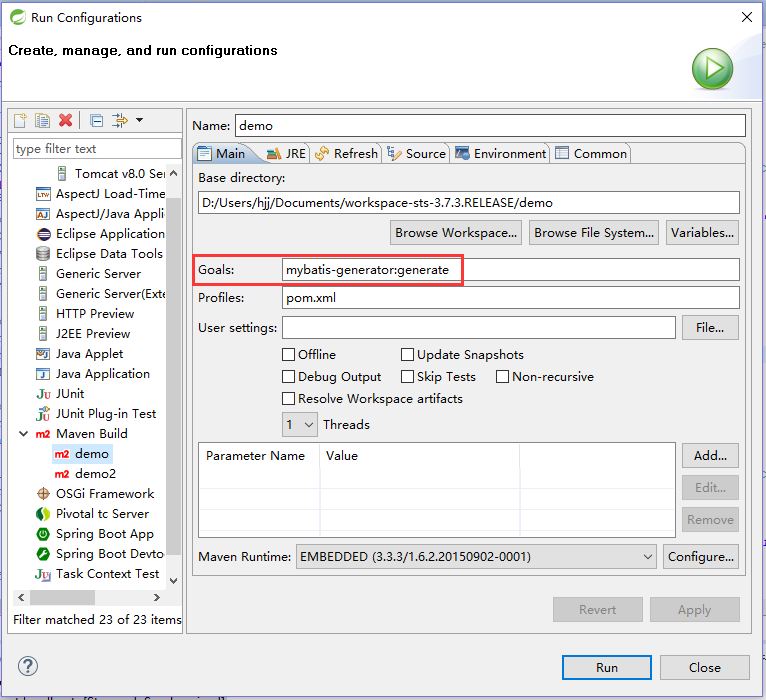
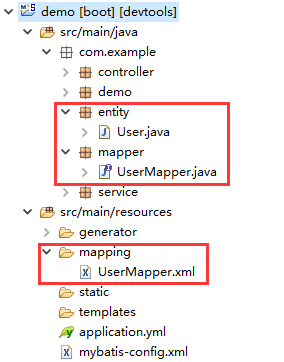
执行mybatis-generator:generate命令即可。
3. 编写源码以及启动项目
package com.example.controller;

import org.springframework.beans.factory.annotation.Autowired;

import org.springframework.stereotype.Controller;

import org.springframework.web.bind.annotation.PathVariable;

import org.springframework.web.bind.annotation.RequestMapping;

import org.springframework.web.bind.annotation.ResponseBody;

import com.example.entity.User;

import com.example.service.UserService;

@RequestMapping("/hjj")

@Controller

public class UserController {

	@Autowired

	private UserService userService;

	@RequestMapping("test")

	public String test(){

		return "test";

	}

	@ResponseBody

	@RequestMapping("/getUserById/{id}")

	public User getUserById(@PathVariable("id")Integer id){

		return userService.getUserById(id);

	}

}
package com.example.service;

import org.springframework.beans.factory.annotation.Autowired;

import org.springframework.stereotype.Service;

import com.example.entity.User;

import com.example.mapper.UserMapper;

@Service

public class UserService {

	@Autowired

	private UserMapper userMapper;

	public User getUserById(Integer id){

		return userMapper.selectByPrimaryKey(id);

	}

}
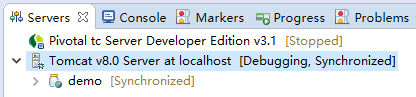
将项目放到Tomcat就可以启动运行了。
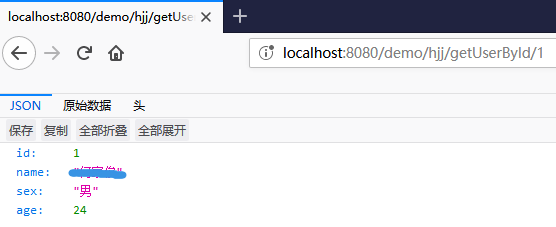
注意:Maven打包项目时,在src/main/java目录下的Java文件会被编译成class文件,而其他类型的文件会被忽略。
下载源码:https://pan.baidu.com/s/1uTapGFlPpKnrmwVA6woKGg 提取码:9wsn
Spring Boot整合MyBatis(使用Spring Tool Suite工具)的更多相关文章
- Spring Boot整合Mybatis并完成CRUD操作
MyBatis 是一款优秀的持久层框架,被各大互联网公司使用,本文使用Spring Boot整合Mybatis,并完成CRUD操作. 为什么要使用Mybatis?我们需要掌握Mybatis吗? 说的官 ...
- spring boot 整合 mybatis 以及原理
同上一篇文章一样,spring boot 整合 mybatis过程中没有看见SqlSessionFactory,sqlsession(sqlsessionTemplate),就连在spring框架整合 ...
- Spring Boot 整合mybatis时遇到的mapper接口不能注入的问题
现实情况是这样的,因为在练习spring boot整合mybatis,所以自己新建了个项目做测试,可是在idea里面mapper接口注入报错,后来百度查询了下,把idea的注入等级设置为了warnin ...
- Spring Boot整合Mybatis报错InstantiationException: tk.mybatis.mapper.provider.base.BaseSelectProvider
Spring Boot整合Mybatis时一直报错 后来发现原来主配置类上的MapperScan导错了包 由于我使用了通用Mapper,所以应该导入通用mapper这个包
- Spring Boot整合MyBatis(非注解版)
Spring Boot整合MyBatis(非注解版),开发时采用的时IDEA,JDK1.8 直接上图: 文件夹不存在,创建一个新的路径文件夹 创建完成目录结构如下: 本人第一步习惯先把需要的包结构创建 ...
- Spring Boot整合Mybatis完成级联一对多CRUD操作
在关系型数据库中,随处可见表之间的连接,对级联的表进行增删改查也是程序员必备的基础技能.关于Spring Boot整合Mybatis在之前已经详细写过,不熟悉的可以回顾Spring Boot整合Myb ...
- Spring Boot系列(三):Spring Boot整合Mybatis源码解析
一.Mybatis回顾 1.MyBatis介绍 Mybatis是一个半ORM框架,它使用简单的 XML 或注解用于配置和原始映射,将接口和Java的POJOs(普通的Java 对象)映射成数据库中的记 ...
- 太妙了!Spring boot 整合 Mybatis Druid,还能配置监控?
Spring boot 整合 Mybatis Druid并配置监控 添加依赖 <!--druid--> <dependency> <groupId>com.alib ...
- Spring Boot 整合 Mybatis 实现 Druid 多数据源详解
摘要: 原创出处:www.bysocket.com 泥瓦匠BYSocket 希望转载,保留摘要,谢谢! “清醒时做事,糊涂时跑步,大怒时睡觉,独处时思考” 本文提纲一.多数据源的应用场景二.运行 sp ...
- Spring boot整合Mybatis
时隔两个月的再来写博客的感觉怎么样呢,只能用“棒”来形容了.闲话少说,直接入正题,之前的博客中有说过,将spring与mybatis整个后开发会更爽,基于现在springboot已经成为整个业界开发主 ...
随机推荐
- cocos2d-x学习记录1——图片显示
这篇算是cocos2d-x入门篇,显示一张图片即可. 观察工程中HelloWorld的结构,包含AppDelegate和HelloWorldScene两个类文件,AppDelegate中包含基本的处理 ...
- idea 解决 pom.xml 中,maven仓库无法导入的问题(红线)
只需要用另一篇文章的 maven clean install 功能就行了 idea Cannot Resolve Symbol 问题解决
- R绘图 第八篇:绘制饼图(ggplot2)
geom_bar()函数不仅可以绘制条形图,还能绘制饼图,跟绘制条形图的区别是坐标系不同,绘制饼图使用的坐标系polar,并且设置theta="y": coord_polar(th ...
- Java 多线程(四)之守护线程(Daemon)
目录 定义 如何创建 判断 注意事项 函数setDaemon(true)必须在 start() 函数之前使用. 守护线程中产生的线程也是守护线程: 测试 @ 定义 Java 中有两种线程: 一种是用户 ...
- Jmeter(八)-发送JDBC请求
下午花了两个小时研究了一下Jmeter发送JDBC请求,现在把基本操作流程分享一下. 做JDBC请求,首先需要两个jar包:mysql驱动-mysql-connector-java-5.1.13-bi ...
- ANSYS渡槽槽身动水压力的施加(2)——U型渡槽
U型渡槽动水压力荷载施加命令及说明 程序中需要用到ANSYS重启动,因为需提取前一步加速度结果以施加部分动水压力: 默认Y方向为重力方向,X方向为横槽向,Z方向为纵槽向: 需准备地震波文件: 需先将槽 ...
- node 随便升级到最新版本的遭遇
将node 升级到最新版本后,创建一个RN新项目,执行:react-native init AwesomeProject 遇到: error An unexpected error occurred ...
- PAT甲题题解-1022. Digital Library (30)-map映射+vector
博主欢迎转载,但请给出本文链接,我尊重你,你尊重我,谢谢~http://www.cnblogs.com/chenxiwenruo/p/6789235.html特别不喜欢那些随便转载别人的原创文章又不给 ...
- 【Alpha】第五次Scrum meeting
今日重大事件一览: 姓名 今日完成任务 所耗时间 刘乾 今日没有完成那个Issue..TuT第一次这么努力工作的我没有完成任务...真的是任务太坑啦. 任务完成了 60% Issue链接:https: ...
- 重温servlet③
请求转发 forward 仅有一个请求 至少两个servlet 前一个的响应头保留着,但是响应体不保留了. 设置响应体太大,会报错 请求包含Include 都包含,响应头和响应体都会保留着 R ...