SpringBoot--- Shiro(拦截,认证)、Thymeleaf(模板引擎)
SpringBoot--- Shiro(拦截,认证)、Thymeleaf(模板引擎)
环境
IDEA :2020.1
SpringBoot: 2.3.3
Java : 8
版本依赖:
shiro-spring : 1.6.0
准备 :环境搭建
导入依赖
   <!-- https://mvnrepository.com/artifact/org.apache.shiro/shiro-spring -->

        <dependency>

            <groupId>org.apache.shiro</groupId>

            <artifactId>shiro-spring</artifactId>

            <version>1.6.0</version>

        </dependency>

        <!--       thymeleaf-->

        <dependency>

            <groupId>org.thymeleaf</groupId>

            <artifactId>thymeleaf-spring5</artifactId>

        </dependency>

        <dependency>

            <groupId>org.thymeleaf.extras</groupId>

            <artifactId>thymeleaf-extras-java8time</artifactId>

        </dependency>
spring与Shiro 的整合包,模板引擎用的是 Thymeleaf。
编写 Controller 类
@Controller

public class HelloController {

    @RequestMapping({"/","/index"})

    public String index(Model model){

        model.addAttribute("msg","Hello Shiro");

        return "welcome";

    }

    @RequestMapping("/level1/{id}")

    public String toLevel1(@PathVariable("id") int id){

        return "pages/level1/" + id;

    }

    @RequestMapping("/level2/{id}")

    public String toLevel2(@PathVariable("id") int id){

        return "pages/level2/" + id;

    }

    @RequestMapping("/level3/{id}")

    public String toLevel3(@PathVariable("id") int id){

        return "pages/level3/" + id;

    }

}
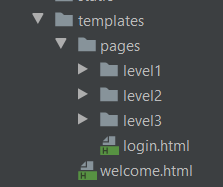
页面素材
采用之前整合 SpringSecurity 时候使用的HTML 页面。(提醒一下,注意导入支持 Thymeleaf 语法的命名空间)需要素材请联系我。
配置类
自定义 Realm,用于认证,授权(未完整)。
public class UserRealm  extends AuthorizingRealm {

    @Override

    protected AuthorizationInfo doGetAuthorizationInfo(PrincipalCollection principalCollection) {

        System.out.println("执行了授权===>doGetAuthorizationInfo");

        return null;

    }

    @Override

    protected AuthenticationInfo doGetAuthenticationInfo(AuthenticationToken authenticationToken) throws AuthenticationException {

        System.out.println("执行了认证===>doGetAuthoricationInfo");

        return null;

    }

}
Shiro 配置类(基本框架)
@Configuration

public class ShiroConfig {

    //3、ShiroFilterFactoryBean

    @Bean

    public ShiroFilterFactoryBean getfilterFactoryBean(

            @Qualifier("securityManager") DefaultWebSecurityManager manager){

        ShiroFilterFactoryBean bean = new ShiroFilterFactoryBean();

        //配置SecurityManager

        bean.setSecurityManager(manager);

        return bean;

    }

    //2、DefaultWebSecurityManager

    @Bean(name = "securityManager")

    public DefaultWebSecurityManager getsecurityManager(@Qualifier("userRealm") UserRealm userRealm){

        DefaultWebSecurityManager manager = new DefaultWebSecurityManager();

        //关联 UserRealm

        manager.setRealm(userRealm);

        return manager;

    }

    //1、创建 realm 类,需要创建 UserRealm 继承 AuthorizingRealm 并重写方法

    @Bean(name = "userRealm")

    public UserRealm realm(){

        return new UserRealm();

    }

}
启动测试,程序是否正常。
1、拦截
拦截本质是通过过滤器,拦截器实现的。
Shiro 采用 ShiroFilterFactoryBean 配置 一个HashMap 来实现。在配置之前我们需要了解配置的含义。
权限过滤器及配置释义
anon:例子/admins/*=anon 没有参数,表示可以匿名使用。*
authc:例如/admins/user/*=authc表示*需要认证(登录)*才能使用,没有参数*
roles(角色):例子/admins/user/=roles[admin],参数可以写多个,多个时必须加上引号,并且参数之间用逗号分割,当有多个参数时,例如admins/user/=roles["admin,guest"],每个参数通过才算通过,相当于hasAllRoles()方法。
perms(权限):例子/admins/user/=perms[user:add:*],参数可以写多个,多个时必须加上引号,并且参数之间用逗号分割,例如/admins/user/=perms["user:add:,user:modify:"],当有多个参数时必须每个参数都通过才通过,想当于isPermitedAll()方法。
rest:例子/admins/user/=rest[user],根据请求的方法,相当于/admins/user/=perms[user:method] ,其中method为post,get,delete等。
port:例子/admins/user/**=port[8081],当请求的url的端口不是8081是跳转到schemal://serverName:8081?queryString,其中schmal是协议http或https等,serverName是你访问的host,8081是url配置里port的端口,queryString
是你访问的url里的?后面的参数。
authcBasic:例如/admins/user/**=authcBasic没有参数表示httpBasic认证
ssl:例子/admins/user/**=ssl没有参数,表示安全的url请求,协议为https
user:例如/admins/user/**=user没有参数表示必须存在用户(使用了cookies session保存了用户),当登入操作时不做检查
配置过滤并测试
在 ShiroFilterFactoryBean 的 setFilterChainDefinitionMap 配置过滤规则。同时配置登录页面,未登录访问相关 authc 级别页面将跳转到登录页面。
    //3、ShiroFilterFactoryBean

    @Bean

    public ShiroFilterFactoryBean getfilterFactoryBean(

            @Qualifier("securityManager") DefaultWebSecurityManager manager){

        ShiroFilterFactoryBean bean = new ShiroFilterFactoryBean();

        //配置SecurityManager

        bean.setSecurityManager(manager);

        Map<String, String> filterMap = new LinkedHashMap<>();

        filterMap.put("/level*/**","authc");

        //配置过滤规则

        bean.setFilterChainDefinitionMap(filterMap);

        return bean;

    }
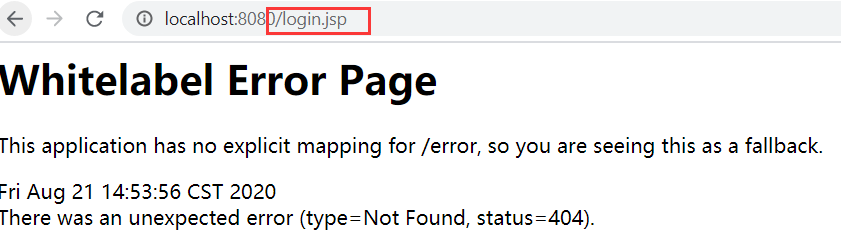
暂时不配置登录页面,这是下一个章节的内容,启动访问,并点击访问需要登录的资源。
Shiro 竟然还 “贴心” 地准备用JSP ,别说了,看见 JSP就头疼,学校里还教了这个.....(这里多说一句,别死磕JSP了,后端的学学JSTL表达式就行。)
2、认证
Shiro 配置类
结合前面的配置,在 Shiro 配置类 的 ShiroFilterFactoryBean 配置登录的url
 //配置登录url

        bean.setLoginUrl("/log/toLogin");
配置 Controller 类
@Controller
@RequestMapping("/log")
public class LogController {
@RequestMapping("/toLogin")
public String toLogin(){
return "/pages/login";
}
@RequestMapping("/doLogin")
public String login(String username , String password , Model model){
//获取当前用户
Subject subject = SecurityUtils.getSubject();
//生成令牌
UsernamePasswordToken token = new UsernamePasswordToken(username , password);
try{
//用令牌尝试登录,失败会抛出异常
subject.login(token);
//成功则返回主页
return "welcome";
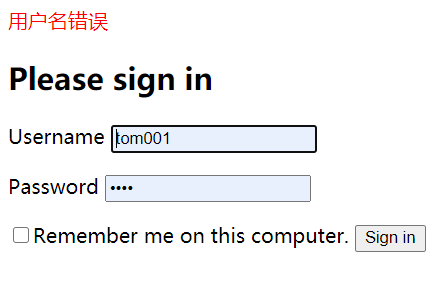
}catch ( UnknownAccountException e){ //捕捉抛出用户名错误
model.addAttribute("msg","用户名错误");
return "/pages/login";
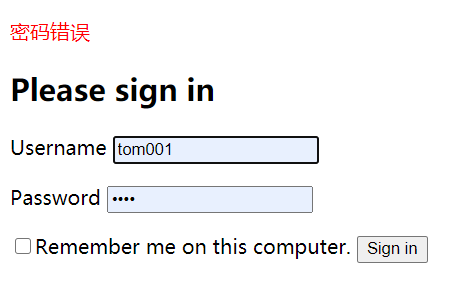
}catch (IncorrectCredentialsException e){//捕捉抛出密码错误
model.addAttribute("msg","密码错误");
return "/pages/login";
}
}
}
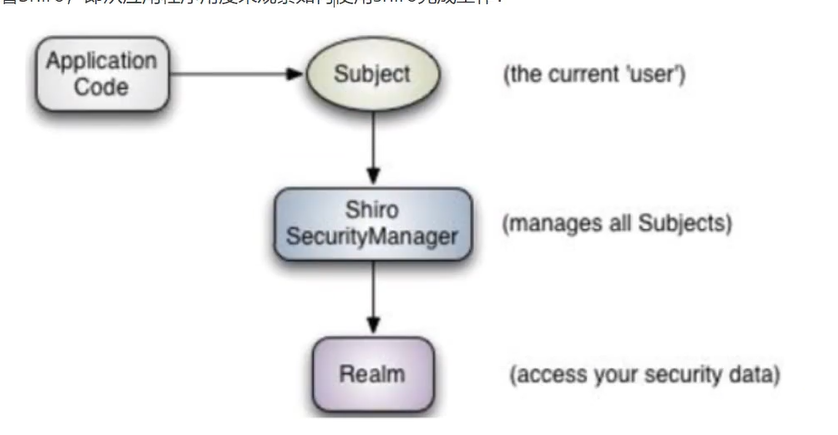
这里说一下, url 为 /doLogin 的方法,这里用到了一个 Shiro 的核心对象 Subject ,表示当前用户,后面将用于登录。
这里非常神奇,不需要任何传参,直接通过 SecurityUtils.getSubject() 获取 Subject 。这一点有点难以理解。不过确实是可以获取的,可以理解为是 Shiro 为我们将这些联系了起来。
生成令牌,我们回到 UserRealm 类 的 doGetAuthenticationInfo 方法。
@Override

    protected AuthenticationInfo doGetAuthenticationInfo(

        AuthenticationToken authenticationToken) throws AuthenticationException {
有一个参数 AuthenticationToken ,它的类型是 认证令牌,查看源码,发现是一个接口。
那就来看他的实现类。

最后一个是用户名密码令牌,查看源码,它的构造方法,可以用来生成一个用于身份认证的令牌。
/**

     * Constructs a new UsernamePasswordToken encapsulating the username and password submitted

     * during an authentication attempt, with a <tt>null</tt> {@link #getHost() host} and a

     * <tt>rememberMe</tt> default of <tt>false</tt>.

     *

     * @param username the username submitted for authentication

     * @param password the password character array submitted for authentication

     */

    public UsernamePasswordToken(final String username, final char[] password) {

        this(username, password, false, null);

    }
回到我们的登录方法,我们可以用页面传递过来的username ,password 生成一个 UsernamePasswordToken 令牌。
之后就是用令牌登录,失败就捕获一些异常,返回一些提示信息到页面。
这里还剩下一个问题,我们作为开发者怎么让 Shiro 知道正确的用户名和密码,这里回到了 UserRealm 类 的 doGetAuthenticationInfo 方法进行配置,这里采用明文用户名和密码配置,后面整合 Mybatis 将结合数据库获取。
    @Override

    protected AuthenticationInfo doGetAuthenticationInfo(AuthenticationToken authenticationToken) throws AuthenticationException {

        System.out.println("执行了认证===>doGetAuthoricationInfo");

		//明文配置用户名和密码

        String username = "tom001";

        String password = "1234";

		//获取令牌

        UsernamePasswordToken userToken =(UsernamePasswordToken) authenticationToken;

        //验证用户名

        if (!userToken.getUsername().equals(username)){

            return null;

        }

	//验证密码交由 Shiro 完成

        return new SimpleAuthenticationInfo(username,password,"");

    }
这里的获取令牌,与之前的生成令牌呼应了。具体对象传递是由 Shiro 完成的。
验证用户名不通过,返回 null 将会由之前登录方法捕获到异常,再做相应处理。
密码不由我们进行处理,可以说是非常安全了。
注意返回值,需要的只是一个接口,我们可以返回它的实现类。
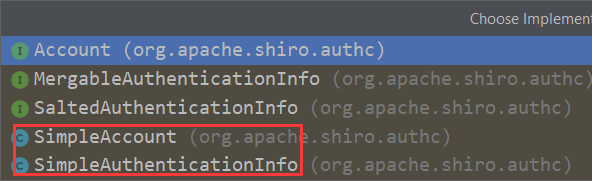
图中两个都是可以使用的,都可以用于认证。
它的构造函数,查看源码
 /**

     * Constructor that takes in a single 'primary' principal of the account and its corresponding credentials,

     * associated with the specified realm.

     * <p/>

     * This is a convenience constructor and will construct a {@link PrincipalCollection PrincipalCollection} based

     * on the {@code principal} and {@code realmName} argument.

     *

     * @param principal   the 'primary' principal associated with the specified realm.

     * @param credentials the credentials that verify the given principal.

     * @param realmName   the realm from where the principal and credentials were acquired.

     */

    public SimpleAuthenticationInfo(Object principal, Object credentials, String realmName) {

        this.principals = new SimplePrincipalCollection(principal, realmName);

        this.credentials = credentials;

    }
其中,principal,credentials ,可以通俗地理解为 用户名,密码,最常见的组合也是用户名和密码。
测试
如有疑问,还可以查看官网给出的十分钟快速入门。https://shiro.apache.org/10-minute-tutorial.html
SpringBoot--- Shiro(拦截,认证)、Thymeleaf(模板引擎)的更多相关文章
- SpringBoot入门篇--使用Thymeleaf模板引擎进行页面的渲染
在做WEB开发的时候,我们不可避免的就是在前端页面之间进行跳转,中间进行数据的查询等等操作.我们在使用SpringBoot之前包括我在内其实大部分都是用的是JSP页面,可以说使用的已经很熟悉.但是我们 ...
- SpringBoot静态资源访问+拦截器+Thymeleaf模板引擎实现简单登陆
在此记录一下这十几天的学习情况,卡在模板引擎这里已经是四天了. 对Springboot的配置有一个比较深刻的认识,在此和大家分享一下初学者入门Spring Boot的注意事项,如果是初学SpringB ...
- JavaEE开发之SpringBoot整合MyBatis以及Thymeleaf模板引擎
上篇博客我们聊了<JavaEE开发之SpringBoot工程的创建.运行与配置>,从上篇博客的内容我们不难看出SpringBoot的便捷.本篇博客我们继续在上篇博客的基础上来看一下Spri ...
- SpringBoot项目的前端+thymeleaf模板引擎
SpringBoot项目创建之后,后台的框架是SpringMVC.但前端的resource和template目录都是空的.这个时候需要创建前台页面. 习惯上,我们会创建JSP,但是,SpringBoo ...
- springboot笔记06——使用Thymeleaf模板引擎
前言 Springboot 推荐使用Thymeleaf做视图层.Thymeleaf支持 html 原型,然后在 html 标签里增加额外的属性来达到模板+数据的展示方式.浏览器解释 html 时会忽略 ...
- (二)SpringBoot基础篇- 静态资源的访问及Thymeleaf模板引擎的使用
一.描述 在应用系统开发的过程中,不可避免的需要使用静态资源(浏览器看的懂,他可以有变量,例:HTML页面,css样式文件,文本,属性文件,图片等): 并且SpringBoot内置了Thymeleaf ...
- (二)SpringBoot2.0基础篇- 静态资源的访问及Thymeleaf模板引擎的使用
一.描述 在应用系统开发的过程中,不可避免的需要使用静态资源(浏览器看的懂,他可以有变量,例:HTML页面,css样式文件,文本,属性文件,图片等): 并且SpringBoot内置了Thymeleaf ...
- 【Springboot】Springboot整合Thymeleaf模板引擎
Thymeleaf Thymeleaf是跟Velocity.FreeMarker类似的模板引擎,它可以完全替代JSP,相较与其他的模板引擎,它主要有以下几个特点: 1. Thymeleaf在有网络和无 ...
- SpringBoot使用thymeleaf模板引擎
(1).添加pom依赖 <dependency> <groupId>org.springframework.boot</groupId> <artifactI ...
随机推荐
- 前端学习(十):CSS选择器
进击のpython ***** 前端学习--CSS选择器 每一条CSS样式声明由两部分组成: 选择器{ 样式: } 在CSS中{}之前的部分就是"选择器","选择器&qu ...
- findViewByid一定要放在setContentView(R.layout.a..)之后
findViewByid一定要放在setContentView(R.layout.a..)之后否则还没布局,根本找不到这些控件setContentView(R.layout.activity_inpu ...
- cookie 和session的简单比较
1.cookie数据存放在客户的浏览器上,session数据放在服务器上. 2.cookie不是很安全,别人可以分析存放在本地的COOKIE并进行COOKIE欺骗 考虑到安全应当使用session ...
- 常用mongo使用方式(限本人)
mongoose连接详情参考官网 在项目中新建db文件夹 connect.js连接mongo: const mongoose=require('mongoose'); mongoose.connect ...
- smartSVN9.2.2 for mac 安装与破解
原文链接:https://www.jianshu.com/p/bb87154e0459 近段时间使用svn进行项目管理,开始使用的是cornerstone,但是用过程中出现一个操作Bug,一.在xco ...
- random随机数函数
- CSS两列布局的N种实现
一.什么是两列布局 两列布局分为两种,一种是左侧定宽.右侧自适应,另一种是两列都自适应(即左侧宽度由子元素决定,右侧补齐剩余空间).在CSS面试题里面属于常考题,也是一个前端开发工程师必须掌握的技能, ...
- PHP 获取图像宽度与高度
PHP 获取图像宽度函数:imagesx() imagesx() 函数用于获取图像的宽度,单位为像素,返回值为整型.高佣联盟 www.cgewang.com 语法: int imagesx( reso ...
- Hive和HBase
1. 两者分别是什么? Apache Hive是一个构建在Hadoop基础设施之上的数据仓库.通过Hive可以使用HQL语言查询存放在HDFS上的数据.HQL是一种类SQL语言,这种语言最终被转化为M ...
- SQLServer 把ID相同的多行数据合并到一起
我们现在有以下GameArea表,以及与其关联的Proveince表: 我们现在需要把GameArea表中GameId相同的数据合并到一行显示,可以使用以下写法: SELECT GameID,STUF ...