关于python中的 take no arguments 的解决方法
针对第四章编写的代码出现的错误做一个总结
Traceback (most recent call last):
File "H:\image\chapter4\p81_chongxie.py", line 160, in <module>
l1 = Linear(X, W1, b1)
TypeError: Linear() takes no arguments
出问题时的init方法的图片
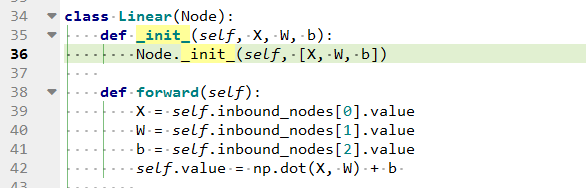
可以看出init两边只有一个下划线 _.
解决办法:把init的两边改成两个下划线 __。即可。

代码运行环境:win7系统 + anaconda3_2020
第四章的代码如下:
 #######################数据结构部分#############################################

 import numpy as np

 import matplotlib.pyplot  as  plt

 #    %matplotlib inline

 class Node(object):

     def __init__(self, inbound_nodes = []):

         self.inbound_nodes = inbound_nodes

         self.value = None

         self.outbound_nodes = []

         self.gradients = {}

         for node in inbound_nodes:

             node.outbound_nodes.append(self)

     def forward(self):

         raise NotImplementedError

     def backward(self):

         raise NotImplementedError

 class Input(Node):

     def __init__(self):

         Node.__init__(self)

     def forward(self):

         pass

     def backward(self):

         self.gradients = {self : 0}

         for n in self.outbound_nodes:

             self.gradients[self] += n.gradients[self]

 ##################################################################################

 class Linear(Node):

     def __init__(self, X, W, b):

         Node.__init__(self, [X, W, b])

     def forward(self):

         X = self.inbound_nodes[0].value

         W = self.inbound_nodes[1].value

         b = self.inbound_nodes[2].value

         self.value = np.dot(X, W) + b

     def backward(self):

         self.gradients = {n: np.zeros_like(n.value) for n in self.inbound_nodes }

         for n in self.outbound_nodes:

             grad_cost = n.gradients[self]

             self.gradients[self.inbound_nodes[0]] += np.dot(grad_cost, self.inbound_nodes[1].value.T)

             self.gradients[self.inbound_nodes[1]] += np.dot(self.inbound_nodes[0].value.T, grad_cost)

             self.gradients[self.inbound_nodes[2]] += np.sum(grad_cost, axis = 0, keepdims = False)

 ###################################################################################

 class Sigmoid(Node):

     def __init__(self, node):

         Node.__init__(self, [node])

     def _sigmoid(self, x):

         return 1. / (1. +  np.exp(-x))    #exp() 方法返回x的指数,e的x次幂

     def forward(self):

         input_value = self.inbound_nodes[0].value

         self.value = self._sigmoid(input_value)

     def backward(self):

         self.gradients = {n: np.zeros_like(n.value) for n in self.inbound_nodes}

         for n in self.outbound_nodes:

             grad_cost = n.gradients[self]

             sigmoid = self.value

             self.gradients[self.inbound_nodes[0]] += sigmoid * (1 - sigmoid) * grad_cost

 class MSE(Node):

     def __init__(self, y, a):

         Node.__init__(self, [y, a])

     def forward(self):

         y = self.inbound_nodes[0].value.reshape(-1, 1)

         a = self.inbound_nodes[1].value.reshape(-1, 1)

         self.m = self.inbound_nodes[0].value.shape[0]

         self.diff = y - a

         self.value = np.mean(self.diff**2)

     def backward(self):

         self.gradients[self.inbound_nodes[0]] = (2 / self.m) * self.diff

         self.gradients[self.inbound_nodes[1]] = (-2 / self.m) * self.diff

 ##########################计算图部分#############################################

 def topological_sort(feed_dict):

     input_nodes = [n for n in feed_dict.keys()]

     G = {}

     nodes = [n for n in input_nodes]

     while len(nodes) > 0:

         n = nodes.pop(0)

         if n not in G:

             G[n] = {'in' : set(), 'out' : set()}

         for m in n.outbound_nodes:

             if m not in G:

                 G[m] = {'in' : set(), 'out' : set()}

             G[n]['out'].add(m)

             G[m]['in'].add(n)

             nodes.append(m)

     L = []

     S = set(input_nodes)

     while len(S) > 0 :

         n = S.pop()

         if isinstance(n, Input):

             n.value = feed_dict[n]

         L.append(n)

         for m in n.outbound_nodes:

             G[n]['out'].remove(m)

             G[m]['in'].remove(n)

             if len(G[m]['in'])  == 0 :

                 S.add(m)

     return L

 #######################使用方法##############################################

 #首先由图的定义执行顺序

  #graph  = topological_sort(feed_dict)

 def forward_and_backward(graph):

     for n in graph :

         n.forward()

     for n in graph[:: -1]:

         n.backward()

 #对各个模块进行正向计算和反向求导

  #forward_and_backward(graph)

 #########################介绍梯度下降################

 def sgd_update(trainables, learning_rate = 1e-2):

     for t in trainables :

         t.value = t.value - learning_rate * t.gradients[t]

 ###########使用这个模型#################################

 from sklearn.utils import resample

 from sklearn import datasets

 #   %matplotlib inline

 data = datasets.load_iris()

 X_  = data.data

 y_  = data.target

 y_[y_ == 2] = 1             # 0 for virginica, 1 for not virginica

 print(X_.shape, y_.shape)   # out (150,4) (150,)

 ########################用写的模块来定义这个神经网络#########################

 np.random.seed(0)

 n_features = X_.shape[1]

 n_class = 1

 n_hidden = 3

 X, y = Input(), Input()

 W1, b1  = Input(), Input()

 W2, b2  = Input(), Input()

 l1 = Linear(X, W1, b1)

 s1 = Sigmoid(l1)

 l2 = Linear(s1, W2, b2)

 t1 = Sigmoid(l2)

 cost = MSE(y, t1)

 ###########训练模型###########################################

 #随即初始化参数值

 W1_0 = np.random.random(X_.shape[1] * n_hidden).reshape([X_.shape[1], n_hidden])

 W2_0 = np.random.random(n_hidden * n_class).reshape([n_hidden, n_class])

 b1_0 = np.random.random(n_hidden)

 b2_0 = np.random.random(n_class)

 #将输入值带入算子

 feed_dict = {

     X: X_, y: y_,

     W1:W1_0, b1: b1_0,

     W2:W2_0, b2: b2_0

 }

 #训练参数

 #这里训练100轮(eprochs),每轮抽4个样本(batch_size),训练150/4次(steps_per_eproch),学习率 0.1

 epochs = 100

 m = X_.shape[0]

 batch_size = 4

 steps_per_eproch = m // batch_size

 lr = 0.1

 graph = topological_sort(feed_dict)

 trainables = [W1, b1,W2, b2]

 l_Mat_W1 = [W1_0]

 l_Mat_W2 = [W2_0]

 l_loss = []

 for i in range(epochs):

     loss = 0

     for j in range(steps_per_eproch):

         X_batch, y_batch = resample(X_, y_, n_samples = batch_size)

         X.value = X_batch

         y.value = y_batch

         forward_and_backward(graph)

         sgd_update(trainables, lr)

         loss += graph[-1].value

     l_loss.append(loss)

     if i % 10 ==9 :

         print("Eproch %d, Loss = %1.5f" % (i, loss))

 #图形化显示

 plt.plot(l_loss)

 plt.title("Cross Entropy value")

 plt.xlabel("Eproch")

 plt.ylabel("Loss")

 plt.show()

 ##########最后用模型预测所有的数据的情况

 X.value = X_

 y.value = y_

 for n in  graph:

     n.forward()

 plt.plot(graph[-2].value.ravel())

 plt.title("predict for all 150 Iris data")

 plt.xlabel("Sample ID")

 plt.ylabel("Probability for not a virginica")

 plt.show()
关于python中的 take no arguments 的解决方法的更多相关文章
- Python中pip install MySQL-python报错解决方法
环境 Centos 7(其他Centos或者RHEL一样) 问题 在执行 pip install MySQL-python 时报错如: Command "python setup.py eg ...
- Python中执行系统命令常见的几种方法--转载
Python中执行系统命令常见的几种方法 Python中执行系统命令常见的几种方法有: (1)os.system # 仅仅在一个子终端运行系统命令,而不能获取命令执行后的返回信息 # 如果再命令行下执 ...
- Python中日期和时间格式化输出的方法
本文转自:https://www.jb51.net/article/62518.htm 本文实例总结了python中日期和时间格式化输出的方法.分享给大家供大家参考.具体分析如下: python格式化 ...
- python中readline判断文件读取结束的方法
注:内容来自网络 本文实例讲述了python中readline判断文件读取结束的方法.分享给大家供大家参考.具体分析如下: 大家知道,python中按行读取文件可以使用readline函数,下面现介绍 ...
- python中执行shell命令的几个方法小结(转载)
转载:http://www.jb51.net/article/55327.htm python中执行shell命令的几个方法小结 投稿:junjie 字体:[增加 减小] 类型:转载 时间:2014- ...
- Python中转换角度为弧度的radians()方法
Python中转换角度为弧度的radians()方法 这篇文章主要介绍了Python中转换角度为弧度的radians()方法,是Python入门中的基础知识,需要的朋友可以参考下 radians()方 ...
- Python使用easy-install安装时报UnicodeDecodeError的解决方法
Python使用easy-install安装时报UnicodeDecodeError的解决方法,有需要的朋友可以参考下. 问题描述: 在使用easy-install安装matplotlib.pypar ...
- sql server 还原数据库后,删除用户,提示数据库主体在该数据库中拥有架构,无法删除解决方法
将另一台服务器上的数据库备份文件,在现在用的这台服务器上还原之后,再创建相同的用户名,提示用户已存在 想将之前的用户先删除掉,却提示“数据库主体在该数据库中拥有架构,无法删除解决方法” 在网上找到方法 ...
- jquery中checkbox全选失效的解决方法
这篇文章主要介绍了jquery中checkbox全选失效的解决方法,需要的朋友可以参考下 如果你使用jQuery 1.6 ,代码if ( $(elem).attr(“checked”) ),将 ...
随机推荐
- Git篇---将秘钥添加到github
第1步:创建SSH Key.在用户主目录下,看看有没有-/.ssh目录,如果有,再看看这个目录下有没有id_rsa和id_rsa.pub这两个文件,如果已经有了,可直接跳到下一步.如果没有,打开She ...
- Java工具类之:包装类
Java工具类--包装类 我们都知道,JDK 其实给我们提供了很多很多 Java 开发者已经写好的现成的类,他们其实都可以理解成工具类,比如我们常见的集合类,日期相关的类,数学相关的类等等,有了这些工 ...
- [开源][示例更新]eCharts配置简化包OptionCreator[typescript版]
前言 eCharts作为国内优秀的开源图表工具,功能强大,但是使用中也存在一定的问题. 文档更新较慢,文档说明不详细. 前端使用的弱类型语言,数据结构在灵活的同时,也容易造成一些问题.例如某些属性到底 ...
- MySQL和PHP中以整型存储IP地址
正文:将IP地址以整型存储 一般我们在数据库中会用到ip地址用来查记录的等等,而ip地址是分为四段的,一般是用varchar或char类型存储.但是其实有更好的存储方法就是以整型存储IP地址. 因为c ...
- 【python】Anaconda4 linux/windos安装
一.什么是Anaconda 二.Win10 安装Anaconda 三.Linu 安装Anaconda ------------------------------------------------- ...
- Threejs实现滴滴官网首页地球动画
.katex { display: block; text-align: center; white-space: nowrap; } .katex-display > .katex > ...
- 利用vue-i18n实现多语言切换
在vue项目中利用vue-i18n,我们可以实现多语言的切换,可以轻松搞定大部分的需求,包括中英文切换,以及词条的变更. vue-i18n基本的使用方法 一.安装vue-i18n npm instal ...
- CentOS 7 内核RPM方式升级
RPM包下载地址: https://elrepo.org/linux/kernel/el7/x86_64/RPMS/ 选择lt版本(长期支持) #下载内核RPM包,这里是kernel-lt-4.4.- ...
- win7下建立docker共享文件夹
前言 建立本机(win7)和VirtualBox中docker虚拟机的共享文件夹,注:下面的命令都是以root身份运行的,使用sudo -i切换到root身份,如无法切换,请自行在命令前加上sudo命 ...
- xenomai内核解析--双核系统调用(三)--如何为xenomai添加一个系统调用
版权声明:本文为本文为博主原创文章,转载请注明出处.如有错误,欢迎指正. @ 目录 一.添加系统调用 二.Cobalt库添加接口 三.应用使用 一.添加系统调用 下面给xenomai添加一个系统调用g ...