Springboot:第一个Springboot程序(一)
1、创建Springboot项目
选择创建Springboot项目:

填写项目基本信息:

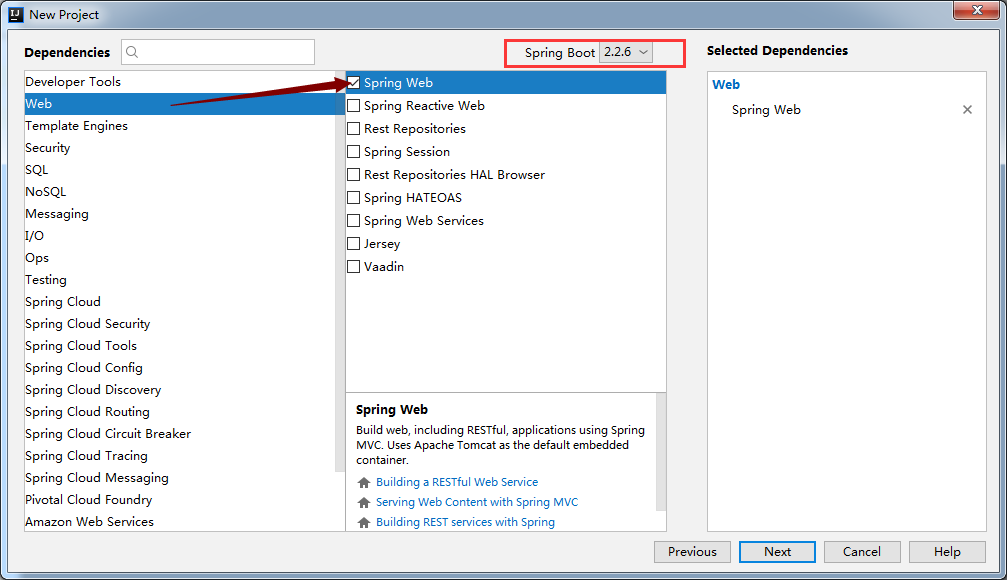
选择Springboot版本以及web依赖(内嵌tomcat):
创建完成:

创建完成后 等待构建maven项目,需要下载项目依赖的环境!
构建完成后的项目结构:
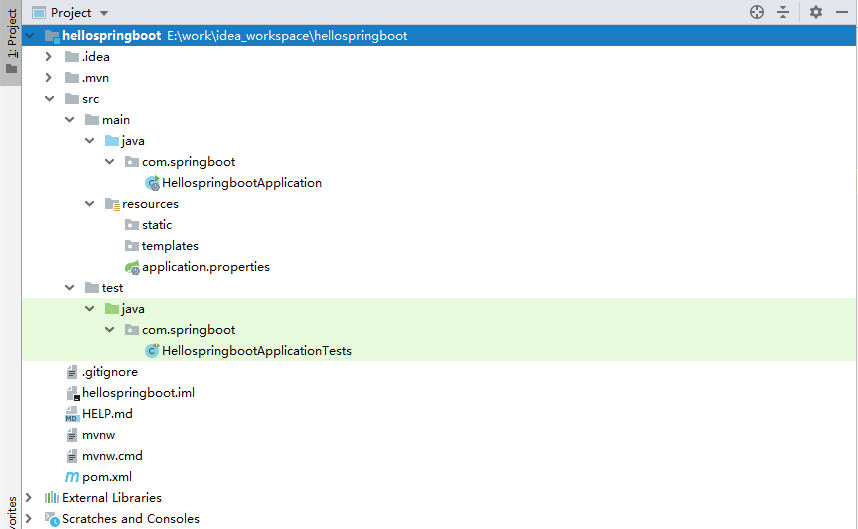
2、Springboot目录结构:
com.springboot: 创建的默认包名,spring默认扫描的包路径

HellospringbootApplication:主程序入口,启动项目

resources:配置文件类路径 一般用于存放配置文件

static:静态文件目录 css js等

templates:模板目录 thymeleaf、freemarker

application.properties:springboot的主配置文件

HellospringbootApplicationTests:测试主程序类

pom.xml:maven依赖环境配置
3、pom文件
<?xml version="1.0" encoding="UTF-8"?>

<project xmlns="http://maven.apache.org/POM/4.0.0" xmlns:xsi="http://www.w3.org/2001/XMLSchema-instance"

         xsi:schemaLocation="http://maven.apache.org/POM/4.0.0 https://maven.apache.org/xsd/maven-4.0.0.xsd">

    <modelVersion>4.0.0</modelVersion>

    <!--父项目 springboot版本-->

    <parent>

        <groupId>org.springframework.boot</groupId>

        <artifactId>spring-boot-starter-parent</artifactId>

        <version>2.2.6.RELEASE</version>

        <relativePath/> <!-- lookup parent from repository -->

    </parent>

    <!--项目坐标:gav-->

    <groupId>com.springboot</groupId>

    <artifactId>hellospringboot</artifactId>

    <version>0.0.1-SNAPSHOT</version>

    <name>hellospringboot</name>

    <description>Demo project for Spring Boot</description>

    <!--jdk版本-->

    <properties>

        <java.version>1.8</java.version>

    </properties>

    <!--环境依赖-->

    <dependencies>

        <!--web环境依赖,会自动装配tomcat、静态资源目录、templates目录-->

        <dependency>

            <groupId>org.springframework.boot</groupId>

            <artifactId>spring-boot-starter-web</artifactId>

        </dependency>

        <!--测试依赖-->

        <dependency>

            <groupId>org.springframework.boot</groupId>

            <artifactId>spring-boot-starter-test</artifactId>

            <scope>test</scope>

            <exclusions>

                <exclusion>

                    <groupId>org.junit.vintage</groupId>

                    <artifactId>junit-vintage-engine</artifactId>

                </exclusion>

            </exclusions>

        </dependency>

    </dependencies>

    <!--maven打包插件-->

    <build>

        <plugins>

            <plugin>

                <groupId>org.springframework.boot</groupId>

                <artifactId>spring-boot-maven-plugin</artifactId>

            </plugin>

        </plugins>

    </build>

</project>
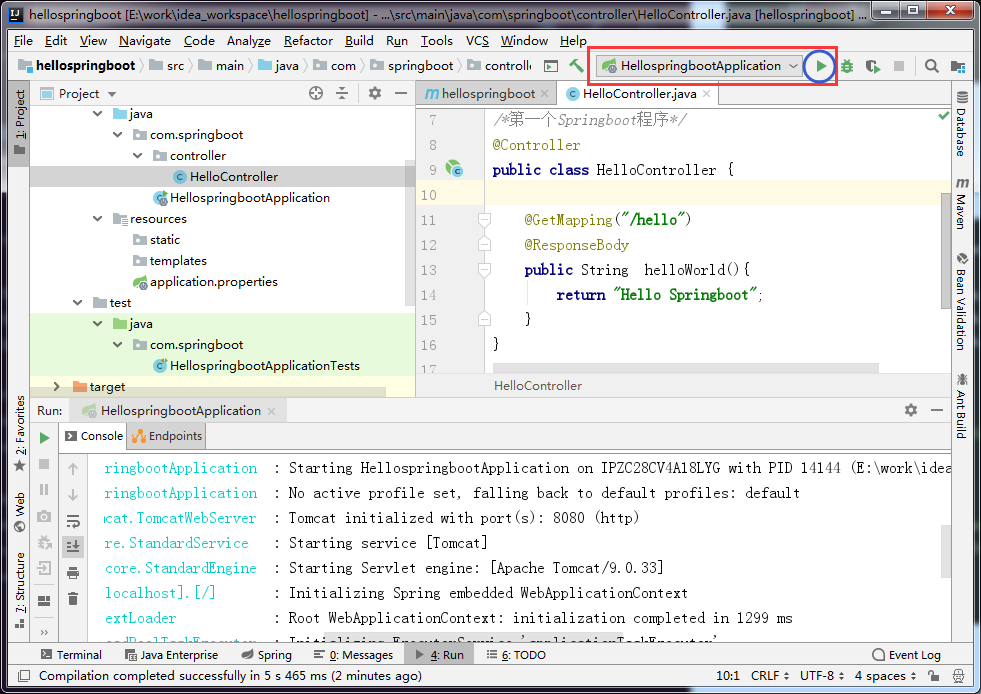
4、程序测试
构建一个controller:
com.springboot.controller.HelloController
package com.springboot.controller;

import org.springframework.stereotype.Controller;

import org.springframework.web.bind.annotation.GetMapping;

import org.springframework.web.bind.annotation.ResponseBody;

/*第一个Springboot程序*/

@Controller

public class HelloController {

    @GetMapping("/hello")

    @ResponseBody

    public String  helloWorld(){

        return "Hello Springboot";

    }

}
启动项目:默认端口8080
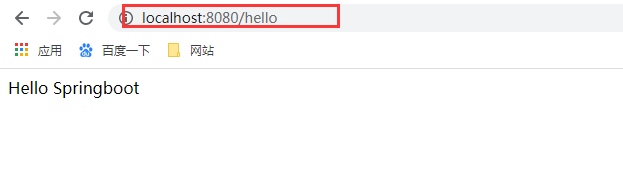
访问项目:

5、程序打包运行
maven-package

打包成功后,会在程序的target目录下生成一个jar包

cmd进入jar的所在目录,用java -jar运行jar包

启动成功

访问项目:
Springboot:第一个Springboot程序(一)的更多相关文章
- springboot之搭建第一个helloworld程序
1.下载基本框架 在网站:https://start.spring.io/ 全部默认,基本没有改动 选择依赖,当然也可以自己在pom.xml加,我们直接在这里选择. 只选择Spring Web Sta ...
- 【SpingBoot】 测试如何使用SpringBoot搭建一个简单后台1
很久没写博客了,最近接到一个组内的测试开发任务是做一个使用SpringBoot 开发一个后台程序(还未完成),特写感想记录一下 1. 为什么选择SpringBoot ? 首先是目前很多公司的后台还是J ...
- (02) 第一个springboot程序
1. 创建一个springboot程序 1. idea 自带的springboot插件 2. 直接从https://start.spring.io 创建好程序下载下来, 之后覆盖你的创建的项目 2. ...
- 第一个SpringBoot程序
第一个SpringBoot程序 例子来自慕课网廖师兄的免费课程 2小时学会SpringBoot Spring Boot进阶之Web进阶 使用IDEA新建工程,选择Spring Initializr,勾 ...
- SpringBoot系列二:搭建自己的第一个SpringBoot程序
声明:本文来源于MLDN培训视频的课堂笔记,写在这里只是为了方便查阅. 一.根据官网手工搭建(http://projects.spring.io/spring-boot/#quick-start) 1 ...
- 用MyEclipse2016 CI版创建一个SpringBoot程序
之前先要在Eclipse里安装STS,步骤如下: 1.点击菜单Help->Install from Catalog 2.在弹出的对话框中点击Popular选项卡,在STS旁边点Install按钮 ...
- idea编写第一个springboot程序
1. 创建一个 springboot 项目 使用 idea 创建的基本步骤: 2. 加入父级,起步依赖 pom.xml文件内容: <?xml version="1.0" en ...
- springboot学习笔记-1 第一个springboot示例
springboot是一个微框架,其设计的目的是为了简化spring框架的搭建和配置过程.从而使开发人员不再需要定义样板化的配置.下面是springboot的入门案例:它演示了利用springboot ...
- 基于SpringBoot开发一个Restful服务,实现增删改查功能
前言 在去年的时候,在各种渠道中略微的了解了SpringBoot,在开发web项目的时候是如何的方便.快捷.但是当时并没有认真的去学习下,毕竟感觉自己在Struts和SpringMVC都用得不太熟练. ...
随机推荐
- Building Applications with Force.com and VisualForce(Dev401)( 八):Designing Applications for Multiple Users: Controling Access to Records.
Module Objectives1.List feature that affect access to data at the record level.2.List the organizati ...
- [vijos1554&bzoj1411]硬币游戏<快速幂>
题目链接:https://vijos.org/p/1554 http://www.lydsy.com/JudgeOnline/problem.php?id=1411 这题真的淫*QAQ... 一看题还 ...
- 面试刷题32:你对tomcat做了哪些性能调优?
背景 java程序员的开发的java应用程序,一般都会选择使用tomcat发布,但是: 如何充分的掌控tomcat,并让它发挥最优性能呢? 这也是面试的热点问题,结合多年的工作实践,我是李福春,今天总 ...
- eolinker测试增强
地址:https://www.eolinker.com Chrome: https://chrome.google.com/webstore/detail/eolinker/mdbgchaihbacj ...
- Netty 中的 handler 和 ChannelPipeline 分析
上一节我们讲了 Netty 的启动流程,从启动流程入手分析了 Reactor 模型的第一步:channel 如何绑定 Selector.然后讲到了 EventLoop 在启动的时候发挥了什么作用.整个 ...
- Zabbix报警机制,Zabbix进阶操作,监控案例
...
- PHP获取所有扩展及扩展下的所有函数签名生成php.snippet
<?php $ext_info = array(); $modules = get_loaded_extensions(); foreach ($modules as $module) { $f ...
- 为什么条件变量需要传入mutex?
条件变量一般而言,会有一个布尔表达式作为唤醒的条件.调用wait的线程需要读取这个布尔表达式内数据, 同样,调用signal的线程需要修改这个布尔表达式的数据,让表达式为真.故而这两个线程必然访问至少 ...
- Python模块---制作属于自己的有声小说
操作环境 Python版本: anaconda3 python3.7.4 操作系统: Ubuntu19.10 编译器: pycharm社区版 用到的模块: pyttsx3,requests pysst ...
- Google GMS介绍
Google GMS介绍GMS全称为GoogleMobile Service.GMS目前提供有Search.Search by Voice.Gmail.Contact Sync.Calendar Sy ...