新建Django项目示例--图书管理系统
知识点:
Django
1. 安装
1. Django版本 1.11.xx
2. 安装方式
1. 命令行 --> Python环境(双版本,pip的使用)
2. PyCharm安装
2. 创建Django项目
1. 创建方式
1. 命令行创建方式
1. cd到你要保存Django项目的目录
2. Django-admin startproject 项目名 --> 会在当前目录创建Django项目
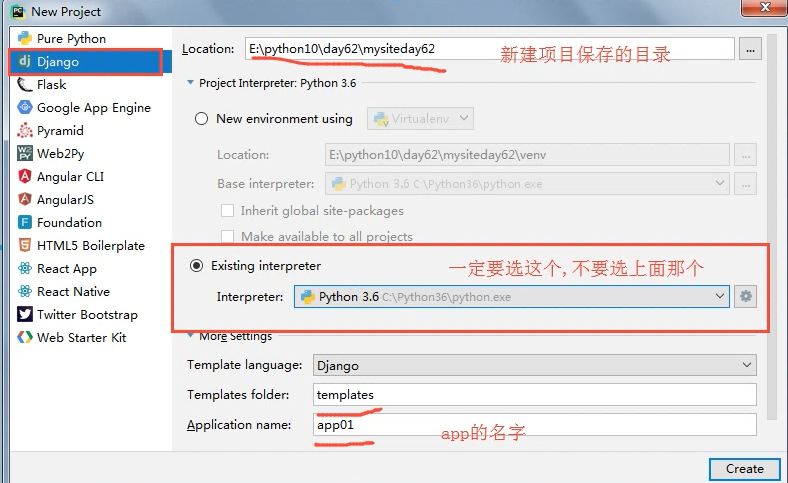
2. PyCharm创建方式
1. File --> new project --> ...
2. 创建完之后一定要选在新窗口打开!!!
3. 配置Django项目
1. settings.py文件
1. templates文件夹的位置
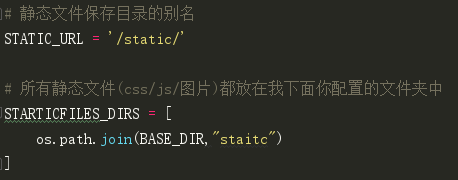
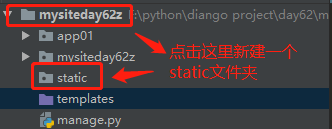
2. 静态文件
1. STATIC_URL --> 静态文件夹的别名(在HTML文件中用的)
2. STATICFILES_DIRS --> 静态文件夹的真正路径
3. 注释掉 csrf 相关的中间件
4. Django项目连接的数据库信息
4. Django WEB请求流程(简版)
1. 启动Django项目,等待用户连接
2. 浏览器在地址栏输入URL,来连接我的Django项目
3. 在urls.py中 找 路径和函数的 对应关系
4. 执行对应的函数
5. 返回响应
5. views.py
1. 专门用来定义处理请求的函数
1. 基本必备三件套
from django.shortcuts import HttpResponse, render, redirect
1. HttpResponse("要返回的内容") --> 通常用于直接返回数据
2. render(request, "html文件", {"k1": v1}) --> 返回一个HTML文件或者打开文件进行字符串替换
3. redirect("URL") --> 告诉用户的浏览器去访问其他的URL 2. request相关
1. request.method --> 查看请求的方法
2. request.POST --> 获取POST请求的数据 6. ORM使用
1. 什么是ORM?
是一种编程的方法论(模型), 和语言无关.(其他的语言也有类似的实现.) 2. ORM的本质:
类 ---> 数据表
对象 ---> 数据行
属性 ---> 字段 按照规定的语法写,自动翻译成对应的SQL语句. 3. ORM的功能:
ORM操作数据表
ORM操作数据行 4. Django里ORM的使用:
1. 手动创建数据库
2. 在settings.py里面,配置数据库的连接信息
DATABASES = {
'default': {
'ENGINE': 'django.db.backends.mysql',
'NAME': 'day62',
'HOST': '127.0.0.1',
'PORT': 3306,
'USER': 'root',
'PASSWORD': '',
}
}
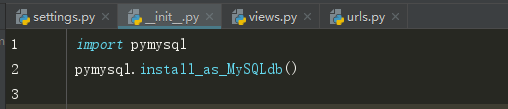
3. 在项目/__init__.py告诉Django用pymysql模块代替MySQLdb来连接MySQL数据库
import pymysql
pymysql.install_as_MySQLdb()
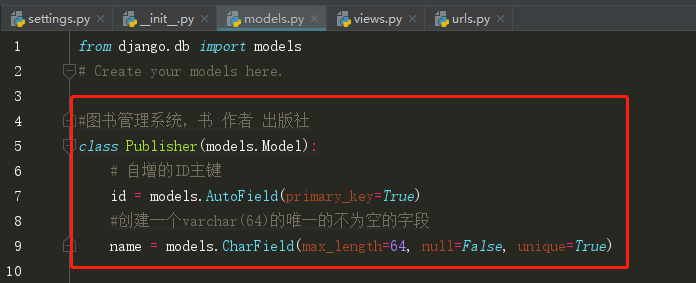
4. 在app/models.py里面定义类
# 出版社
class Publisher(models.Model):
id = models.AutoField(primary_key=True) # 自增的ID主键
# 创建一个varchar(64)的唯一的不为空的字段
name = models.CharField(max_length=64, null=False, unique=True)
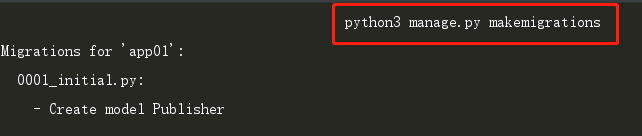
5. 执行两个命令
1. python3 manage.py makemigrations --> 把models.py里面的更改记录到小本本上
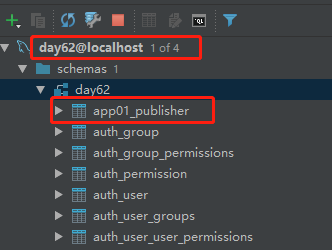
2. python3 manage.py migrate --> 把更改翻译成SQL语句,去数据库执行 2. 今日内容
1. GET请求和POST请求
都属于HTTP协议规定的请求方法 2. 什么时候用GET请求?
1. 浏览器想要得到一个HTML页面的时候
2. 搜索引擎查询关键字的时候 www.sogo.com/web/?query=迪丽热巴 3. 什么时候用POST?
1. 向后端提交数据
1. 大段的数据
2. 包含隐私的数据
3. 上传文件 4. 实际中GET和POST的应用场景
1. GET:
1. 直接在浏览器地址栏输入URL访问网站
2. a标签
2. POST:
1. 登录注册
2. 修改(新增)大段的数据
3. 上传文件 1. 内容回顾
1. 单表的增删改查
1. 删和改
1. GET请求 URL传值
1. 格式
127.0.0.1:8000/delete_publisher/?name=alex&id=7
2. Django后端取值
request.GET --> 大字典
request.GET["name"]/request.GET["id"] --> key不存在就报错了
request.GET.get("name", "sb") --> 推荐用这个方法取值 2. 复习一下POST方法提交的数据怎么取:
request.POST.get("key")
3. ORM操作
1. 删除
1. 先找到对象,调用对象的.delete()方法
publisher_obj = models.Publisher.objects.get(id=7)
publisher_obj.delete()
或者
models.Publisher.objects.get(id=7).delete() 2. 修改
1. 找到对象,通过修改对象的属性来修改数据库中指定字段的值,要保存
publisher_obj = models.Publisher.objects.get(id=7)
publisher_obj.name = "新的出版社名字"
publisher_obj.save() --> 把修改提交到数据库 2. GET和POST
1. GET请求:
1. GET请求携带的数据都拼在了URL上
2. GET请求携带的数据有长度限制 40k
2. POST请求
1. form表单提交数据
2. 上传文件 3. 几个GET请求具体的应用场景:
1. 浏览器地址栏直接输入URL
2. 点击a标签
3. 搜索引擎检索
3. request相关的知识点
1. request.method
1. GET
2. POST
2. request.POST --> 所有和post请求相关的数据
3. request.GET --> 所有和GET请求相关的数据
内容概要
一、创建Django项目
1. 命令行创建方式

    1. cd到你要保存Django项目的目录

    2. Django-admin startproject 项目名   --> 会在当前目录创建Django项目

2. PyCharm创建方式

    1. File --> new project --> ...

    2. 创建完之后一定要选在新窗口打开!!!
PyCharm创建Django项目:
二、配置Django项目
1. settings.py文件

    1. templates文件夹的位置

2. 静态文件

    1. STATIC_URL         --> 静态文件夹的别名(在HTML文件中用的)

    2. STATICFILES_DIRS   --> 静态文件夹的真正路径

3. 注释掉setting.py中 带有 csrf 的那一行(大概45~47行)

4. Django项目连接的数据库信息
1、静态文件配置
2、注释掉setting.py中 带有 csrf 的那一行(大概45~47行)

3、 Django项目连接的数据库信息
见下面四、ODR中的 2. 在settings.py里面,配置数据库的连接信息
三、Django WEB请求流程(简版)
1. 启动Django项目,等待用户连接

2. 浏览器在地址栏输入URL,来连接我的Django项目

3. 在urls.py中找路径和函数的对应关系

4. 执行对应的函数

5. 返回响应
views.py文件:
1. 专门用来定义处理请求的函数

    1. 基本必备三件套

        from django.shortcuts import HttpResponse, render, redirect

        1. HttpResponse("要返回的内容")            --> 通常用于直接返回数据

        2. render(request, "html文件", {"k1": v1}) --> 返回一个HTML文件或者打开文件进行字符串替换

        3. redirect("URL")                         --> 告诉用户的浏览器去访问其他的URL

  2. request相关

      1. request.method     --> 查看请求的方法

      2. request.POST       --> 获取POST请求的数据
四、ORM使用
1. 什么是ORM?

    是一种编程的方法论(模型), 和语言无关.(其他的语言也有类似的实现.)

2. ORM的本质:

    类    --->    数据表

    对象  --->    数据行

    属性  --->    字段

    按照规定的语法写,自动翻译成对应的SQL语句.

3. ORM的功能:

    ORM操作数据表

    ORM操作数据行

4. Django里ORM的使用:

    1. 手动创建数据库

    2. 在settings.py里面,配置数据库的连接信息

        DATABASES = {

                'default': {

                                   'ENGINE': jango.db.backends.mysql',

                        'NAME': 'day62',

                        'HOST': '127.0.0.1',

                        'PORT': 3306,

                        'USER': 'root',

                        'PASSWORD': '',

                        }

                    }

    3. 在项目/__init__.py告诉Django用pymysql模块代替MySQLdb来连接MySQL数据库

        import pymysql

        pymysql.install_as_MySQLdb()

    4. 在app/models.py里面定义类

        # 出版社

        class Publisher(models.Model):

            id = models.AutoField(primary_key=True)  # 自增的ID主键

            # 创建一个varchar(64)的唯一的不为空的字段

            name = models.CharField(max_length=64, null=False, unique=True)

    5. 执行两个命令

        1. python3 manage.py makemigrations   --> 把models.py里面的更改记录到小本本上

        2. python3 manage.py migrate  --> 把更改翻译成SQL语句,去数据库执行
流程介绍
1、在cmd中新建一个数据库

2. 在settings.py里面,配置数据库的连接信息

3. 在项目/__init__.py告诉Django用pymysql模块代替MySQLdb来连接MySQL数据库
4、在app/models.py里面定义类(这里以创建一个图书管理系统为例)
5、 执行两个命令
在pycharm下面的Terminal 中依次执行以下两条命令
1. python3 manage.py makemigrations   #把models.py里面的更改记录到小本本上

2. python3 manage.py migrate  #把更改翻译成SQL语句,去数据库执行

五、出版社管理系统--增删改查
1、展示出版社列表
(1) 在urls.py中添加一个函数对应关系

(2) 在views中添加对应的函数
from django.shortcuts import render

from app01 import models

# Create your views here.

# 展示出版社列表

def publisher_list(request):

    # 去数据库查出所有的出版社,填充到HTML中,给用户返回

    ret = models.Publisher.objects.all().order_by("id")

    return render(request, "publisher_list.html", {"publisher_list": ret})
<!DOCTYPE html>

<html lang="en">

<head>

    <meta charset="UTF-8">

    <title>出版社列表</title>

</head>

<body>

<a href="/add_publisher/">添加新的出版社</a>

<table border="">

    <thead>

    <tr>

        <th>序号</th>

        <th>ID</th>

        <th>出版社名称</th>

        <th>操作</th>

    </tr>

    </thead>

    <tbody>

    {% for publisher in publisher_list %}

        <tr>

{#       循环添加序号#}

        <td>{{ forloop.counter }}</td>

{#       循环取出库中的ID#}

        <td>{{ publisher.id }}</td>

{#       循环取出库中的name#}

        <td>{{ publisher.name }}</td>

        <td>

            <a href="/delete_publisher/?id={{ publisher.id }}">删除</a>

            <a href="/edit_publisher/?id={{ publisher.id }}">编辑</a>

        </td>

        </tr>

    {% endfor %}

    </tbody>

</table>

</body>

</html>
publisher_list.html
此时点击运行,在浏览器中输入http://127.0.0.1:8000/publisher_list/就会出现:

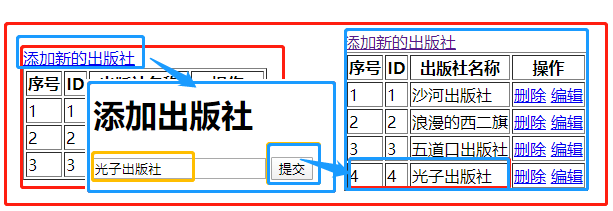
2、添加新的出版社
<a href="/add_publisher/">添加新的出版社</a>
(1) 在urls.py中新添加一个函数对应关系
url(r'^add_publisher/', views.add_publisher),
(2) 在views中添加对应的函数
# 添加新的出版社

def add_publisher(request):

    error_msg = ""

    # 如果是POST请求,我就取到用户填写的数据

    if request.method == "POST":

        new_name = request.POST.get("publisher_name", None)

        if new_name:

            # 通过ORM去数据库里新建一条记录

            models.Publisher.objects.create(name=new_name)

            # 引导用户访问出版社列表页,查看是否添加成功  --> 跳转

            return redirect("/publisher_list/")

        else:

            error_msg = "出版社名字不能为空!"

    # 用户第一次来,我给他返回一个用来填写的HTML页面

    return render(request, "add_publisher.html", {"error": error_msg})
<!DOCTYPE html>

<html lang="en">

<head>

    <meta charset="UTF-8">

    <title>添加出版社</title>

</head>

<body>

<h1>添加出版社</h1>

<form action="/add_publisher/" method="post">

    <input type="text" name="publisher_name">

    <input type="submit" value="提交">

    <p style="color: red">{{ error }}</p>

</form>

</body>

</html>

{#form表单提交数据需要注意的几点:#}

{#1. form不是from,所有获取用户输入的标签都应该放在form里面, 并且必须要有name属性#}

{#2. action属性控制往哪儿提交,method一般都设置成post#}

{#3. 提交按钮必须是type=submit,不能是别的类型#}
add_publisher.html
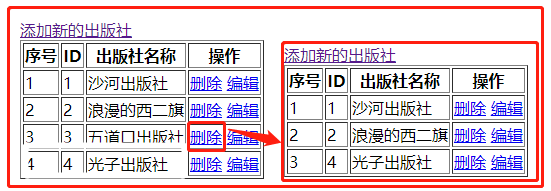
3、删除出版社
<a href="/delete_publisher/?id={{ publisher.id }}">删除</a>
(1) 在urls.py中添加一个函数对应关系
url(r'^delete_publisher/', views.delete_publisher),
(2) 在views中添加对应的函数
# 删除出版社的函数

def delete_publisher(request):

    print(request.GET)

    print("=" * 120)

    # 删除指定的数据

    # 1. 从GET请求的参数里面拿到将要删除的数据的ID值,这个ID值是点击的时候附加的一个参数,见上面a标签

    del_id = request.GET.get("id", None)  # 字典取值,取不到默认为None

    # 如果能取到id值

    if del_id:

        # 去数据库删除当前id值的数据

        # 根据id值查找到数据

        del_obj = models.Publisher.objects.get(id=del_id)

        # 删除

        del_obj.delete()

        # 返回删除后的页面,跳转到出版社的列表页,查看删除是否成功

        return redirect("/publisher_list/")

    else:

        return HttpResponse("要删除的数据不存在!")
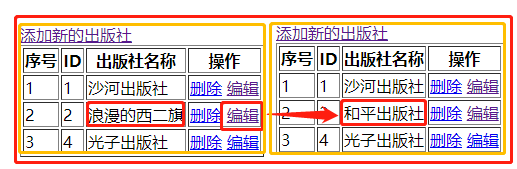
4、编辑出版社
<a href="/edit_publisher/?id={{ publisher.id }}">编辑</a>
(1) 在urls.py中添加一个函数对应关系
url(r'^edit_publisher/', views.edit_publisher),
(2) 在views中添加对应的函数
# 编辑出版社

def edit_publisher(request):

    # 用户修改完出版社的名字,点击提交按钮,给我发来新的出版社名字

    if request.method == "POST":

        print(request.POST)

        # 取新出版社名字

        edit_id = request.POST.get("id")

        new_name = request.POST.get("publisher_name")

        # 更新出版社

        # 根据id取到编辑的是哪个出版社

        edit_publisher = models.Publisher.objects.get(id=edit_id)

        edit_publisher.name = new_name

        edit_publisher.save()  # 把修改提交到数据库

        # 跳转出版社列表页,查看是否修改成功

        return redirect("/publisher_list/")

    # 从GET请求的URL中取到id参数

    edit_id = request.GET.get("id")

    if edit_id:

        # 获取到当前编辑的出版社对象

        publisher_obj = models.Publisher.objects.get(id=edit_id)

        return render(request, "edit_publisher.html", {"publisher": publisher_obj})

    else:

        return HttpResponse("编辑的出版社不存在!")
<!DOCTYPE html>

<html lang="en">

<head>

    <meta charset="UTF-8">

    <title>编辑出版社</title>

</head>

<body>

<h1>编辑出版社</h1>

<form action="/edit_publisher/" method="post">

    <input type="text" name="id" value="{{ publisher.id }}" style="display: none">

    <input type="text" name="publisher_name" value="{{ publisher.name }}">

    <input type="submit" value="提交">

    <p style="color: red">{{ error }}</p>

</form>

</body>

</html>
edit_publisher.html
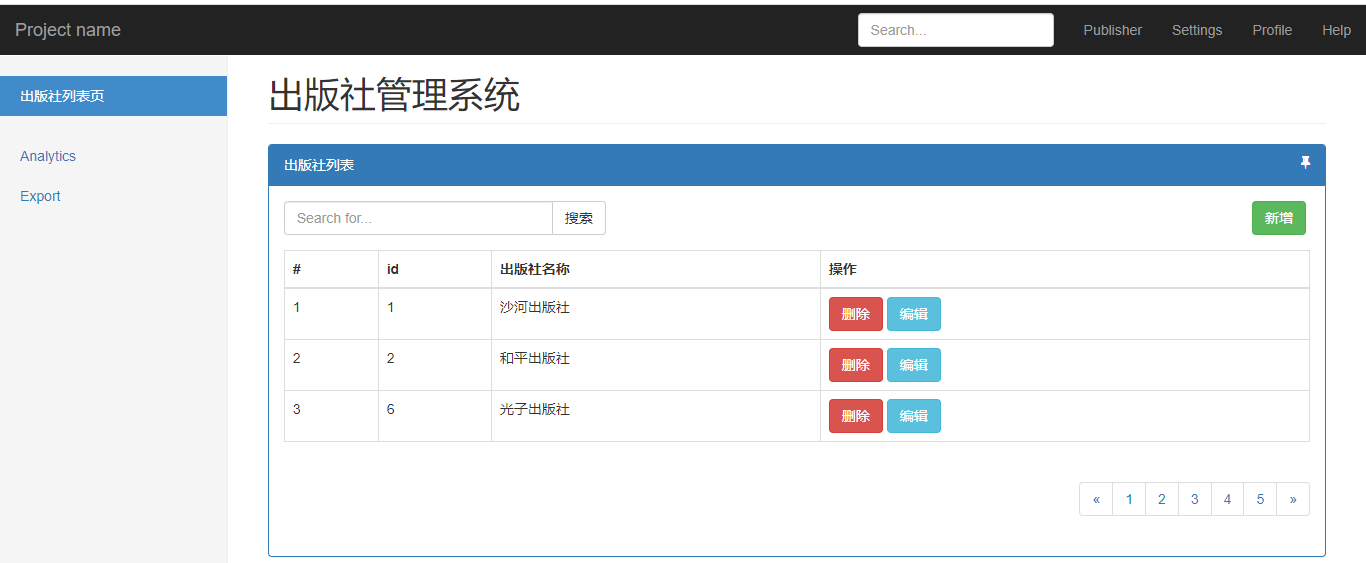
最后应用Bootstrap样式更换publisher_list.html文件
<!DOCTYPE html>
<!-- saved from url=(0042)https://v3.bootcss.com/examples/dashboard/ -->
<html lang="zh-CN">
<head>
<meta http-equiv="Content-Type" content="text/html; charset=UTF-8"> <meta http-equiv="X-UA-Compatible" content="IE=edge">
<meta name="viewport" content="width=device-width, initial-scale=1">
<!-- 上述3个meta标签*必须*放在最前面,任何其他内容都*必须*跟随其后! -->
<meta name="description" content="">
<meta name="author" content="">
<link rel="icon" href="https://v3.bootcss.com/favicon.ico"> <title>出版社管理系统</title>
<!-- Bootstrap core CSS -->
<link href="/static/bootstrap/css/bootstrap.min.css" rel="stylesheet">
<!-- Custom styles for this template -->
<link href="/static/dashboard.css" rel="stylesheet">
<link rel="stylesheet" href="/static/fontawesome/css/font-awesome.min.css">
</head> <body>
<nav class="navbar navbar-inverse navbar-fixed-top">
<div class="container-fluid">
<div class="navbar-header">
<button type="button" class="navbar-toggle collapsed" data-toggle="collapse" data-target="#navbar"
aria-expanded="false" aria-controls="navbar">
<span class="sr-only">Toggle navigation</span>
<span class="icon-bar"></span>
<span class="icon-bar"></span>
<span class="icon-bar"></span>
</button>
<a class="navbar-brand" href="https://v3.bootcss.com/examples/dashboard/#">Project name</a>
</div>
<div id="navbar" class="navbar-collapse collapse">
<ul class="nav navbar-nav navbar-right">
<li><a href="https://v3.bootcss.com/examples/dashboard/#">Publisher</a></li>
<li><a href="https://v3.bootcss.com/examples/dashboard/#">Settings</a></li>
<li><a href="https://v3.bootcss.com/examples/dashboard/#">Profile</a></li>
<li><a href="https://v3.bootcss.com/examples/dashboard/#">Help</a></li>
</ul>
<form class="navbar-form navbar-right">
<input type="text" class="form-control" placeholder="Search...">
</form>
</div>
</div>
</nav> <div class="container-fluid">
<div class="row">
<div class="col-sm-3 col-md-2 sidebar">
<ul class="nav nav-sidebar">
<li class="active"><a href="/publisher_list/">出版社列表页<span class="sr-only">(current)</span></a>
</li>
<li><a href="https://v3.bootcss.com/examples/dashboard/#"></a></li>
<li><a href="https://v3.bootcss.com/examples/dashboard/#">Analytics</a></li>
<li><a href="https://v3.bootcss.com/examples/dashboard/#">Export</a></li>
</ul> </div>
<div class="col-sm-9 col-sm-offset-3 col-md-10 col-md-offset-2 main">
<h1 class="page-header">出版社管理系统</h1> <div class="panel panel-primary">
<!-- Default panel contents -->
<div class="panel-heading">出版社列表 <i class="fa fa-thumb-tack pull-right"></i></div>
<div class="panel-body">
<div class="row" style="margin-bottom: 15px">
<div class="col-md-4">
<div class="input-group">
<input type="text" class="form-control" placeholder="Search for...">
<span class="input-group-btn">
<button class="btn btn-default" type="button">搜索</button>
</span>
</div><!-- /input-group -->
</div><!-- /.col-md-4 -->
<div class="col-md-1 pull-right">
<a class="btn btn-success" href="/add_publisher/">新增</a>
</div> </div><!-- /.row --> <table class="table table-bordered">
<thead>
<tr>
<th>#</th>
<th>id</th>
<th>出版社名称</th>
<th>操作</th>
</tr>
</thead>
<tbody>
{% for publisher in publisher_list %}
<tr>
<td>{{ forloop.counter }}</td>
<td>{{ publisher.id }}</td>
<td>{{ publisher.name }}</td>
<td>
<a class="btn btn-danger" href="/delete_publisher/?id={{ publisher.id }}">删除</a>
<a class="btn btn-info" href="/edit_publisher/?id={{ publisher.id }}">编辑</a>
</td>
</tr>
{% endfor %}
</tbody>
</table> <nav aria-label="Page navigation" class="text-right">
<ul class="pagination">
<li>
<a href="#" aria-label="Previous">
<span aria-hidden="true">«</span>
</a>
</li>
<li><a href="#">1</a></li>
<li><a href="#">2</a></li>
<li><a href="#">3</a></li>
<li><a href="#">4</a></li>
<li><a href="#">5</a></li>
<li>
<a href="#" aria-label="Next">
<span aria-hidden="true">»</span>
</a>
</li>
</ul>
</nav>
</div> </div>
</div>
</div>
</div> <div class="modal fade" tabindex="-1" role="dialog" id="myModal">
<div class="modal-dialog" role="document">
<div class="modal-content">
<div class="modal-header">
<button type="button" class="close" data-dismiss="modal" aria-label="Close"><span aria-hidden="true">×</span>
</button>
<h4 class="modal-title">用户信息</h4>
</div>
<div class="modal-body">
<form class="form-horizontal">
<div class="form-group">
<label for="inputEmail3" class="col-sm-2 control-label">邮箱</label>
<div class="col-sm-10">
<input type="email" class="form-control" id="inputEmail3" placeholder="Email">
</div>
</div>
<div class="form-group">
<label for="inputPassword3" class="col-sm-2 control-label">密码</label>
<div class="col-sm-10">
<input type="password" class="form-control" id="inputPassword3" placeholder="Password">
</div>
</div>
</form>
</div>
<div class="modal-footer">
<button type="button" class="btn btn-default" data-dismiss="modal">取消</button>
<button type="button" class="btn btn-primary">保存</button>
</div>
</div><!-- /.modal-content -->
</div><!-- /.modal-dialog -->
</div><!-- /.modal --> <!-- Bootstrap core JavaScript
================================================== -->
<!-- Placed at the end of the document so the pages load faster -->
<script src="/static/jquery-3.3.1.js"></script>
<script src="/static/bootstrap/js/bootstrap.min.js"></script> </body>
</html>
publisher_list.html
新的主界面为:
六、建book表及增删改查
1、app01下models.py文件中新建book列表
# 书

class Book(models.Model):

    id = models.AutoField(primary_key=True)  # 自增的ID主键

    # 创建一个varchar(64)的唯一的不为空的字段

    title = models.CharField(max_length=64, null=False, unique=True)

    # 和出版社关联的外键字段,这里publisher对应的是一个对象,在数据库中存的是一个ID

    publisher = models.ForeignKey(to="Publisher")
建完之后告诉django models.py文件有变更,有两种方式:
1、在Terminal中依次运行python3 manage.py makemigrations 与python3 manage.py migrage
2、点击Tools->Run manage.py Task,然后在弹出的窗口依次运行makemigrations 与 migrate
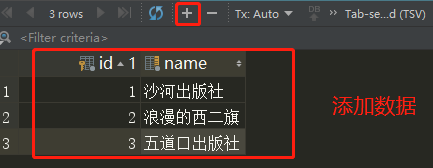
2、添加数据
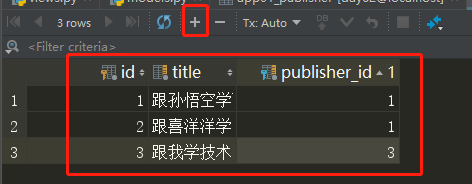
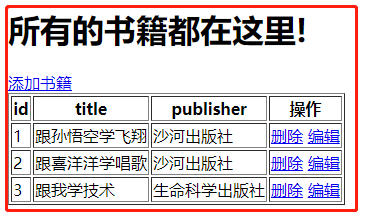
3、展示书籍列表
(1) 在urls.py中添加一个函数对应关系
url(r'^book_list/', views.book_list),
(2) 在views中添加对应的函数
# 展示书的列表

def book_list(request):

    # 去数据库中查询所有的书籍

    all_book = models.Book.objects.all()

    # 在HTML页面完成字符串替换(渲染数据)

    return render(request, "book_list.html", {"all_book": all_book})
<!DOCTYPE html>

<html lang="en">

<head>

    <meta charset="UTF-8">

    <title>书籍列表</title>

</head>

<body>

<h1>所有的书籍都在这里!</h1>

<a href="/add_book/">添加书籍</a>

<table border="1">

    <thead>

    <tr>

        <th>id</th>

        <th>title</th>

        <th>publisher</th>

        <th>操作</th>

    </tr>

    </thead>

    <tbody>

    {% for i in all_book %}

{#      i指的是book书对象#}

        <tr>

        <td>{{ i.id }}</td>

        <td>{{ i.title }}</td>

{#       i.publisher取到的是一个对应的出版社对象,可以取id和name#}

        <td>{{ i.publisher.name }}</td>

        <td>

            <a href="/delete_book/?id={{ i.id }}">删除</a>

            <a href="/edit_book/?id={{ i.id }}">编辑</a>

        </td>

        </tr>

    {% endfor %}

    </tbody>

</table>

</body>

</html>
book_list.html
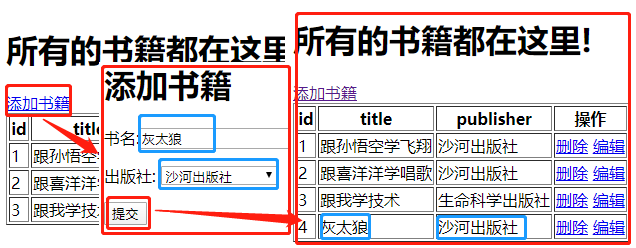
4、添加书籍
<a href="/add_book/">添加书籍</a>
(1) 在urls.py中添加一个函数对应关系
url(r'^add_book/', views.add_book), # 添加书籍
(2) 在views中添加对应的函数
# 添加书籍

def add_book(request):

    if request.method == "POST":

        print(request.POST)

        print("=" * 120)

        # {"book_title": "跟金老板学开车", "publisher": 2}

        new_title = request.POST.get("book_title")

        new_publisher_id = request.POST.get("publisher")

        # 创建新书对象,自动提交

        models.Book.objects.create(title=new_title, publisher_id=new_publisher_id)

        # 用出版社对象创建

        # publisher_obj = models.Publisher.objects.get(id=new_publisher_id)

        # models.Book.objects.create(title=new_title, publisher=publisher_obj)

        # 返回到书籍列表页

        return redirect("/book_list/")

    # 取到所有的出版社

    ret = models.Publisher.objects.all()

    return render(request, "add_book.html", {"publisher_list": ret})
<!DOCTYPE html>

<html lang="en">

<head>

    <meta charset="UTF-8">

    <title>添加书籍</title>

</head>

<body>

<h1>添加书籍</h1>

<form action="/add_book/" method="post">

    <p>

        书名:<input type="text" name="book_title">

    </p>

    <p>

        出版社:

        <select name="publisher" >

            {% for publisher in publisher_list %}

                <option value="{{ publisher.id }}">{{ publisher.name }}</option>

            {% endfor %}

        </select>

    </p>

    <p>

         <input type="submit" value="提交">

    </p>

</form>

</body>

</html>
add_book.html
5、删除书籍
<a href="/delete_book/?id={{ i.id }}">删除</a>
(1) 在urls.py中添加一个函数对应关系
url(r'^delete_book/', views.delete_book), # 删除书籍
(2) 在views中添加对应的函数
# 删除书籍

def delete_book(request):

    # 从URL里面获取要删除的书籍的id值

    delete_id = request.GET.get("id")  # 从URL里面取数据

    # 去删除数据库中删除指定id的数据

    models.Book.objects.get(id=delete_id).delete()

    # 返回书籍列表页面, 查看是否删除成功

    return redirect("/book_list/")
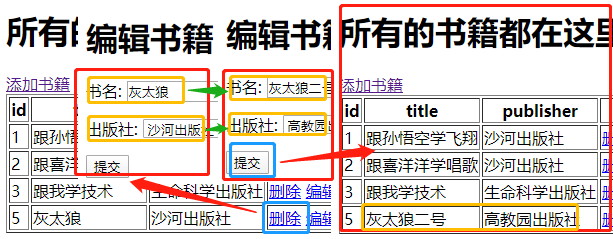
6、编辑书籍
<a href="/edit_book/?id={{ i.id }}">编辑</a>
(1) 在urls.py中添加一个函数对应关系
url(r'^edit_book/', views.edit_book), # 编辑书籍
(2) 在views中添加对应的函数
# 编辑书籍

def edit_book(request):

    if request.method == "POST":

        # 从提交的数据里面取,书名和书关联的出版社

        edit_id = request.POST.get("id")

        new_title = request.POST.get("book_title")

        new_publisher_id = request.POST.get("publisher")

        # 更新

        edit_book_obj = models.Book.objects.get(id=edit_id)

        edit_book_obj.title = new_title  # 更新书名

        edit_book_obj.publisher_id = new_publisher_id  # 更新书籍关联的出版社

        # 将修改提交到数据库

        edit_book_obj.save()

        # 返回书籍列表页面,查看是否编辑成功

        return redirect("/book_list/")

    # 返回一个页面,让用户编辑书籍信息

    # 取到编辑的书的id值

    edit_id = request.GET.get("id")

    # 根据id去数据库中把具体的书籍对象拿到

    edit_book_obj = models.Book.objects.get(id=edit_id)

    print(edit_book_obj.id)

    print(edit_book_obj.title)

    print(edit_book_obj.publisher)  # 取到当前书籍对象关联的出版社对象

    print(edit_book_obj.publisher_id)  # 取到当前书籍对象关联的出版社的id值

    ret = models.Publisher.objects.all()

    return render(

        request,

        "edit_book.html",

        {"publisher_list": ret, "book_obj": edit_book_obj}

    )
<!DOCTYPE html>

<html lang="en">

<head>

    <meta charset="UTF-8">

    <title>编辑书籍</title>

</head>

<body>

<h1>编辑书籍</h1>

<form action="/edit_book/" method="post">

    <input type="text" style="display: none" name="id" value="{{ book_obj.id }}">

    <p>

        书名:

        <input type="text" name="book_title" value="{{ book_obj.title }}">

    </p>

    <p>

        出版社:

        <select name="publisher">

            {% for publisher in publisher_list %}

                {% if book_obj.publisher_id == publisher.id %}

                    {#  当前书籍关联的出版社才默认选中#}

                    <option selected value="{{ publisher.id }}">{{ publisher.name }}</option>

                {% else %}

                    {# 其他的出版社不选中 #}

                    <option value="{{ publisher.id }}">{{ publisher.name }}</option>

                {% endif %}

            {% endfor %}

        </select>

    </p>

    <p>

        <input type="submit" value="提交">

    </p>

</form>

</body>

</html>
edit_book.html
应用Bootstrap样式更换book_list.html文件
<!DOCTYPE html>
<!-- saved from url=(0042)https://v3.bootcss.com/examples/dashboard/ -->
<html lang="zh-CN">
<head>
<meta http-equiv="Content-Type" content="text/html; charset=UTF-8"> <meta http-equiv="X-UA-Compatible" content="IE=edge">
<meta name="viewport" content="width=device-width, initial-scale=1">
<!-- 上述3个meta标签*必须*放在最前面,任何其他内容都*必须*跟随其后! -->
<meta name="description" content="">
<meta name="author" content="">
<link rel="icon" href="https://v3.bootcss.com/favicon.ico"> <title>图书管理系统</title>
<!-- Bootstrap core CSS -->
<link href="/static/bootstrap/css/bootstrap.min.css" rel="stylesheet">
<!-- Custom styles for this template -->
<link href="/static/dashboard.css" rel="stylesheet">
<link rel="stylesheet" href="/static/fontawesome/css/font-awesome.min.css">
</head> <body>
<nav class="navbar navbar-inverse navbar-fixed-top">
<div class="container-fluid">
<div class="navbar-header">
<button type="button" class="navbar-toggle collapsed" data-toggle="collapse" data-target="#navbar"
aria-expanded="false" aria-controls="navbar">
<span class="sr-only">Toggle navigation</span>
<span class="icon-bar"></span>
<span class="icon-bar"></span>
<span class="icon-bar"></span>
</button>
<a class="navbar-brand" href="https://v3.bootcss.com/examples/dashboard/#">BMS-S10</a>
</div>
<div id="navbar" class="navbar-collapse collapse">
<ul class="nav navbar-nav navbar-right">
<li><a href="https://v3.bootcss.com/examples/dashboard/#">Publisher</a></li>
<li><a href="https://v3.bootcss.com/examples/dashboard/#">Settings</a></li>
<li><a href="https://v3.bootcss.com/examples/dashboard/#">Profile</a></li>
<li><a href="https://v3.bootcss.com/examples/dashboard/#">Help</a></li>
</ul>
<form class="navbar-form navbar-right">
<input type="text" class="form-control" placeholder="Search...">
</form>
</div>
</div>
</nav> <div class="container-fluid">
<div class="row">
<div class="col-sm-3 col-md-2 sidebar">
<ul class="nav nav-sidebar">
<li><a href="/publisher_list/">出版社列表页</a></li>
<li class="active"><a href="/book_list/">书籍列表</a></li>
<li><a href="author_list">作者列表</a></li>
</ul> </div>
<div class="col-sm-9 col-sm-offset-3 col-md-10 col-md-offset-2 main">
<h1 class="page-header">书籍管理页面</h1> <div class="panel panel-primary">
<!-- Default panel contents -->
<div class="panel-heading">书籍列表 <i class="fa fa-thumb-tack pull-right"></i></div>
<div class="panel-body">
<div class="row" style="margin-bottom: 15px">
<div class="col-md-4">
<div class="input-group">
<input type="text" class="form-control" placeholder="Search for...">
<span class="input-group-btn">
<button class="btn btn-default" type="button">搜索</button>
</span>
</div><!-- /input-group -->
</div><!-- /.col-md-4 -->
<div class="col-md-3 pull-right">
<a class="btn btn-success pull-right" href="/add_book/">新页面添加</a>
<a class="btn btn-success pull-right">新增</a>
</div> </div><!-- /.row --> <table class="table table-bordered">
<thead>
<tr>
<th>#</th>
<th>id</th>
<th>书名</th>
<th>出版社名称</th>
<th>操作</th>
</tr>
</thead>
<tbody>
{% for i in all_book %}
{# i指的是book书对象#}
<tr>
<td>{{ forloop.counter }}</td>
<td>{{ i.id }}</td>
<td>{{ i.title }}</td>
{# i.publisher取到的是一个对应的出版社对象,可以取id和name#}
<td>{{ i.publisher.name }}</td>
<td>
<a class="btn btn-danger" href="/delete_book/?id={{ i.id }}">删除</a>
<a class="btn btn-info" href="/edit_book/?id={{ i.id }}">编辑</a>
</td>
</tr>
{% endfor %}
</tbody>
</table> <nav aria-label="Page navigation" class="text-right">
<ul class="pagination">
<li>
<a href="#" aria-label="Previous">
<span aria-hidden="true">«</span>
</a>
</li>
<li><a href="#">1</a></li>
<li><a href="#">2</a></li>
<li><a href="#">3</a></li>
<li><a href="#">4</a></li>
<li><a href="#">5</a></li>
<li>
<a href="#" aria-label="Next">
<span aria-hidden="true">»</span>
</a>
</li>
</ul>
</nav>
</div> </div>
</div>
</div>
</div> <div class="modal fade" tabindex="-1" role="dialog" id="myModal">
<div class="modal-dialog" role="document">
<div class="modal-content">
<div class="modal-header">
<button type="button" class="close" data-dismiss="modal" aria-label="Close"><span aria-hidden="true">×</span>
</button>
<h4 class="modal-title">用户信息</h4>
</div>
<div class="modal-body">
<form class="form-horizontal">
<div class="form-group">
<label for="inputEmail3" class="col-sm-2 control-label">邮箱</label>
<div class="col-sm-10">
<input type="email" class="form-control" id="inputEmail3" placeholder="Email">
</div>
</div>
<div class="form-group">
<label for="inputPassword3" class="col-sm-2 control-label">密码</label>
<div class="col-sm-10">
<input type="password" class="form-control" id="inputPassword3" placeholder="Password">
</div>
</div>
</form>
</div>
<div class="modal-footer">
<button type="button" class="btn btn-default" data-dismiss="modal">取消</button>
<button type="button" class="btn btn-primary">保存</button>
</div>
</div><!-- /.modal-content -->
</div><!-- /.modal-dialog -->
</div><!-- /.modal --> <!-- Bootstrap core JavaScript
================================================== -->
<!-- Placed at the end of the document so the pages load faster -->
<script src="/static/jquery-3.3.1.js"></script>
<script src="/static/bootstrap/js/bootstrap.min.js"></script> </body>
</html>
book_list.html
应用Bootstrap样式更换add_book.html文件
<!DOCTYPE html>

<!-- saved from url=(0042)https://v3.bootcss.com/examples/dashboard/ -->

<html lang="zh-CN">

<head>

    <meta http-equiv="Content-Type" content="text/html; charset=UTF-8">

    <meta http-equiv="X-UA-Compatible" content="IE=edge">

    <meta name="viewport" content="width=device-width, initial-scale=1">

    <!-- 上述3个meta标签*必须*放在最前面,任何其他内容都*必须*跟随其后! -->

    <meta name="description" content="">

    <meta name="author" content="">

    <link rel="icon" href="https://v3.bootcss.com/favicon.ico">

    <title>添加书籍</title>

    <!-- Bootstrap core CSS -->

    <link href="/static/bootstrap/css/bootstrap.min.css" rel="stylesheet">

    <!-- Custom styles for this template -->

    <link href="/static/dashboard.css" rel="stylesheet">

    <link rel="stylesheet" href="/static/fontawesome/css/font-awesome.min.css">

</head>

<body>

<div class="container">

    <div class="row">

        <div class="col-md-6 col-md-offset-3">

            <div class="panel panel-primary">

            <div class="panel-heading">添加新书</div>

                <div class="panel-body">

                    <form class="form-horizontal" action="/add_book/" method="post">

                        <div class="form-group">

                            <label for="book_title" class="col-sm-2 control-label">书名</label>

                            <div class="col-sm-10">

                                <input type="text" class="form-control" id="book_title" name="book_title"

                                       placeholder="书名">

                            </div>

                        </div>

                        <div class="form-group">

                            <label for="inputPassword3" class="col-sm-2 control-label">出版社</label>

                            <div class="col-sm-10">

                                <select class="form-control" name="publisher">

                                    {% for publisher in publisher_list %}

                                        <option value="{{ publisher.id }}">{{ publisher.name }}</option>

                                    {% endfor %}

                                </select>

                            </div>

                        </div>

                        <div class="form-group">

                            <div class="col-sm-offset-2 col-sm-10">

                                <button type="submit" class="btn btn-success">提交</button>

                            </div>

                        </div>

                    </form>

                </div>

            </div>

        </div>

    </div>

</div>

</body>

</html>
add_book.html
应用Bootstrap样式更换edit_book.html文件
<!DOCTYPE html>

<!-- saved from url=(0042)https://v3.bootcss.com/examples/dashboard/ -->

<html lang="zh-CN">

<head>

    <meta http-equiv="Content-Type" content="text/html; charset=UTF-8">

    <meta http-equiv="X-UA-Compatible" content="IE=edge">

    <meta name="viewport" content="width=device-width, initial-scale=1">

    <!-- 上述3个meta标签*必须*放在最前面,任何其他内容都*必须*跟随其后! -->

    <meta name="description" content="">

    <meta name="author" content="">

    <link rel="icon" href="https://v3.bootcss.com/favicon.ico">

    <title>编辑书籍</title>

    <!-- Bootstrap core CSS -->

    <link href="/static/bootstrap/css/bootstrap.min.css" rel="stylesheet">

    <!-- Custom styles for this template -->

    <link href="/static/dashboard.css" rel="stylesheet">

    <link rel="stylesheet" href="/static/fontawesome/css/font-awesome.min.css">

</head>

<body>

<div class="container">

    <div class="row">

        <div class="col-md-6 col-md-offset-3">

            <div class="panel panel-primary">

                <div class="panel-heading">编辑书籍</div>

                <div class="panel-body">

                    <form class="form-horizontal" action="/edit_book/" method="post">

                    <input type="text" style="display: none" name="id" value="{{ book_obj.id }}">

                        <div class="form-group">

                            <label for="book_title" class="col-sm-2 control-label">书名</label>

                            <div class="col-sm-10">

                                <input type="text" class="form-control" id="book_title" name="book_title"

                                       placeholder="书名" value="{{ book_obj.title }}">

                            </div>

                        </div>

                        <div class="form-group">

                            <label for="inputPassword3" class="col-sm-2 control-label">出版社</label>

                            <div class="col-sm-10">

                                <select class="form-control" name="publisher">

                                    {% for publisher in publisher_list %}

                                        {% if book_obj.publisher_id == publisher.id %}

                                            {#  当前书籍关联的出版社才默认选中#}

                                            <option selected value="{{ publisher.id }}">{{ publisher.name }}</option>

                                        {% else %}

                                            {# 其他的出版社不选中 #}

                                            <option value="{{ publisher.id }}">{{ publisher.name }}</option>

                                        {% endif %}

                                    {% endfor %}

                                </select>

                            </div>

                        </div>

                        <div class="form-group">

                            <div class="col-sm-offset-2 col-sm-10">

                                <button type="submit" class="btn btn-success">提交</button>

                            </div>

                        </div>

                    </form>

                </div>

            </div>

        </div>

    </div>

</div>

</body>

</html>
edit_book.html
七、建author表及增删改查
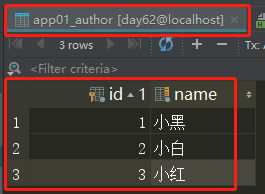
1、app01下models.py文件中新建author列表
# 作者表
class Author(models.Model):
id = models.AutoField(primary_key=True)
name = models.CharField(max_length=16, null=False, unique=True)
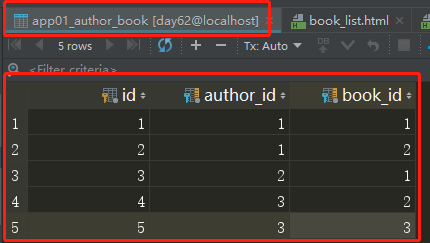
# 告诉ORM 我这张表和book表是多对多的关联关系,ORM自动帮我生成了第三张表
book = models.ManyToManyField(to="Book") def __str__(self):
return "<Author Object: {}>".format(self.name)
在pycharm下面的Terminal 中依次执行以下两条命令
1. python3 manage.py makemigrations   #把models.py里面的更改记录到小本本上

2. python3 manage.py migrate  #把更改翻译成SQL语句,去数据库执行
2、添加数据
此时在数据库中就会有两张表app01_author和app01_author_book,分别添加数据
3、展示作者
(1) 在urls.py中添加一个函数对应关系
url(r'^author_list/', views.author_list), # 展示作者
(2) 在views中添加对应的函数
# 作者列表

def author_list(request):

    # author_obj = models.Author.objects.get(id=1)

    # print(author_obj.book.all())

    # print("=" * 120)

    # 查询所有的作者

    all_author = models.Author.objects.all().order_by("id")

    return render(request, "author_list.html", {"author_list": all_author})
<!DOCTYPE html>
<html lang="en">
<head>
<meta charset="UTF-8">
<title>作者列表</title>
</head>
<body> <a href="/add_author/">添加新的作者</a> <h1>所有的作者</h1> <table border="1">
<thead>
<tr>
<th>#</th>
<th>ID</th>
<th>名字</th>
<th>作品</th>
<th>操作</th>
</tr>
</thead>
<tbody>
{% for author in author_list %}
<tr>
<td>{{ forloop.counter }}</td>
<td>{{ author.id }}</td>
<td>{{ author.name }}</td>
<td>
{% for book in author.book.all %}
{{ book.title }}
{% endfor %}
</td>
<td>
<a href="/delete_author/?id={{ author.id }}">删除</a>
<a href="/edit_author/?id={{ author.id }}">编辑</a>
</td>
</tr>
{% endfor %}
</tbody>
</table>
</body>
</html>
author_list.html

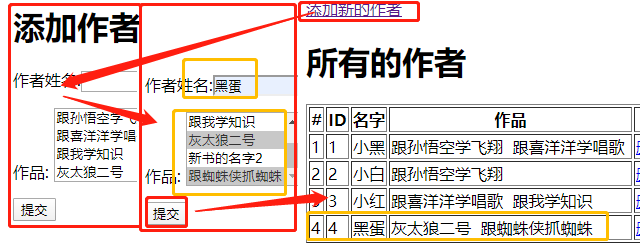
4、添加作者
<a href="/add_author/">添加新的作者</a>
(1) 在urls.py中添加一个函数对应关系
url(r'^add_author/', views.add_author), # 添加作者
(2) 在views中添加对应的函数
# 添加作者

def add_author(request):

    if request.method == "POST":

        print("in post...")

        # 取到提交的数据

        new_author_name = request.POST.get("author_name")

        # post提交的数据是多个值的时候一定会要用getlist,如多选的checkbox和多选的select

        books = request.POST.getlist("books")

        # 创建作者

        new_author_obj = models.Author.objects.create(name=new_author_name)

        # 把新作者和书籍建立对应关系,自动提交

        new_author_obj.book.set(books)

        # 跳转到作者列表页面,查看是否添加成功!

        return redirect("/author_list/")

    # 查询所有的书籍

    ret = models.Book.objects.all()

    return render(request, "add_author.html", {"book_list": ret})
<!DOCTYPE html>

<html lang="en">

<head>

    <meta charset="UTF-8">

    <title>添加作者</title>

</head>

<body>

<h1>添加作者</h1>

<form action="/add_author/" method="post">

    <p>

       作者姓名:<input type="text" name="author_name">

    </p>

    <p>

        作品:

        <select multiple name="books">

            {% for book in book_list %}

            <option value="{{ book.id }}">{{ book.title }}</option>

            {% endfor %}

        </select>

    </p>

    <p>

        <input type="submit" value="提交">

    </p>

</form>

</body>

</html>
add_author.html
5、删除作者
<a href="/delete_author/?id={{ author.id }}">删除</a>
(1) 在urls.py中添加一个函数对应关系
url(r'^delete_author/', views.delete_author), # 删除作者
(2) 在views中添加对应的函数
# 删除作者

def delete_author(request):

    # 从URL里面取到要删除的作者id

    delete_id = request.GET.get("id")

    #根据ID值取到要删除的作者对象,直接删除

    # 1. 去作者表把作者删了

    # 2. 去作者和书的关联表,把对应的关联记录删除了

    models.Author.objects.get(id=delete_id).delete()

    # 返回作者列表页面

    return redirect("/author_list/")
6、编辑作者
<a href="/edit_author/?id={{ author.id }}">编辑</a>
(1) 在urls.py中添加一个函数对应关系
url(r'^edit_author/', views.edit_author), # 编辑作者
(2) 在views中添加对应的函数
# 编辑作者

def edit_author(request):

    # 如果编辑完提交数据过来

    if request.method == "POST":

        # 拿到提交过来的编辑后的数据

        edit_author_id = request.POST.get("author_id")

        new_author_name = request.POST.get("author_name")

        # 拿到编辑后作者关联的书籍信息

        new_books = request.POST.getlist("books")

        # 根据ID找到当前编辑的作者对象

        edit_author_obj = models.Author.objects.get(id=edit_author_id)

        # 更新作者的名字

        edit_author_obj.name = new_author_name

        # 更新作者关联的书的对应关系

        edit_author_obj.book.set(new_books)

        # 将修改提交到数据库

        edit_author_obj.save()

        # 返回作者列表页,查看是否编辑成功

        return redirect("/author_list/")

    # 从URL里面取要编辑的作者的id信息

    edit_id = request.GET.get("id")

    # 找到要编辑的作者对象

    edit_author_obj = models.Author.objects.get(id=edit_id)

    # 查询所有的书籍对象

    ret = models.Book.objects.all()

    return render(request, "edit_author.html", {"book_list": ret, "author": edit_author_obj})
<!DOCTYPE html>

<html lang="en">

<head>

    <meta charset="UTF-8">

    <title>编辑作者</title>

</head>

<body>

<h1>编辑作者</h1>

<form action="/edit_author/" method="post">

    <input type="text" name="author_id" value="{{ author.id }}" style="display: none">

    <p>

       作者姓名:<input type="text" name="author_name" value="{{ author.name }}">

    </p>

    <p>

        作品:

        <select multiple name="books">

            {% for book in book_list %}

{#                如果当前这本书 在 当前作者关联的所有书 里面 #}

                {% if book in author.book.all %}

                    <option selected value="{{ book.id }}">{{ book.title }}</option>

                {% else %}

                <option  value="{{ book.id }}">{{ book.title }}</option>{% endif %}

            {% endfor %}

        </select>

    </p>

    <p>

        <input type="submit" value="提交">

    </p>

</form>

</body>

</html>
edit_author.html

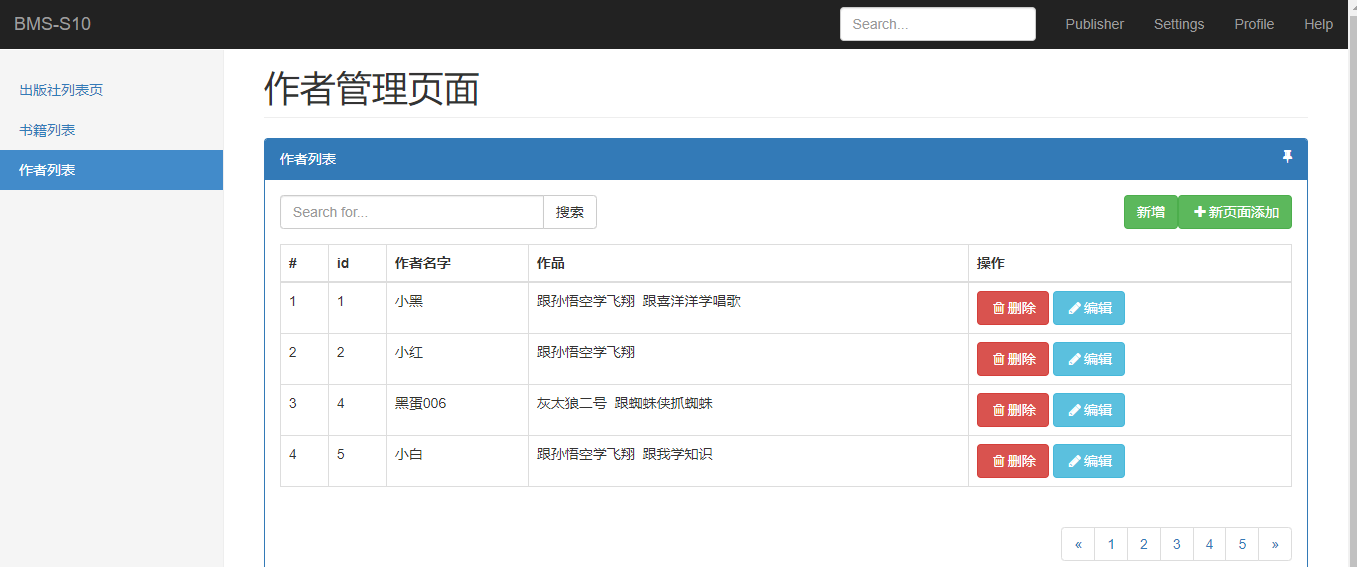
应用Bootstrap样式更换author_list.html文件
<!DOCTYPE html>
<!-- saved from url=(0042)https://v3.bootcss.com/examples/dashboard/ -->
<html lang="zh-CN">
<head>
<meta http-equiv="Content-Type" content="text/html; charset=UTF-8"> <meta http-equiv="X-UA-Compatible" content="IE=edge">
<meta name="viewport" content="width=device-width, initial-scale=1">
<!-- 上述3个meta标签*必须*放在最前面,任何其他内容都*必须*跟随其后! -->
<meta name="description" content="">
<meta name="author" content="">
<link rel="icon" href="https://v3.bootcss.com/favicon.ico"> <title>图书管理系统</title>
<!-- Bootstrap core CSS -->
<link href="/static/bootstrap/css/bootstrap.min.css" rel="stylesheet">
<!-- Custom styles for this template -->
<link href="/static/dashboard.css" rel="stylesheet">
<link rel="stylesheet" href="/static/fontawesome/css/font-awesome.min.css">
</head> <body>
<nav class="navbar navbar-inverse navbar-fixed-top">
<div class="container-fluid">
<div class="navbar-header">
<button type="button" class="navbar-toggle collapsed" data-toggle="collapse" data-target="#navbar"
aria-expanded="false" aria-controls="navbar">
<span class="sr-only">Toggle navigation</span>
<span class="icon-bar"></span>
<span class="icon-bar"></span>
<span class="icon-bar"></span>
</button>
<a class="navbar-brand" href="https://v3.bootcss.com/examples/dashboard/#">BMS-S10</a>
</div>
<div id="navbar" class="navbar-collapse collapse">
<ul class="nav navbar-nav navbar-right">
<li><a href="https://v3.bootcss.com/examples/dashboard/#">Publisher</a></li>
<li><a href="https://v3.bootcss.com/examples/dashboard/#">Settings</a></li>
<li><a href="https://v3.bootcss.com/examples/dashboard/#">Profile</a></li>
<li><a href="https://v3.bootcss.com/examples/dashboard/#">Help</a></li>
</ul>
<form class="navbar-form navbar-right">
<input type="text" class="form-control" placeholder="Search...">
</form>
</div>
</div>
</nav> <div class="container-fluid">
<div class="row">
<div class="col-sm-3 col-md-2 sidebar">
<ul class="nav nav-sidebar">
<li><a href="/publisher_list/">出版社列表页</a></li>
<li><a href="/book_list/">书籍列表</a></li>
<li class="active"><a href="/author_list/">作者列表</a></li>
</ul> </div>
<div class="col-sm-9 col-sm-offset-3 col-md-10 col-md-offset-2 main">
<h1 class="page-header">作者管理页面</h1> <div class="panel panel-primary">
<!-- Default panel contents -->
<div class="panel-heading">作者列表 <i class="fa fa-thumb-tack pull-right"></i></div>
<div class="panel-body">
<div class="row" style="margin-bottom: 15px">
<div class="col-md-4">
<div class="input-group">
<input type="text" class="form-control" placeholder="Search for...">
<span class="input-group-btn">
<button class="btn btn-default" type="button">搜索</button>
</span>
</div><!-- /input-group -->
</div><!-- /.col-md-4 -->
<div class="col-md-3 pull-right">
<a class="btn btn-success pull-right" href="/add_author/"><i class="fa fa-plus fa-fw"></i>新页面添加</a>
<a class="btn btn-success pull-right">新增</a>
</div> </div><!-- /.row --> <table class="table table-bordered">
<thead>
<tr>
<th>#</th>
<th>id</th>
<th>作者名字</th>
<th>作品</th>
<th>操作</th>
</tr>
</thead>
<tbody>
{% for author in author_list %}
<tr>
<td>{{ forloop.counter }}</td>
<td>{{ author.id }}</td>
<td>{{ author.name }}</td>
<td>
{% for book in author.book.all %}
{{ book.title }}
{% endfor %}
</td>
<td>
<a class="btn btn-danger" href="/delete_author/?id={{ author.id }}"><i class="fa fa-trash-o fa-fw"></i>删除</a>
<a class="btn btn-info" href="/edit_author/?id={{ author.id }}"><i class="fa fa-pencil fa-fw"></i>编辑</a>
</td>
</tr>
{% endfor %}
</tbody>
</table> <nav aria-label="Page navigation" class="text-right">
<ul class="pagination">
<li>
<a href="#" aria-label="Previous">
<span aria-hidden="true">«</span>
</a>
</li>
<li><a href="#">1</a></li>
<li><a href="#">2</a></li>
<li><a href="#">3</a></li>
<li><a href="#">4</a></li>
<li><a href="#">5</a></li>
<li>
<a href="#" aria-label="Next">
<span aria-hidden="true">»</span>
</a>
</li>
</ul>
</nav>
</div> </div>
</div>
</div>
</div> <div class="modal fade" tabindex="-1" role="dialog" id="myModal">
<div class="modal-dialog" role="document">
<div class="modal-content">
<div class="modal-header">
<button type="button" class="close" data-dismiss="modal" aria-label="Close"><span aria-hidden="true">×</span>
</button>
<h4 class="modal-title">用户信息</h4>
</div>
<div class="modal-body">
<form class="form-horizontal">
<div class="form-group">
<label for="inputEmail3" class="col-sm-2 control-label">邮箱</label>
<div class="col-sm-10">
<input type="email" class="form-control" id="inputEmail3" placeholder="Email">
</div>
</div>
<div class="form-group">
<label for="inputPassword3" class="col-sm-2 control-label">密码</label>
<div class="col-sm-10">
<input type="password" class="form-control" id="inputPassword3" placeholder="Password">
</div>
</div>
</form>
</div>
<div class="modal-footer">
<button type="button" class="btn btn-default" data-dismiss="modal">取消</button>
<button type="button" class="btn btn-primary">保存</button>
</div>
</div><!-- /.modal-content -->
</div><!-- /.modal-dialog -->
</div><!-- /.modal --> <!-- Bootstrap core JavaScript
================================================== -->
<!-- Placed at the end of the document so the pages load faster -->
<script src="/static/jquery-3.3.1.js"></script>
<script src="/static/bootstrap/js/bootstrap.min.js"></script> </body>
</html>
authro_list.html
应用Bootstrap样式更换add_author.html文件
<!DOCTYPE html>

<!-- saved from url=(0042)https://v3.bootcss.com/examples/dashboard/ -->

<html lang="zh-CN">

<head>

    <meta http-equiv="Content-Type" content="text/html; charset=UTF-8">

    <meta http-equiv="X-UA-Compatible" content="IE=edge">

    <meta name="viewport" content="width=device-width, initial-scale=1">

    <!-- 上述3个meta标签*必须*放在最前面,任何其他内容都*必须*跟随其后! -->

    <meta name="description" content="">

    <meta name="author" content="">

    <link rel="icon" href="https://v3.bootcss.com/favicon.ico">

    <title>图书管理系统</title>

    <!-- Bootstrap core CSS -->

    <link href="/static/bootstrap/css/bootstrap.min.css" rel="stylesheet">

    <!-- Custom styles for this template -->

    <link href="/static/dashboard.css" rel="stylesheet">

    <link rel="stylesheet" href="/static/fontawesome/css/font-awesome.min.css">

</head>

<body>

<div class="container">

    <div class="row">

        <div class="col-md-6 col-md-offset-3">

            <div class="panel panel-primary">

                <div class="panel-heading">

                    <h3 class="panel-title">添加作者</h3>

                </div>

                <div class="panel-body">

                    <form class="form-horizontal" action="/add_author/" method="post">

                        <div class="form-group">

                            <label for="author-name" class="col-sm-2 control-label">姓名</label>

                            <div class="col-sm-10">

                                <input type="text" class="form-control" id="author-name" placeholder="姓名"

                                       name="author_name">

                            </div>

                        </div>

                        <div class="form-group">

                            <label for="books" class="col-sm-2 control-label">作品</label>

                            <div class="col-sm-10">

                                <select multiple class="form-control" id="books" name="books">

                                    {% for book in book_list %}

                                        <option value="{{ book.id }}">{{ book.title }}</option>

                                    {% endfor %}

                                </select>

                            </div>

                        </div>

                        <div class="form-group">

                            <div class="col-sm-offset-2 col-sm-10">

                                <button type="submit" class="btn btn-primary">提交</button>

                            </div>

                        </div>

                    </form>

                </div>

            </div>

        </div>

    </div>

</div>

</body>

</html>
add_author.html
应用Bootstrap样式更换edit_author.html文件
<!DOCTYPE html>

<!-- saved from url=(0042)https://v3.bootcss.com/examples/dashboard/ -->

<html lang="zh-CN">

<head>

    <meta http-equiv="Content-Type" content="text/html; charset=UTF-8">

    <meta http-equiv="X-UA-Compatible" content="IE=edge">

    <meta name="viewport" content="width=device-width, initial-scale=1">

    <!-- 上述3个meta标签*必须*放在最前面,任何其他内容都*必须*跟随其后! -->

    <meta name="description" content="">

    <meta name="author" content="">

    <link rel="icon" href="https://v3.bootcss.com/favicon.ico">

    <title>图书管理系统</title>

    <!-- Bootstrap core CSS -->

    <link href="/static/bootstrap/css/bootstrap.min.css" rel="stylesheet">

    <!-- Custom styles for this template -->

    <link href="/static/dashboard.css" rel="stylesheet">

    <link rel="stylesheet" href="/static/fontawesome/css/font-awesome.min.css">

</head>

<body>

<div class="container">

    <div class="row">

        <div class="col-md-6 col-md-offset-3">

            <div class="panel panel-primary">

                <div class="panel-heading">

                    <h3 class="panel-title">编辑作者</h3>

                </div>

                <div class="panel-body">

                    <form class="form-horizontal" action="/edit_author/" method="post">

                        <input type="text" name="author_id" value="{{ author.id }}" style="display: none">

                        <div class="form-group">

                            <label for="author-name" class="col-sm-2 control-label">姓名</label>

                            <div class="col-sm-10">

                                 <input type="text" class="form-control" id="author-name" placeholder="姓名" name="author_name" value="{{ author.name }}">

                            </div>

                        </div>

                        <div class="form-group">

                            <label for="books" class="col-sm-2 control-label">作品</label>

                            <div class="col-sm-10">

                                <select multiple class="form-control" id="books" name="books">

                                    {% for book in book_list %}

                                        {% if book in author.book.all %}

                                            <option selected value="{{ book.id }}">{{ book.title }}</option>

                                            {% else %}

                                             <option  value="{{ book.id }}">{{ book.title }}</option>

                                        {% endif %}

                                    {% endfor %}

                                </select>

                            </div>

                        </div>

                        <div class="form-group">

                            <div class="col-sm-offset-2 col-sm-10">

                                <button type="submit" class="btn btn-primary">提交</button>

                            </div>

                        </div>

                    </form>

                </div>

            </div>

        </div>

    </div>

</div>

</body>

</html>
edit_author.html
项目最终的效果为
1. 图书管理系统写完

    1. 出版社的增删改查

    2. 书籍的增删改查

    3. 作者的增删改查

    班级管理系统

        1. 班级

        2. 学生

        3. 老师

2. 应用Bootstrap样式
task
新建Django项目示例--图书管理系统的更多相关文章
- C项目实践--图书管理系统(1)
1.功能需求分析 图书管理系统主要用于对大量的图书信息,包括书名.作者.出版社.出版日期.ISBN(书号)等进行增.删.改.查以及保存等操作.同时也包括对用户的管理,用户包括管理员和普通用户两种权限, ...
- C项目实践--图书管理系统(3)
接下来将要实现用户管理模块的相关功能,用户管理模块的主要功能包括增加用户,查找用户以及保存用户等功能,查找用户时,如果查找成功,充许对查找到用户进行更新或删除操作.如果查找不成功,则给出相应的提示信息 ...
- C项目实践--图书管理系统(2)
前面在<<C项目实践-图书管理系统(1)>>中把系统中的三大功能模块中可能涉及到的常量,结构体及相关函数进行了声明定义,下来就来实现它们. 执行系统首先从登录到系统开始,所以首 ...
- MOOC(1)-使用pycharm新建Django项目、开发post接口
https://www.cnblogs.com/liqu/p/9308966.html 1.安装Django的两种方式: > 1) pip install django 2)下载离线安装包,进入 ...
- javaWeb项目之图书管理系统(附视频讲解)
视频播放地址:javaWeb图书系统 本系统为"Swing项目之图书管理系统"(此源码已共享)的Web版,网页框架用采用EasyUI 数据库为MysqL,写Web项目摒弃了火狐浏览 ...
- Django框架之图书管理系统(一)
图书管理系统共分为两篇博客进行讲解,该篇博客主要记录图书与出版社之间的关系(一对一),记录图书的增删查改操作 ============================================= ...
- C项目实践--图书管理系统(4)
前面已经把图书管理系统的所有功能模块都已实现完毕了,下面通过运行来分析该系统的操作流程并检验是否符合逻辑设计要求. 3.系统操作过程 F5 运行 1.登录系统 系统运行之后,提示输入用户名和密码,系统 ...
- 【WPF on .NET Core 3.0】 Stylet演示项目 - 简易图书管理系统(3) - 使用Conductor切换页面
前两章中, 我们已经实现了这个图书管理系统的登录窗口, 并实施了完善的单元测试. 该是时候回过头来关注我们的主窗口了. 一个功能丰富的系统一般会有多个页面, 我们图书管理系统虽然是"简易&q ...
- 用pycharm开发django项目示例
pycharm开发django工程(一) 在pycharm(企业版)中新建Django工程,注意使用虚拟环境 创建成功后,在pycharm显示的工程目录结构如下: 打开pycharm的Termina ...
随机推荐
- 【LeetCode】15.三数之和
题目描述 1. 三数之和 给你一个包含 n 个整数的数组 nums,判断 nums 中是否存在三个元素 a,b,c ,使得 a + b + c = 0 ?请你找出所有满足条件且不重复的三元组. 注意: ...
- 关于HashSet与HashMap
package com.test; import java.util.Collection; import java.util.HashMap; import java.util.HashSet; i ...
- 并发——抽象队列同步器AQS的实现原理
一.前言 这段时间在研究Java并发相关的内容,一段时间下来算是小有收获了.ReentrantLock是Java并发中的重要部分,所以也是我的首要研究对象,在学习它的过程中,我发现它是基于抽象队列 ...
- 六、【Docker笔记】Docker数据管理
前几节我们介绍了Docker的基本使用和三大核心概念,那么我们在使用Docker的过程中,Docker中必然产生了大量的数据,对于这些数据我们需要查看或者对这些数据进行一个备份,也有可能容器之间的数据 ...
- 1025 PAT Ranking (25 分)
Programming Ability Test (PAT) is organized by the College of Computer Science and Technology of Zhe ...
- Java 中为什么不能创建泛型数组?
之前只是知道在 Java 中不能创建泛型数组,今天翻看 <Effective Java>其中对这个部分有讲解,记录一下. 现在我们假设在 Java 中可以创建泛型数组,看看可能会发生什么情 ...
- pinpoint配置使用
一.下载pinpoint包 从https://github.com/naver/pinpoint/releases 下载 pinpoint-agent.tar.gz pinpoint-collecto ...
- 八、【Docker笔记】使用Dockerfile创建镜像
在前面我们讲解了基于已有的镜像容器创建和基于本地模板导入两种方式来创建镜像,在这里我们就来说说第三种创建镜像的方式.Dockerfile是一个文本格式的配置文件,我们可以通过Dockerfile快速创 ...
- Python魔法缓存,以数字开始
Python魔法缓存,以数字开始 众所周知,Python是弱类型的脚本语言,变量的定义是不用声明类型的. a = 1 Python所有数字的本质都是对象, 他们是不可改变的数据类型,这意味着改变数字数 ...
- JAVA中使用Date和SimpleDateFromat类表示时间
转自:https://www.imooc.com/code/2335 仅做个人学习保存之用,侵删! 在程序开发中,经常需要处理日期和时间的相关数据,此时我们可以使用 java.util 包中的 Dat ...