Ignite安装配置——中篇
Linux Ignite配置——上篇大体介绍了一下Ignite工具的功能、特性等,以及如何在Linux 上安装配置。从上篇可见Ignite安装非常的简单方便。下面介绍一下Ignite Repository Wizard(SQL Server或 ORACLE)配置以及如何注册需要监控的数据库。
在上篇中介绍了如何启动Ignite服务,其实只需要进入/home/ignite8/ignite_8_3_407目录下。就可以看到startup.sh 和shutdwon.sh 两个shell脚本。用来启动和关闭Ignite服务。
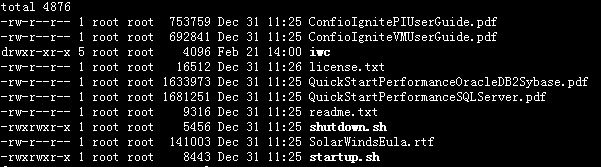
不过如果要跟全面的了解如何使用Ignite,建议大家先看看/home/ignite/ignite_8_3_407/readme.txt , 里面介绍了启动Ignite服务,升级Ignite指导、迁移Ignite服务器等等,如下所示:
IGNITE - UNIX/LINUX README
===========================================================================
CONTENTS
---------------------------------------------------------------------------
- Startup Instructions
- Upgrade Instructions
- How to Move the Ignite Server
- Troubleshooting
- Release Notes
- Contacting Confio
STARTUP INSTRUCTIONS
---------------------------------------------------------------------------
Ignite Server is a web server. Make sure you install Ignite on a server that:
- has network connectivity to the Repository and all of the monitored databases, and
- is available at all times (e.g. a laptop might not be a good choice), and
- is not running applications where performance is critical (e.g. do not install Ignite on monitored database machines)
) Start Ignite Server
---------------------------------------------------------------------------
Change to the Ignite Home directory (containing this readme.txt), and then run:
./startup.sh
Ignite must remain running at all times to collect monitoring data. If you plan to log
out of the account from which you start Ignite, run the following instead:
nohup ./startup.sh
This will prevent the Ignite process from exiting when you log out.
Note: You may want to setup this file to run whenever the server is
rebooted (using the rc files) or run this command every few minutes
via a cron job. The script starts the web server if it is not already
running.
-----------------------------------------------------------------
-- Example Cron Entry that starts Ignite, if not already started,
-- every minute.
-----------------------------------------------------------------
* * * * * /home/confio/ignite_8_2_14/startup.sh >/home/confio/ignite_8_2_14/startup.log >&
If the startup.sh script fails, manually create a file called
java_loc.txt and place it in the <Ignite Home>/iwc/tomcat/ignite_config
directory. The file should contain one line with the full path to a
java executable.
-----------------------------------------------------------------
-- Example contents of java_loc.txt
-- The file should only have ONE line.
-- No comments are allowed in the file.
-----------------------------------------------------------------
/home/bea9/jrockit90_150_03/jre/bin/java
Go to step . For new installs, once you have opened a browser to Ignite,
a wizard will walk you through creating a repository and monitoring
database instances.
) Use Ignite in a Browser
---------------------------------------------------------------------------
After Ignite has been started on the server (step above), bring up this link
in your browser:
http://<Server Machine Name>:8123
or
http://<Server Machine IP>:8123
If the link does not work, see the Troubleshooting section below.
Congratulations! You have completed the Ignite installation.
UPGRADE INSTRUCTIONS (for Existing Ignite Installations)
---------------------------------------------------------------------------
Prerequisite: System has an existing Ignite installation
. On the server that holds the existing Ignite installation, shut down
Ignite (run shutdown.sh). If a cron job was setup, make sure it is
commented out during the upgrade.
. Locate the new installation directory that was created when you ran the
installation.
/home/confio/ignite_8_2_12 <= old Ignite home
/home/confio/ignite_8_2_14 <= new Ignite home
If you are upgrading from an Ignite Trial to a production Ignite
version, the process is the same but the directory names will look a
little different, for example:
/home/confio/igniteTF_8_2_12 <= old Ignite home (for Trial)
/home/confio/ignite_8_2_14 <= new Ignite home (for Production)
. Copy certain folders from old directory (Do NOT copy any hotfix files)
cp -fr <OLD_home>/iwc/tomcat/ignite_config/* <NEW_home>/iwc/tomcat/ignite_config/
cp -fr <OLD_home>/iwc/tomcat/logs/* <NEW_home>/iwc/tomcat/logs/
4. If you are upgrading from 8.2.x or higher, and you are using SSL, LDAPS or have changed the default Ignite ports
cp -fr <OLD_home>/iwc/tomcat/conf/server.xml <NEW_home>/iwc/tomcat/conf/
cp -fr <OLD_home>/iwc/tomcat/conf/.keystore <NEW_home>/iwc/tomcat/conf/
If you are using LDAPS but your web server is not configured to use SSL, it is not necessary to copy the server.xml file.
If you are upgrading from 8.1.x or below (to 8.2 or higher), and you are using SSL or have changed the default Ignite ports
cp -fr <OLD_home>/iwc/tomcat/conf/.keystore <NEW_home>/iwc/tomcat/conf/
The format of server.xml has changed significantly, so you'll need to copy over the appropriate values.
Open server.xml in both OLD and NEW directories, and copy over the port values and, if you want to use SSL,
uncomment the SSL section (see detailed instructions in <NEW_home>/iwc/ssl_setup.txt.
5. If you previously disabled a cron job, update the path in those scripts to
the new directory name and re-enable the job.
6. The upgrade is complete. The next step is to start Ignite (see the
section on Startup Instructions).
===========================================================================
REFERENCE INFORMATION
===========================================================================
How to Move the Ignite Server
---------------------------------------------------------------------------
1) Install the software on the new server.
2) Shutdown Ignite on the old server (run ./shutdown.sh).
3) Copy the directory "<Ignite Home>/iwc/tomcat/ignite_config" from the
old server overwriting the same subdirectory on the new server.
4) Delete the "cat.txt" and "java_loc.txt" files from the directory
"<Ignite Home>/iwc/tomcat/ignite_config" on the new server.
5) Startup Ignite on the new server again.
Troubleshooting
---------------------------------------------------------------------------
Ignite doesn't seem to start:
Check the logs located in <Ignite Home>/tomcat/logs
The error logs don't show errors but I cannot access Ignite from a browser:
Make sure you do not have a firewall that may prevent Ignite from listening
on the ports that are specified in <Ignite Home>/tomcat/conf/server.xml.
Also, make sure the client machine can ping the server running Ignite.
The error logs indicate default ports are already in use:
You can change the default ports of 8123 and 8127 by editing
<Ignite Home>/tomcat/conf/server.xml
and updating the line <Connector port="8123"/>
and updating the line <Server port="8127" shutdown="SHUTDOWN">
NOTE: You cannot use the same port for both settings.
We do not recommend changing this ports unless there is a port
conflict.
Release Notes
---------------------------------------------------------------------------
Version Information:
To check the version of your install, look in the
<Ignite Home>/iwc/tomcat/webapps/iwc/meta-inf/manifest.mf
after you have started Ignite at least once.
Ignite Server Port:
You can change the default ports that the Ignite Server uses (8123 and 8127)
by editing the file <Ignite Home>/tomcat/conf/server.xml and updating the
following lines:
<Server port="8127" shutdown="SHUTDOWN">
<Connector port="8123"/>
NOTE: You cannot use the same port for both settings.
We do not recommend changing this ports unless there is a port
conflict.
SSL:
Instructions to setup SSL are contained in the ./iwc/ssl_setup.txt file.
IE 6:
The search dialog listbox for the Reports will always show on top when the
View SQL Properties dialog is displayed. To correctly view the SQL Properties,
the dialog can be moved away from the search dialog.
Viewing server logs from IE 6 will cause the error
"Can't find the <very long temp dir>/<log_file_name>.log file". To view the log
file, save it to disk, then open the log file in a text file.
IE Browser:
When you are using tabs in IE the cookies used for the user's session are
the same. If you log out of one of the tabs, the other tab will be logged
out as well. Using two different IE browsers will have separate session
cookies, thus allowing independent functionality.
Firefox Browser:
When you are using two Firefox browsers or tabs, the cookies used for the
user's session are the same. If you log out of one the others will be
loggedout as well.
JRE/JDK Version:
It is highly recommended to use JRE/JDK version 1.5 or higher. Old versions of
the JRE/JDK (1.4.2.17 and below) could cause the following error:
Unexpected Signal : 11 occurred at PC=0xFEDBBCFC
Function=[Unknown. Nearest: JVM_NativePath+0x8AE0]
Library=/usr/j2se/jre/lib/sparc/server/libjvm.so
Contacting Confio
---------------------------------------------------------------------------
The best method of contacting us for any product related question is via
email:
support@confio.com
Other methods of contact:
Phone: +1 303-938-8282
Toll free: 1-866-CONFIO1(1-866-266-3461
Current Confio customers requiring technical support assistance should request
support via support@confio.com or by calling one of the above phone numbers
and selecting Option 2.
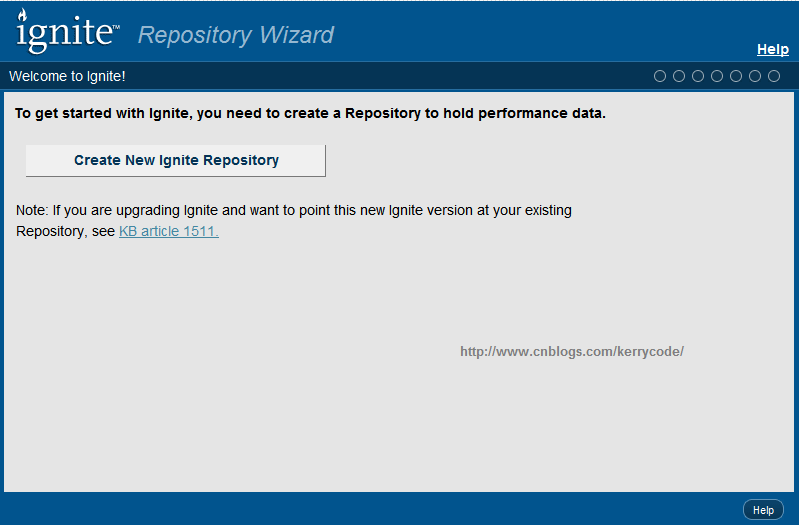
创建Ignite Repository
启动Ignite服务后,在IE浏览器输入http://<Machine Name>:8123 or http://<Machine IP>:8123后(端口可以在配置文件修改),就会看到如下界面:
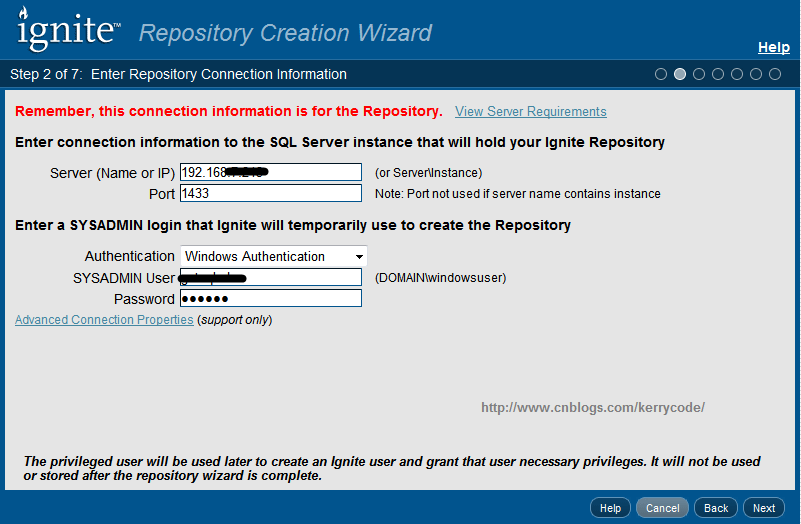
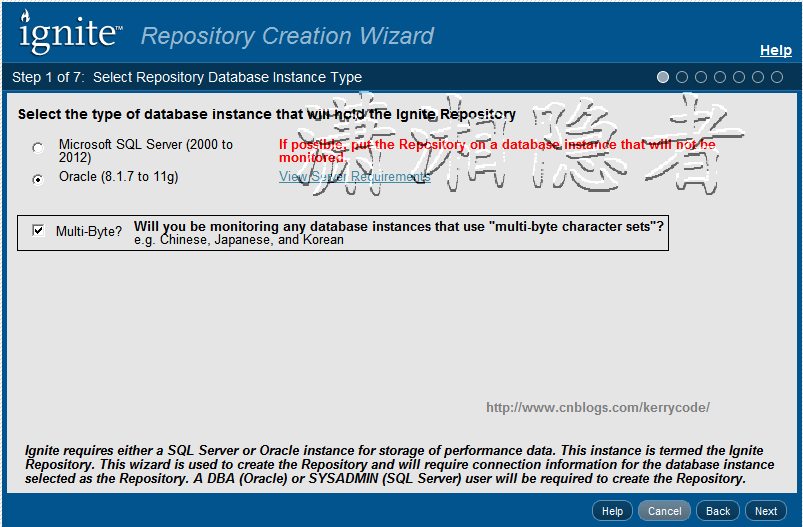
点击“Create New Ignite Repository" 后,会进入下面界面,你可以选SQL SERVER 数据库或Oracle 数据库作为Igntie的Repository,用来保存Ignite抓取的数据信息。 请留意”Multi-Byte“选项

输入数据库服务器的IP地址。以及数据库的端口号。如果没有修改则端口号为默认的1433,另外需要SYSTADMIN login权限
你可以用Windows Authentication 或SQL Authentication方式
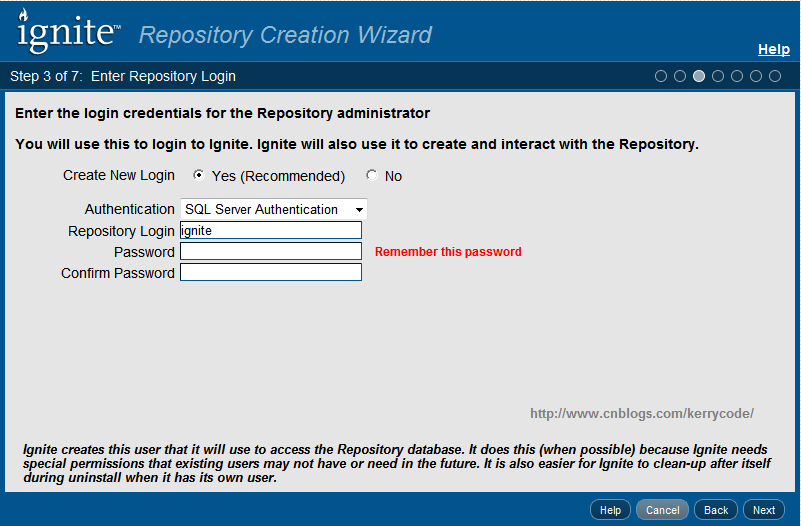
接下来会在数据库创建一个账号(最好使用SQL Server Authentication)用来登录Ignite系统。如果数据库已经有了该账号,可以选择”No"选项
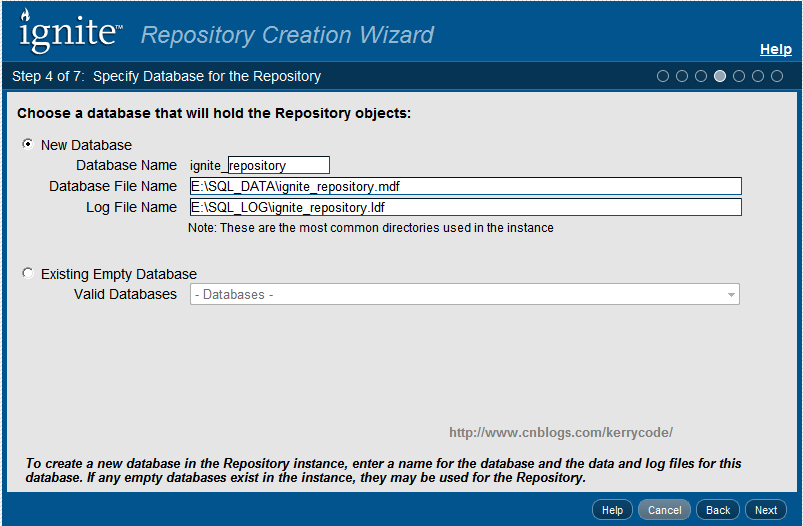
接下来,你可以选择创建一个新的数据库或从数据库实例中挑选一个已经存在的数据库用来保存监控数据。

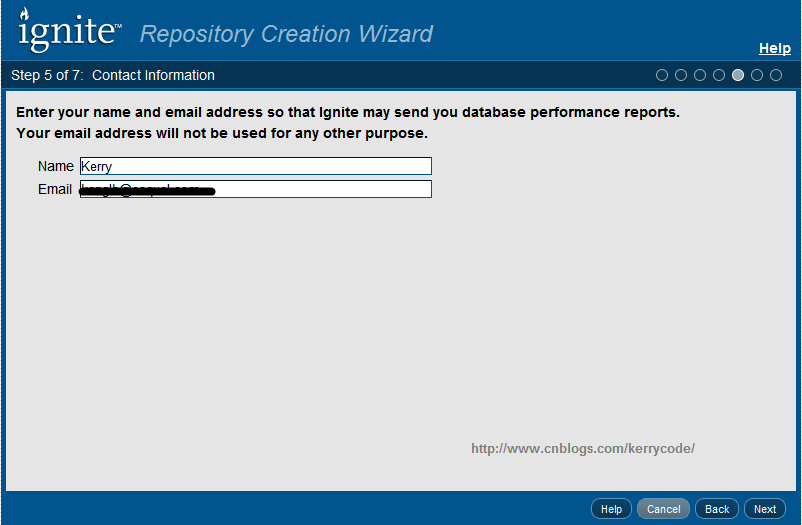
接下来输入你的名字或邮箱,用来接收Ignite的告警邮件或报表。
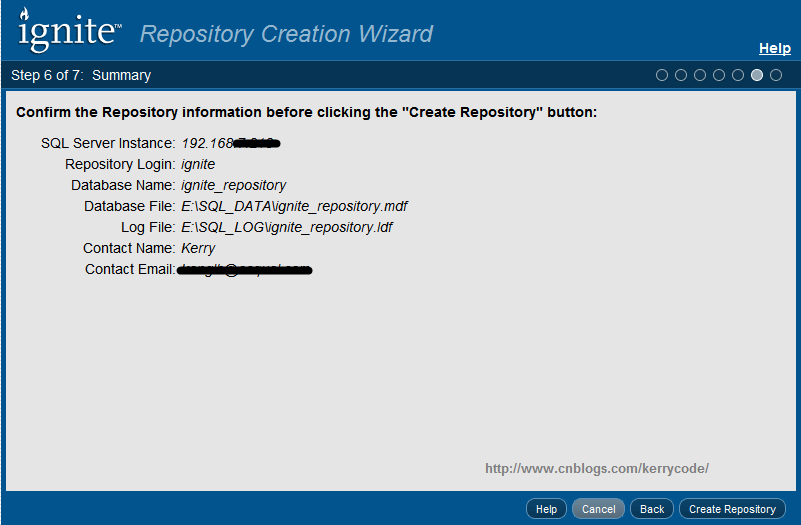
使用Oracle数据库作为Ignite 的Repository的配置过程大同小异,在此不作过多介绍。唯一比较遗憾的是,如果使用SQL Server作为Repository 数据库,只能选择一个数据库作为Repository,而不能选择多个,这样就有一个弊端。随着数据库数据量增长以及监控的数据库
越来越多。非常难以管理。而使用Oracle作为Repository的话,可以为被监控的数据库选择某一个表空间用来保存数据,这样就非常方便管理。
监控SQL SERVER数据库
接下来在Home界面选择“Register DB Instance for Monitoring",监控你像监控的数据库

例如我要监控的数据库类型为Microsoft SQL Server,如下所示,选择”Microsoft SQL Server“选项

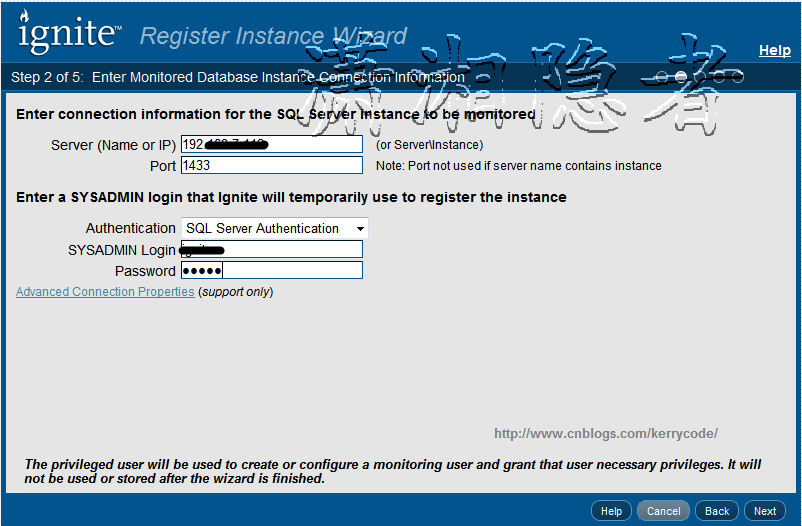
输入被监控数据库的Ip地址或计算机名称,以及一个SYSADMIN权限的登录名
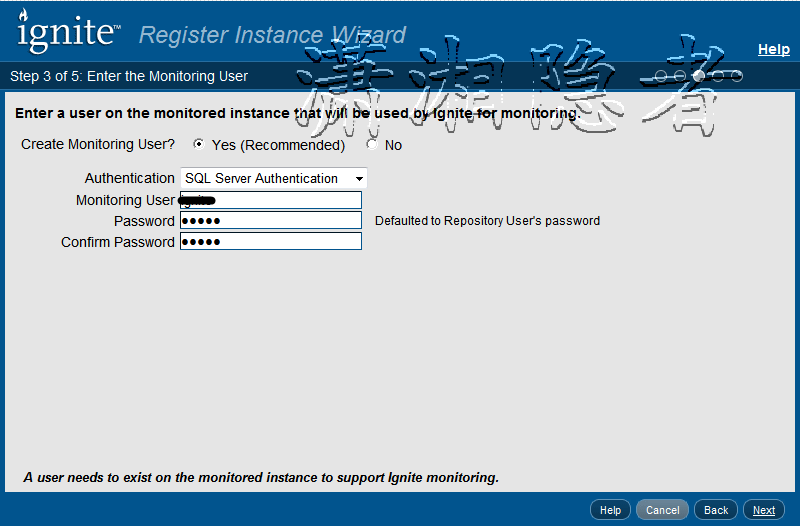
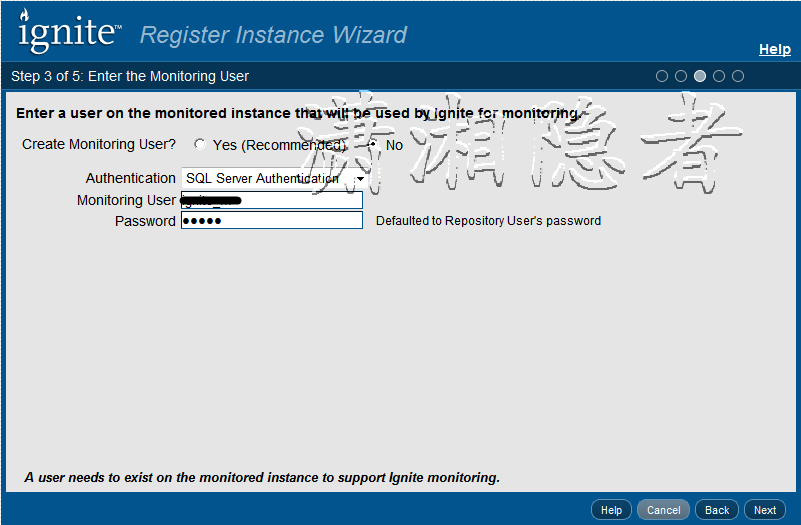
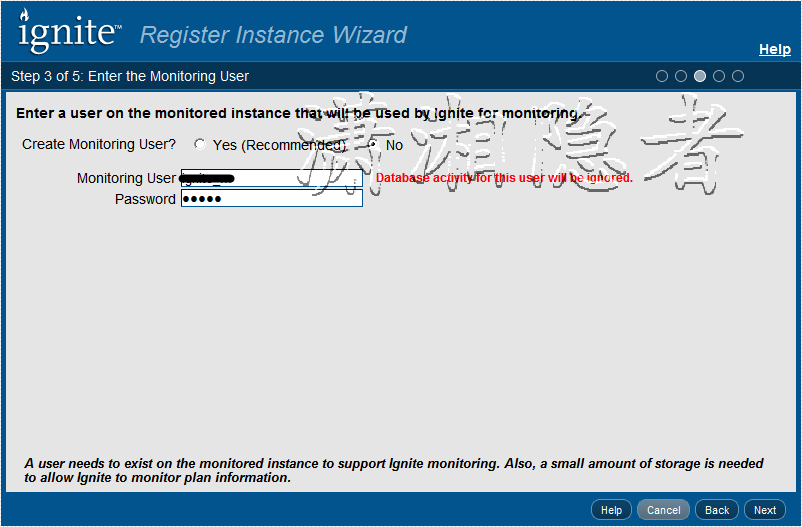
创建一个用来采集数据库的账号
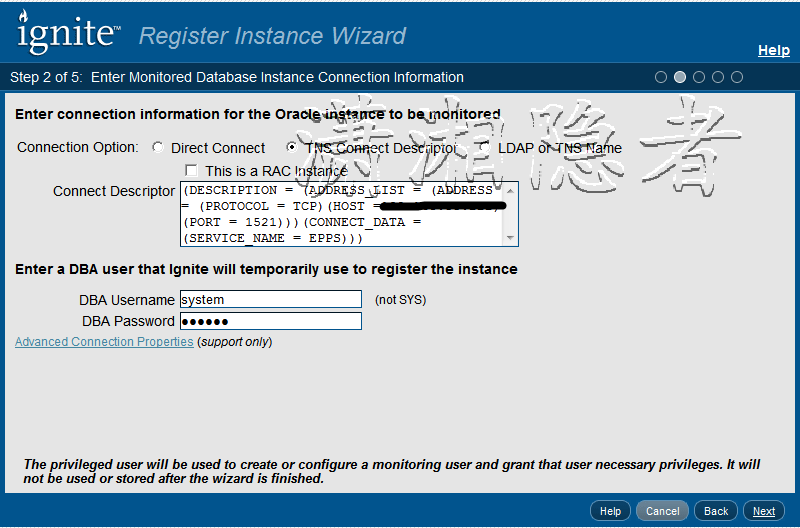
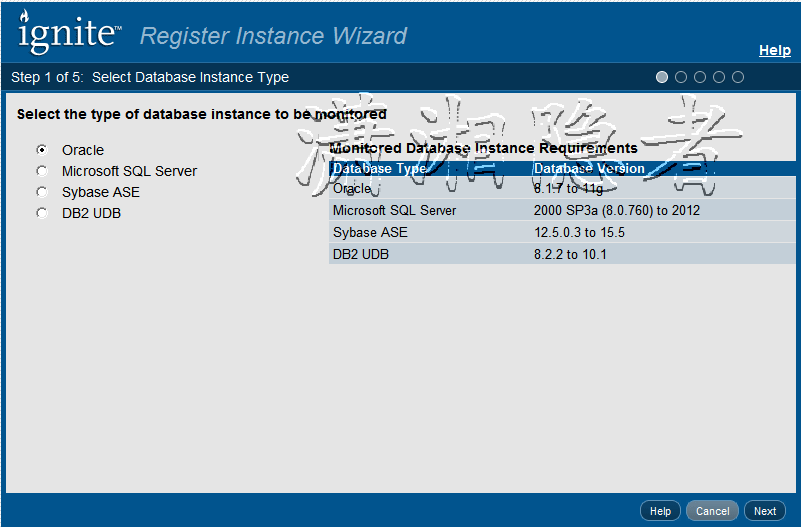
监控ORACLE数据库
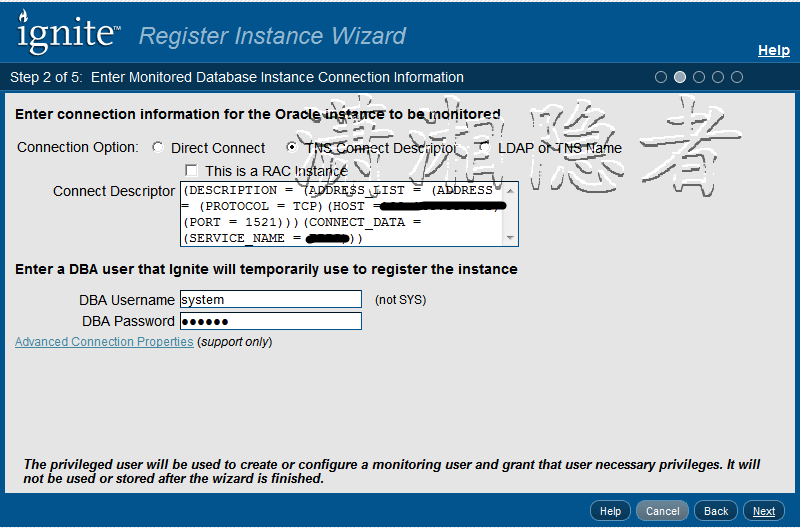
你可以选择“Direct Connect" 、”TNS Connect Description“、”LDAP or TNS Name"连接方式链接到Oracle数据库,下面我们选择“TNS Connect Description“,然后输入一个DBA Username登录系统用来创建后面相关账号

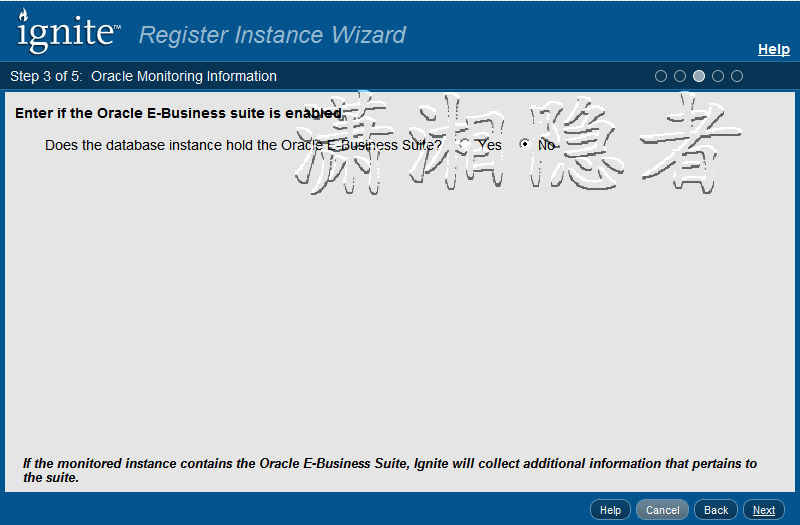
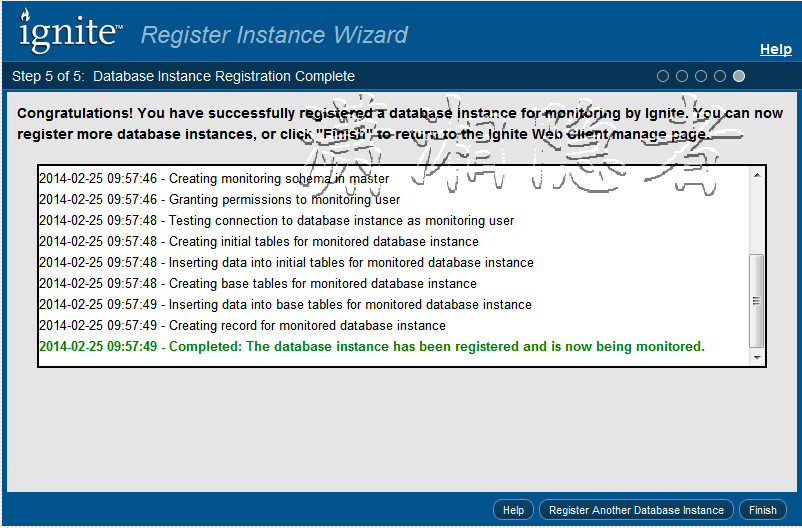
后面跟监控SQL Server 数据库的操作步骤一样了,在此略过。
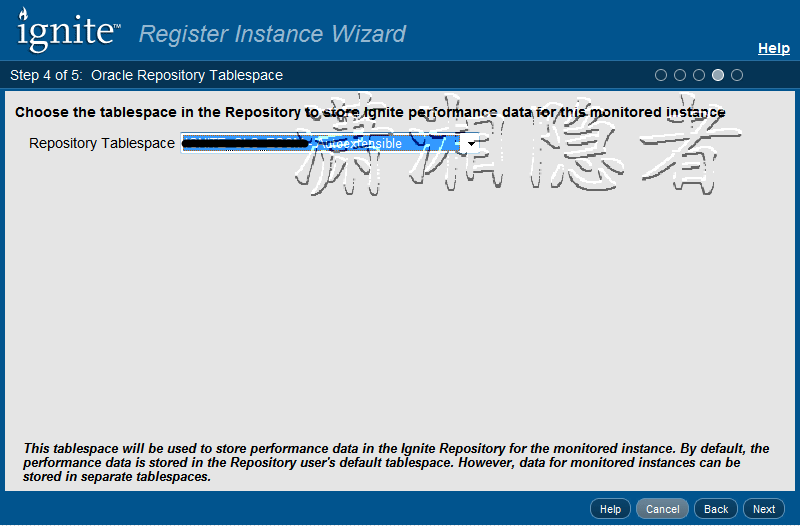
下面我们看看Ignite使用Oracle 数据库作为Repositor时,注册监控数据库的向导步骤。


前面步骤大体类似,唯一不同的是在下面,可以为被监控的数据库选择Repository Tablespace,便于管理。


Ignite安装配置——中篇的更多相关文章
- Ignite安装配置——上篇
Ignite介绍 Ignite 是SolarWinds公司开发的一款数据库性能监控.性能分析并提供优化解决方案的性能检测分析工具,Ignite配置简单.方便:它会收集实时会话数据.服务器资源使用情况, ...
- Hive安装配置指北(含Hive Metastore详解)
个人主页: http://www.linbingdong.com 本文介绍Hive安装配置的整个过程,包括MySQL.Hive及Metastore的安装配置,并分析了Metastore三种配置方式的区 ...
- Hive on Spark安装配置详解(都是坑啊)
个人主页:http://www.linbingdong.com 简书地址:http://www.jianshu.com/p/a7f75b868568 简介 本文主要记录如何安装配置Hive on Sp ...
- ADFS3.0与SharePoint2013安装配置(原创)
现在越来越多的企业使用ADFS作为单点登录,我希望今天的内容能帮助大家了解如何配置ADFS和SharePoint 2013.安装配置SharePoint2013这块就不做具体描述了,今天主要讲一下怎么 ...
- Hadoop的学习--安装配置与使用
安装配置 系统:Ubuntu14.04 java:1.7.0_75 相关资料 官网 下载地址 官网文档 安装 我们需要关闭掉防火墙,命令如下: sudo ufw disable 下载2.6.5的版本, ...
- redis的安装配置
主要讲下redis的安装配置,以及以服务的方式启动redis 1.下载最新版本的redis-3.0.7 到http://redis.io/download中下载最新版的redis-3.0.7 下载后 ...
- Windows环境下的NodeJS+NPM+Bower安装配置
npm作为一个NodeJS的模块管理,之前我由于没有系统地看资料所以导致安装配置模块的时候走了一大段弯路,所以现在很有必要列出来记录下.我们要先配置npm的全局模块的存放路径以及cache的路径,例如 ...
- ubuntu kylin 14.04安装配置MongoDB v2.6.1(转)
1.获取最新版本 https://fastdl.mongodb.org/linux/mongodb-linux-x86_64-2.6.1.tgz 2.解压并进入bin目录 tar zxvf mongo ...
- Django基础之安装配置
安装配置 一 MVC和MTV模式 著名的MVC模式:所谓MVC就是把web应用分为模型(M),控制器(C),视图(V)三层:他们之间以一种插件似的,松耦合的方式连接在一起. 模型负责业务对象与数据库的 ...
随机推荐
- Microsoft Message Analyzer (微软消息分析器,“网络抓包工具 - Network Monitor”的替代品)官方正式版现已发布
来自官方日志的喜悦 被誉为全新开始的消息分析器时代,由MMA为您开启,博客原文写的很激动,大家可以点击这里浏览:http://blogs.technet.com/b/messageanalyzer/a ...
- 淘宝web前端开发岗面试经历及感悟
今天下午四点接到淘宝UED的面试电话,很突然,很激动.现在怀着淡淡的忧伤为之文以志一下. 1.自我介绍一下. 我xx时候毕业,在xx公司任xx职务,主要负责xx balabala.(怕公司同事听到,接 ...
- JS Div滚动,下拉框添加属性,年月日下拉条
创建某一下拉菜单的项: str = str+"<option value='"+i+"'>"+i+"</option>&quo ...
- springMVC学习笔记(一)-----springMVC原理
一.什么是springmvc springMVC是spring框架的一个模块,springMVC和spring无需通过中间整合层进行开发. springMVC是一个基于mvc的web框架. Sprin ...
- 从零开始,搭建博客系统MVC5+EF6搭建框架(3),添加Nlog日志、缓存机制(MemoryCache、RedisCache)、创建控制器父类BaseController
一.回顾系统进度以及本章概要 目前博客系统已经数据库创建.以及依赖注入Autofac集成,接下来就是日志和缓存集成,这里日志用的是Nlog,其实还有其他的日志框架如log4,这些博客园都有很多介绍,这 ...
- SQL 性能优化-查询优化(like查询)
废话不说,上代码 SET STATISTICS IO ON SELECT * FROM dbo.T_AssNews WHERE Content LIKE '%会%' 花费时间 执行计划 一个百分号的代 ...
- 设计模式(四)抽象工厂模式(Abstract Factory Pattern)
一.引言 在上一专题中介绍了工厂方法模式,工厂方法模式是为了克服简单工厂模式的缺点而设计出来的,简单工厂模式的工厂类随着产品类的增加需要增加额外的代码,而工厂方法模式每个具体工厂类只完成单个实例的创建 ...
- Asp.net 面向接口可扩展框架之应用程序上下文作用域组件
在团队中推广面向接口开发两年左右,成果总体来说我还是挺满意的,使用面向接口开发的模块使用Unity容器配置的功能非常稳定,便于共享迁移(另一个项目使用只需要复制配置和调用接口即可),如果再配合上DI那 ...
- Newtonsoft.Json(Json.Net)学习笔记
Newtonsoft.Json 在Vs2013中就有自带的: 下面是Json序列化和反序列化的简单封装: /// <summary> /// Json帮助类 /// </summar ...
- de4dot3.14更新文件打包下载
刚发现de4dot更新了,虽然只是10月份的文件更新,并未发布新的release,但好多人还不会编译... 关于de4dot有何功能就不再讲了. 本文主要提供编译通过后的打包文件下载. 首先下载de4 ...