最详细的 Spring Boot 多模块开发与排坑指南
创建项目
创建一个 SpringBoot 项目非常的简单,简单到这里根本不用再提。你可以在使用 IDEA 新建项目时直接选择 Spring Initlalize 创建一个 Spring Boot 项目,也可以使用 Spring 官方提供的 Spring Boot 项目生成页面得到一个项目。
下面介绍一下使用 Spring 官方生成的方式,如果你已经有了一个 Spring Boot 项目,这部分可以直接跳过。
填写
group和Artifact信息,选择依赖(我选择了 Spring Web 和 Lombok )。
点击
Generate按钮下载项目。打开下载的项目,删除无用的
.mvn文件夹,mvnw、mvnw.cmd、HELP.md文件。
到这里已经得到了一个 Spring Boot 初始项目了,我们直接导入到 IDEA 中,看一眼 pom.xml 的内容。
<?xml version="1.0" encoding="UTF-8"?>

<project xmlns="http://maven.apache.org/POM/4.0.0" xmlns:xsi="http://www.w3.org/2001/XMLSchema-instance"

	xsi:schemaLocation="http://maven.apache.org/POM/4.0.0 https://maven.apache.org/xsd/maven-4.0.0.xsd">

	<modelVersion>4.0.0</modelVersion>

	<parent>

		<groupId>org.springframework.boot</groupId>

		<artifactId>spring-boot-starter-parent</artifactId>

		<version>2.2.5.RELEASE</version>

		<relativePath/> <!-- lookup parent from repository -->

	</parent>

	<groupId>com.wdbyte</groupId>

	<artifactId>springboot-module-demo</artifactId>

	<version>0.0.1-SNAPSHOT</version>

	<name>springboot-module-demo</name>

	<description>Demo project for Spring Boot</description>

	<properties>

		<java.version>1.8</java.version>

	</properties>

	<dependencies>

		<dependency>

			<groupId>org.springframework.boot</groupId>

			<artifactId>spring-boot-starter-web</artifactId>

		</dependency>

		<dependency>

			<groupId>org.projectlombok</groupId>

			<artifactId>lombok</artifactId>

			<optional>true</optional>

		</dependency>

		<dependency>

			<groupId>org.springframework.boot</groupId>

			<artifactId>spring-boot-starter-test</artifactId>

			<scope>test</scope>

			<exclusions>

				<exclusion>

					<groupId>org.junit.vintage</groupId>

					<artifactId>junit-vintage-engine</artifactId>

				</exclusion>

			</exclusions>

		</dependency>

	</dependencies>

	<build>

		<plugins>

			<plugin>

				<groupId>org.springframework.boot</groupId>

				<artifactId>spring-boot-maven-plugin</artifactId>

			</plugin>

		</plugins>

	</build>

</project>
把目录结构调整成自己想要的结构,然后添加 controller 和 entity 用于测试。
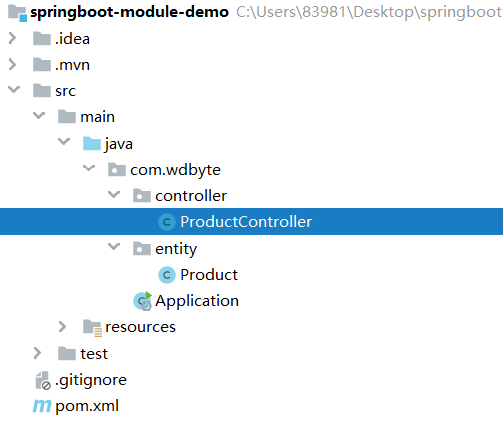
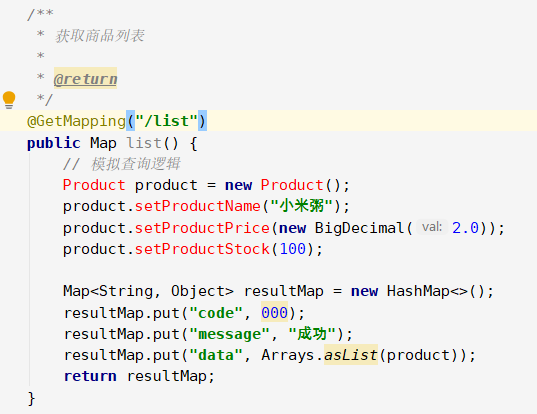
ProductController 类源代码。
@RestController

@RequestMapping("/product")

public class ProductController {

    /**

     * 获取商品列表

     *

     * @return

     */

    @GetMapping("/list")

    public Map list() {

        // 模拟查询商品逻辑

        Product product = new Product();

        product.setProductName("小米粥");

        product.setProductPrice(new BigDecimal(2.0));

        product.setProductStock(100);

        Map<String, Object> resultMap = new HashMap<>();

        resultMap.put("code", 000);

        resultMap.put("message", "成功");

        resultMap.put("data", Arrays.asList(product));

        return resultMap;

    }

}
Product 类源代码。
@Data

public class Product {

    /** 商品名称. */

    private String productName;

    /** 商品价格. */

    private BigDecimal productPrice;

    /** 商品库存。 */

    private int productStock;

}
模块化
借助 IDEA 工具可以快速的把项目改造成 maven 多模块,这里我们把准备测试 demo 拆分为 common 和 web 两个模块,common 模块存放实体类。web 模块存放 controller 层(这里项目虽小,拆分只是为了演示)。话不多说,直接开始。
配置主 pom.xml 打包方式 为 pom
<?xml version="1.0" encoding="UTF-8"?>

<project xmlns="http://maven.apache.org/POM/4.0.0" xmlns:xsi="http://www.w3.org/2001/XMLSchema-instance"

         xsi:schemaLocation="http://maven.apache.org/POM/4.0.0 https://maven.apache.org/xsd/maven-4.0.0.xsd">

    <modelVersion>4.0.0</modelVersion>

    <!-- 配置主 pom 打包方式为 pom -->

    <packaging>pom</packaging>

    ....

    ....
创建 common 模块
项目直接 new -> module。

选择 maven -> next,填写模块名称。
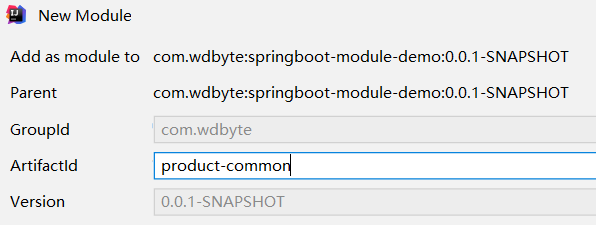
继续 next 完成模块创建。
创建 web 模块
web 模块的创建和 common 模块如出一辙,不再赘述。完成两个模块的创建之后,你会发现你的主 pom.xml 文件里自动添加了 module 部分。
<modules>

    <module>product-common</module>

	<module>product-web</module>

</modules>
移动代码到指定模块
移动
Product.java到product-common模块,其他部分代码和 resource 部分直接移动到product-web模块,移动完后你的代码结构是这个样子。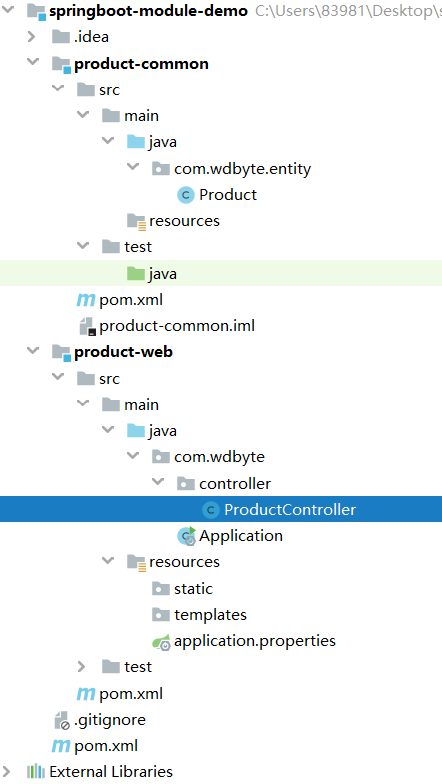
到这里,多模块已经拆分完成了, 但是 ProductController 代码里的红色警告让你发现事情还没有结束。
依赖管理
处理依赖问题
你发现了代码里的红色警告,不过你也瞬间想到了是因为把 Product 类移动到了 product-common 模块,导致这里引用不到了。
然后你查看了下 product-common 模块的 pom.xml 里的内容。
<?xml version="1.0" encoding="UTF-8"?>

<project xmlns="http://maven.apache.org/POM/4.0.0"

         xmlns:xsi="http://www.w3.org/2001/XMLSchema-instance"

         xsi:schemaLocation="http://maven.apache.org/POM/4.0.0 http://maven.apache.org/xsd/maven-4.0.0.xsd">

    <parent>

        <artifactId>springboot-module-demo</artifactId>

        <groupId>com.wdbyte</groupId>

        <version>0.0.1-SNAPSHOT</version>

    </parent>

    <modelVersion>4.0.0</modelVersion>

    <artifactId>product-common</artifactId>

</project>
机智的在 Product-web 模块的 pom.xml 里引入 product-common,手起键落,轻松搞定。
<?xml version="1.0" encoding="UTF-8"?>

<project xmlns="http://maven.apache.org/POM/4.0.0"

         xmlns:xsi="http://www.w3.org/2001/XMLSchema-instance"

         xsi:schemaLocation="http://maven.apache.org/POM/4.0.0 http://maven.apache.org/xsd/maven-4.0.0.xsd">

    <parent>

        <artifactId>springboot-module-demo</artifactId>

        <groupId>com.wdbyte</groupId>

        <version>0.0.1-SNAPSHOT</version>

    </parent>

    <modelVersion>4.0.0</modelVersion>

    <artifactId>product-web</artifactId>

    <dependencies>

        <dependency>

            <groupId>com.wdbyte</groupId>

            <artifactId>product-common</artifactId>

        </dependency>

    </dependencies>

</project>
满心欢喜的你快速的点击 Build-> Build Project,得到的 Error 警告刺痛了顶着黑眼圈的你。
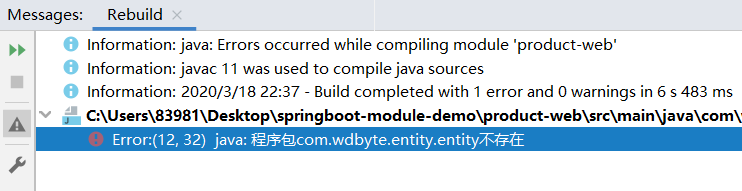
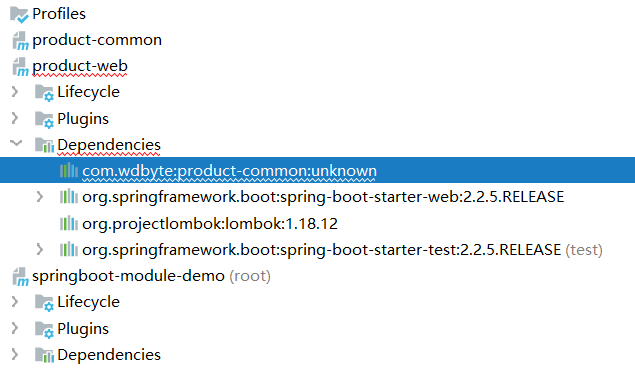
不过你还是迅速定位了问题,查看 maven 依赖,你发现是因为没有指定 product-common 依赖的版本号。
原来如此,因为没有指定版本号,我们指定上不就完事了嘛。在最外层的主 pom.xml 中添加 <dependencyManagement> 添加上指定依赖和要指定的版本号。
    <dependencyManagement>

        <dependencies>

            <dependency>

                <groupId>com.wdbyte</groupId>

                <artifactId>product-common</artifactId>

                <version>0.0.1-SNAPSHOT</version><!-- maven 打包默认 0.0.1-SNAPSHOT 版本 -->

            </dependency>

        </dependencies>

    </dependencyManagement>
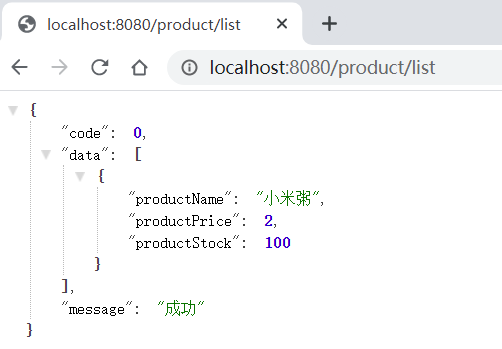
刷新 maven ,发现项目已经不报错了,编译成功,运行启动类,熟悉的 Spring logo 又出现在眼前。
优化依赖
是的,Spring Boot 应用在改造成多模块后成功运行了起来,但是你貌似发现一个问题,模块 common 和模块 web 都继承了主 pom ,主 pom 中有 Lombok 、Spring Boot Web 和 Spring Boot Test 依赖,而 common 模块里只用到了 Lombok 啊,却一样继承了 Spring Boot 其他依赖,看来还是要改造一把。
只有
common模块用到的依赖移动到common模块。<?xml version="1.0" encoding="UTF-8"?>
<project xmlns="http://maven.apache.org/POM/4.0.0"
xmlns:xsi="http://www.w3.org/2001/XMLSchema-instance"
xsi:schemaLocation="http://maven.apache.org/POM/4.0.0 http://maven.apache.org/xsd/maven-4.0.0.xsd">
<parent>
<artifactId>springboot-module-demo</artifactId>
<groupId>com.wdbyte</groupId>
<version>0.0.1-SNAPSHOT</version>
</parent>
<modelVersion>4.0.0</modelVersion>
<artifactId>product-common</artifactId>
<dependencies>
<dependency>
<groupId>org.projectlombok</groupId>
<artifactId>lombok</artifactId>
<optional>true</optional>
</dependency>
</dependencies>
</project>
只有
web模块用到的依赖移动到web模块。<?xml version="1.0" encoding="UTF-8"?>
<project xmlns="http://maven.apache.org/POM/4.0.0"
xmlns:xsi="http://www.w3.org/2001/XMLSchema-instance"
xsi:schemaLocation="http://maven.apache.org/POM/4.0.0 http://maven.apache.org/xsd/maven-4.0.0.xsd">
<parent>
<artifactId>springboot-module-demo</artifactId>
<groupId>com.wdbyte</groupId>
<version>0.0.1-SNAPSHOT</version>
</parent>
<modelVersion>4.0.0</modelVersion>
<artifactId>product-web</artifactId> <dependencies>
<dependency>
<groupId>com.wdbyte</groupId>
<artifactId>product-common</artifactId>
</dependency> <dependency>
<groupId>org.springframework.boot</groupId>
<artifactId>spring-boot-starter-web</artifactId>
</dependency> <dependency>
<groupId>org.springframework.boot</groupId>
<artifactId>spring-boot-starter-test</artifactId>
<scope>test</scope>
<exclusions>
<exclusion>
<groupId>org.junit.vintage</groupId>
<artifactId>junit-vintage-engine</artifactId>
</exclusion>
</exclusions>
</dependency>
</dependencies>
</project>
抽取用到的版本号到
<properties>,这里抽取common模块的依赖版本。到这里最外层主 pom 的内容是这样的。
<?xml version="1.0" encoding="UTF-8"?>

<project xmlns="http://maven.apache.org/POM/4.0.0" xmlns:xsi="http://www.w3.org/2001/XMLSchema-instance"

         xsi:schemaLocation="http://maven.apache.org/POM/4.0.0 https://maven.apache.org/xsd/maven-4.0.0.xsd">

    <modelVersion>4.0.0</modelVersion>

    <packaging>pom</packaging>

    <modules>

        <module>product-common</module>

        <module>product-web</module>

    </modules>

    <parent>

        <groupId>org.springframework.boot</groupId>

        <artifactId>spring-boot-starter-parent</artifactId>

        <version>2.2.5.RELEASE</version>

        <relativePath/> <!-- lookup parent from repository -->

    </parent>

    <groupId>com.wdbyte</groupId>

    <artifactId>springboot-module-demo</artifactId>

    <version>0.0.1-SNAPSHOT</version>

    <name>springboot-module-demo</name>

    <description>Demo project for Spring Boot</description>

    <properties>

        <java.version>1.8</java.version>

        <product-common.version>0.0.1-SNAPSHOT</product-common.version>

    </properties>

    <dependencyManagement>

        <dependencies>

            <dependency>

                <groupId>com.wdbyte</groupId>

                <artifactId>product-common</artifactId>

                <version>${product-common.version}</version>

            </dependency>

        </dependencies>

    </dependencyManagement>

    <build>

        <plugins>

            <plugin>

                <groupId>org.springframework.boot</groupId>

                <artifactId>spring-boot-maven-plugin</artifactId>

            </plugin>

        </plugins>

    </build>

</project>
看似完美,重新 Build-> Build Project ,发现一切正常,运行发现一切正常,访问正常。
打包编译
好了,终于到了最后一步了,你感觉到胜利的曙光已经照到了头顶,反射出耀眼的光芒。接着就是 mvn package 。
[INFO] springboot-module-demo ............................. SUCCESS [  2.653 s]

[INFO] product-common ..................................... FAILURE [  2.718 s]

[INFO] product-web ........................................ SKIPPED

[INFO] ------------------------------------------------------------------------

[INFO] BUILD FAILURE

[INFO] ------------------------------------------------------------------------

[INFO] Total time: 6.084 s

[INFO] Finished at: 2020-03-19T08:15:52+08:00

[INFO] Final Memory: 22M/87M

[INFO] ------------------------------------------------------------------------

[ERROR] Failed to execute goal org.springframework.boot:spring-boot-maven-plugin:2.2.5.RELEASE:repackage (repackage) on project product-common: Execution repackage of goal org.springframework.boot:spring-boot-m

aven-plugin:2.2.5.RELEASE:repackage failed: Unable to find main class -> [Help 1]

[ERROR]
ERROR 让你伤心了,但是你还是从报错中寻找到了一些蛛丝马迹,你看到是 spring-boot-maven-plugin 报出的错误。重新审视你的主 pom 发现 <build> 编译插件用到了 spring-boot-maven-plugin。
    <build>

        <plugins>

            <plugin>

                <groupId>org.springframework.boot</groupId>

                <artifactId>spring-boot-maven-plugin</artifactId>

            </plugin>

        </plugins>

    </build>
略加思索后将这段移动到 web 模块的 pom,因为这是 Spring Boot 的打包方式,现在放在主 pom 中所有的模块都会继承到,那么对于 common 模块来说是肯定不需要的。
移动后重新打包,不管你是运行命令 mvn package 还是双击 IDEA 中的 maven 管理中的 package ,想必这时候你都已经打包成功了
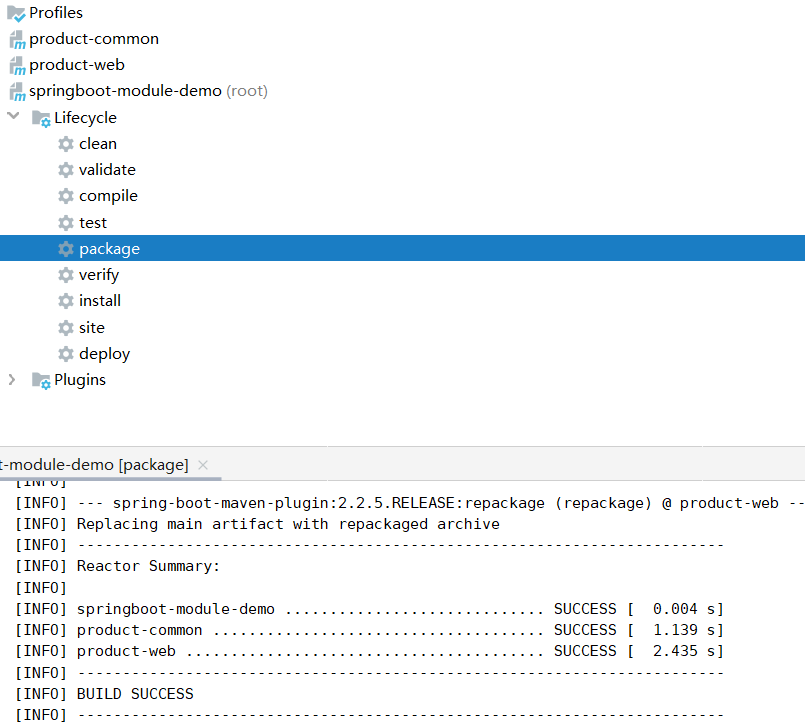
在 web 模块下的目录 target 里也可以看到打包后的 jar 文件 product-web-0.0.1-SNAPSHOT.jar。可以使用 java 命令直接运行。
$ \springboot-module-demo\product-web\target>java -jar product-web-0.0.1-SNAPSHOT.jar

  .   ____          _            __ _ _

 /\\ / ___'_ __ _ _(_)_ __  __ _ \ \ \ \

( ( )\___ | '_ | '_| | '_ \/ _` | \ \ \ \

 \\/  ___)| |_)| | | | | || (_| |  ) ) ) )

  '  |____| .__|_| |_|_| |_\__, | / / / /

 =========|_|==============|___/=/_/_/_/

 :: Spring Boot ::        (v2.2.5.RELEASE)

2020-03-19 08:33:03.337  INFO 15324 --- [           main] com.wdbyte.Application                   : Starting Application v0.0.1-SNAPSHOT on DESKTOP-8SCFV4M with PID 15324 (C:\Users\83981\Desktop\springboot-mod

ule-demo\product-web\target\product-web-0.0.1-SNAPSHOT.jar started by 83981 in C:\Users\83981\Desktop\springboot-module-demo\product-web\target)

2020-03-19 08:33:03.340  INFO 15324 --- [           main] com.wdbyte.Application                   : No active profile set, falling back to default profiles: default

2020-03-19 08:33:04.410  INFO 15324 --- [           main] o.s.b.w.embedded.tomcat.TomcatWebServer  : Tomcat initialized with port(s): 8080 (http)

2020-03-19 08:33:04.432  INFO 15324 --- [           main] o.apache.catalina.core.StandardService   : Starting service [Tomcat]

2020-03-19 08:33:04.432  INFO 15324 --- [           main] org.apache.catalina.core.StandardEngine  : Starting Servlet engine: [Apache Tomcat/9.0.31]

2020-03-19 08:33:04.493  INFO 15324 --- [           main] o.a.c.c.C.[Tomcat].[localhost].[/]       : Initializing Spring embedded WebApplicationContext

2020-03-19 08:33:04.493  INFO 15324 --- [           main] o.s.web.context.ContextLoader            : Root WebApplicationContext: initialization completed in 1107 ms

2020-03-19 08:33:04.636  INFO 15324 --- [           main] o.s.s.concurrent.ThreadPoolTaskExecutor  : Initializing ExecutorService 'applicationTaskExecutor'

2020-03-19 08:33:04.769  INFO 15324 --- [           main] o.s.b.w.embedded.tomcat.TomcatWebServer  : Tomcat started on port(s): 8080 (http) with context path ''

2020-03-19 08:33:04.772  INFO 15324 --- [           main] com.wdbyte.Application                   : Started Application in 1.924 seconds (JVM running for 2.649)

2020-03-19 08:33:07.087  INFO 15324 --- [extShutdownHook] o.s.s.concurrent.ThreadPoolTaskExecutor  : Shutting down ExecutorService 'applicationTaskExecutor'
想必少了点什么,多模块不仅为了结构清晰,更是为了其他项目可以复用模块(如 common 模块),现在这个时候如果你新打开了一个项目,依赖 common 发现是引用不到的,因为你需要把模块安装到本地仓库。可以点击 IDEA -> Maven -> install,也可以通过 maven 命令。
# -Dmaven.test.skip=true 跳过测试

# -U 强制刷新

# clean 清理缓存

# install 安装到本地仓库

$ \springboot-module-demo> mvn -Dmaven.test.skip=true -U clean install
重新引入发现没有问题了。
文中代码已经上传到 Github: https://github.com/niumoo/springboot
这篇文章到这里就结束了,如果你觉得不错可以关注我的公众号一起交流。
公众号满载干货,童叟无欺。

最详细的 Spring Boot 多模块开发与排坑指南的更多相关文章
- Spring boot 多模块项目 + Swagger 让你的API可视化
Spring boot 多模块项目 + Swagger 让你的API可视化 前言 手写 Api 文档的几个痛点: 文档需要更新的时候,需要再次发送一份给前端,也就是文档更新交流不及时. 接口返回结果不 ...
- Spring Boot Web应用开发 CORS 跨域请求支持:
Spring Boot Web应用开发 CORS 跨域请求支持: 一.Web开发经常会遇到跨域问题,解决方案有:jsonp,iframe,CORS等等CORS与JSONP相比 1. JSONP只能实现 ...
- Spring Boot 多模块项目创建与配置 (一) (转)
Spring Boot 多模块项目创建与配置 (一) 最近在负责的是一个比较复杂项目,模块很多,代码中的二级模块就有9个,部分二级模块下面还分了多个模块.代码中的多模块是用maven管理的,每个模块都 ...
- Spring Boot 多模块项目创建与配置 (一)
最近在负责的是一个比较复杂项目,模块很多,代码中的二级模块就有9个,部分二级模块下面还分了多个模块.代码中的多模块是用maven管理的,每个模块都使用spring boot框架.之前有零零散散学过一些 ...
- Spring Boot 多模块项目创建与配置 (转)
转载:https://www.cnblogs.com/MaxElephant/p/8205234.html 最近在负责的是一个比较复杂项目,模块很多,代码中的二级模块就有9个,部分二级模块下面还分了多 ...
- Maven 搭建spring boot多模块项目(附源码),亲测可以,感谢原创
原创地址:https://segmentfault.com/a/1190000005020589 我的DEMO码云地址,持续添加新功能: https://gitee.com/itbase/Spring ...
- Maven 搭建spring boot多模块项目
Maven 搭建spring boot多模块项目 备注:所有项目都在idea中创建 1.idea创建maven项目 1-1: 删除src,target目录,只保留pom.xml 1-2: 根目录pom ...
- Spring Boot 企业级应用开发实战 刘伟东-2018年3月第一版
Spring会自动搜索某些路径下的Java类 并将这些类注册微Bean实例,这样就省去了所有Bean都配置在XML的麻烦 Spring会适当地将显示指定路径下的的类全部注册微Spring Bean . ...
- 图书-技术-SpringBoot:《Spring Boot 企业级应用开发实战》
ylbtech-图书-技术-SpringBoot:<Spring Boot 企业级应用开发实战> Spring Boot 企业级应用开发实战,全书围绕如何整合以 Spring Boot 为 ...
随机推荐
- Laravel wxxcx 微信小程序获取用户信息
wxxcx 是Laravel5微信小程序登录获取用户信息扩展 部署 12345678 # 安装$ composer require iwanli/wxxcx# 注册服务# 在 /config/app. ...
- 用手机应用追踪城市噪声污染——微软Azure助力解决城市问题
噪声无孔不入的城市地带(图片来自于网络) 2014年4月19日发行的<经济学人>杂志预言,到2030年,中国人口的70%(约10亿人)会在城市中居住.中国城镇化的高速发展一方面大大提高了 ...
- Android Studio NDK编程初探
继上一篇学习了如何使用NDK编译FFMPEG后,接下来就是要学习如何在Android Studio中使用了. 经过参考和一系列的摸索,记录下具体步骤. 创建C++ Support的Android St ...
- zabbix监控mysql数据库信息脚本
---恢复内容开始--- 在/usr/local/zabbix/etc/zabbix_agentd.conf增加 # 获取mysql性能指标 UserParameter=mysql.status[*] ...
- (转载)SVN使用说明
为了方便个人使用,转载过来的,如需查阅,请前往原文地址:http://blog.csdn.net/ideal_utopia/article/details/51883796 为什么要使用SVN? 在程 ...
- C++扬帆远航——7(年月日)
/* * Copyright (c) 2016,烟台大学计算机与控制工程学院 * All rights reserved. * 文件名:charizi.cpp * 作者:常轩 * 完成日期:2016年 ...
- Redis list实现原理 - 双向循环链表
双向链表 双向表示每个节点知道自己的直接前驱和直接后继,每个节点需要三个域 查找方向可以是从左往右也可以是从右往左,但是要实现从右往左还需要终端节点的地址,所以通常会设计成双向的循环链表; 双向的循环 ...
- docker RPM包安装
1. 下载 docker RPM包 docker 使用的系统是 Centos 7.6 基础设施服务器 # wget https://download.docker.com/linux/centos/ ...
- 前端如何真正晋级成全栈:腾讯 Serverless 前端落地与实践
Serverless 是当下炙手可热的技术,被认为是云计算发展的未来方向,拥有免运维.降低开发成本.按需自动扩展等诸多优点.尤其是在前端研发领域,使用 Node 开发云函数,可以让前端工程师更加专注于 ...
- ASP.NET CORE 管道模型及中间件使用解读
说到ASP.NET CORE 管道模型不得不先来看看之前的ASP.NET 的管道模型,两者差异很大,.NET CORE 3.1 后完全重新设计了框架的底层,.net core 3.1 的管道模型更加灵 ...