iOS开发-在表单元中添加子视图
#import <UIKit/UIKit.h>

@interface NameAndColorCellTableViewCell : UITableViewCell

@property(copy,nonatomic) NSString *name;

@property(copy,nonatomic) NSString *color;

@end
NameAndColorCellTableViewCell.h
//

//  NameAndColorCellTableViewCell.m

//  Tabel Cells

//

//  Created by  Jierism on 16/7/21.

//  Copyright © 2016年  Jierism. All rights reserved.

//

#import "NameAndColorCellTableViewCell.h"

@interface NameAndColorCellTableViewCell ()

// 定义两个属性变量

@property(strong,nonatomic) UILabel *nameLabel;

@property(strong,nonatomic) UILabel *colorLabel;

@end

@implementation NameAndColorCellTableViewCell

- (void)awakeFromNib {

    [super awakeFromNib];

    // Initialization code

}

- (void)setSelected:(BOOL)selected animated:(BOOL)animated {

    [super setSelected:selected animated:animated];

    // Configure the view for the selected state

}

- (instancetype)initWithStyle:(UITableViewCellStyle)style reuseIdentifier:(NSString *)reuseIdentifier

{

    self = [super initWithStyle:style reuseIdentifier:reuseIdentifier];

    if (self) {

        // 初始化代码

        // 往表单元里面添加子视图

        // 这里在每个表单元里添加了四个Label

        CGRect nameLabelRect = CGRectMake(, , , );

        UILabel *nameMaker = [[UILabel alloc] initWithFrame:nameLabelRect];

        nameMaker.textAlignment = NSTextAlignmentRight;  // 右对齐

        nameMaker.text = @"Name:";

        nameMaker.font = [UIFont boldSystemFontOfSize:];

        [self.contentView addSubview:nameMaker];

        CGRect colorLabelRect = CGRectMake(, , , );

        UILabel *colorMaker = [[UILabel alloc] initWithFrame:colorLabelRect];

        colorMaker.textAlignment = NSTextAlignmentRight;

        colorMaker.text = @"Color:";

        colorMaker.font = [UIFont boldSystemFontOfSize:];

        [self.contentView addSubview:colorMaker];

        CGRect nameValueRect = CGRectMake(, , , );

        self.nameLabel = [[UILabel alloc] initWithFrame:nameValueRect];

        [self.contentView addSubview:_nameLabel];

        CGRect colorValueRect = CGRectMake(, , , );

        self.colorLabel = [[UILabel alloc] initWithFrame:colorValueRect];

        [self.contentView addSubview:_colorLabel];

    }

    return self;

}

// 重写了Name和Color的set方法,当传递一个新的值时,更新标签的额内容

- (void) setName:(NSString *)n {

    if (![n isEqualToString:_name]) {

        _name = [n copy];

        self.nameLabel.text = _name;

    }

}

- (void)setColor:(NSString *)c {

    if (![c isEqualToString:_color]) {

        _color = [c copy];

        self.colorLabel.text = _color;

    }

}

@end
NameAndColorCellTableViewCell.m
#import <UIKit/UIKit.h>

@interface ViewController : UIViewController<UITableViewDataSource>

@end
ViewController.h
//
// ViewController.m
// Tabel Cells
//
// Created by Jierism on 16/7/20.
// Copyright © 2016年 Jierism. All rights reserved.
// #import "ViewController.h"
#import "NameAndColorCellTableViewCell.h" static NSString *CellTableIdentifier = @"CellTableIdentifier"; @interface ViewController () // 定义一个数组和输出接口
@property (copy,nonatomic) NSArray *computers;
@property (weak,nonatomic) IBOutlet UITableView *tableView; @end @implementation ViewController - (void)viewDidLoad {
[super viewDidLoad];
// Do any additional setup after loading the view, typically from a nib. // 往数组里定义字典
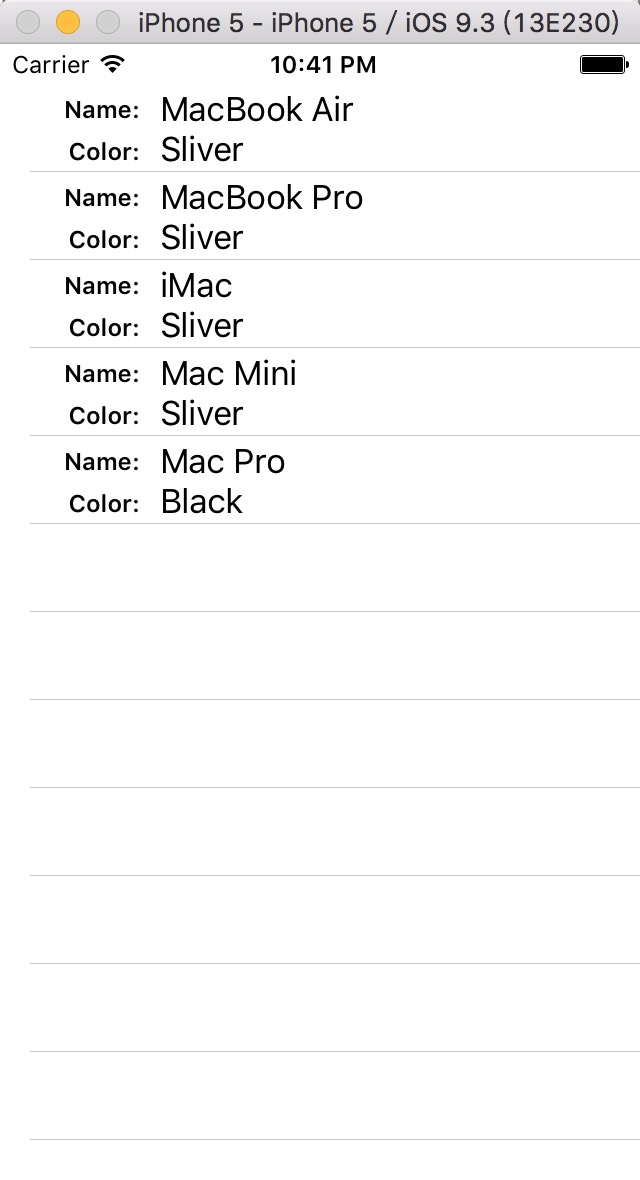
self.computers = @[@{@"Name" : @"MacBook Air",@"Color" : @"Sliver"},
@{@"Name" : @"MacBook Pro",@"Color" : @"Sliver"},
@{@"Name" : @"iMac",@"Color" : @"Sliver"},
@{@"Name" : @"Mac Mini",@"Color" : @"Sliver"},
@{@"Name" : @"Mac Pro",@"Color" : @"Black"},];
[self.tableView registerClass:[NameAndColorCellTableViewCell class] forCellReuseIdentifier:CellTableIdentifier];
} - (void)didReceiveMemoryWarning {
[super didReceiveMemoryWarning];
// Dispose of any resources that can be recreated.
} // DataSource方法 // 返回数组元素个数的行数,这里return的数不能大于元素的个数,否则崩溃
- (NSInteger)tableView:(UITableView *)tableView numberOfRowsInSection:(NSInteger)section
{
return [self.computers count];
} - (UITableViewCell *)tableView:(UITableView *)tableView cellForRowAtIndexPath:(NSIndexPath *)indexPath
{
NameAndColorCellTableViewCell *cell = [tableView dequeueReusableCellWithIdentifier:CellTableIdentifier forIndexPath:indexPath]; NSDictionary *rowData = self.computers[indexPath.row]; cell.name = rowData[@"Name"];
cell.color = rowData[@"Color"]; return cell;
} @end
ViewController.m
以上代码手动实现了在表单元中添加了4个Label,并显示相关内容,运行效果如图
这个效果还有另外一种实现方法,就是使用storyboard,用nib实现。不过之前与一位师兄交流中得知,以后工作中用代码实现视图布局比较多,因为会解决很多问题。在这之前自己做的都是使用storyboard,虽然现在觉得使用起来会省事,但是到了开发大型的APP的时候who know,right?所以,自己还需要提升用代码实现布局的能力。
iOS开发-在表单元中添加子视图的更多相关文章
- 关于cell中添加子视图 复用重叠问题的解决方法
问题本质: 因为你要添加的子视图并不是在自定义的cell中实现的,而是根据系统给的UITableViewCell这个类创建的实例,每次进图 cellForRow方法都会创建一个cell,每次都要创 ...
- iOS开发(OC)中的命名规范
开小差:最近发现自己有一个经验主义的毛病,不太容易接受新的知识,这对从事技术研发的人来说不太合理,需要改之. 正文:通过读写大量代码我有自己的一套编程思路和习惯,自认为自己的编码习惯还是不错的,代码结 ...
- IOS开发之表视图(UITableView)
IOS开发之表视图(UITableView)的基本介绍(一) (一):UITableView的基本概念 1.在IOS开发中,表视图的应用十分广泛和普及.因此掌握表视图的用法显得非常重要.一般情况下对于 ...
- iOS开发拓展篇—xib中关于拖拽手势的潜在错误
iOS开发拓展篇—xib中关于拖拽手势的潜在错误 一.错误说明 自定义一个用来封装工具条的类 搭建xib,并添加一个拖拽的手势. 主控制器的代码:加载工具条 封装工具条以及手势拖拽的监听事件 此时运行 ...
- IOS开发效率之为Xcode添加常用的代码片段
IOS开发效率之为Xcode添加常用的代码片段 原文地址:http://blog.csdn.net/pingchangtan367/article/details/30041285 tableview ...
- iOS开发实用技巧—Objective-C中的各种遍历(迭代)方式
iOS开发实用技巧—Objective-C中的各种遍历(迭代)方式 说明: 1)该文简短介绍在iOS开发中遍历字典.数组和集合的几种常见方式. 2)该文对应的代码可以在下面的地址获得:https:// ...
- 解决UIViewController中添加子控制器viewWillAppear不调用问题
问题描述: 我在UICollectionViewController中添加子控制器数组, 并在cellForItem中把子控制器数组中对应的控制器对应的view添加到了UICollectionView ...
- [iOS]在NavigationController中的ScrollView中的子视图都会下移64个像素
情况是这种: 我有一个UINavigationController,设置为self.window的root视图, 然后有一个UIVIewController是UINavigtionController ...
- UIScrollView中添加一个视图,实现让其始终固定在某个位置
ScrollView中添加一个视图,实现让其始终固定在某个位置,如最底部的位置.方法是自定义一个继承UIScrollView,重写它的layoutSubviews方法.代码如下: #import &q ...
随机推荐
- SQL Server中的分页
sqlserver2000时的分页思路 .分页查询时,首先将数据排序 select * from MyStudent order by fid desc .取第一页数据 * from MyStuden ...
- P114、面试题17:合并两个排序的链表
题目:输入两个递增排序的链表,合并这两个链表并使新链表中的结点仍然是按照递增顺序的.struct ListNode{ int m_nKey; ListNode* m_p ...
- hadoop博客
http://www.cnblogs.com/scotoma/ http://www.cnblogs.com/xia520pi/
- [ffmpeg 扩展第三方库编译系列] 关于需要用到cmake 创建 mingw32编译环境问题
我在这里给出我编译的例子 cmake -G"MinGW Makefiles" -DCMAKE_BUILD_TYPE=Release -DCMAKE_INSTALL_PREFIX=& ...
- poj 1039 Pipe(叉乘。。。)
题目:http://poj.org/problem?id=1039 题意:有一宽度为1的折线管道,上面顶点为(xi,yi),所对应的下面顶点为(xi,yi-1),假设管道都是不透明的,不反射的,光线从 ...
- poj 2635 The Embarrassed Cryptographer(数论)
题目:http://poj.org/problem?id=2635 高精度求模 同余模定理. 题意: 给定一个大数K,K是两个大素数的乘积的值.再给定一个int内的数L 问这两个大素数中最小的一个是 ...
- 函数innobase_start_or_create_for_mysql
buffer pool初始化 /******************************************************************** Starts InnoDB a ...
- js不能执行,IE处理方法
一.如果你的ie不能打开js脚本(连系统里所有的js文件都不运行,网页上的js广告或好多页面都显示不了),请按一下步骤进行排查与解决: 1.查看是否IE的安全里面禁止了JS的运行: 将工具=>i ...
- UVa 1213 (01背包变形) Sum of Different Primes
题意: 选择K个质数使它们的和为N,求总的方案数. 分析: 虽然知道推出来了转移方程, 但还是没把代码敲出来,可能基本功还是不够吧. d(i, j)表示i个素数的和为j的方案数,则 d(i, j) = ...
- POJ 2135 Farm Tour(最小费用最大流,变形)
题意:给一个无向图,FJ要从1号点出发到达n号点,再返回到1号点,但是路一旦走过了就会销毁(即回去不能经过),每条路长度不同,那么完成这趟旅行要走多长的路?(注:会有重边,点号无序,无向图!) 思路: ...