android apk 防止反编译技术第一篇-加壳技术
做android framework方面的工作将近三年的时间了,现在公司让做一下android apk安全方面的研究,于是最近就在网上找大量的资料来学习。现在将最近学习成果做一下整理总结。学习的这些成果我会做成一个系列慢慢写出来与大家分享,共同进步。这篇主要讲apk的加壳技术,废话不多说了直接进入正题。
一、加壳技术原理
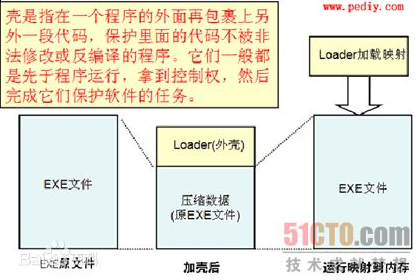
所谓apk的加壳技术和pc exe的加壳原理一样,就是在程序的外面再包裹上另外一段代码,保护里面的代码不被非法修改或反编译,在程序运行的时候优先取得程序的控制权做一些我们自己想做的工作。(哈哈,跟病毒的原理差不多)
PC exe的加壳原理如下:
二、android apk加壳实现
要想实现加壳需要解决的技术点如下:
(1)怎么第一时间执行我们的加壳程序?
首先根据上面的原理我们在apk中要想优先取得程序的控制权作为android apk的开发人员都知道Application会被系统第一时间调用而我们的程序也会放在这里执行。
(2)怎么将我们的加壳程序和原有的android apk文件合并到一起?
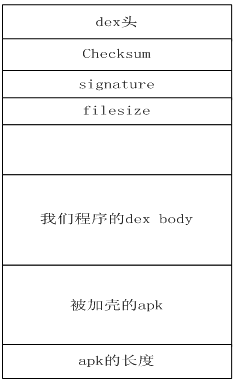
我们知道android apk最终会打包生成dex文件,我们可以将我们的程序生成dex文件后,将我们要进行加壳的apk和我们dex文件合并成一个文件,然后修改dex文件头中的checksum、signature和file_size的信息,并且要附加加壳的apk的长度信息在dex文件中,以便我们进行解壳保证原来apk的正常运行。加完壳后整个文件的结构如下:
(3)怎么将原来的apk正常的运行起来?
按照(2)中的合并方式在当我们的程序首先运行起来后,逆向读取dex文件获取原来的apk文件通过DexClassLoader动态加载。
具体实现如下:
(1)修改原来apk的AndroidMainfest.xml文件,假如原来apk的AndroidMainfest.xml文件内容如下:
1. <application
2. android:icon="@drawable/ic_launcher"
3. android:label="@string/app_name"
4. android:theme="@style/AppTheme" android:name="com.android.MyApplication" >
5. </application>
修改后的内容如下:
1. <application
2. android:icon="@drawable/ic_launcher"
3. android:label="@string/app_name"
4. android:theme="@style/AppTheme" android:name="com.android.shellApplication" >
5. <meta-data android:name="APPLICATION_CLASS_NAME" android:value="com.android.MyApplication"/>
6. </application>
com.android.shellApplication这个就是我们的程序的的application的名称,而
7. <meta-data android:name="APPLICATION_CLASS_NAME" android:value="com.android.MyApplication"/>
是原来的apk的application名称。
(2)合并文件代码实现如下:
public class ShellTool {

  /**

   * @param args

   */

  public static void main(String[] args) {

         // TODO Auto-generated method stub

         try {

                File payloadSrcFile = new File("payload.apk");//我们要加壳的apk文件

                File unShellDexFile = new File("classes.dex");//我们的程序生成的dex文件

                byte[] payloadArray = encrpt(readFileBytes(payloadSrcFile));

                byte[] unShellDexArray = readFileBytes(unShellDexFile);

                int payloadLen = payloadArray.length;

                int unShellDexLen = unShellDexArray.length;

                int totalLen = payloadLen + unShellDexLen +4;

                byte[] newdex = new byte[totalLen];

                //添加我们程序的dex

                System.arraycopy(unShellDexArray, 0, newdex, 0, unShellDexLen);

                //添加要加壳的apk文件

                System.arraycopy(payloadArray, 0, newdex, unShellDexLen,

                              payloadLen);

                //添加apk文件长度

                System.arraycopy(intToByte(payloadLen), 0, newdex, totalLen-4, 4);

                        //修改DEX file size文件头

                fixFileSizeHeader(newdex);

                //修改DEX SHA1 文件头

                fixSHA1Header(newdex);

                //修改DEX CheckSum文件头

                fixCheckSumHeader(newdex);

                String str = "outdir/classes.dex";

                File file = new File(str);

                if (!file.exists()) {

                       file.createNewFile();

                }

                FileOutputStream localFileOutputStream = new FileOutputStream(str);

                localFileOutputStream.write(newdex);

                localFileOutputStream.flush();

                localFileOutputStream.close();

         } catch (Exception e) {

                // TODO Auto-generated catch block

                e.printStackTrace();

         }

  }

  //直接返回数据,读者可以添加自己加密方法

  private static byte[] encrpt(byte[] srcdata){

         return srcdata;

  }

  private static void fixCheckSumHeader(byte[] dexBytes) {

         Adler32 adler = new Adler32();

         adler.update(dexBytes, 12, dexBytes.length - 12);

         long value = adler.getValue();

         int va = (int) value;

         byte[] newcs = intToByte(va);

         byte[] recs = new byte[4];

         for (int i = 0; i < 4; i++) {

                recs[i] = newcs[newcs.length - 1 - i];

                System.out.println(Integer.toHexString(newcs[i]));

         }

         System.arraycopy(recs, 0, dexBytes, 8, 4);

         System.out.println(Long.toHexString(value));

         System.out.println();

  }

  public static byte[] intToByte(int number) {

         byte[] b = new byte[4];

         for (int i = 3; i >= 0; i--) {

                b[i] = (byte) (number % 256);

                number >>= 8;

         }

         return b;

  }

  private static void fixSHA1Header(byte[] dexBytes)

                throws NoSuchAlgorithmException {

         MessageDigest md = MessageDigest.getInstance("SHA-1");

         md.update(dexBytes, 32, dexBytes.length - 32);

         byte[] newdt = md.digest();

         System.arraycopy(newdt, 0, dexBytes, 12, 20);

         String hexstr = "";

         for (int i = 0; i < newdt.length; i++) {

                hexstr += Integer.toString((newdt[i] & 0xff) + 0x100, 16)

                              .substring(1);

         }

         System.out.println(hexstr);

  }

  private static void fixFileSizeHeader(byte[] dexBytes) {

         byte[] newfs = intToByte(dexBytes.length);

         System.out.println(Integer.toHexString(dexBytes.length));

         byte[] refs = new byte[4];

         for (int i = 0; i < 4; i++) {

                refs[i] = newfs[newfs.length - 1 - i];

                System.out.println(Integer.toHexString(newfs[i]));

         }

         System.arraycopy(refs, 0, dexBytes, 32, 4);

  }

  private static byte[] readFileBytes(File file) throws IOException {

         byte[] arrayOfByte = new byte[1024];

         ByteArrayOutputStream localByteArrayOutputStream = new ByteArrayOutputStream();

         FileInputStream fis = new FileInputStream(file);

         while (true) {

                int i = fis.read(arrayOfByte);

                if (i != -1) {

                       localByteArrayOutputStream.write(arrayOfByte, 0, i);

                } else {

                       return localByteArrayOutputStream.toByteArray();

                }

         }

  }

}
(3)在我们的程序中加载运行原来的apk文件,代码如下:
public class shellApplication extends Application {

  private static final String appkey = "APPLICATION_CLASS_NAME";

  private String apkFileName;

  private String odexPath;

  private String libPath;

  protected void attachBaseContext(Context base) {

         super.attachBaseContext(base);

         try {

                File odex = this.getDir("payload_odex", MODE_PRIVATE);

                File libs = this.getDir("payload_lib", MODE_PRIVATE);

                odexPath = odex.getAbsolutePath();

                libPath = libs.getAbsolutePath();

                apkFileName = odex.getAbsolutePath() + "/payload.apk";

                File dexFile = new File(apkFileName);

                if (!dexFile.exists())

                       dexFile.createNewFile();

                // 读取程序classes.dex文件

                byte[] dexdata = this.readDexFileFromApk();

                // 分离出解壳后的apk文件已用于动态加载

                this.splitPayLoadFromDex(dexdata);

                // 配置动态加载环境

                Object currentActivityThread = RefInvoke.invokeStaticMethod(

                              "android.app.ActivityThread", "currentActivityThread",

                              new Class[] {}, new Object[] {});

                String packageName = this.getPackageName();

                HashMap mPackages = (HashMap) RefInvoke.getFieldOjbect(

                              "android.app.ActivityThread", currentActivityThread,

                              "mPackages");

                WeakReference wr = (WeakReference) mPackages.get(packageName);

                DexClassLoader dLoader = new DexClassLoader(apkFileName, odexPath,

                              libPath, (ClassLoader) RefInvoke.getFieldOjbect(

                                            "android.app.LoadedApk", wr.get(), "mClassLoader"));

                RefInvoke.setFieldOjbect("android.app.LoadedApk", "mClassLoader",

                              wr.get(), dLoader);

         } catch (Exception e) {

                // TODO Auto-generated catch block

                e.printStackTrace();

         }

  }

  public void onCreate() {

         {

                // 如果源应用配置有Appliction对象,则替换为源应用Applicaiton,以便不影响源程序逻辑。

                String appClassName = null;

                try {

                       ApplicationInfo ai = this.getPackageManager()

                                     .getApplicationInfo(this.getPackageName(),

                                                   PackageManager.GET_META_DATA);

                       Bundle bundle = ai.metaData;

                       if (bundle != null

                                     && bundle.containsKey("APPLICATION_CLASS_NAME")) {

                              appClassName = bundle.getString("APPLICATION_CLASS_NAME");

                       } else {

                              return;

                       }

                } catch (NameNotFoundException e) {

                       // TODO Auto-generated catch block

                       e.printStackTrace();

                }

                Object currentActivityThread = RefInvoke.invokeStaticMethod(

                              "android.app.ActivityThread", "currentActivityThread",

                              new Class[] {}, new Object[] {});

                Object mBoundApplication = RefInvoke.getFieldOjbect(

                              "android.app.ActivityThread", currentActivityThread,

                              "mBoundApplication");

                Object loadedApkInfo = RefInvoke.getFieldOjbect(

                              "android.app.ActivityThread$AppBindData",

                              mBoundApplication, "info");

                RefInvoke.setFieldOjbect("android.app.LoadedApk", "mApplication",

                              loadedApkInfo, null);

                Object oldApplication = RefInvoke.getFieldOjbect(

                              "android.app.ActivityThread", currentActivityThread,

                              "mInitialApplication");

                ArrayList<Application> mAllApplications = (ArrayList<Application>) RefInvoke

                              .getFieldOjbect("android.app.ActivityThread",

                                            currentActivityThread, "mAllApplications");

                mAllApplications.remove(oldApplication);

                ApplicationInfo appinfo_In_LoadedApk = (ApplicationInfo) RefInvoke

                              .getFieldOjbect("android.app.LoadedApk", loadedApkInfo,

                                            "mApplicationInfo");

                ApplicationInfo appinfo_In_AppBindData = (ApplicationInfo) RefInvoke

                              .getFieldOjbect("android.app.ActivityThread$AppBindData",

                                            mBoundApplication, "appInfo");

                appinfo_In_LoadedApk.className = appClassName;

                appinfo_In_AppBindData.className = appClassName;

                Application app = (Application) RefInvoke.invokeMethod(

                              "android.app.LoadedApk", "makeApplication", loadedApkInfo,

                              new Class[] { boolean.class, Instrumentation.class },

                              new Object[] { false, null });

                RefInvoke.setFieldOjbect("android.app.ActivityThread",

                              "mInitialApplication", currentActivityThread, app);

                HashMap mProviderMap = (HashMap) RefInvoke.getFieldOjbect(

                              "android.app.ActivityThread", currentActivityThread,

                              "mProviderMap");

                Iterator it = mProviderMap.values().iterator();

                while (it.hasNext()) {

                       Object providerClientRecord = it.next();

                       Object localProvider = RefInvoke.getFieldOjbect(

                                     "android.app.ActivityThread$ProviderClientRecord",

                                     providerClientRecord, "mLocalProvider");

                       RefInvoke.setFieldOjbect("android.content.ContentProvider",

                                     "mContext", localProvider, app);

                }

                app.onCreate();

         }

  }

  private void splitPayLoadFromDex(byte[] data) throws IOException {

         byte[] apkdata = decrypt(data);

         int ablen = apkdata.length;

         byte[] dexlen = new byte[4];

         System.arraycopy(apkdata, ablen - 4, dexlen, 0, 4);

         ByteArrayInputStream bais = new ByteArrayInputStream(dexlen);

         DataInputStream in = new DataInputStream(bais);

         int readInt = in.readInt();

         System.out.println(Integer.toHexString(readInt));

         byte[] newdex = new byte[readInt];

         System.arraycopy(apkdata, ablen - 4 - readInt, newdex, 0, readInt);

         File file = new File(apkFileName);

         try {

                FileOutputStream localFileOutputStream = new FileOutputStream(file);

                localFileOutputStream.write(newdex);

                localFileOutputStream.close();

         } catch (IOException localIOException) {

                throw new RuntimeException(localIOException);

         }

         ZipInputStream localZipInputStream = new ZipInputStream(

                       new BufferedInputStream(new FileInputStream(file)));

         while (true) {

                ZipEntry localZipEntry = localZipInputStream.getNextEntry();

                if (localZipEntry == null) {

                       localZipInputStream.close();

                       break;

                }

                String name = localZipEntry.getName();

                if (name.startsWith("lib/") && name.endsWith(".so")) {

                       File storeFile = new File(libPath + "/"

                                     + name.substring(name.lastIndexOf('/')));

                       storeFile.createNewFile();

                       FileOutputStream fos = new FileOutputStream(storeFile);

                       byte[] arrayOfByte = new byte[1024];

                       while (true) {

                              int i = localZipInputStream.read(arrayOfByte);

                              if (i == -1)

                                     break;

                              fos.write(arrayOfByte, 0, i);

                       }

                       fos.flush();

                       fos.close();

                }

                localZipInputStream.closeEntry();

         }

         localZipInputStream.close();

  }

  private byte[] readDexFileFromApk() throws IOException {

         ByteArrayOutputStream dexByteArrayOutputStream = new ByteArrayOutputStream();

         ZipInputStream localZipInputStream = new ZipInputStream(

                       new BufferedInputStream(new FileInputStream(

                                     this.getApplicationInfo().sourceDir)));

         while (true) {

                ZipEntry localZipEntry = localZipInputStream.getNextEntry();

                if (localZipEntry == null) {

                       localZipInputStream.close();

                       break;

                }

                if (localZipEntry.getName().equals("classes.dex")) {

                       byte[] arrayOfByte = new byte[1024];

                       while (true) {

                              int i = localZipInputStream.read(arrayOfByte);

                              if (i == -1)

                                     break;

                              dexByteArrayOutputStream.write(arrayOfByte, 0, i);

                       }

                }

                localZipInputStream.closeEntry();

         }

         localZipInputStream.close();

         return dexByteArrayOutputStream.toByteArray();

  }

  // //直接返回数据,读者可以添加自己解密方法

  private byte[] decrypt(byte[] data) {

         return data;

  }
根据上面的讲述相信大家对apk的加壳技术有了一定的了解,下一篇我们将讲解另一种android apk防止反编译技术,期待大家的捧场。如果对这篇讲的技术有任何疑问及想要获得这篇文章讲的技术的工程源码
欢迎关注个人微信公众平台:程序员互动联盟(coder_online),扫一扫下方二维码或搜索微信号coder_online即可关注,我们可以在线交流。

android apk 防止反编译技术第一篇-加壳技术的更多相关文章
- android apk 防止反编译技术第三篇-加密
上一篇我们讲了apk防止反编译技术中的加壳技术,如果有不明白的可以查看我的上一篇博客http://my.oschina.net/u/2323218/blog/393372.接下来我们将介绍另一种防止a ...
- android apk 防止反编译技术第四篇-对抗JD-GUI
又到周末一个人侘在家里无事可干,这就是程序员的悲哀啊.好了我们利用周末的时间继续介绍android apk防止反编译技术的另一种方法.前三篇我们讲了加壳技术(http://my.oschina.net ...
- android apk 防止反编译技术第二篇-运行时修改字节码
上一篇我们讲了apk防止反编译技术中的加壳技术,如果有不明白的可以查看我的上一篇博客http://my.oschina.net/u/2323218/blog/393372.接下来我们将介绍另一种防止a ...
- android apk 防止反编译技术第二篇-运行时修改Dalvik指令
上一篇我们讲了apk防止反编译技术中的加壳技术,如果有不明白的可以查看我的上一篇博客http://my.oschina.net/u/2323218/blog/393372.接下来我们将介绍另一种防止a ...
- 转: android apk 防止反编译技术(1~5连载)
转: android apk 防止反编译技术 做android framework方面的工作将近三年的时间了,现在公司让做一下android apk安全方面的研究,于是最近就在网上找大量的资料来学习. ...
- Android Apk的反编译和加密
这几天在上海出差,忙里偷闲学习了一下Apk的反编译工具的基本使用.下面就简单介绍一下如何将我们从网上下载的Apk文件进行反编译得到我们想要获得的资源文件和源码. Android的应用程序APK文件说到 ...
- Android Apk的反编译与代码混淆
一.反编译 1.获取工具: 既然是反编译,肯定要用到一些相关的工具,工具可以到这里下载,里面包含三个文件夹,用于反编译,查看反编译之后的代码: 其实这两工具都是google官方出的,也可在google ...
- android apk 文件反编译
最近,自己坑逼的把一个android 项目修改版本的代码删除了.这个项目居然还没上传到源代码管理器.幸好还有apk文件,修改的代码也不多可以反编译一下. 1.下载 dex2jar 获取源码工具 地 ...
- android apk简单反编译
1. 查看或者提取资源文件: 使用谷歌官方工具apktool,命令行如下: apktool d xxx.apk xxx_decode d代表反编译,xxx.apk为你要反编译的apk,xxx_ ...
随机推荐
- 独树一帜的字符串匹配算法——RK算法
参加了雅虎2015校招,笔试成绩还不错,谁知初面第一题就被问了个字符串匹配,要求不能使用KMP,但要和KMP一样优,当时瞬间就呵呵了.后经过面试官的一再提示,也还是没有成功在面试现场写得.现将该算法记 ...
- Razor模板引擎(C#版)语法
1.简介: Razor 是一种标记语法,可以让您将基于服务器的代码(Visual Basic 和 C#)嵌入到网页中. 基于服务器的代码可以在网页传送给浏览器时,创建动态 Web 内容.当一个网页被请 ...
- ModSecurity CRS笔记[转]
转自:http://danqingdani.blog.163.com/blog/static/186094195201472304841643/ ModSecurity的规则因为奇怪的正则(可读性差? ...
- XMPP——Smack[1]连接、登陆及账户操作
临毕业前,应需求,花了三天写了个小的聊天工具,貌似简陋得很….若有机会再完善吧,目前毕业季,处理毕业事宜,还要准备即将的入职. 眼瞅着大学四年就这么结束了,哎. 开始吧,四篇博文简单介绍下基本实现,由 ...
- Postfix 电子邮件系统精要
来源: http://sery.blog.51cto.com/10037/45500 Postfix 电子邮件系统精要 作者:田逸(sery@163.com) from [url]http://ww ...
- BZOJ 2002: [Hnoi2010]Bounce 弹飞绵羊 LCT
2002: [Hnoi2010]Bounce 弹飞绵羊 Time Limit: 1 Sec Memory Limit: 256 MB 题目连接 http://www.lydsy.com/JudgeOn ...
- [Sciter系列] MFC下的Sciter–1.创建工程框架
Sciter SDK中提供的Win32下例程很多,唯独使用很多(对我个人而言)的MFC框架下Sciter程序的构建讲的很少,虽然MFC有这样那样的诟病,但是不可否认的是编写一般的小项目,这仍然是大 ...
- Nginx+Tomcat集群部署
为了获取更好的性能,我们常常需要将tomcat进行集群部署.下文通过nginx转发实现tomcat集群,并通过nginx-upstream-jvm-route插件保证session的粘滞. 应用场景环 ...
- 【项目经验】如何用TexturePacker & Physicseditor开发游戏
首先感谢Andreas的license.先广告一下Andreas. ------------------------------------------------------------------ ...
- [AngularJS] Best Practise - Resolve promises in router, defer controllers
See more:http://toddmotto.com/opinionated-angular-js-styleguide-for-teams/ /** * Created by Answer12 ...