
Android软件开发之EditText 详解(八)
EditText在API中的结构
java.lang.Object
android.view.View
android.widget.TextView
android.widget.EditText
已知直接子类:
AutoCompleteTextView, ExtractEditText
已知间接子类:
MultiAutoCompleteTextView
EditText是TextView的直接子类 所以EditText会继承父类TextView的一些方法。下面我用自己写的一个Demo 和大家详细的说明一下EditView的使用方法。
1.简单的EditText输入框
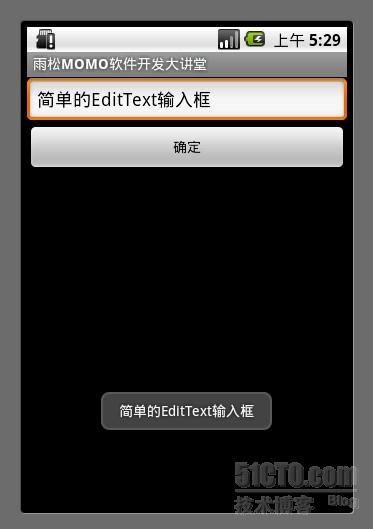
非常简单,在layout布局中配置一下EditText 在配置一个Button 在代码中监听Button 的事件 获取当前EditView中输入的内容并且显示出来。
- <?xml version="1.0" encoding="utf-8"?>
- <LinearLayout xmlns:android="http://schemas.android.com/apk/res/android"
- android:id="@+id/textviewll"
- android:orientation="vertical" android:layout_width="fill_parent"
- android:layout_height="fill_parent">
- <EditText
- android:id="@+id/sample_edit_text0"
- android:layout_width="fill_parent"
- android:layout_height="wrap_content"
- android:text="简单的EditText输入框"/>
- <Button
- android:id="@+id/sample_button0"
- android:layout_width="fill_parent" android:layout_height="wrap_content"
- android:text="确定"/>
- </LinearLayout>
- public class SampleActivity extends Activity {
- @Override
- protected void onCreate(Bundle savedInstanceState) {
- setContentView(R.layout.sample);
- final EditText editText0 = (EditText)findViewById(R.id.sample_edit_text0);
- Button button0 = (Button)findViewById(R.id.sample_button0);
- button0.setOnClickListener(new OnClickListener() {
- @Override
- public void onClick(View arg0) {
- String str = editText0.getText().toString();
- Toast.makeText(SampleActivity.this,str, Toast.LENGTH_LONG).show();
- }
- });
- super.onCreate(savedInstanceState);
- }
- }
在layout中配置信息
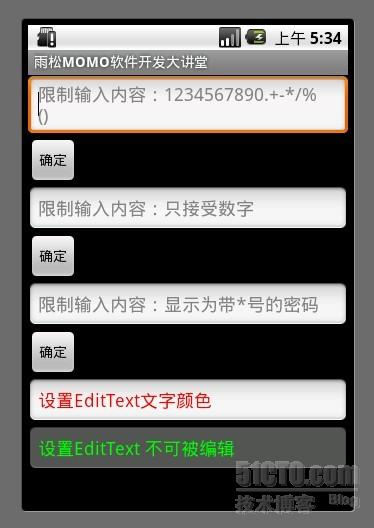
android:digits="1234567890.+-*/%\n()"
限制输入框中只能输入自己定义的这些字符串 如果输入其它将不予以显示
android:phoneNumber="true"
限制输入框中只能输入手机号码
android:password="true"
限制输入框中输入的任何内容将以"*"符号来显示
android:hint="默认文字"
输入内容前默认显示在输入框中的文字
android:textColorHint="#FF0000"
设置文字内容颜色
android:enabled="false"
设置输入框不能被编辑

3.编辑框中显示图片
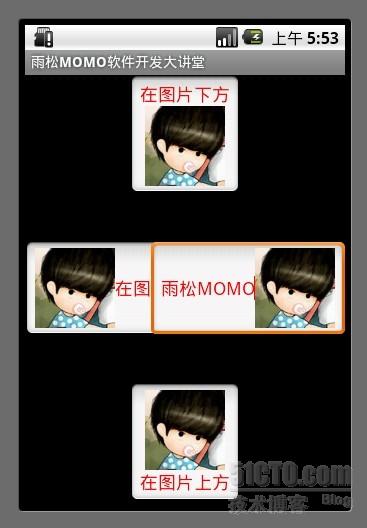
上一篇讲TextView中就讲过在TextView中添加图片的方法,因为EditText是TextView的子类, 所以当然也可以添加图片了,只是一旦在EditText中添加图片以后是不能删除的,如图所示我可以编辑图片旁边的内容,写入文字。
- <?xml version="1.0" encoding="utf-8"?>
- <RelativeLayout xmlns:android="http://schemas.android.com/apk/res/android"
- android:id="@+id/textviewll"
- android:orientation="vertical"
- android:layout_width="fill_parent"
- android:layout_height="fill_parent"
- >
- <EditText
- android:layout_width="wrap_content"
- android:layout_height="wrap_content"
- android:text="在图片下方"
- android:textColor="#FF0000"
- android:drawableBottom="@drawable/jay"
- android:layout_alignParentTop="true"
- android:layout_centerHorizontal="true"
- >
- </EditText>
- <EditText
- android:layout_width="wrap_content"
- android:layout_height="wrap_content"
- android:text="在图片上方"
- android:textColor="#FF0000"
- android:drawableTop="@drawable/jay"
- android:layout_alignParentBottom="true"
- android:layout_centerHorizontal="true"
- >
- </EditText>
- <EditText
- android:layout_width="wrap_content"
- android:layout_height="wrap_content"
- android:text="在图片左边"
- android:textColor="#FF0000"
- android:drawableLeft="@drawable/jay"
- android:layout_alignParentLeft="true"
- android:layout_centerVertical="true"
- >
- </EditText>
- <EditText
- android:layout_width="wrap_content"
- android:layout_height="wrap_content"
- android:text="在图片右边"
- android:textColor="#FF0000"
- android:drawableRight="@drawable/jay"
- android:layout_alignParentRight="true"
- android:layout_centerVertical="true"
- >
- </EditText>
- </RelativeLayout >
4.设置软键盘的Enter键
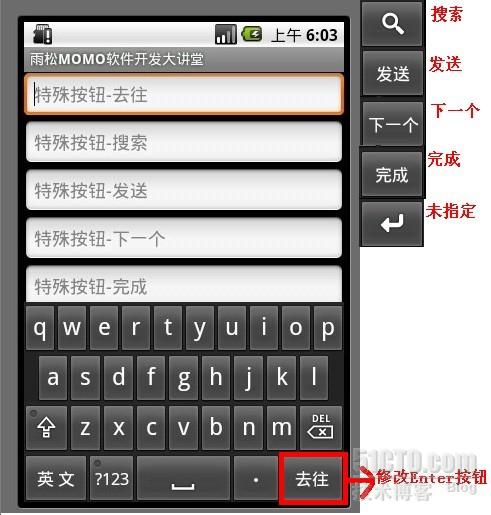
如图所示我们可以修改软键盘的Enter按钮的样式,可以在代码中监听 按钮点击事件。
- package cn.m15.xys;
- import android.app.Activity;
- import android.os.Bundle;
- import android.view.KeyEvent;
- import android.view.inputmethod.EditorInfo;
- import android.widget.EditText;
- import android.widget.TextView;
- import android.widget.Toast;
- import android.widget.TextView.OnEditorActionListener;
- public class KeyBoardActivity extends Activity {
- @Override
- protected void onCreate(Bundle savedInstanceState) {
- setContentView(R.layout.keyboard);
- EditText editText0 = (EditText)findViewById(R.id.txtTest0);
- editText0.setOnEditorActionListener(new OnEditorActionListener() {
- @Override
- public boolean onEditorAction(TextView arg0, int arg1, KeyEvent arg2) {
- if (arg1 == EditorInfo.IME_ACTION_GO) {
- Toast.makeText(KeyBoardActivity.this, "你点了软键盘'去往'按钮",
- Toast.LENGTH_SHORT).show();
- }
- return false;
- }
- });
- EditText editText1 = (EditText)findViewById(R.id.txtTest1);
- editText1.setOnEditorActionListener(new OnEditorActionListener() {
- @Override
- public boolean onEditorAction(TextView arg0, int arg1, KeyEvent arg2) {
- if (arg1 == EditorInfo.IME_ACTION_SEARCH) {
- Toast.makeText(KeyBoardActivity.this, "你点了软键盘'搜索'按钮",
- Toast.LENGTH_SHORT).show();
- }
- return false;
- }
- });
- EditText editText2 = (EditText)findViewById(R.id.txtTest2);
- editText2.setOnEditorActionListener(new OnEditorActionListener() {
- @Override
- public boolean onEditorAction(TextView arg0, int arg1, KeyEvent arg2) {
- if (arg1 == EditorInfo.IME_ACTION_SEND) {
- Toast.makeText(KeyBoardActivity.this, "你点了软键盘'发送'按钮",
- Toast.LENGTH_SHORT).show();
- }
- return false;
- }
- });
- EditText editText3 = (EditText)findViewById(R.id.txtTest3);
- editText3.setOnEditorActionListener(new OnEditorActionListener() {
- @Override
- public boolean onEditorAction(TextView arg0, int arg1, KeyEvent arg2) {
- if (arg1 == EditorInfo.IME_ACTION_NEXT) {
- Toast.makeText(KeyBoardActivity.this, "你点了软键盘'下一个'按钮",
- Toast.LENGTH_SHORT).show();
- }
- return false;
- }
- });
- EditText editText4 = (EditText)findViewById(R.id.txtTest4);
- editText4.setOnEditorActionListener(new OnEditorActionListener() {
- @Override
- public boolean onEditorAction(TextView arg0, int arg1, KeyEvent arg2) {
- if (arg1 == EditorInfo.IME_ACTION_DONE) {
- Toast.makeText(KeyBoardActivity.this, "你点了软键盘'完成'按钮",
- Toast.LENGTH_SHORT).show();
- }
- return false;
- }
- });
- EditText editText5 = (EditText)findViewById(R.id.txtTest5);
- editText5.setOnEditorActionListener(new OnEditorActionListener() {
- @Override
- public boolean onEditorAction(TextView arg0, int arg1, KeyEvent arg2) {
- if (arg1 == EditorInfo.IME_ACTION_UNSPECIFIED) {
- Toast.makeText(KeyBoardActivity.this, "你点了软键盘'未指定'按钮",
- Toast.LENGTH_SHORT).show();
- }
- return false;
- }
- });
- super.onCreate(savedInstanceState);
- }
- }
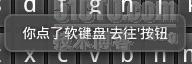
监听软键盘的点击事件
- <?xml version="1.0" encoding="utf-8"?>
- <LinearLayout xmlns:android="http://schemas.android.com/apk/res/android"
- android:id="@+id/textviewll"
- android:orientation="vertical" android:layout_width="fill_parent"
- android:layout_height="fill_parent">
- <EditText android:id="@+id/txtTest0"
- android:imeOptions="actionGo"
- android:layout_width="fill_parent"
- android:layout_height="wrap_content"
- android:hint="特殊按钮-去往"
- ></EditText>
- <EditText android:id="@+id/txtTest1"
- android:imeOptions="actionSearch"
- android:layout_width="fill_parent"
- android:layout_height="wrap_content"
- android:hint="特殊按钮-搜索"
- ></EditText>
- <EditText android:id="@+id/txtTest2"
- android:imeOptions="actionSend"
- android:layout_width="fill_parent"
- android:layout_height="wrap_content"
- android:hint="特殊按钮-发送"
- ></EditText>
- <EditText android:id="@+id/txtTest3"
- android:imeOptions="actionNext"
- android:layout_width="fill_parent"
- android:layout_height="wrap_content"
- android:hint="特殊按钮-下一个"
- ></EditText>
- <EditText android:id="@+id/txtTest4"
- android:imeOptions="actionDone"
- android:layout_width="fill_parent"
- android:layout_height="wrap_content"
- android:hint="特殊按钮-完成"
- ></EditText>
- <EditText android:id="@+id/txtTest5"
- android:imeOptions="actionUnspecified"
- android:layout_width="fill_parent"
- android:layout_height="wrap_content"
- android:hint="特殊按钮-未指定"
- ></EditText>
- </LinearLayout>
5.监听软键盘的按键事件
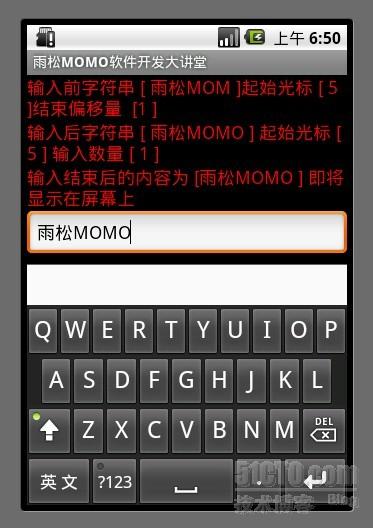
做项目的时候 有时候须要在用户输入内容时做检测,比如如果用户输入不合法的内容不予以显示在EditText中, 这时候我就要用到addTextChangedListener 用它来监听用户输入状态。可以在监听中改变用户输入的内容或者提示用户输入内容不合法等等。 如图所示我的每次输入操作都可以被正常的监听出来,用户输入内容的正常流程 beforeTextChanged() -》onTextChanged() -》afterTextChanged()然后是通知屏幕绘制 显示在屏幕上 所以我们可以在这三个方法中来修改用户输入内容 或者截取用户输入的内容。
- package cn.m15.xys;
- import android.app.Activity;
- import android.os.Bundle;
- import android.text.Editable;
- import android.text.TextWatcher;
- import android.widget.EditText;
- import android.widget.TextView;
- public class MonitorKeyActivity extends Activity {
- @Override
- protected void onCreate(Bundle savedInstanceState) {
- setContentView(R.layout.monitorkey);
- EditText editText = (EditText)findViewById(R.id.monitor_edit_text0);
- final TextView textView0 = (TextView)findViewById(R.id.monitor_text0);
- final TextView textView1 = (TextView)findViewById(R.id.monitor_text1);
- final TextView textView2 = (TextView)findViewById(R.id.monitor_text2);
- editText.addTextChangedListener(new TextWatcher() {
- @Override
- public void onTextChanged(CharSequence text, int start, int before, int count) {
- //text 输入框中改变后的字符串信息
- //start 输入框中改变后的字符串的起始位置
- //before 输入框中改变前的字符串的位置 默认为0
- //count 输入框中改变后的一共输入字符串的数量
- textView1.setText("输入后字符串 [ " + text.toString() + " ] 起始光标 [ " + start + " ] 输入数量 [ " + count+" ]");
- }
- @Override
- public void beforeTextChanged(CharSequence text, int start, int count,int after) {
- //text 输入框中改变前的字符串信息
- //start 输入框中改变前的字符串的起始位置
- //count 输入框中改变前后的字符串改变数量一般为0
- //after 输入框中改变后的字符串与起始位置的偏移量
- System.out.println(text.toString());
- textView0.setText("输入前字符串 [ " + text.toString() + " ]起始光标 [ " + start + " ]结束偏移量 [" + after + " ]");
- }
- @Override
- public void afterTextChanged(Editable edit) {
- //edit 输入结束呈现在输入框中的信息
- textView2.setText("输入结束后的内容为 [" + edit.toString()+" ] 即将显示在屏幕上");
- }
- });
- super.onCreate(savedInstanceState);
- }
- }
- <?xml version="1.0" encoding="utf-8"?>
- <LinearLayout xmlns:android="http://schemas.android.com/apk/res/android"
- android:id="@+id/textviewll"
- android:orientation="vertical" android:layout_width="fill_parent"
- android:layout_height="fill_parent">
- <TextView
- android:id="@+id/monitor_text0"
- android:layout_width="fill_parent"
- android:layout_height="wrap_content"
- android:textSize="18dip"
- android:textColor="#FF0000"/>
- <TextView
- android:id="@+id/monitor_text1"
- android:layout_width="fill_parent"
- android:layout_height="wrap_content"
- android:textSize="18dip"
- android:textColor="#FF0000"
- />
- <TextView
- android:id="@+id/monitor_text2"
- android:layout_width="fill_parent"
- android:layout_height="wrap_content"
- android:textSize="18dip"
- android:textColor="#FF0000"
- />
- <EditText
- android:id="@+id/monitor_edit_text0"
- android:layout_width="fill_parent"
- android:layout_height="wrap_content"
- android:hint="监听软键盘按键的输入状态"/>
- </LinearLayout>
雨松MOMO希望可以和大家一起进步。
本文出自 “雨松MOMO的程序世界” 博客,请务必保留此出处http://xys289187120.blog.51cto.com/3361352/657189
Android软件开发之EditText 详解(八)的更多相关文章
- Android软件开发之EditText 详解
EditText在API中的结构 java.lang.Objectandroid.view.Viewandroid.widget.TextView android.widget.Edit ...
- Android软件开发之ListView 详解【转】
ListView的使用方法 ListView是Android软件开发中非常重要组件之一,基本上是个软件基本都会使用ListView ,今天我通过一个demo来教大家怎么样使用ListView组件 绘 ...
- 【Android】Android软件开发之ListView 详解
原创作品,允许转载,转载时请务必以超链接形式标明文章 原始出处 .作者信息和本声明.否则将追究法律责任.http://xys289187120.blog.51cto.com/3361352/65717 ...
- Android开发之EditText 详解(addTextChangedListener监听用户输入状态)
为了实现像qq或者微信输入框的效果,当在 EditText输入字符串时发送按钮显示,当输入框字符消除掉时按钮改变.所以这时候我就要用到addTextChangedListener 用它来监听用户输入状 ...
- Android开发之InstanceState详解
Android开发之InstanceState详解 本文介绍Android中关于Activity的两个神秘方法:onSaveInstanceState() 和 onRestoreInstanceS ...
- Android开发之InstanceState详解(转)---利用其保存Activity状态
Android开发之InstanceState详解 本文介绍Android中关于Activity的两个神秘方法:onSaveInstanceState() 和 onRestoreInstanceS ...
- Android开发之MdiaPlayer详解
Android开发之MdiaPlayer详解 MediaPlayer类可用于控制音频/视频文件或流的播放,我曾在<Android开发之基于Service的音乐播放器>一文中介绍过它的使用. ...
- android软件开发之webView.addJavascriptInterface循环渐进【一】
本篇文章由:http://www.sollyu.com/android-software-development-webview-addjavascriptinterface-cycle-of-gra ...
- android软件开发之webView.addJavascriptInterface循环渐进【二】
本篇文章由:http://www.sollyu.com/android-software-development-webview-addjavascriptinterface-cycle-of-gra ...
随机推荐
- Go开发环境与LIteIDE安装、配置、搭建
Go开发环境搭建 1.下载准备好安装包(Go-1.8.3.Git-2.9.2-64-bit) 下载链接:http://www.golangtc.com/download 2.配置环境变量 系统变量:新 ...
- json数据 提示框flash.now[:notice] flash.now[:alert]
实现json.做出提示框 1.在controller中使用flash.now[:alert] = "str"方法来做print def topodata #@vnic = Vnic ...
- 我们要注意的Mysql基本安全设置
1.设置或修改Mysql root密码:默认安装后空密码,以mysqladmin命令设置密码: mysqladmin -uroot password "password" Mysq ...
- 在网页中使用SVG
SVG可以作为一个独立的文件存在.但更多的时候,我们希望他能集成在某个更大的文档中,比如HTML.将SVG插入到HTML中主要有以下几种方式: 将 SVG 作为图像导入 将 SVG放入 iframe ...
- js学习笔记28----事件默认行为
事件默认行为 : 当一个事件发生的时候浏览器自己会默认做的事情. 怎么阻止? 当前这个行为是什么事件触发的,然后在这个事件的处理函数中使用return false; 右键菜单事件 oncont ...
- 12款优秀jQuery Ajax分页插件和教程
在这篇文章中,我为大家收集了12个基于 jQuery 框架的 Ajax 分页插件,这些插件都提供了详细的使用教程和演示.Ajax 技术的出现使得 Web 项目的用户体验有了极大的提高,如今借助优秀的 ...
- TensorFlow基础笔记(15) 编译TensorFlow.so,提供给C++平台调用
参考 http://blog.csdn.net/rockingdingo/article/details/75452711 https://www.cnblogs.com/hrlnw/p/700764 ...
- 【转】MFC 数据绑定 DoDataExchange( )
void CRegisterDialog::DoDataExchange(CDataExchange* pDX) { CDialog::DoDataExchange(pDX); //{{AFX_DAT ...
- 【Java面试题】39 Set里的元素是不能重复的,那么用什么方法来区分重复与否呢? 是用==还是equals()? 它们有何区别?
1.什么是Set?(what) Set是Collection容器的一个子接口,它不允许出现重复元素,当然也只允许有一个null对象. 2.如何来区分重复与否呢?(how) “ 用 iterator() ...
- bootstrap table使用指南
Bootstrap table是国人开发的一款基于 Bootstrap 的 jQuery 表格插件,通过简单的设置,就可以拥有强大的单选.多选.排序.分页,以及编辑.导出.过滤(扩展)等等的功能. 目 ...