android开发------编写用户界面之线性布局
一个好的应用程序离不开人性化的用户界面。在学习其他东西之前。理应先学习编写程序的布局(外观)
今天,我们就来学习android的UI布局----LinearLayout。
LinearLayout,即线性布局。从名字我们就可以知道,它的元素是线型排列的。
注意:在以后的部分代码编写当中,我们采用硬编码的方式将字符串值写入android:text等标签中,
不会另外在strings.xml文件中定义字符串值,这个时候eclipse IDE会出现黄色的下划线警告,我们忽略就可以了
主要知识点:
android:layout_width
android:layout_height
android:orientation
android:id
我们先创建一个名叫Layouts的项目,项目名称首字母记得大写,虽然不是必须,但这是一个最佳实践。
我们依然用layouts目录下的activity_main.xml文件作为示范,不多说,直接上代码
 <LinearLayout

     android:layout_width="fill_parent"

     android:layout_height="fill_parent"

     android:orientation="vertical"

     xmlns:android="http://schemas.android.com/apk/res/android">

     <TextView

         android:layout_width="wrap_content"

         android:layout_height="wrap_content"

         android:text="请输入登录信息"

         android:textSize="20sp"

         android:layout_gravity="center"/>

     <EditText

         android:id="@+id/userName"

         android:layout_width="fill_parent"

         android:layout_height="wrap_content"

         android:layout_marginTop="10dp"

         android:hint="输入你的用户名"/>

     <EditText

         android:id="@+id/passwd"

         android:password="true"

         android:layout_width="fill_parent"

         android:layout_height="wrap_content"

         android:layout_marginTop="18dp"

         android:hint="输入你的密码" />

     <Button

         android:id="@+id/btnLogin"

         android:layout_width="wrap_content"

         android:layout_height="wrap_content"

         android:text="登录"

         android:layout_gravity="center" />

 </LinearLayout>
看一下运行效果
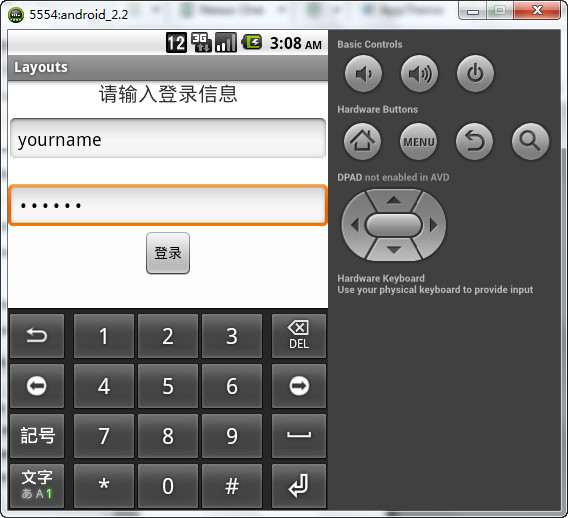
接下来我们解释一下代码的结构和原理
我们编写了一个LinearLayout的布局,需要注意的是,LinearLayout标签必须是一个根元素,它的外面不能出现任何元素。但是里面能嵌套任何布局元素。即,最外层的布局不能有兄弟元素(同级元素)
因此,下面的情况不能出现
<LinearLayout

    android:layout_width="fill_parent"

    android:layout_height="wrap_content"

    android:orientation="vertical"

    xmlns:android="http://schemas.android.com/apk/res/android">

   <!-- 其他元素 -->

</LinearLayout>

<LinearLayout

    android:layout_width="fill_parent"

    android:layout_height="wrap_content"

    android:orientation="vertical">

    <!-- 其他元素 -->

</LinearLayout>
现在知道什么是线性布局了吧
它们一个跟在另一个的后面排列,就像一条线一样。
认识新标签:
<TextView />:我们昨天说过,不再重复
<EditText />:文本框,用于接收用户的输入
<Button />:按钮,当用户点击的时候处理相应的事件
设置元素属性:
我们主要简单说一下下面的几个属性,其他的可以自己研究一下。
android:layout_width="fill_parent"
layout_width: 设置元素长度,值可以是fill_parent(填充父元素,最外层的父元素就是Activity窗体)、wrap_content(根据内容的长度自适应)、或者用单位控制,如10dp,20dp,100dp等等
android:layout_height="fill_parent"
layout_height: 设置元素高度,layout_width的设置同样适用于layout_height
android:orientation="vertical"
orientation:布局的排列方向,值可以是vertical(垂直)和horizontal(水平),如果忽略这个属性,默认是horizontal
android:layout_gravity="center"
layout_gravity:元素的对齐方向,常用的有right,left,center等,有多个值可以选择,这里就自己测试吧,多动手,学得快。
android:id="@+id/idName"
android:id: 为元素添加一个独一无二的身份标识。@符号的作用我们说过了。那么+号的作用又是什么呢?
当我们第一次为一个元素添加一个身份标识的时候,就需要用到+号,这样,程序编译的时候,就会在gen目录下的R.java文件中生成一个资源ID,
以后我们就可以通过这个ID引用这个标签中的内容。
除了添加自己的ID名称之外,我们还可以使用android内置的ID。这个时候+号就不需要了,如:
@android:id/list、@android:id/empty
这样,我们定义的元素就会使用android.R类中预先定义的ID值
上面的使用方法,以后会说到,这里不进一步解释。
那么,第二个文本框中的效果又是怎样实现的呢
很简单,就是android:password="true",这样,我们看到的就是一个个黑点,而不是我们输入的字母和数字等
上面的代码中,android:orientation的值是vertical,现在我们将它换成horizontal,看又是什么情况
<LinearLayout

    android:layout_width="fill_parent"

    android:layout_height="fill_parent"

    android:orientation="horizontal"

    xmlns:android="http://schemas.android.com/apk/res/android">

    <EditText

        android:layout_width="0dp"

        android:layout_weight="1"

        android:layout_height="wrap_content"

        android:hint="send message"/>

    <Button

        android:layout_width="wrap_content"

        android:layout_height="wrap_content"

        android:text="发送"/>

</LinearLayout>
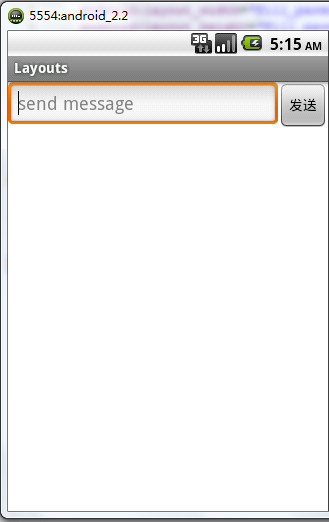
没有错,元素现在向水平方向排列,我们再添加多几个元素看看
<LinearLayout

    android:layout_width="fill_parent"

    android:layout_height="fill_parent"

    android:orientation="horizontal"

    xmlns:android="http://schemas.android.com/apk/res/android">

    <TextView

        android:layout_width="wrap_content"

        android:layout_height="wrap_content"

        android:text="信息标题:"/>

    <EditText

        android:layout_width="0dp"

        android:layout_height="wrap_content"

        android:layout_weight="1"

        android:hint="message title here"/>

    <TextView

        android:layout_width="wrap_content"

        android:layout_height="wrap_content"

        android:text="message content"/>

    <EditText

        android:layout_width="wrap_content"

        android:layout_height="wrap_content"

        android:hint="message title here"/>

    <Button

        android:id="@+id/btnSend"

        android:layout_width="wrap_content"

        android:layout_height="wrap_content"

        android:text="发送"/>

</LinearLayout>
运行效果:
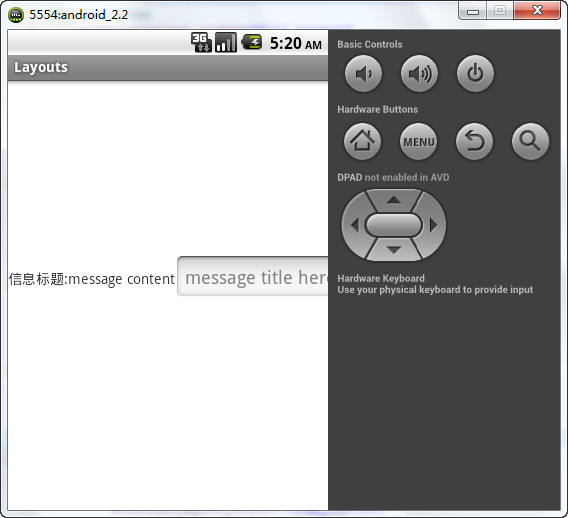
乱套了,为什么
当水平排列的时候,如果元素的长度超过activity本身的长度的时候,元素就会溢出,导致部分元素无法显示。
我们先不管android:layout_weight="1"是什么,也不管为什么要将android:layout_width的值设置为0dp。后面会说。
现在,我们应该对LinearLayout有所了解了。代码最好自己敲一次,这样学习才有意思
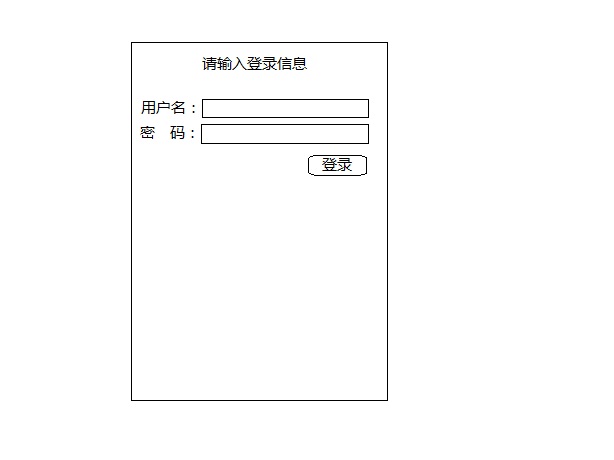
那么我就布置一道简单的练习题吧
请用LinearLayout完成下图中的布局
android开发------编写用户界面之线性布局的更多相关文章
- android开发------编写用户界面之线性布局(补充知识)
在前面的文章中 http://www.cnblogs.com/ai-developers/p/android_linearlayout.html 我们看到了布局中有这样一个属性: layout_wei ...
- android开发------编写用户界面之相对布局
今天要说的是RelativeLayout.RelativeLayout相对于LinearLayout的主要不同点在于它需要一个参照物. 我们先来看一下官方对这个布局的解释: RelativeLayou ...
- Android开发之详解五大布局
http://bbs.chinaunix.net/thread-3654213-1-1.html 为了适应各式各样的界面风格,Android系统提供了5种布局,这5种布局分别是: LinearLayo ...
- Android开发之玩转FlexboxLayout布局
在这之前,我曾认真的研究过鸿洋大神的Android 自定义ViewGroup 实战篇 -> 实现FlowLayout,按照大神的思路写出了一个流式布局,所有的东西都是难者不会会者不难,当自己能自 ...
- android 开发 RecyclerView 横排列列表布局
1.写一个一竖的自定义布局: <?xml version="1.0" encoding="utf-8"?> <LinearLayout xml ...
- Android之UI编程(一):线性布局
package com.example.fk_layout; import android.app.Activity; import android.os.Bundle; public class L ...
- android开发4:Android布局管理器1(线性布局,相对布局RelativeLayout-案例)
控件类概述 View 可视化控件的基类 属性名称 对应方法 描述 android:background setBackgroundResource(int) 设置背景 android:clickabl ...
- Android开发自学笔记(Android Studio)—4.1布局组件
一.引言 Android的界面是有布局和组件协同完成的,布局好比是建筑里的框架,而组件则相当于建筑里的砖瓦.组件按照布局的要求依次排列,就组成了用户所看见的界面.在Android4.0之前,我们通常说 ...
- Android开发1:基本UI界面设计——布局和组件
前言 啦啦啦~本学期要开始学习Android开发啦~ 博主在开始学习前是完完全全的小白,只有在平时完成老师要求的实验的过程中一步一步学习~从此篇博文起,博主将开始发布Android开发有关的博文,希望 ...
随机推荐
- jquery 获取设置值、添加元素详解
jQuery 获取内容和属性 jQuery DOM 操作 jQuery 中非常重要的部分,就是操作 DOM 的能力. jQuery 提供一系列与 DOM 相关的方法,这使访问和操作元素和属性变得很容易 ...
- 阻塞通信之Socket编程
Socket通信,主要是基于TCP协议的通信.本文从Socket通信(代码实现).多线程并发.以及TCP协议相关原理方面 介绍 阻塞Socket通信一些知识. 本文从服务器端的视角,以“Echo Se ...
- POJ 3449 Geometric Shapes --计算几何,线段相交
题意: 给一些多边形或线段,输出与每一个多边形或线段的有哪一些多边形或线段. 解法: 想法不难,直接暴力将所有的图形处理成线段,然后暴力枚举,相交就加入其vector就行了.主要是代码有点麻烦,一步一 ...
- POJ2955Brackets[区间DP]
Brackets Time Limit: 1000MS Memory Limit: 65536K Total Submissions: 6585 Accepted: 3534 Descript ...
- Unity 5.3 安装完没有Android(安卓)或IOS Module(模块)?
Unity5.3 模块独立 Unity5.3把各个模块分开来了,主程序安装包更轻巧,在官网下载的话,能下载到 Unity安装程序,Unity编辑器等一些资源package,其它的模块可以通过Unity ...
- C# Enum 进行逻辑运算
Enum定义 enum 全称(Enumeration),即一种由一组称为枚举数列表的命名常量组成的独特类型. 通常情况下,最好是在命名空间內直接定义 enum,以便该命名空间中所有的类都能够同样方便地 ...
- Windows 10 UWP开发:如何不让界面卡死
http://edi.wang/post/2016/2/18/windows-10-uwp-async-await-ui-thread 关于UI线程 这里我们需要一点关于 UI 线程模型的概念,简单的 ...
- Flex数据绑定陷阱(一)
Flex数据绑定陷阱:常见的误用和错误 当构建Flex或者Adobe AIR程序时,将一个对象的值自动的传递给另一个对象这种处理是数据绑定最常 用并最有用的特征之一. 尽管如此,同时数据绑定会减缓程序 ...
- bzoj2438[中山市选2011]杀人游戏
Description 一位冷血的杀手潜入 Na-wiat,并假装成平民.警察希望能在 N 个人里面, 查出谁是杀手. 警察能够对每一个人进行查证,假如查证的对象是平民,他会告诉警察,他 认识的人, ...
- hdu 1166
敌兵布阵 Time Limit: 2000/1000 MS (Java/Others) Memory Limit: 65536/32768 K (Java/Others) Total Submi ...