v8环境搭建采坑记录
项目组有把js接入C++服务求的需求,故开始了v8接入的工作,用了一天多时间,v8才在centos环境上成功安装,过程中踩了很多坑,下面将采坑过程记录如下:


#How to compile and install v8 and v8js on CentOS 7
#https://velenux.wordpress.com/2018/04/17/how-to-compile-and-install-v8-and-v8js-on-centos-7/

#v8在centos下的编译安装脚本
#!/bin/bash

set -x  # debug
set -e  # exit on all errors

# update and install basic packages
sudo yum -y upgrade #right
sudo yum -y --enablerepo=epel --enablerepo=remi-php71 install git subversion make gcc-c++ chrpath redhat-lsb-core php php-devel php-pear #right

mkdir -p local/src #right

# install the depot tools from google
git clone https://chromium.googlesource.com/chromium/tools/depot_tools.git local/depot_tools #需要vpn啊,没有vpn的话,该命令不必执行,可以使用github上的镜像(最终是用github镜像成功安装了v8)
export PATH=$PATH:$PWD/local/depot_tools   #right

# install v8
cd local/src  #right
fetch v8 #需要vpn啊,没有vpn的话,该命令不必执行,可以直接使用github镜像(最终是用github镜像成功安装了v8)
cd v8  #right
//检查下载v8的依赖包
gclient sync --with_branch_heads --with_tags -Rv --disable-syntax-validation  #right
#在上面这个命令执行时,可能会提示
client not configured; see 'gclient config'
那么需要我们对gclient进行配置,方法如下,执行如下命令
gclient config https://chromium.googlesource.com/v8/v8   #right

./tools/dev/v8gen.py -vv x64.release -- is_debug=false is_official_build=true is_component_build=true is_cfi=false is_clang=false v8_use_external_startup_data=false treat_warnings_as_errors=false  use_custom_libcxx=false use_gold=false  #right,非常关键(尤其是use_custom_libcxx、is_clang、v8_use_external_startup_data这三个编译选项的配置),非常重要,这里的编译选项配置如果不正确,在下面的编译和代码执行过程中会出现各种问题,具体出现的问题都罗列在了下面的”问题解决描述“中

time ninja -C out.gn/x64.release #编译  #right
time ./tools/run-tests.py --gn   #right
#v8 install
mkdir -p /opt/v8/{lib,include}

cd /home/ldx/software/v8-instal/v8
/bin/cp -v out.gn/x64.release/lib*.so out.gn/x64.release/*_blob.bin out.gn/x64.release/icudtl.dat /opt/v8/lib/
/bin/cp -v out.gn/x64.release/lib*.so out.gn/x64.release/*_blob.bin out.gn/x64.release/icudtl.dat /usr/lib64
/bin/cp -v out.gn/x64.release/lib*.so out.gn/x64.release/*_blob.bin out.gn/x64.release/icudtl.dat /usr/local/lib
/bin/cp -vR include/* /opt/v8/include/

#并配置环境变量(PATH、LIB、LD_LIB、INCLUDE_PATH)
#使用了v8库的c++代码的编译方法
g++ -o main xx.cpp -std=c++11 -lpthread -lv8 -lv8_libplatform

#生成可执行文件后,即可运行:
./main
源代码hello-world.cc(v8/sample下面的示例文件)内容如下:
// Copyright 2015 the V8 project authors. All rights reserved.
// Use of this source code is governed by a BSD-style license that can be
// found in the LICENSE file.

#include <stdio.h>
#include <stdlib.h>
#include <string.h>

#include "include/libplatform/libplatform.h"
#include "include/v8.h"

int main(int argc, char* argv[]) {
  // Initialize V8.
  v8::V8::InitializeICUDefaultLocation(argv[]);
  v8::V8::InitializeExternalStartupData(argv[]);
  std::unique_ptr<v8::Platform> platform = v8::platform::NewDefaultPlatform();
  v8::V8::InitializePlatform(platform.get());
  v8::V8::Initialize();

  // Create a new Isolate and make it the current one.
  v8::Isolate::CreateParams create_params;
  create_params.array_buffer_allocator =
      v8::ArrayBuffer::Allocator::NewDefaultAllocator();
  v8::Isolate* isolate = v8::Isolate::New(create_params);
  {
    v8::Isolate::Scope isolate_scope(isolate);

    // Create a stack-allocated handle scope.
    v8::HandleScope handle_scope(isolate);

    // Create a new context.
    v8::Local<v8::Context> context = v8::Context::New(isolate);

    // Enter the context for compiling and running the hello world script.
    v8::Context::Scope context_scope(context);

    {
      // Create a string containing the JavaScript source code.
      v8::Local<v8::String> source =
          v8::String::NewFromUtf8(isolate, "'Hello' + ', World!'",
                                  v8::NewStringType::kNormal)
              .ToLocalChecked();

      // Compile the source code.
      v8::Local<v8::Script> script =
          v8::Script::Compile(context, source).ToLocalChecked();

      // Run the script to get the result.
      v8::Local<v8::Value> result = script->Run(context).ToLocalChecked();

      // Convert the result to an UTF8 string and print it.
      v8::String::Utf8Value utf8(isolate, result);
      printf("%s\n", *utf8);
    }

    {
      // Use the JavaScript API to generate a WebAssembly module.
      //
      // |bytes| contains the binary format for the following module:
      //
      //     (func (export "add") (param i32 i32) (result i32)
      //       get_local 0
      //       get_local 1
      //       i32.add)
      //
      const char* csource = R"(
        let bytes = new Uint8Array([
          0x00, 0x61, 0x73, 0x6d, 0x01, 0x00, 0x00, 0x00, 0x01, 0x07, 0x01,
          0x60, 0x02, 0x7f, 0x7f, 0x01, 0x7f, 0x03, 0x02, 0x01, 0x00, 0x07,
          0x07, 0x01, 0x03, 0x61, 0x64, 0x64, 0x00, 0x00, 0x0a, 0x09, 0x01,
          0x07, 0x00, 0x20, 0x00, 0x20, 0x01, 0x6a, 0x0b
        ]);
        let module = new WebAssembly.Module(bytes);
        let instance = new WebAssembly.Instance(module);
        instance.exports.add(, );
      )";

      // Create a string containing the JavaScript source code.
      v8::Local<v8::String> source =
          v8::String::NewFromUtf8(isolate, csource, v8::NewStringType::kNormal)
              .ToLocalChecked();

      // Compile the source code.
      v8::Local<v8::Script> script =
          v8::Script::Compile(context, source).ToLocalChecked();

      // Run the script to get the result.
      v8::Local<v8::Value> result = script->Run(context).ToLocalChecked();

      // Convert the result to a uint32 and print it.
      uint32_t number = result->Uint32Value(context).ToChecked();
      printf("3 + 4 = %u\n", number);
    }
  }

  // Dispose the isolate and tear down V8.
  isolate->Dispose();
  v8::V8::Dispose();
  v8::V8::ShutdownPlatform();
  delete create_params.array_buffer_allocator;
  ;
}
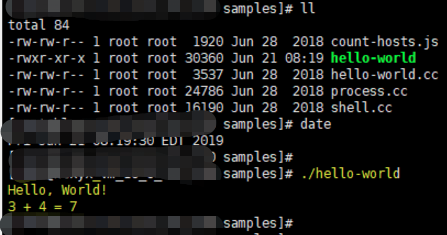
运行结果如下:
下面都是环境准备中遇到的问题:
1 GCC升级
//gcc升级
CentOS把最新的开发者工具包放到了一个名为centos-release-scl的源仓库中,名称是devtools-。GCC已经升级到7.1版本,CentOS目前尚未跟进,最高版本是devtools-,其中包含GCC 6.2.1版本。具体做法如下:

sudo yum install centos-release-scl

scl enable devtoolset- bash
\*

# 执行以下命令的一条,分别切换到 , , ,
# source /opt/rh/devtoolset-/enable
# source /opt/rh/devtoolset-/enable
# source /opt/rh/devtoolset-/enable
# source /opt/rh/devtoolset-/enable

gcc -v

#然后设置下环境变量即可,不修改系统的gcc
GCCPath=/opt/rh/devtoolset-/root/usr
export CC=$GCCPath/bin/gcc
export CXX=$GCCPath/bin/g++
export CPP=$GCCPath/bin/cpp
export LD=$GCCPath/bin/g++
export LIBRARY_PATH=$GCCPath/lib64:$LIBRARY_PATH
export LD_LIBRARY_PATH=$GCCPath/lib64:$LD_LIBRARY_PATH

//gcc源码编译升级到支持C++14的gcc5+
.tar.gz
cd
./contrib/download_prerequisites #下载依赖项
cd ../
mkdir build
cd build
../configure --enable-checking=release --enable-languages=c,c++ --enable-multilib  #--enable-multilib  --disable-multilib
make -j4  #多核编译
make install
gcc -v
2 问题解决:Undefined reference to v8::platform::NewDefaultPlatform
#问题解决:
Undefined reference to v8::platform::NewDefaultPlatform
#解决方法:
./tools/dev/v8gen.py -vv x64.release增加以下选项设置:
Building with GN args:

     is_debug: false,
     is_official_build: true,
     is_component_build: true,
     is_cfi: false,
     is_clang: false,
     v8_use_external_startup_data: false,
     treat_warnings_as_errors: false,
     use_custom_libcxx: false,
     use_sysroot: false,
     use_gold: false
3 问题解决:software/v8-instal/local/depot_tools/ninja-linux64: /usr/lib64/libc.so.6: version `GLIBC_2.18' not found (required by /usr/lib64/libstdc++.so.6)
//解决software/v8-instal/local/depot_tools/ninja-linux64: /usr/lib64/libc.so.6: version `GLIBC_2.18' not found (required by /usr/lib64/libstdc++.so.6)
curl -O http://ftp.gnu.org/gnu/glibc/glibc-2.18.tar.gz
tar zxf glibc-2.18.tar.gz
cd glibc-2.18/
mkdir build
cd build/ .
./configure --prefix=/usr
make -j2
make install
4 问题解决:g++: error: unrecognized command line option ‘-std=gnu++14’
需要将GCC升级到5+
//问题解决1
g++: error: unrecognized command line option ‘-std=gnu++’

解决方法:
Since Folly uses modern language and library features, GCC 4.8 is no longer supported.
GCC 4.9 currently works, but only as long as select internal projects require.
Best to use GCC +.
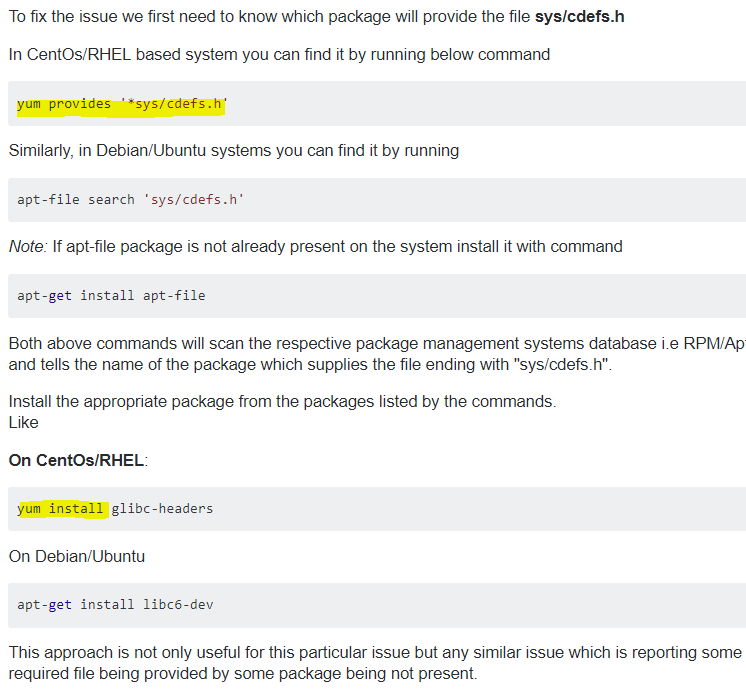
5 问题解决:
//问题解决
./../build/linux/debian_sid_amd64-sysroot/usr/include/features.h::: fatal error: sys/cdefs.h: No such file or directory

解决方法:
apt-get --reinstall install libc6 libc6-dev //ubuntu环境
apt-get install gcc-multilib//ubuntu环境

//centos环境
find / -name "cdefs.h" // 系统中存在该文件/usr/include/sys/cdefs.h

vim /etc/profile
增加几行:
C_INCLUDE_PATH=/usr/include/ #gcc找到头文件的路径
export C_INCLUDE_PATH

CPLUS_INCLUDE_PATH=$CPLUS_INCLUDE_PATH #g++找到头文件的路径
export CPLUS_INCLUDE_PATH

并执行:
source /etc/profile
6 问题解决:
../../third_party/binutils/Linux_x64/Release/bin/ld.gold: error: cannot open crti.o: No such file or directory
配置动态链接库
//问题解决3
../../third_party/binutils/Linux_x64/Release/bin/ld.gold: error: cannot open crti.o: No such file or directory
find / -name "crti.o" // 首先查看系统中是否存在该文件/usr/lib/crti.o和/usr/lib64/crti.o

vim /etc/profile
增加几行:

LD_LIBRARY_PATH=$LD_LIBRARY_PATH:/usr/lib #找到动态链接库的路径
export LD_LIBRARY_PATH

LIBRARY_PATH=$LIBRARY_PATH:/usr/lib #找到静态库的路径
export LIBRARY_PATH

并执行:
source /etc/profile
7 问题解决:
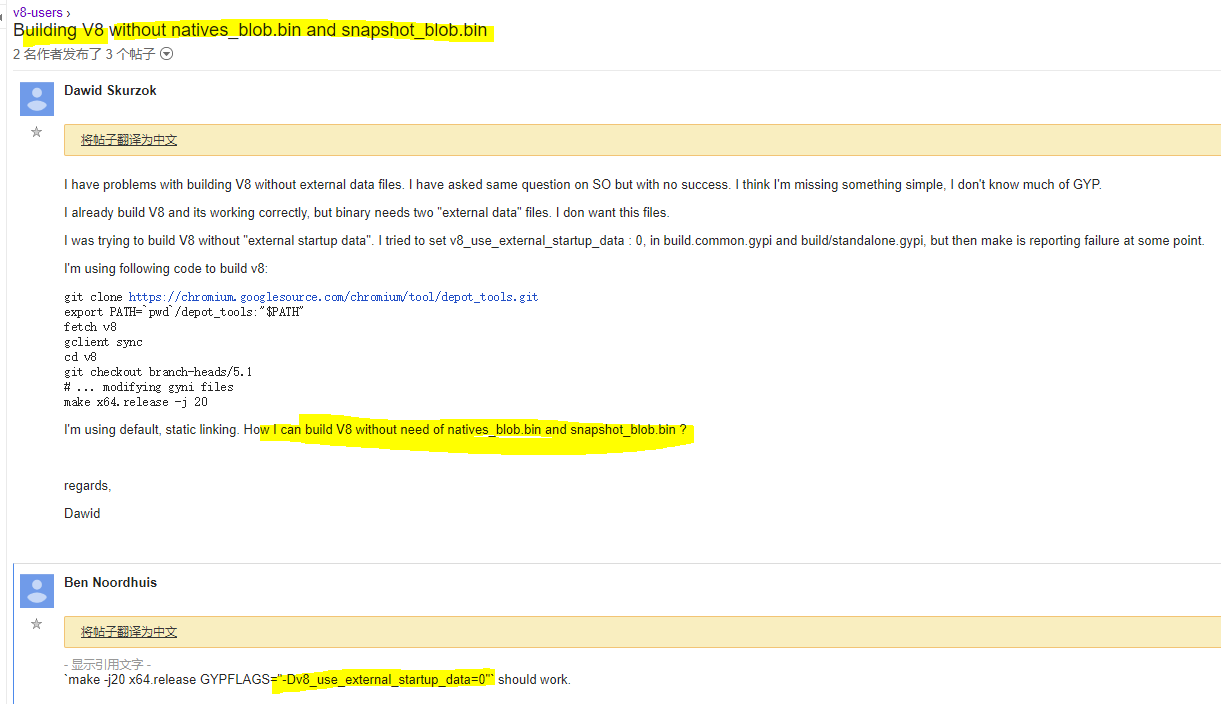
Failed to open startup resource './natives_blob.bin'.
Failed to open startup resource './snapshot_blob.bin'.
解决方法:在v8编译时配置下面的编译选项
//问题解决
Failed to open startup resource './natives_blob.bin'.
Failed to open startup resource './snapshot_blob.bin'.

解决方法:
`make -j20 x64.release GYPFLAGS="-Dv8_use_external_startup_data=0"` should work.
google找到了解决方案:
8 问题解决:
../configure --enable-checking=release --enable-languages=c,c++ --enable-multilib
//设置enable-multilib后
/usr/include/gnu/stubs.h:7:27: fatal error: gnu/stubs-32.h: No such file or directory
解决方法:
解决方法:
yum install glibc-devel.i686
9 问题解决:
解决”fatal error: sys/cdefs.h: No such file or directory“的方法:
10 问题解决:
fetch v8 /usr/lib64/python2.7/subprocess.py in _execute_child OSError: [Errno 2] No such file or directory
#问题解决1
#fetch v8 /usr/lib64/python2./subprocess.py ] No such file or directory
#解答
You miss the svn binary.
Make sure you follow the instructions here and in particular that you run build/install-build-deps.sh

//IN https://chromium.googlesource.com/chromium/src/+/master/docs/linux_build_instructions.md

Get the code
Create a chromium directory for the checkout and change to it (you can call this whatever you like and put it wherever you like, as long as the full path has no spaces):

$ mkdir ~/chromium && cd ~/chromium
Run the fetch tool from depot_tools to check out the code and its dependencies.

$ fetch --nohooks --no-history chromium
If you don't want the full repo history, you can save a lot of time by adding the --no-history flag to fetch.

Expect the command to take  minutes on even a fast connection, and many hours on slower ones.

If you've already installed the build dependencies on the machine (from another checkout, for example), you can omit the --nohooks flag and fetch will automatically execute gclient runhooks at the end.

When fetch completes, it will have created a hidden .gclient file and a directory called src in the working directory. The remaining instructions assume you have switched to the src directory:

$ cd src
Install additional build dependencies
Once you have checked out the code, and assuming you're using Ubuntu, run build/install-build-deps.sh

$ ./build/install-build-deps.sh
You may need to adjust the build dependencies for other distros. There are some notes at the end of this document, but we make no guarantees for their accuracy.
参考博客:https://lizijie.github.io/2018/07/03/%E6%BA%90%E7%A0%81%E5%AE%89%E8%A3%85v8%E6%8A%A5%E9%94%99.html#%E5%A6%82%E4%BD%95%E9%85%8D%E7%BD%AEdepot_tools
官方建议使用depot_tools来下载v8,而不是简单地从github仓库git clone。然而v8和depot_tools都存放再googlesource,在国内访问不到。
可以使用网友下载好的depot_tool&v8
depot_tools:https://pan.baidu.com/s/10lWOMwv0BuKi2R5hlVcI9g
v8 6.9源码:https://pan.baidu.com/s/1wHmOynP6YfLmfm7tMkIUig
#gclient sync
Error: 10>
10> ____ v8/third_party/depot_tools at b3853afe341f2c478f07edba8ac4e60ea833c3b1
10> You have unstaged changes.
10> Please commit, stash, or reset.
#gclient sync --with_branch_heads --with_tags -Rv --disable-syntax-validation
解决方法如下:


//GLIBC_2.18安装
curl -O http://ftp.gnu.org/gnu/glibc/glibc-2.18.tar.gz
tar zxf glibc-2.18.tar.gz
cd glibc-2.18/
mkdir build
cd build/ .
./configure --prefix=/usr
make -j2
make install
13 问题解决:Error getting repository data for remi-php71, repository not found
解决方法:添加源
//问题1:Error getting repository data for remi-php71, repository not found

添加epel源:
rpm -vih http://dl.fedoraproject.org/pub/epel/7/x86_64/Packages/e/epel-release-7-11.noarch.rpm

添加remi源:
rpm -Uvh http://rpms.remirepo.net/enterprise/remi-release-7.rpm

添加ELRepo源:
rpm --import https://www.elrepo.org/RPM-GPG-KEY-elrepo.org
14 问题解决:
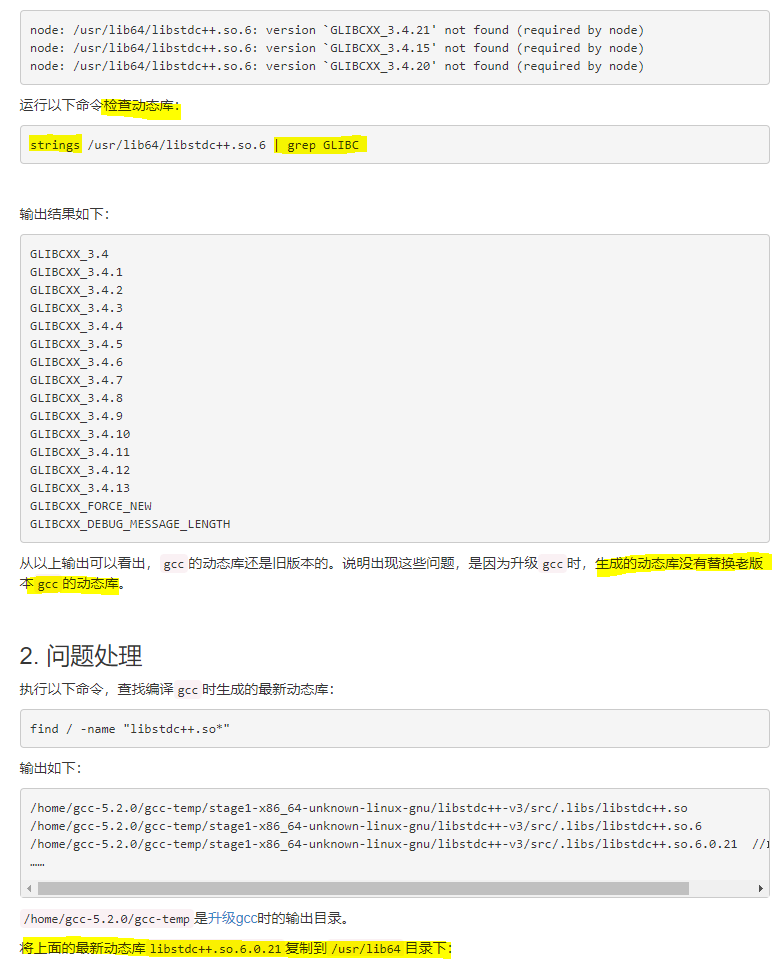
//usr/local/lib/libv8.so: undefined reference to `std::__cxx11::basic_string<char, std::char_traits<char>, std::allocator<char> >::_M_assign(std::__cxx11::basic_string<char, std::char_traits<char>, std::allocator<char> > const&)@GLIBCXX_3.4.21'
解决方案:升级GCC到5以上
15 问题解决:
/tmp/cc6msrUw.o: In function `main':
hello-world.cc:(.text+0x75): undefined reference to `v8::platform::NewDefaultPlatform(int, v8::platform::IdleTaskSupport, v8::platform::InProcessStackDumping, std::unique_ptr<v8::TracingController, std::default_delete<v8::TracingController> >)'
/usr/lib64/libstdc++.so.6: undefined reference to `__cxa_thread_atexit_impl@GLIBC_2.18'
解决方案:在更高版本GCC版本下编译v8,并配置相关GN的 编译选项
     is_debug: false,
     is_official_build: true,
     is_component_build: true,
     is_cfi: false,
     is_clang: false,
     v8_use_external_startup_data: false,
     treat_warnings_as_errors: false,
     use_custom_libcxx: false,
     use_sysroot: false,
     use_gold: false
v8环境搭建采坑记录的更多相关文章
- windows 下 react-native(v0.56) Android 环境搭建踩坑记录
debugservicereact-native 安装官网 https://reactnative.cn/docs/getting-started.html 根据官网步骤一步步执行下去.还能碰到一些问 ...
- uni-app采坑记录
1. uni-app采坑记录 1.1. 前言 这里记录下uni-app实践中踩的坑 1.2. 坑点 1.2.1. 触发事件@longTap和@longpress 这两个都表示长按触发事件,那么这两个有 ...
- Charles 抓包工具安装和采坑记录
Charles 抓包工具安装和采坑记录 网络抓包是解决网络问题的第一步,也是网络分析的基础.网络出现问题,第一步肯定是通过抓包工具进行路径分析,看哪一步出现异常.做网络爬虫,第一步就是通过抓包工具对目 ...
- Antd前端开发采坑记录
背景 基于页面友好,界面整洁美观:基于Antd框架开发虾能平台 选型 基于Antd-admin工程架构,进行开发:基于Antd+React+Umj 采坑记录 按照Html方式天机onClick方法,每 ...
- React Native 环境搭建踩坑
React Native (web Android)环境搭建踩坑(真的是一个艰辛的过程,大概所有坑都被我踩了 官方文档地址 : https://facebook.github.io/react-nat ...
- HUE Oozie : error=2, No such file or directory采坑记录
HUE Oozie : error=2, No such file or directory采坑记录 1.错误详情 一直都是同一种方式在hue上定义workflow,不知为啥 今天定义的就是不行... ...
- Android Studio采坑记录
折腾了几个月的Android Studio,终于在今天被我搞定了 ( ̄▽ ̄)~* 开贴记录下,免得下次再次采坑 先说下我之前电脑的环境配置吧,sdk是几年前在网上下载别人整理出来的包,一直没有更新过 ...
- Redis集群搭建采坑总结
背景 先澄清一下,整个过程问题都不是我解决的,我在里面就是起了个打酱油的角色.因为实际上我负责这个项目,整个过程也比较清楚.之前也跟具体负责的同事说过,等过段时间带他做做项目复盘.结果一直忙,之前做的 ...
- Flutter环境搭建遇坑小结(一)
对flutter的了解与开发也有一段时间了,总的来说,搭建开发环境遇到的各种坑也是很多,尤其对于初次接触Android开发的人员来说 一.flutter运行提示Running Gradle task ...
随机推荐
- UWP应用载入SVG图片的兼容性方案
原文 UWP应用载入SVG图片的兼容性方案 新版本<纸书科学计算器>的更新点之一,就是优化了表达式的显示方式.在旧版本中,表达式里的符号是用png图片显示的,当用户放大看的时候会发现一些锯 ...
- SpringMVC使用MultipartFile文件上传,多文件上传,带参数上传
一.配置SpringMVC 二.单文件与多文件上传 三.多文件上传 四.带参数上传 一.配置SpringMVC 在spring.xml中配置: <!-- springmvc文件上传需要配置的节点 ...
- XML转义字符 如"&"
解析数据 XML 解析器通常情况下会处理XML文档中的所有文本. 当XML元素被解析的时候,XML元素内部的文本也会被解析,例如: <message>Hello Word!</mes ...
- Cleanmymac X 4.4.3 激活破解版|兼容mac最新系统-Mac电脑清理工具
CleanMyMac X 4.4.3 激活破解版为最新版清理工具,为你所爱的东西腾出空间.CleanMyMac拥有一系列巧妙的新功能,它可以安全.智能地扫描和清理整个系统,删除大的未使用的文件,卸载不 ...
- Scala 学习之路(八)—— 类和对象
一.初识类和对象 Scala的类与Java的类具有非常多的相似性,示例如下: // 1. 在scala中,类不需要用public声明,所有的类都具有公共的可见性 class Person { // 2 ...
- 【搬家啦】2019年06月20日csdn难民来报道啦~
原博地址:https://blog.csdn.net/the_fool_
- c# 自己实现可迭代的容器
在c#中我们经常使用到foreach语句来遍历容器,如数组,List,为什么使用foreach语句能够遍历一个这些容器呢,首先的一个前提是这些容器都实现了IEnumerable接口,通过IEnumer ...
- Sole跟Tomcat的整合 Solr4.4 + Tomcat
1, 下载Solr4.4 Tomcat7 2, 拷贝 solr-4.4.0\dist\solr4.4.war => tomcat\webapps 下面 重命名为solr.war 3, 启动to ...
- 安装Ruby、多版本Ruby共存、Ruby安装慢问题
rbenv rbenv可以管理多个版本的ruby.可以分为3种范围(或者说不同生效作用域)的版本: local版:本地,针对各项目范围 global版:全局,没有shell和local版时使用glob ...
- HDU 6043:Colorful Tree(树上统计所有路径总颜色数)***
题目链接 题意 给出一棵有n个结点的树,每个结点有一个颜色,问在这棵树的所有路径中,每条路径的颜色数求和是多少. 思路 求每种颜色的贡献可以转化为总的和减去每种颜色在哪些路径上没有出现的贡献,一个颜色 ...