通过GL函数处理图片以及其它相关功能
我们知道在屏幕后处理里面通过 Graphics.Blit 函数可以通过材质处理屏幕图片, 当我们想要处理一般图片的时候, 直接调用GL函数就行了, 按照习惯自己封装一个 Blit 方法 :
    public static void Blit(Texture source, Material material, RenderTexture destination, int materialPass = 0)

    {

        if(material.SetPass(materialPass))

        {

            material.mainTexture = source;

            Graphics.SetRenderTarget(destination);

            GL.PushMatrix();

            GL.LoadOrtho();

            GL.Begin(GL.QUADS);

            {

                Vector3 coords = new Vector3(0, 0, 0);

                GL.TexCoord(coords);

                GL.Vertex(coords);

                coords = new Vector3(1, 0, 0);

                GL.TexCoord(coords);

                GL.Vertex(coords);

                coords = new Vector3(1, 1, 0);

                GL.TexCoord(coords);

                GL.Vertex(coords);

                coords = new Vector3(0, 1, 0);

                GL.TexCoord(coords);

                GL.Vertex(coords);

            }

            GL.End();

            GL.PopMatrix();

        }

    }

不需要这么麻烦, 直接Graphics.Blit(...)就行了
因为 Graphics.SetRenderTarget 方法传入的是 RenderTexture, 渲染出来的 RenderTexture 不能直接当成 Texture2D 或 Cubemap 或 Texture3D 等来使用, 一般需要进行二次转换. 就拿 Texture2D 来作为例子, 转换方法貌似有那么几种, 下来看看 :
0. 各个变量
    public Material material;

    public Texture2D input;

    public Texture2D outPutTex2D;

    public RenderTexture renderTexture;
1. 使用指针的方式, 一般来说如果 RenderTexture 的内存跟 Texture2D 一样的话, 用 Texture2D 直接指向 RenderTexture 的相关地址应该就可以了, 因为官方没有文档直接就测试代码 :
    private void Start()

    {

        if(renderTexture == false)

        {

            renderTexture = RenderTexture.GetTemporary(Screen.width, Screen.height, , RenderTextureFormat.ARGB32, RenderTextureReadWrite.Linear);

        }

        renderTexture.hideFlags = HideFlags.DontSave;

        outPutTex2D = Texture2D.CreateExternalTexture(Screen.width, Screen.height, TextureFormat.ARGB32, false, true, renderTexture.GetNativeTexturePtr());

        // ArgumentException: nativeTex can not be null

    }
在渲染 RenderTexture 之前获取它的 GetNativeTexturePtr 是不行的, 报错. 改一下, 在渲染完之后再获取的话 :
    private void Start()

    {

        if(renderTexture == false)

        {

            renderTexture = RenderTexture.GetTemporary(Screen.width, Screen.height, , RenderTextureFormat.ARGB32, RenderTextureReadWrite.Linear);

        }

        renderTexture.hideFlags = HideFlags.DontSave;

        Blit(input, material, renderTexture);

        var nativeTexturePtr = renderTexture.GetNativeTexturePtr();

        if(nativeTexturePtr != System.IntPtr.Zero)

        {

            outPutTex2D = Texture2D.CreateExternalTexture(Screen.width, Screen.height, TextureFormat.ARGB32, false, true, nativeTexturePtr);

        }

    }
直接就崩了, 虽然断点看到它的 nativeTexturePtr 确实能获取到, 不过想到 RenderTexture 在创建的时候没有指定是哪种内存, 直接用指针来创建 Texture2D 应该就是会崩的吧.

因为官方文档啥也没写, 估计这条路走不通...
PS : 补充一下, 就算设定了 RenderTexture 的类型也是会崩溃的.
    renderTexture = new RenderTexture(W, H, , RenderTextureFormat.ARGB32, RenderTextureReadWrite.Linear);

    renderTexture.dimension = UnityEngine.Rendering.TextureDimension.Tex2D;

    renderTexture.enableRandomWrite = true;

    renderTexture.wrapMode = TextureWrapMode.Clamp;

    renderTexture.Create();

    outPutTex2D = Texture2D.CreateExternalTexture(W, H, TextureFormat.ARGB32, false, true, renderTexture.GetNativeDepthBufferPtr());    // 崩溃
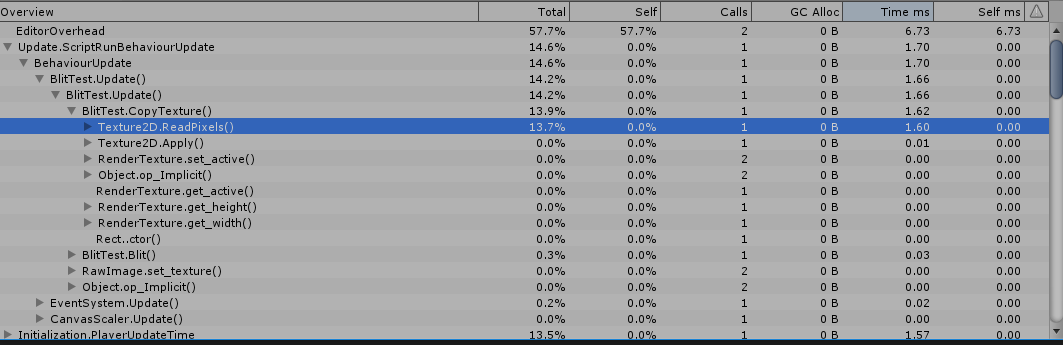
2. 使用 Texture2D.ReadPixels 方法, 这个是最常见的方法 :
    private void Start()

    {

        int W = (int)Screen.width;

        int H = (int)Screen.height;

        if(renderTexture == false)

        {

            renderTexture = RenderTexture.GetTemporary(W, H, , RenderTextureFormat.ARGB32, RenderTextureReadWrite.Linear);

        }

        renderTexture.hideFlags = HideFlags.DontSave;

        outPutTex2D = new Texture2D(W, H, TextureFormat.ARGB32, false, true);

        Blit(input, material, renderTexture);

        var current = RenderTexture.active;

        RenderTexture.active = renderTexture;

        outPutTex2D.ReadPixels(new Rect(, , renderTexture.width, renderTexture.height), , );

        outPutTex2D.Apply();

        RenderTexture.active = current;

    }
这个最常用, 结果也是正确的没什么好说的, 只是效率堪忧
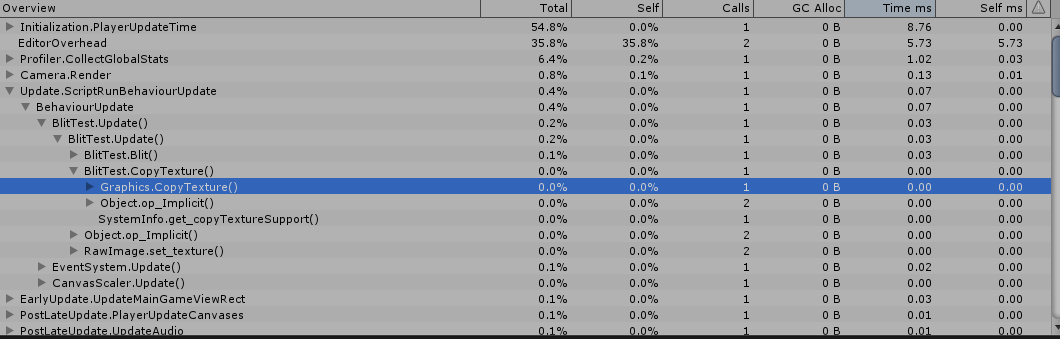
3. 调用 Graphics.CopyTexture 复制图片 :
    private void Start()

    {

        int W = (int)Screen.width;

        int H = (int)Screen.height;

        if(renderTexture == false)

        {

            renderTexture = RenderTexture.GetTemporary(W, H, , RenderTextureFormat.ARGB32, RenderTextureReadWrite.Linear);

        }

        renderTexture.hideFlags = HideFlags.DontSave;

        outPutTex2D = new Texture2D(W, H, TextureFormat.ARGB32, false, true);

        Blit(input, material, renderTexture);

        if((SystemInfo.copyTextureSupport & UnityEngine.Rendering.CopyTextureSupport.RTToTexture) != )

        {

            Graphics.CopyTexture(renderTexture, outPutTex2D);

        }

    }
这个应该就是上面的使用指针地址进行复制的封装, 效率杠杠的. 而且也不需要对应类型.
把这些功能封装一下, 由于它的使用条件比较严格, 并且性能差距巨大, 这种就需要每个人都注意才行 :
    public static void CopyTexture(RenderTexture from, Texture2D to)

    {

        if(from && to)

        {

            if((SystemInfo.copyTextureSupport & UnityEngine.Rendering.CopyTextureSupport.RTToTexture) !=

                && (from.width == to.width && from.height == to.height))

            {

                Graphics.CopyTexture(from, to);

            }

            else

            {

                var current = RenderTexture.active;

                RenderTexture.active = from;

                to.ReadPixels(new Rect(, , Mathf.Min(from.width, to.width), Mathf.Min(from.height, to.height)), , );

                to.Apply();

                RenderTexture.active = current;

            }

        }

    }
Graphics.CopyTexture
PS : 在官方文档里面看见一句话
Compressed texture formats add some restrictions to the CopyTexture with a region variant. For example, PVRTC formats are not supported since they are not block-based (for these formats you can only copy whole texture or whole mip level). For block-based formats (e.g. DXT, ETC), the region size and coordinates must be a multiple of compression block size (4 pixels for DXT).
If both source and destination textures are marked as "readable" (i.e. copy of data exists in system memory for reading/writing on the CPU), these functions copy it as well.
第一句是废话, 不是对应的大小引擎都不让你压缩, 第二句话括号里的意思是说打开了 reading/writing 的图片, 会在系统内存里面存在副本, 那么就是双倍的内存占用了么? 赶紧测试一下...
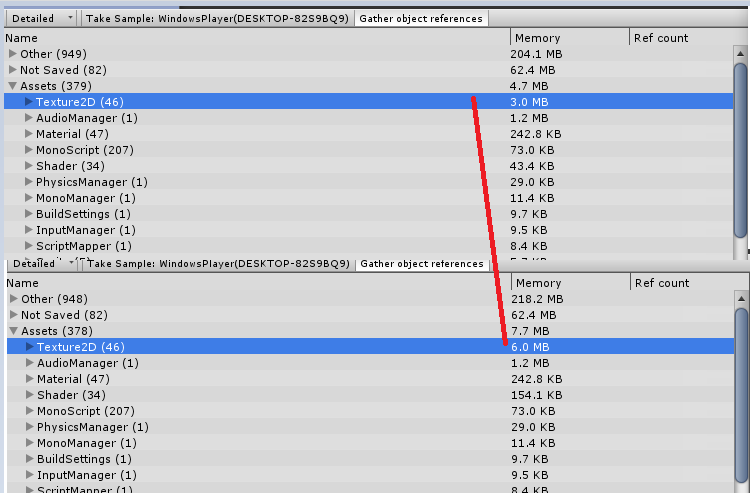
没错, 正是如此......虽然图片导入设置自动就是不打开Read/Write的, 以后还是注意一下的好...
(2019.12.10)
补充 : 说到 Read/Write 的问题, 顺便就说到图片是否可读的问题了, 当我们使用 Graphics.CopyTexture 的时候, 逻辑是内存指针的修改, 所以速度贼快, 可是一般来说系统 RenderTexture 的内存是不可读的, 相当于关闭了 Read/Write 的功能了, 这在哪些地方会出问题呢?
1. 保存图片, 如果要保存图片到硬盘, 使用 Texture2D.EncodeToJPG(); 方法的话, 得到的就是一片灰色, 至于为什么不是白色或者黑色, 之后再研究, 反正得不到在运行时看到的图片就是了.
2. 获取 / 设置 图片片元颜色, Texture2D.GetPixel(...) 报错.
补充 : 用 RenderTexture 作为 Camera.targetTexture 使用的时候, 在相机打开了深度图渲染时一定要用带深度的 RenderTexture, 不然会渲染出奇怪的东西...
(2020.04.28)
当我们的图片是压缩格式的时候, 对图片进行GetPixel或者Copy等操作都是不可能的, 因为操作在CPU层面进行, 而压缩图片是在GPU进行解压的, 如下所示:
    public static Texture2D BlitUnreadableTextureToTexture2D(Texture2D from)

    {

        var readableTexture = new Texture2D(from.width, from.height, TextureFormat.ARGB32, false, true);

        readableTexture.alphaIsTransparency = from.alphaIsTransparency;

        Graphics.CopyTexture(from, readableTexture);    // 报错

        return readableTexture;

    }
    public static void BlitUnreadableTextureToTexture2D(Texture2D from)

    {

        from.GetPixel(, );  // 报错

    }
必须通过GPU进行获取, 没错就是使用Blit RenderTexture的方式来获取解压像素:
        public static Texture2D BlitUnreadableTextureToTexture2D(Texture2D from)

        {

            var readableTexture = new Texture2D(from.width, from.height, TextureFormat.ARGB32, false, true);

            readableTexture.alphaIsTransparency = from.alphaIsTransparency;

            var renderTexture = RenderTexture.GetTemporary(from.width, from.height, , RenderTextureFormat.ARGB32, RenderTextureReadWrite.Linear);

            renderTexture.hideFlags = HideFlags.DontSave;

            var blitMaterial = new Material(AssetDatabase.LoadAssetAtPath<Shader>("Assets/Editor/EditorResources/SimpleBlitShader.shader"));

            Graphics.Blit(from, renderTexture, blitMaterial, );    // 仍然不可读

            var current = RenderTexture.active;

            RenderTexture.active = renderTexture;

            readableTexture.ReadPixels(new Rect(, , renderTexture.width, renderTexture.height), , );

            readableTexture.Apply();

            RenderTexture.active = current;

            RenderTexture.ReleaseTemporary(renderTexture);

            return readableTexture;

        }
这里经过Blit之后的RenderTexture仍然是非可读的, 必须经过低效率的ReadPixels方式读入readableTexture......
通过GL函数处理图片以及其它相关功能的更多相关文章
- JobTracker等相关功能模块初始化
[Hadoop代码笔记]Hadoop作业提交之JobTracker等相关功能模块初始化 一.概要描述 本文重点描述在JobTracker一端接收作业.调度作业等几个模块的初始化工作.想过模块的介绍会在 ...
- LoadRunner(四)——深度了解LR相关功能
参考学习感谢:<精通软件性能测试与LoadRunner实战> 相关功能: 1 无工具情况下的性能测试 2性能测试工具LoadRunner的工作原理 3 VuGen应用介绍 4 协议的类型及 ...
- Excel催化剂开源第31波-pdf相关功能实现及类库介绍
在Excel催化剂刚推出的pdf相关功能中,反馈很热烈,不止是用户层面好多人喜欢,也听到在.NET开发群里有询问pdf在winform上展现的功能诉求,一段时间没写开源篇,生怕大家以为Excel催化剂 ...
- SQL数据同步到ELK(四)- 利用SQL SERVER Track Data相关功能同步数据(上)
一.相关文档 老规矩,为了避免我的解释误导大家,请大家务必通过官网了解一波SQL SERVER的相关功能. 文档地址: 整体介绍文档:https://docs.microsoft.com/en-us/ ...
- 测试functional的bind以及相关功能
注:在VS2010 UPDATE1下测试通过 /*测试functional的bind以及相关功能*/ #include <iostream> #include <functional ...
- 在github上最热门好评高的ROS相关功能包
在github上最热门最受欢迎的ROS相关功能包 下面依次列出,排名不分先后: 1 Simulation Tools In ROS https://github.com/ros-simulation ...
- Android高级控件(三)—— 使用Google ZXing实现二维码的扫描和生成相关功能体系
Android高级控件(三)-- 使用Google ZXing实现二维码的扫描和生成相关功能体系 摘要 现在的二维码可谓是烂大街了,到处都是二维码,什么都是二维码,扫一扫似乎已经流行到习以为常了,今天 ...
- 前端自定义format函数,做字符串格式化功能
<!DOCTYPE html> <html lang="en"> <head> <meta charset="UTF-8&quo ...
- Linux下系统时间函数、DST等相关问题总结(转)
Linux下系统时间函数.DST等相关问题总结 下面这个结构体存储了跟时区相关的位移量(offset)以及是否存在DST等信息,根据所在的时区信息,很容易找到系统时间与UTC时间之间的时区偏移,另外根 ...
随机推荐
- Django—使用后台管理Models
后台的配置 1.创建后台管理员 [root@localhost study_django]# python manage.py createsuperuser [root@localhost stud ...
- JAVA学习路线,实战开发
Java基础课程内容包含:Java开发介绍.Java数组.Java面向对象.常用基础类.集合.IO流.多线程.异常.反射. 第一部分:Java开发介绍 1. DOS常用命令 2. JVM.JR ...
- 2019中国大学生程序设计竞赛(CCPC) - 网络选拔赛
传送门 A.^&^ 题意: 找到最小的正数\(C\),满足\((A\ xor\ C)\&(B\ xor \ C)\)最小. 思路: 输出\(A\&B\)即可,特判答案为0的情况 ...
- gcd套路变换
gcd套路变换 GCD https://www.luogu.org/problem/P2568 给定整数N,求1<=x,y<=N且Gcd(x,y)为素数的数对(x,y)有多少对. $ 1& ...
- 微信小程序开发练习
微信小程序开发工具git管理 https://blog.csdn.net/qq_36672905/article/details/82887102 这个开发工具的界面和交互真的是熟悉又友好,吹爆他
- 纯手打AJAX,还有一个对象转查询字符串的小方法obj=>url
function json2url(json){ var arr=[]; for(var name in json){ arr.push(name+'='+json[name]); } return ...
- 【转】ASP.NET Core 如何设置发布环境
在ASP.NET Core中自带了一些内置对象,可以读取到当前程序处于什么样的环境当中,比如在ASP.NET Core的Startup类的Configure方法中,我们就会看到这么一段代码: publ ...
- laravel项目本地数据库连接错乱原因和解决方法
由于在本地建了两个laravel项目,test.me 和 api-test.me,当我在 test.me 中调用 curl 去请求 api-test.me 的方法,试图获取数据时, 接口一直返回没有找 ...
- Django日志记录详细的报错信息
当服务器500错误的时候,普通日志只会记录一行500的request信息,并不会记录详细的报错定位 [ERROR] 2019-06-12 15:07:03,597 "GET /api/v1/ ...
- Zabbix 数据清理
目录 Zabbix 数据清理的一系列操作 一.问题 二.解决办法 Zabbix 数据清理的一系列操作 基本信息: Zabbix 版本 4.0.9 MySQL 版本 5.5 一.问题 我们将 Zabbi ...