Nacos Cluster Building
原文链接:https://www.javaspring.net/nacos/nacos-cluster-building
Continue to talk about the Nacos build of the production environment, through the previous 《Spring Cloud Alibaba basic tutorial: Nacos data persistence》 We already know the storage principle of Nacos for configuration information. When the cluster is built, you must use centralized storage, such as MySQL storage. Next, follow the previous article and continue to the next step. Through this article, we will complete the construction of the Nacos production environment.
1.Cluster Building
According to the official documentation, Nacos's cluster architecture is roughly as shown below (the MySQL that centralizes storing information is omitted):
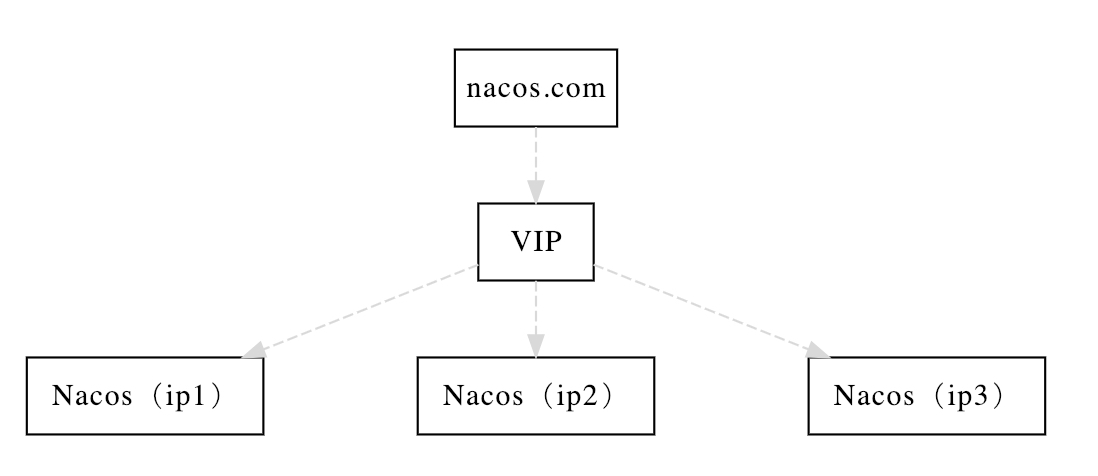
Here we will introduce the details of each step of our construction step by step.
1.1.MySQL data source configuration
For the modification of the data source, the reason has been explained in the previous article Nacos Data Persistence. If you don't understand it, you can read this first and come back here.
Initialize and configure the MySQL data source before configuring the cluster. Mainly divided into the following two steps:
- Step1: Initialize the MySQL database, the database initialization file:
nacos-mysql.sql, can be obtained under theconfdirectory under theNacospackage. - Step 2: Modify the
conf/application.propertiesfile, add support for MySQL data source configuration, add (currently only mysql) data source url, username and password. Configuration examples are as follows:
spring.datasource.platform=mysql

db.num=1

db.url.0=jdbc:mysql://localhost:3306/nacos?characterEncoding=utf8&connectTimeout=1000&socketTimeout=3000&autoReconnect=true

db.user=root

db.password=
More introduction and thinking, see the previous article "Nacos Data Persistence"。
1.2.Cluster Configuration
There is a cluster.conf.example in Nacos's conf directory. You can remove the example extension and use that directly, or create a cluster.conf file separately, then open and configure the Nacos instance address to be deployed later.
This document uses three Nacos servers on different local endpoints as an example. You can configure the following:
127.0.0.1:8841

127.0.0.1:8842

127.0.0.1:8843
Note: The examples here are for local learning testing only, and the actual production environment must be deployed on different nodes in order to be highly available. In addition, the Nacos cluster requires 3 or more nodes and ensures that the three nodes are mutually accessible.
1.3.Launching an instance
After completing the above configuration, we can start to launch the Nacos instance on each node to form a Nacos cluster to use.
Since our test learning uses the local startup multi-instance in this article, there will be some differences with the real production deployment, so here are two cases to explain how to start each Nacos instance.
Local test
In this article, in the cluster configuration, we set up three Nacos instances are local, but different ports, so we need to modify the different port numbers when starting Nacos.
Here is a way to easily start three local instances of Nacos. We can copy the startup.sh script in the bin directory three times to start Nacos instances of three different ports, in order to make it easy to distinguish For the startup script of the instance, we can add the port number to the naming of the script, for example:
- startup-8841.sh
- startup-8842.sh
- startup-8843.sh
Then, modify the parameters in the three scripts separately, as shown in the red part of the following figure (the port number is assigned according to the above script name):

Here we use the -Dserver.port method, in the start command, specify a specific port number for Nacos, in order to start three different Nacos instances on the machine to form a cluster.
After modifying the three script configurations, you can start the Nacos cluster locally by executing the following commands:
sh startup-8841.sh

sh startup-8842.sh

sh startup-8843.sh
Production Environment
In the actual production environment deployment, because each instance is distributed on different nodes, we can directly use the default startup script (unless you need to modify some JVM parameters, etc.). You only need to execute the sh startup.sh command in the bin directory of each node's Nacos.
2.Proxy Configuration
After the Nacos cluster is launched, we need to provide a unified portal for us to maintain and access the Spring Cloud application, as shown in the architecture diagram. To put it simply, we need to make an access point for the three Nacos instances launched above that can be load balanced for them. There are many ways to implement this. Here is a simple example of using Nginx.
In the http section of the Nginx configuration file, we can add the following configuration:
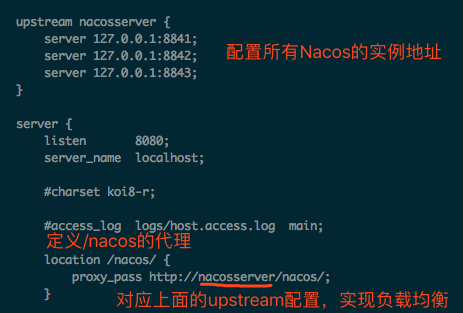
In this way, when we visit: http://localhost:8080/nacos/, it will be load-balanced proxy to the three Nacos instances we started before. Here we do not have a specific strategy for configuring upstream. By default, we use a linear rotation training method. If necessary, we can also configure a more complex distribution strategy. This part is the use of Nginx, and will not be described here.
Here is a question I encountered when trying to build. If you have encountered it, I hope the following instructions can help you solve the problem.
The error message is as follows:
2019-02-20 16:20:53,216 INFO The host [nacos_server] is not valid

 Note: further occurrences of request parsing errors will be logged at DEBUG level.

java.lang.IllegalArgumentException: The character [_] is never valid in a domain name.

	at org.apache.tomcat.util.http.parser.HttpParser$DomainParseState.next(HttpParser.java:926)

	at org.apache.tomcat.util.http.parser.HttpParser.readHostDomainName(HttpParser.java:822)

	at org.apache.tomcat.util.http.parser.Host.parse(Host.java:71)

	at org.apache.tomcat.util.http.parser.Host.parse(Host.java:45)

	at org.apache.coyote.AbstractProcessor.parseHost(AbstractProcessor.java:288)

	at org.apache.coyote.http11.Http11Processor.prepareRequest(Http11Processor.java:809)

	at org.apache.coyote.http11.Http11Processor.service(Http11Processor.java:384)

	at org.apache.coyote.AbstractProcessorLight.process(AbstractProcessorLight.java:66)

	at org.apache.coyote.AbstractProtocol$ConnectionHandler.process(AbstractProtocol.java:791)

	at org.apache.tomcat.util.net.NioEndpoint$SocketProcessor.doRun(NioEndpoint.java:1417)

	at org.apache.tomcat.util.net.SocketProcessorBase.run(SocketProcessorBase.java:49)

	at java.util.concurrent.ThreadPoolExecutor.runWorker(ThreadPoolExecutor.java:1149)

	at java.util.concurrent.ThreadPoolExecutor$Worker.run(ThreadPoolExecutor.java:624)

	at org.apache.tomcat.util.threads.TaskThread$WrappingRunnable.run(TaskThread.java:61)

	at java.lang.Thread.run(Thread.java:748)
The main reason is that nacos_server was used as the name when configuring upstream, and the _ symbol does not appear in the domain name in the Tomcat version used by Nacos, so the screenshot above gives the upstream The name is nacosserver and the _ symbol is removed.
At this point, Nacos's cluster building is complete! We can access Nacos through the proxy address of Nginx configuration: http://localhost:8080/nacos/, which can also be configured in the Spring Cloud application as the access address of the registry and configuration center. The reader can use the code example at the end of the article to modify the original Nacos address to start, to see if the configuration information can be obtained to verify the success of the cluster setup. You can also deliberately close an instance to verify that the Nacos cluster is still working.
3.Think Deeply
Under the guidance of Nacos's official documentation, Nacos's cluster construction is generally very smooth, and there is not much difficulty. But one question worth considering is similar to the thinking about data persistence in the previous article. As a registry and configuration center, is Nacos' architecture too bloated? In addition to Nacos itself, there is a need to rely on more middleware to complete the entire production environment. Compared to other middleware that can be used for service discovery and configuration, it is not so advantageous. Especially for small teams, such complexity and cost investment are also considered when selecting a model.
4.Sample Code
The client code for the article. You can view the alibaba-nacos-config-client project in the following repository:
- Github:https://github.com/dyc87112/SpringCloud-Learning/
- Gitee:https://gitee.com/didispace/SpringCloud-Learning/
原文链接:https://www.javaspring.net/nacos/nacos-cluster-building
转载,请保留原文地址,谢谢 ~
Nacos Cluster Building的更多相关文章
- Easy and cheap cluster building on AWS backup
https://grapeot.me/easy-and-cheap-cluster-building-on-aws.html Thu 17 July 2014 , by Yan Wang | 2 Co ...
- 从源码看Nacos的设计
目录 客户端与集群的交互 数据同步 实例信息同步 服务集群信息 关于priv-raft协议 Nacos集群在k8s中的实践 这片博文来源于我在公司部门内的分享,我隐去了和公司项目相关的部分,重新整理, ...
- NACOS升级操作
Server端 0.8.0及以上版本: 解压安装包后替换{nacos.home}/target/nacos-server.jar 删除{nacos.home}/plugins/cmdb/及{nacos ...
- nacos-docker安装nacos并配置数据库
拉取nacos/nacos-server镜像 docker pull nacos/nacos-server 配置数据库(MySQL) 创建存储nacos配置的数据库 create database n ...
- MySQL优化面试
原则:尽量使用整型表示字符串 存储IP INET_ATON(str),address to number INET_NTOA(number),number to address MySQL内部的枚举类 ...
- SkyWorking基础:6.2版本安装部署
就在今天,SkyWorking发布了6.2版本. 概述 什么是SkyWorking SkyWalking是观察性分析平台和应用性能管理系统. 提供分布式追踪.服务网格遥测分析.度量聚合和可视化一体化解 ...
- MySQL优化/面试,看这一篇就够了
原文链接:http://www.zhenganwen.top/articles/2018/12/25/1565048860202.html 作者:Anwen~链接:https://www.nowcod ...
- mysql 优化知识点
附录: https://www.nowcoder.com/discuss/150059?type=0&order=0&pos=13&page=0 本文概要 概述 为什么要优化 ...
- 3万字总结,Mysql优化之精髓
本文知识点较多,篇幅较长,请耐心学习 MySQL已经成为时下关系型数据库产品的中坚力量,备受互联网大厂的青睐,出门面试想进BAT,想拿高工资,不会点MySQL优化知识,拿offer的成功率会大大下降. ...
随机推荐
- shell脚本exercise2
通过文件里面的网址,判断是否访问成功网址 #!/bin/bash check(){ code=`curl -I -m -o /dev/null -s -w %{http_code} http://$u ...
- Springboot中使用redis进行api限流
api限流的场景 限流的需求出现在许多常见的场景中 秒杀活动,有人使用软件恶意刷单抢货,需要限流防止机器参与活动 某api被各式各样系统广泛调用,严重消耗网络.内存等资源,需要合理限流 淘宝获取ip所 ...
- Internet History,Technology,and Security - The Web Makes it Easy to Use(Week3)
时间如白驹过隙,又到了新的一周的慕课学习啦.这周内容较为简单,主要讲述互联网内部的发展状况. The Early World-Wide-Web Getting to the Web 谈到万维网,我们不 ...
- Spring Boot 整合 Druid
Spring Boot 整合 Druid 概述 Druid 是阿里巴巴开源平台上的一个项目,整个项目由数据库连接池.插件框架和 SQL 解析器组成.该项目主要是为了扩展 JDBC 的一些限制,可以让程 ...
- go实践之apiserver搭建
文章目录 go实践之apiserver搭建 1.配置文件读取 2.数据连接 3.日志初始化 4.server初始化 5.接口编写 go实践之apiserver搭建 本文主要记录下博主用gin搭建app ...
- python2和python3编码问题
欢迎加入python学习交流群 667279387 一.什么是编解码 1.什么是unicode 2.编码方式 二.python中的编解码 1.python2 (1).encode() 和 .decod ...
- Sring+mybatis模拟银行转账
实体类: package com.bjsxt.pojo; import java.io.Serializable; public class Account implements Serializab ...
- JavaScript2 基础
运算符 赋值运算符 用于给变量赋值. y=5;/z=2; 算术运算符 即算数符号,是基本算数运算.+ 加 / - 减/ * 乘/ / 除/ % 取余数/ ++ 自增(y++先赋值再自增/++y先自 ...
- 如何在ASP.NET Core 中快速构建PDF文档
比如我们需要ASP.NET Core 中需要通过PDF来进行某些简单的报表开发,随着这并不难,但还是会手忙脚乱的去搜索一些资料,那么恭喜您,这篇帖子会帮助到您,我们就不会再去浪费一些宝贵的时间. 在本 ...
- 测试工程师有福啦!一键生成api文档及测试功能
最近发现一个比较好用的插件,可根据api的功能注释说明一键生成文档以及功能demo: swaggerUI 是一个简单的Restful API 测试和文档工具.简单.漂亮.易用.通过读取JSON 配置显 ...