【深度学习】BP反向传播算法Python简单实现
转载:火烫火烫的
个人觉得BP反向传播是深度学习的一个基础,所以很有必要把反向传播算法好好学一下
得益于一步一步弄懂反向传播的例子这篇文章,给出一个例子来说明反向传播
不过是英文的,如果你感觉不好阅读的话,优秀的国人已经把它翻译出来了。
一步一步弄懂反向传播的例子(中文翻译)
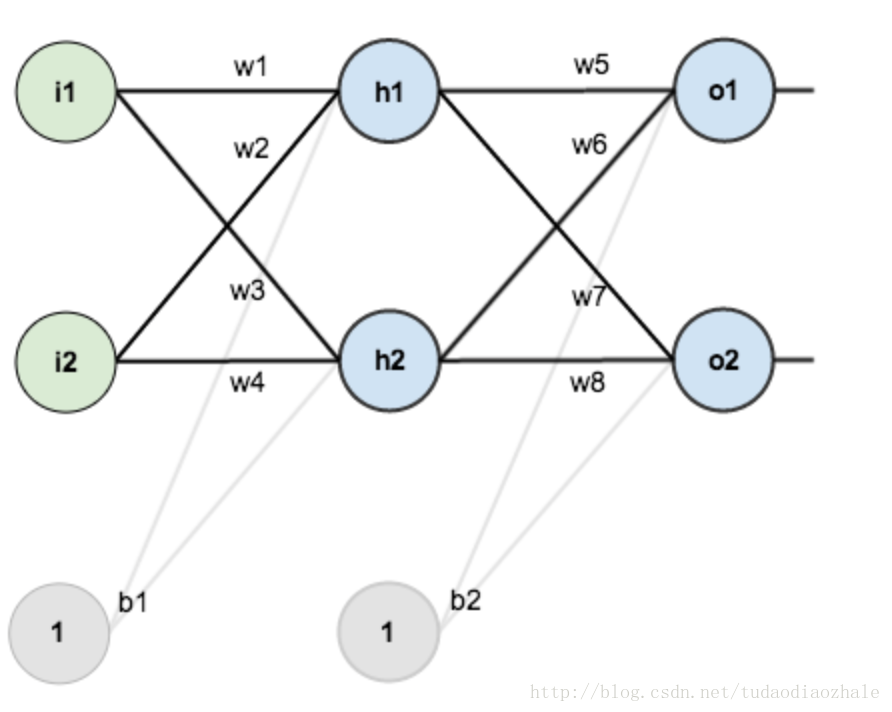
然后我使用了那个博客的图片。这次的目的主要是对那个博客的一个补充。但是首先我觉得先用面向过程的思想来实现一遍感觉会好一点。
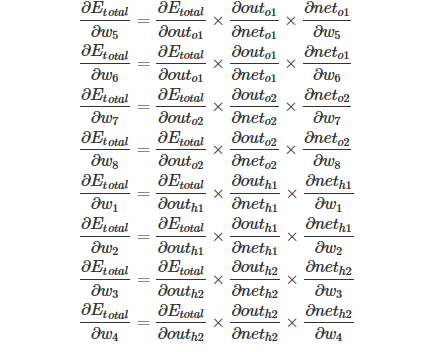
随便把文中省略的公式给大家给写出来。大家可以先看那篇博文
 import numpy as np

 # "pd" 偏导

 def sigmoid(x):

     return 1 / (1 + np.exp(-x))

 def sigmoidDerivationx(y):

     return y * (1 - y)

 if __name__ == "__main__":

     #初始化

     bias = [0.35, 0.60]

     weight = [0.15, 0.2, 0.25, 0.3, 0.4, 0.45, 0.5, 0.55]

     output_layer_weights = [0.4, 0.45, 0.5, 0.55]

     i1 = 0.05

     i2 = 0.10

     target1 = 0.01

     target2 = 0.99

     alpha = 0.5 #学习速率

     numIter = 10000 #迭代次数

     for i in range(numIter):

         #正向传播

         neth1 = i1*weight[1-1] + i2*weight[2-1] + bias[0]

         neth2 = i1*weight[3-1] + i2*weight[4-1] + bias[0]

         outh1 = sigmoid(neth1)

         outh2 = sigmoid(neth2)

         neto1 = outh1*weight[5-1] + outh2*weight[6-1] + bias[1]

         neto2 = outh2*weight[7-1] + outh2*weight[8-1] + bias[1]

         outo1 = sigmoid(neto1)

         outo2 = sigmoid(neto2)

         print(str(i) + ", target1 : " + str(target1-outo1) + ", target2 : " + str(target2-outo2))

         if i == numIter-1:

             print("lastst result : " + str(outo1) + " " + str(outo2))

         #反向传播

         #计算w5-w8(输出层权重)的误差

         pdEOuto1 = - (target1 - outo1)

         pdOuto1Neto1 = sigmoidDerivationx(outo1)

         pdNeto1W5 = outh1

         pdEW5 = pdEOuto1 * pdOuto1Neto1 * pdNeto1W5

         pdNeto1W6 = outh2

         pdEW6 = pdEOuto1 * pdOuto1Neto1 * pdNeto1W6

         pdEOuto2 = - (target2 - outo2)

         pdOuto2Neto2 = sigmoidDerivationx(outo2)

         pdNeto1W7 = outh1

         pdEW7 = pdEOuto2 * pdOuto2Neto2 * pdNeto1W7

         pdNeto1W8 = outh2

         pdEW8 = pdEOuto2 * pdOuto2Neto2 * pdNeto1W8

         # 计算w1-w4(输出层权重)的误差

         pdEOuto1 = - (target1 - outo1) #之前算过

         pdEOuto2 = - (target2 - outo2)  #之前算过

         pdOuto1Neto1 = sigmoidDerivationx(outo1)    #之前算过

         pdOuto2Neto2 = sigmoidDerivationx(outo2)    #之前算过

         pdNeto1Outh1 = weight[5-1]

         pdNeto2Outh2 = weight[7-1]

         pdEOuth1 = pdEOuto1 * pdOuto1Neto1 * pdNeto1Outh1 + pdEOuto2 * pdOuto2Neto2 * pdNeto1Outh1

         pdOuth1Neth1 = sigmoidDerivationx(outh1)

         pdNeth1W1 = i1

         pdNeth1W2 = i2

         pdEW1 = pdEOuth1 * pdOuth1Neth1 * pdNeth1W1

         pdEW2 = pdEOuth1 * pdOuth1Neth1 * pdNeth1W2

         pdNeto1Outh2 = weight[6-1]

         pdNeto2Outh2 = weight[8-1]

         pdOuth2Neth2 = sigmoidDerivationx(outh2)

         pdNeth2W3 = i1

         pdNeth2W4 = i2

         pdEOuth2 = pdEOuto1 * pdOuto1Neto1 * pdNeto1Outh2 + pdEOuto2 * pdOuto2Neto2 * pdNeto2Outh2

         pdEW3 = pdEOuth2 * pdOuth2Neth2 * pdNeth2W3

         pdEW4 = pdEOuth2 * pdOuth2Neth2 * pdNeth2W4

         #权重更新

         weight[1-1] = weight[1-1] - alpha * pdEW1

         weight[2-1] = weight[2-1] - alpha * pdEW2

         weight[3-1] = weight[3-1] - alpha * pdEW3

         weight[4-1] = weight[4-1] - alpha * pdEW4

         weight[5-1] = weight[5-1] - alpha * pdEW5

         weight[6-1] = weight[6-1] - alpha * pdEW6

         weight[7-1] = weight[7-1] - alpha * pdEW7

         weight[8-1] = weight[8-1] - alpha * pdEW8

         # print(weight[1-1])

         # print(weight[2-1])

         # print(weight[3-1])

         # print(weight[4-1])

         # print(weight[5-1])

         # print(weight[6-1])

         # print(weight[7-1])

         # print(weight[8-1])
不知道你是否对此感到熟悉一点了呢?反正我按照公式实现一遍之后深有体会,然后用向量的又写了一次代码。
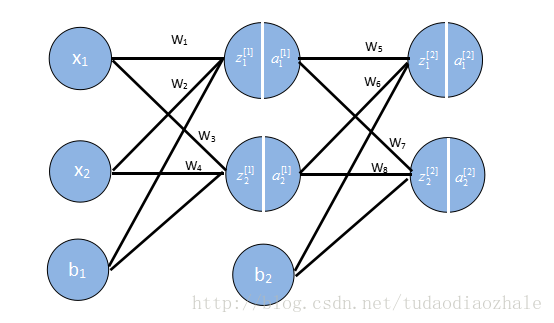
接下来我们要用向量来存储这些权重,输出结果等,因为如果我们不这样做,你看上面的例子就知道我们需要写很多w1,w2等,这要是参数一多就很可怕。
这些格式我是参考吴恩达的格式,相关课程资料->吴恩达深度学习视频。
 import numpy as np

 def sigmoid(x):

     return 1 / (1 + np.exp(-x))

 def sigmoidDerivationx(y):

     return y * (1 - y)

 if __name__ == '__main__':

     # 初始化一些参数

     alpha = 0.5

     numIter = 1000000 #迭代次数

     w1 = [[0.15, 0.20], [0.25, 0.30]]  # Weight of input layer

     w2 = [[0.40, 0.45], [0.50, 0.55]]

     # print(np.array(w2).T)

     b1 = 0.35

     b2 = 0.60

     x = [0.05, 0.10]

     y = [0.01, 0.99]

     # 前向传播

     z1 = np.dot(w1, x) + b1     # dot函数是常规的矩阵相乘

     a1 = sigmoid(z1)

     z2 = np.dot(w2, a1) + b2

     a2 = sigmoid(z2)

     for n in range(numIter):

         # 反向传播 使用代价函数为C=1 / (2n) * sum[(y-a2)^2]

         # 分为两次

         # 一次是最后一层对前面一层的错误

         delta2 = np.multiply(-(y-a2), np.multiply(a2, 1-a2))

         # for i in range(len(w2)):

         #     print(w2[i] - alpha * delta2[i] * a1)

         #计算非最后一层的错误

         # print(delta2)

         delta1 = np.multiply(np.dot(np.array(w2).T, delta2), np.multiply(a1, 1-a1))

         # print(delta1)

         # for i in range(len(w1)):

             # print(w1[i] - alpha * delta1[i] * np.array(x))

         #更新权重

         for i in range(len(w2)):

             w2[i] = w2[i] - alpha * delta2[i] * a1

         for i in range(len(w1)):

             w1[i] = w1[i] - alpha * delta1[i] * np.array(x)

         #继续前向传播,算出误差值

         z1 = np.dot(w1, x) + b1

         a1 = sigmoid(z1)

         z2 = np.dot(w2, a1) + b2

         a2 = sigmoid(z2)

         print(str(n) + " result:" + str(a2[0]) + ", result:" +str(a2[1]))

         # print(str(n) + "  error1:" + str(y[0] - a2[0]) + ", error2:" +str(y[1] - a2[1]))
可以看到,用向量来表示的话代码就简短了非常多。但是用了向量化等的方法,如果不太熟,去看吴恩达深度学习的第一部分,再返过来看就能懂了。
【深度学习】BP反向传播算法Python简单实现的更多相关文章
- 深度学习之反向传播算法(BP)代码实现
反向传播算法实战 本文仅仅是反向传播算法的实现,不涉及公式推导,如果对反向传播算法公式推导不熟悉,强烈建议查看另一篇文章神经网络之反向传播算法(BP)公式推导(超详细) 我们将实现一个 4 层的全连接 ...
- 机器学习 —— 基础整理(七)前馈神经网络的BP反向传播算法步骤整理
这里把按 [1] 推导的BP算法(Backpropagation)步骤整理一下.突然想整理这个的原因是知乎上看到了一个帅呆了的求矩阵微分的方法(也就是 [2]),不得不感叹作者的功力.[1] 中直接使 ...
- 深度学习——前向传播算法和反向传播算法(BP算法)及其推导
1 BP算法的推导 图1 一个简单的三层神经网络 图1所示是一个简单的三层(两个隐藏层,一个输出层)神经网络结构,假设我们使用这个神经网络来解决二分类问题,我们给这个网络一个输入样本,通过前向运算得到 ...
- PyTorch深度学习实践——反向传播
反向传播 课程来源:PyTorch深度学习实践--河北工业大学 <PyTorch深度学习实践>完结合集_哔哩哔哩_bilibili 目录 反向传播 笔记 作业 笔记 在之前课程中介绍的线性 ...
- 深度学习梯度反向传播出现Nan值的原因归类
症状:前向计算一切正常.梯度反向传播的时候就出现异常,梯度从某一层开始出现Nan值(Nan: Not a number缩写,在numpy中,np.nan != np.nan,是唯一个不等于自身的数). ...
- 手推机器学习公式(一) —— BP 反向传播算法
方便起见,本文仅以三层的神经网络举例. f(⋅):表示激励函数 xi:表示输入层: yj:表示中间的隐层: yj=f(netj) netj=∑i=0nvijxi ok:表示输出层,dk 则表示期望输出 ...
- BP反向传播算法的工作原理How the backpropagation algorithm works
In the last chapter we saw how neural networks can learn their weights and biases using the gradient ...
- 100天搞定机器学习|day37 无公式理解反向传播算法之精髓
100天搞定机器学习(Day1-34) 100天搞定机器学习|Day35 深度学习之神经网络的结构 100天搞定机器学习|Day36 深度学习之梯度下降算法 本篇为100天搞定机器学习之第37天,亦 ...
- 100天搞定机器学习|day38 反向传播算法推导
往期回顾 100天搞定机器学习|(Day1-36) 100天搞定机器学习|Day37无公式理解反向传播算法之精髓 上集我们学习了反向传播算法的原理,今天我们深入讲解其中的微积分理论,展示在机器学习中, ...
随机推荐
- [LeetCode&Python] Problem 690. Employee Importance
You are given a data structure of employee information, which includes the employee's unique id, his ...
- 软工实践第二次作业—Wordcount
Git仓库地址:https://github.com/cwabc/PersonProject-C 一.问题描述 输入一个txt文件名,以命令行参数传入,程序能够统计txt文件中的以下几个指标: 统计文 ...
- acm 2084
////////////////////////////////////////////////////////////////////////////////#include<iostream ...
- Python下载与安装配置
最近想学习Python那就开始吧 首先就是下载安装了 Python最新源码,二进制文档,新闻资讯等可以在Python的官网查看到: Python官网:https://www.python.org/ 你 ...
- crash - JNI WARNING: input is not valid modified utf-8: illegal continuation byte
the key point is "Modified UTF-8" is not like "Regular UTF-8", a legal Rgular UT ...
- 【java规则引擎】《Drools7.0.0.Final规则引擎教程》第4章 4.5RHS语法
转载至:https://blog.csdn.net/wo541075754/article/details/76651073 RHS语法 使用说明 RHS是满足LHS条件之后进行后续处理部分的统称,该 ...
- shell command
查看网卡流量报告 sar -n DEV kill pid ps -ef |grep xxx |grep -v grep |awk '{print $2}' |xargs ki ...
- luarocks 自定义包发布试用
luarocks 是一个方便的lua 包管理工具,可以帮助我们实现代码的复用以及分享 注册账户 我使用了gihtub 的账户,直接点击&&授权即可 创建一个简单的luarocks 包项 ...
- lua-resty-shell 多任务执行
已经写过一个openresty 使用lua-resty-shell 执行shell 脚本的demo,但是实际上我们可能是多节点运行, 同时需要负载均衡的机制. lua-resty-shell 支持un ...
- mysql中 where in 用法详解
这里分两种情况来介绍 1.in 后面是记录集,如: select * from table where uname in(select uname from user); 2.in ...