Redisson实现分布式锁(一)
为什么要使用分布式锁?
单机情况下,多线程同时访问并改变临界资源(可变共享变量),将会使得这个变量不可预知,所以我们引入了同步(lock—synchronized)。但在分布式场景下(多机部署),业务上我们需保证某个共享变量数据最终一致性,但实际每个机器的变量是独立的,同步(lock—synchronized)的机制仅仅限于单机,这种情况下,就需要有一个多机情况下的共享数据库(通常为redis),通过某种手段达到与同步一样效果机制。
demo
 <!-- redisson -->

        <dependency>

            <groupId>org.redisson</groupId>

            <artifactId>redisson</artifactId>

            <version>3.2.3</version>

        </dependency>
import org.redisson.Redisson;

import org.redisson.config.Config;

import org.springframework.beans.factory.annotation.Value;

import org.springframework.context.annotation.Bean;

import org.springframework.context.annotation.Configuration;

@Configuration

public class RedissonConfig {

    @Bean

    public Redisson redissonSingle() {

        //支持Single单机,Master/Slave 主从,Sentinel哨兵,Cluster集群等模式

        //此为单机模式

        Config config = new Config();

        config.useSingleServer()

                //redis://127.0.0.1:6379  报错:原因未知??

                .setAddress("127.0.0.1:6379")

                .setTimeout(3000);

        return (Redisson)Redisson.create(config);

    }

}
import org.redisson.Redisson;

import org.redisson.api.RBucket;

import org.redisson.api.RLock;

import org.springframework.data.redis.core.StringRedisTemplate;

import org.springframework.stereotype.Service;

import javax.annotation.Resource;

import java.util.Date;

import java.util.concurrent.TimeUnit;

@Service

public class ProductService {

    @Resource

    private StringRedisTemplate stringRedisTemplate;

    @Resource

    private Redisson redisson;

    /**

     * 分布式锁的key

     */

    private String lockKey = "key_product_id";

    /**

     * 从redis或取

     */

    public int getProductId() {

        String productid = stringRedisTemplate.opsForValue().get("product");

        return Integer.parseInt(productid);

    }

    /**

     * 修改product

     *

     * @return

     */

    public void setProductId() {

        RLock lock = redisson.getLock(lockKey);

        //60s 后自动释放锁

        lock.lock(60, TimeUnit.SECONDS);

        String productId = stringRedisTemplate.opsForValue().get("product");

        /*获取redis中的key-value对象,key不存在没关系

        RBucket<Integer> keyObject = redisson.getBucket("product");

        System.out.println(keyObject.get());

        keyObject.set(100);

        */

        int sprodId = Integer.parseInt(productId);

        if (sprodId > 0) {

            stringRedisTemplate.opsForValue().set("product", --sprodId + "");

            System.out.println(Thread.currentThread().getName() + "  lockkey:" + lockKey + ",product:" + sprodId + "");

        }

        lock.unlock(); //释放锁

    }

}
    @Test

    public void testSetProductId(){

        //开启100线程(有兴趣可以另起一个工程,看看两个工程执行细节)

        ExecutorService executorService= Executors.newFixedThreadPool(5);

        for(int i = 0;i < 1000;i++){

            executorService.submit(()->{productService.setProductId();});

        }

        while(true){

            try {

                Thread.sleep(50000);

            } catch (InterruptedException e) {

                e.printStackTrace();

            }

            int prodId = productService.getProductId();

            if(prodId <= 0){

                executorService.shutdown();

                break;

            }

        }

    }
结果:
...
pool-4-thread-4 lockkey:key_product_id,product:3
pool-4-thread-3 lockkey:key_product_id,product:2
pool-4-thread-5 lockkey:key_product_id,product:1
pool-4-thread-1 lockkey:key_product_id,product:0
其实上面代码不是太严谨:
RedissonLock源码:
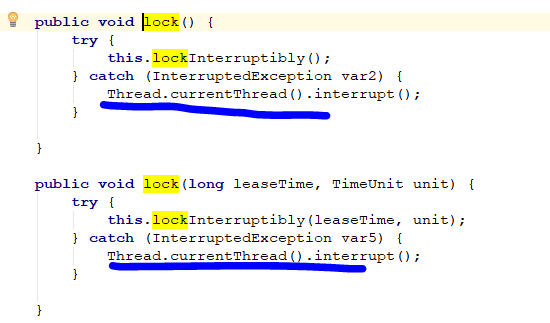
当锁再Thread1持有时,试想当线程Thread2在lock.lock()后发生中断时,异常被捕捉,lock不会因为等待Thread1线程释放锁而阻塞,而是直接处理业务逻辑。这就导致需要同步的部分没有同步,并且试图释放不是自己的锁,发生异常。
eg:
public void setProductId() {

        RLock lock = redisson.getLock(lockKey);

        //60s 后自动释放锁

        lock.lock(60, TimeUnit.SECONDS);

        Thread t = Thread.currentThread();

        //if(!t.isInterrupted()){

            try{

                String productId = stringRedisTemplate.opsForValue().get("product");

                int sprodId = Integer.parseInt(productId);

                if (sprodId > 0) {

                    stringRedisTemplate.opsForValue().set("product", --sprodId + "");

                    System.out.println(">>>>>>"+t.getName() + ",product:" + sprodId + "");

                }

                try {

                    Thread.sleep(100);

                } catch (InterruptedException e) {

                    e.printStackTrace();

                }

            }finally {

                lock.unlock(); //释放锁

            }

        //}else{

        //    System.out.println(t.getName()+"发生中断.....");

        //}

    }
 @Test

    public void testSetProductId2(){

        //开启2个线程

        Thread thread1 = new Thread(()-> productService.setProductId());

        Thread thread2 = new Thread(()-> productService.setProductId());

        thread1.start();

        try {

            Thread.sleep(50);

        } catch (InterruptedException e) {

            e.printStackTrace();

        }

        thread2.start();

        thread2.interrupt();

        try {

            Thread.sleep(1000);

        } catch (InterruptedException e) {

            e.printStackTrace();

        }

    }
运行结果:

可知:thread-10取值是9,而不是Thread-9执行完的8。
严谨的写法:
public void setProductId() {

        RLock lock = redisson.getLock(lockKey);

        //60s 后自动释放锁

        lock.lock(60, TimeUnit.SECONDS);

        Thread t = Thread.currentThread();

        if(!t.isInterrupted()){

            try{

                String productId = stringRedisTemplate.opsForValue().get("product");

                int sprodId = Integer.parseInt(productId);

                if (sprodId > 0) {

                    stringRedisTemplate.opsForValue().set("product", --sprodId + "");

                    System.out.println(">>>>>>"+t.getName() + ",product:" + sprodId + "");

                }

            }finally {

                lock.unlock(); //释放锁

            }

        }else{

            System.out.println(t.getName()+"发生中断.....");

        }

    }
当然,上面的方法用lock是阻塞方法,可以用tryLock()方法。
 public void setProductId2() {

        RLock lock = redisson.getLock(lockKey);

        //60s 后自动释放锁

        try {

            boolean locked = lock.tryLock(60,TimeUnit.SECONDS);

            if(locked){

                String productId = stringRedisTemplate.opsForValue().get("product");

                int sprodId = Integer.parseInt(productId);

                if (sprodId > 0) {

                    stringRedisTemplate.opsForValue().set("product", --sprodId + "");

                    System.out.println(">>>>>>"+Thread.currentThread().getName() + ",product:" + sprodId + "");

                }

                try {

                    Thread.sleep(100);

                } catch (InterruptedException e) {

                    e.printStackTrace();

                }

            }

        } catch (InterruptedException e) {

            e.printStackTrace();

        }finally {

            lock.unlock(); //释放锁

        }

    }
  @Test

    public void testSetProductId2(){

        //开启2个线程

        Thread thread1 = new Thread(()-> productService.setProductId2());

        Thread thread2 = new Thread(()-> productService.setProductId2());

        thread1.start();

        try {

            Thread.sleep(50);

        } catch (InterruptedException e) {

            e.printStackTrace();

        }

        thread2.start();

        //thread2.interrupt();

        try {

            Thread.sleep(1000);

        } catch (InterruptedException e) {

            e.printStackTrace();

        }

    }
执行结果:

RLock接口的特点
继承标准接口Lock
拥有标准锁接口的所有特性,比如lock,unlock,trylock等等。
扩展标准接口Lock
扩展了很多方法,常用的主要有:强制锁释放,带有效期的锁,还有一组异步的方法。其中前面两个方法主要是解决标准lock可能造成的死锁问题。比如某个线程获取到锁之后,线程所在机器死机,此时获取了锁的线程无法正常释放锁导致其余的等待锁的线程一直等待下去。
可重入机制
各版本实现有差异,可重入主要考虑的是性能,同一线程在未释放锁时如果再次申请锁资源不需要走申请流程,只需要将已经获取的锁继续返回并且记录上已经重入的次数即可,与jdk里面的ReentrantLock功能类似。重入次数靠hincrby命令来配合使用,详细的参数下面的代码。
判断是否是同一个线程:
public class RedissonLock extends RedissonExpirable implements RLock {

    final UUID id;

    protected RedissonLock(CommandExecutor commandExecutor, String name, UUID id) {

        super(commandExecutor, name);

        this.internalLockLeaseTime = TimeUnit.SECONDS.toMillis(30L);

        this.commandExecutor = commandExecutor;

        this.id = id;

    }

    String getLockName(long threadId) {

        return this.id + ":" + threadId;

    }
RLock获取锁的两种场景
这里拿tryLock的源码来看:tryAcquire方法是申请锁并返回锁有效期还剩余的时间,如果为空说明锁未被其它线程申请直接获取并返回,如果获取到时间,则进入等待竞争逻辑。
public boolean tryLock(long waitTime, long leaseTime, TimeUnit unit) throws InterruptedException {

        long time = unit.toMillis(waitTime);

        long current = System.currentTimeMillis();

        final long threadId = Thread.currentThread().getId();

        Long ttl = this.tryAcquire(leaseTime, unit);

        if(ttl == null) {

            return true;

        } else {

            //有竞争获取锁

            time -= System.currentTimeMillis() - current;

            if(time <= 0L) {

                return false;

            } else {

                current = System.currentTimeMillis();

                final RFuture subscribeFuture = this.subscribe(threadId);

                if(!this.await(subscribeFuture, time, TimeUnit.MILLISECONDS)) {

                    //超过客户端设置的最大等待时间,取消订阅,返回false

                    if(!subscribeFuture.cancel(false)) {

                        subscribeFuture.addListener(new FutureListener() {

                            public void operationComplete(Future<RedissonLockEntry> future) throws Exception {

                                if(subscribeFuture.isSuccess()) {

                                    RedissonLock.this.unsubscribe(subscribeFuture, threadId);

                                }

                            }

                        });

                    }

                    return false;

                } else {

                    boolean var16;

                    try {

                        time -= System.currentTimeMillis() - current;

                        if(time <= 0L) {

                            //不等待申请锁,返回false

                            boolean currentTime1 = false;

                            return currentTime1;

                        }

                        do {

                            long currentTime = System.currentTimeMillis();

                            //tryAcquire方法是申请锁并返回锁有效期还剩余的时间

                            //如果为空说明锁未被其它线程申请直接获取并返回

                            //如果获取到时间,则进入等待竞争逻辑

                            ttl = this.tryAcquire(leaseTime, unit);

                            if(ttl == null) {

                                var16 = true;

                                return var16;

                            }

                            time -= System.currentTimeMillis() - currentTime;

                            if(time <= 0L) {

                                //不等待申请锁,返回false

                                var16 = false;

                                return var16;

                            }

                            currentTime = System.currentTimeMillis();

                            //通过信号量(共享锁)阻塞,等待解锁消息

                            if(ttl.longValue() >= 0L && ttl.longValue() < time) {

                                //ttl(剩余时间) 小于time(等待时间),就在ttl时间范围内

                                this.getEntry(threadId).getLatch().tryAcquire(ttl.longValue(), TimeUnit.MILLISECONDS);

                            } else {

                                //在time(等待时间)范围内

                                this.getEntry(threadId).getLatch().tryAcquire(time, TimeUnit.MILLISECONDS);

                            }

                            //更新等待时间(最大等待时间-已经消耗的阻塞时间)

                            time -= System.currentTimeMillis() - currentTime;

                        } while(time > 0L);

                        var16 = false;

                    } finally {

                        // 无论是否获得锁,都要取消订阅解锁消息

                        this.unsubscribe(subscribeFuture, threadId);

                    }

                    return var16;

                }

            }

        }

    }
首先看this.tryAcquire()
 private Long tryAcquire(long leaseTime, TimeUnit unit) {

        return (Long)this.get(this.tryAcquireAsync(leaseTime, unit, Thread.currentThread().getId()));

    }

private <T> RFuture<Long> tryAcquireAsync(long leaseTime, TimeUnit unit, final long threadId) {

        if (leaseTime != -1L) {

            return this.tryLockInnerAsync(leaseTime, unit, threadId, RedisCommands.EVAL_LONG);

        } else {

            RFuture<Long> ttlRemainingFuture = this.tryLockInnerAsync(30L, TimeUnit.SECONDS, threadId, RedisCommands.EVAL_LONG);

            ttlRemainingFuture.addListener(new FutureListener<Long>() {

                public void operationComplete(Future<Long> future) throws Exception {

                    if (future.isSuccess()) {

                        Long ttlRemaining = (Long)future.getNow();

                        if (ttlRemaining == null) {

                            RedissonLock.this.scheduleExpirationRenewal(threadId);

                        }

                    }

                }

            });

            return ttlRemainingFuture;

        }

    }

 <T> RFuture<T> tryLockInnerAsync(long leaseTime, TimeUnit unit, long threadId, RedisStrictCommand<T> command) {

        this.internalLockLeaseTime = unit.toMillis(leaseTime);

        return this.commandExecutor.evalWriteAsync(this.getName(), LongCodec.INSTANCE, command, "if (redis.call('exists', KEYS[1]) == 0) then redis.call('hset', KEYS[1], ARGV[2], 1); redis.call('pexpire', KEYS[1], ARGV[1]); return nil; end; if (redis.call('hexists', KEYS[1], ARGV[2]) == 1) then redis.call('hincrby', KEYS[1], ARGV[2], 1); redis.call('pexpire', KEYS[1], ARGV[1]); return nil; end; return redis.call('pttl', KEYS[1]);", Collections.singletonList(this.getName()), new Object[]{this.internalLockLeaseTime, this.getLockName(threadId)});

    }
tryAcquire()方法是申请锁并返回锁有效期还剩余的时间。
发现源码其实是一个lua脚本进行加锁操作(由于高版本的redis支持lua脚本,所以redisson也对其进行了支持,采用了脚本模式)
参数
KEYS[1](getName()) :需要加锁的key,这里需要是字符串类型。
ARGV[1](internalLockLeaseTime) :锁的超时时间,防止死锁
ARGV[2](getLockName(threadId)) :锁的唯一标识, id(UUID.randomUUID()) + “:” + threadId
--检查key是否被占用了,如果没有则设置超时时间和唯一标识,初始化value=1
if (redis.call('exists', KEYS[]) == ) then

    redis.call('hset', KEYS[], ARGV[], ); //key,field,1

    redis.call('pexpire', KEYS[], ARGV[]);

    return nil;

end;

--如果锁重入,需要判断锁的key field 都一致情况下 value 加一

if (redis.call('hexists', KEYS[], ARGV[]) == ) then

    redis.call('hincrby', KEYS[], ARGV[], ); //key,field,+1
   --锁重入重新设置超时时间

    redis.call('pexpire', KEYS[], ARGV[]);

    return nil;
end;
--返回lockKey剩余的过期时间

return redis.call('pttl', KEYS[]);
加锁的流程:
- 判断lock键是否存在,不存在直接调用hset存储当前线程信息并且设置过期时间,返回nil,告诉客户端直接获取到锁。
- 判断lock键是否存在,存在则将重入次数加1,并重新设置过期时间,返回nil,告诉客户端直接获取到锁。
- 被其它线程已经锁定,返回锁有效期的剩余时间,告诉客户端需要等待。
key[1:]lock.com.paic.phssp.springtest.redisson.ProductService.anotationProd#product.1
agv[1]:e9ca7a5b-e7d5-4ebe-968c-1759f690984d75
agv[2]:1000
同理unlockInnerAsync()解锁:
参数:
KEYS[1](getName()):需要加锁的key,这里需要是字符串类型。
KEYS[2](getChannelName()):redis消息的ChannelName,一个分布式锁对应唯一的一个 channelName:“redisson_lock__channel__{” + getName() + “}”
ARGV[1](LockPubSub.unlockMessage):redis消息体,这里只需要一个字节的标记就可以,主要标记redis的key已经解锁,再结合redis的Subscribe,能唤醒其他订阅解锁消息的客户端线程申请锁。
ARGV[2](internalLockLeaseTime):锁的超时时间,防止死锁
ARGV[3](getLockName(threadId)) :锁的唯一标识, id(UUID.randomUUID()) + “:” + threadId--
--如果keys[1]不存在,则发布消息,说明已经被解锁了

if (redis.call('exists', KEYS[]) == ) then

    redis.call('publish', KEYS[], ARGV[]);

    return ;

end;
--key和field不匹配,说明当前客户端线程没有持有锁,不能主动解锁

if (redis.call('hexists', KEYS[], ARGV[]) == ) then

    return nil;

end;
--将value减1,这里主要用在重入锁

local counter = redis.call('hincrby', KEYS[], ARGV[], -);

if (counter > ) then

    redis.call('pexpire', KEYS[], ARGV[]);

    return ;

else
    --删除key并消息

    redis.call('del', KEYS[]);

    redis.call('publish', KEYS[], ARGV[]);

    return ;

end;

return nil;
解锁
- 如果lock键不存在,发消息说锁已经可用
- 如果锁不是被当前线程锁定,则返回nil
- 由于支持可重入,在解锁时将重入次数需要减1
- 如果计算后的重入次数>0,则重新设置过期时间
- 如果计算后的重入次数<=0,则发消息说锁已经可用
锁续期:
就是当线程运行时间超过lock过时时间,如何保证锁不释放,而是等到线程结束后释放。
tryAcquireAsync()-->scheduleExpirationRenewal()
private void scheduleExpirationRenewal(final long threadId) {

        if (!expirationRenewalMap.containsKey(this.getEntryName())) {

            Timeout task = this.commandExecutor.getConnectionManager().newTimeout(new TimerTask() {

                public void run(Timeout timeout) throws Exception {

                    RFuture<Boolean> future = RedissonLock.this.commandExecutor.evalWriteAsync(RedissonLock.this.getName(), LongCodec.INSTANCE, RedisCommands.EVAL_BOOLEAN, "if (redis.call('hexists', KEYS[1], ARGV[2]) == 1) then redis.call('pexpire', KEYS[1], ARGV[1]); return 1; end; return 0;", Collections.singletonList(RedissonLock.this.getName()), new Object[]{RedissonLock.this.internalLockLeaseTime, RedissonLock.this.getLockName(threadId)});

                    future.addListener(new FutureListener<Boolean>() {

                        public void operationComplete(Future<Boolean> future) throws Exception {

                            RedissonLock.expirationRenewalMap.remove(RedissonLock.this.getEntryName());

                            if (!future.isSuccess()) {

                                RedissonLock.log.error("Can't update lock " + RedissonLock.this.getName() + " expiration", future.cause());

                            } else {

                                if ((Boolean)future.getNow()) {

                                    RedissonLock.this.scheduleExpirationRenewal(threadId);

                                }

                            }

                        }

                    });

                }

            }, this.internalLockLeaseTime / 3L, TimeUnit.MILLISECONDS);

            if (expirationRenewalMap.putIfAbsent(this.getEntryName(), task) != null) {

                task.cancel();

            }

        }

    }
获取锁成功就会开启一个定时任务,频率:internalLockLeaseTime / 3L,当线程没结束会续期,当宕机时,定时任务跑不了,就不会续期。锁到期就释放。
参考:
https://www.cnblogs.com/zhongkaiuu/p/redisson.html
https://www.cnblogs.com/ASPNET2008/p/6385249.html
https://www.jianshu.com/p/b12e1c0b3917
Redisson实现分布式锁(一)的更多相关文章
- Redisson实现分布式锁
转: Redisson实现分布式锁 Redisson文档参考:https://github.com/redisson/redisson/wiki/%E7%9B%AE%E5%BD%95 redis是实现 ...
- 使用Redisson实现分布式锁,Spring AOP简化之
源码 Redisson概述 Redisson是一个在Redis的基础上实现的Java驻内存数据网格(In-Memory Data Grid).它不仅提供了一系列的分布式的Java常用对象,还提供了许多 ...
- Redisson实现分布式锁(3)—项目落地实现
Redisson实现分布式锁(3)-项目落地实现 有关Redisson实现分布式锁前面写了两篇博客作为该项目落地的铺垫. 1.Redisson实现分布式锁(1)---原理 2.Redisson实现分布 ...
- Redisson实现分布式锁(2)—RedissonLock
Redisson实现分布式锁(2)-RedissonLock 有关Redisson实现分布式锁上一篇博客讲了分布式的锁原理:Redisson实现分布式锁---原理 这篇主要讲RedissonLock和 ...
- Redisson实现分布式锁(1)---原理
Redisson实现分布式锁(1)---原理 有关Redisson作为实现分布式锁,总的分3大模块来讲. 1.Redisson实现分布式锁原理 2.Redisson实现分布式锁的源码解析 3.Redi ...
- 利用Redisson实现分布式锁及其底层原理解析
Redis介绍 参考地址:https://blog.csdn.net/turbo_zone/article/details/83422215 redis是一个key-value存储系统.和Memcac ...
- 【高并发】你知道吗?大家都在使用Redisson实现分布式锁了!!
写在前面 忘记之前在哪个群里有朋友在问:有出分布式锁的文章吗-@冰河?我的回答是:这周会有,也是[高并发]专题的.想了想,还是先发一个如何使用Redisson实现分布式锁的文章吧?为啥?因为使用Red ...
- Redisson 实现分布式锁的原理分析
写在前面 在了解分布式锁具体实现方案之前,我们应该先思考一下使用分布式锁必须要考虑的一些问题. 互斥性:在任意时刻,只能有一个进程持有锁. 防死锁:即使有一个进程在持有锁的期间崩溃而未能主动释放锁, ...
- spring boot:用redis+redisson实现分布式锁(redisson3.11.1/spring boot 2.2)
一,为什么要使用分布式锁? 如果在并发时锁定代码的执行,java中用synchronized锁保证了线程的原子性和可见性 但java锁只在单机上有效,如果是多台服务器上的并发访问,则需要使用分布式锁, ...
- 冷饭新炒:理解Redisson中分布式锁的实现
前提 在很早很早之前,写过一篇文章介绍过Redis中的red lock的实现,但是在生产环境中,笔者所负责的项目使用的分布式锁组件一直是Redisson.Redisson是具备多种内存数据网格特性的基 ...
随机推荐
- NSIS+Duilib 制作Windows安装包
转载:https://www.cnblogs.com/zzllily/articles/5443850.html 转载:https://blog.csdn.net/bruce135lee/articl ...
- 从输入URL到页面显示发生了什么
阅读目录 1.输入地址 2.浏览器查找域名的 IP 地址 3.浏览器向 web 服务器发送一个 HTTP 请求 4.服务器的永久重定向响应 5.浏览器跟踪重定向地址 6.服务器处理请求 7.服务器返回 ...
- Selenium Webdriver弹出框的种种类型
普通弹出框 div 一般这种 弹出框都属于dom的一部分,我们查看一下页面源码就可以定位到改弹出框了,然后定位下右上角的那个关闭, 这里有id,所以很方便通过 dr.findElement(By.id ...
- topcoder srm 530 div1
problem1 link 对于每个还未切掉的‘X’用cutter作用一次.从左上角到右下角,依次判断即可. problem2 link 首先,如果一个顶点不能从0到达或者不能到达节点$n-1$,那么 ...
- Ubuntu 18.04 修改gedit的配色方案
下图中的蓝色的注释代码,真是有点让人瞎眼的感觉 去这个网站 https://github.com/mig/gedit-themes/tree/master 下载所有后解压到/usr/share/gtk ...
- hdfoo站点开发笔记-2
httpd的目录的 Options: (里面的单词都是用的复数): Options Indexes FollowSymLinks 为了避免有些目录下没有生成deny.htm而显示列表, 可以直接给 / ...
- 如何 使用vim的 session和viminfo 恢复上一次工作的环境??
使用vim的 session和viminfo 恢复上一次工作的环境, 主要有两个方面的内容需要保存: 要使用session,保存窗口和视图, 及全局设置 要使用viminfo保存 命令行历史, 搜索历 ...
- POJ 3041 Asteroids(最小点覆盖)题解
题意:n*n的网格中有k个点,开一枪能摧毁一行或一列的所有点,问最少开几枪 思路:我们把网格看成两个集合,行集合和列集合,如果有点x,y那么就连接x->y,所以我们只要做最小点覆盖就好了. 参考 ...
- 【Hadoop 分布式部署 八:分布式协作框架Zookeeper架构功能讲解 及本地模式安装部署和命令使用 】
What is Zookeeper 是一个开源的分布式的,为分布式应用提供协作服务的Apache项目 提供一个简单的原语集合,以便与分布式应用可以在他之上构建更高层次的同步服务 设计非常简单易于编 ...
- 【ASP.Net】 http请求中get,put,post,delete的区别与使用总结
在web api的设计上, 需要设计这个每个action对应的资源的请求方法是什么. Get方法是对服务器资源的请求获取, 一般get方法的参数都放在URL当中的. 所以通常情况下这种请求方式都是不安 ...