神经网络手写数字识别numpy实现
本文摘自Michael Nielsen的Neural Network and Deep Learning,该书的github网址为:https://github.com/mnielsen/neural-networks-and-deep-learning
"""

network.py

~~~~~~~~~~

A module to implement the stochastic gradient descent learning

algorithm for a feedforward neural network.  Gradients are calculated

using backpropagation.  Note that I have focused on making the code

simple, easily readable, and easily modifiable.  It is not optimized,

and omits many desirable features.

"""

#### Libraries

# Standard library

import random

# Third-party libraries

import numpy as np

class Network(object):

    def __init__(self, sizes):

        """The list ``sizes`` contains the number of neurons in the

        respective layers of the network.  For example, if the list

        was [2, 3, 1] then it would be a three-layer network, with the

        first layer containing 2 neurons, the second layer 3 neurons,

        and the third layer 1 neuron.  The biases and weights for the

        network are initialized randomly, using a Gaussian

        distribution with mean 0, and variance 1.  Note that the first

        layer is assumed to be an input layer, and by convention we

        won't set any biases for those neurons, since biases are only

        ever used in computing the outputs from later layers."""

        self.num_layers = len(sizes)

        self.sizes = sizes

        self.biases = [np.random.randn(y, 1) for y in sizes[1:]]

        self.weights = [np.random.randn(y, x)

                        for x, y in zip(sizes[:-1], sizes[1:])]

    def feedforward(self, a):

        """Return the output of the network if ``a`` is input."""

        for b, w in zip(self.biases, self.weights):

            a = sigmoid(np.dot(w, a)+b)

        return a

    def SGD(self, training_data, epochs, mini_batch_size, eta,

            test_data=None):

        """Train the neural network using mini-batch stochastic

        gradient descent.  The ``training_data`` is a list of tuples

        ``(x, y)`` representing the training inputs and the desired

        outputs.  The other non-optional parameters are

        self-explanatory.  If ``test_data`` is provided then the

        network will be evaluated against the test data after each

        epoch, and partial progress printed out.  This is useful for

        tracking progress, but slows things down substantially."""

        if test_data: n_test = len(test_data)

        n = len(training_data)

        for j in xrange(epochs):

            random.shuffle(training_data)

            mini_batches = [

                training_data[k:k+mini_batch_size]

                for k in xrange(0, n, mini_batch_size)]

            for mini_batch in mini_batches:

                self.update_mini_batch(mini_batch, eta)

            if test_data:

                print "Epoch {0}: {1} / {2}".format(

                    j, self.evaluate(test_data), n_test)

            else:

                print "Epoch {0} complete".format(j)

    def update_mini_batch(self, mini_batch, eta):

        """Update the network's weights and biases by applying

        gradient descent using backpropagation to a single mini batch.

        The ``mini_batch`` is a list of tuples ``(x, y)``, and ``eta``

        is the learning rate."""

        nabla_b = [np.zeros(b.shape) for b in self.biases]

        nabla_w = [np.zeros(w.shape) for w in self.weights]

        for x, y in mini_batch:

            delta_nabla_b, delta_nabla_w = self.backprop(x, y)

            nabla_b = [nb+dnb for nb, dnb in zip(nabla_b, delta_nabla_b)]

            nabla_w = [nw+dnw for nw, dnw in zip(nabla_w, delta_nabla_w)]

        self.weights = [w-(eta/len(mini_batch))*nw

                        for w, nw in zip(self.weights, nabla_w)]

        self.biases = [b-(eta/len(mini_batch))*nb

                       for b, nb in zip(self.biases, nabla_b)]

    def backprop(self, x, y):

        """Return a tuple ``(nabla_b, nabla_w)`` representing the

        gradient for the cost function C_x.  ``nabla_b`` and

        ``nabla_w`` are layer-by-layer lists of numpy arrays, similar

        to ``self.biases`` and ``self.weights``."""

        nabla_b = [np.zeros(b.shape) for b in self.biases]

        nabla_w = [np.zeros(w.shape) for w in self.weights]

        # feedforward

        activation = x

        activations = [x] # list to store all the activations, layer by layer

        zs = [] # list to store all the z vectors, layer by layer

        for b, w in zip(self.biases, self.weights):

            z = np.dot(w, activation)+b

            zs.append(z)

            activation = sigmoid(z)

            activations.append(activation)

        # backward pass

        delta = self.cost_derivative(activations[-1], y) * \

            sigmoid_prime(zs[-1])

        nabla_b[-1] = delta

        nabla_w[-1] = np.dot(delta, activations[-2].transpose())

        # Note that the variable l in the loop below is used a little

        # differently to the notation in Chapter 2 of the book.  Here,

        # l = 1 means the last layer of neurons, l = 2 is the

        # second-last layer, and so on.  It's a renumbering of the

        # scheme in the book, used here to take advantage of the fact

        # that Python can use negative indices in lists.

        for l in xrange(2, self.num_layers):

            z = zs[-l]

            sp = sigmoid_prime(z)

            delta = np.dot(self.weights[-l+1].transpose(), delta) * sp

            nabla_b[-l] = delta

            nabla_w[-l] = np.dot(delta, activations[-l-1].transpose())

        return (nabla_b, nabla_w)

    def evaluate(self, test_data):

        """Return the number of test inputs for which the neural

        network outputs the correct result. Note that the neural

        network's output is assumed to be the index of whichever

        neuron in the final layer has the highest activation."""

        test_results = [(np.argmax(self.feedforward(x)), y)

                        for (x, y) in test_data]

        return sum(int(x == y) for (x, y) in test_results)

    def cost_derivative(self, output_activations, y):

        """Return the vector of partial derivatives \partial C_x /

        \partial a for the output activations."""

        return (output_activations-y)

#### Miscellaneous functions

def sigmoid(z):

    """The sigmoid function."""

    return 1.0/(1.0+np.exp(-z))

def sigmoid_prime(z):

    """Derivative of the sigmoid function."""

    return sigmoid(z)*(1-sigmoid(z))
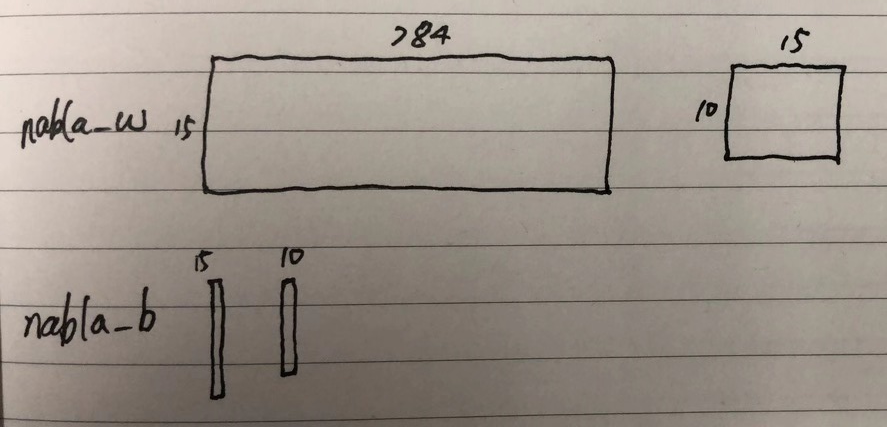
假设输入的sizes是[784, 15, 10],下图有助于理解数据结构:

神经网络手写数字识别numpy实现的更多相关文章
- 基于Numpy的神经网络+手写数字识别
基于Numpy的神经网络+手写数字识别 本文代码来自Tariq Rashid所著<Python神经网络编程> 代码分为三个部分,框架如下所示: # neural network class ...
- TensorFlow 卷积神经网络手写数字识别数据集介绍
欢迎大家关注我们的网站和系列教程:http://www.tensorflownews.com/,学习更多的机器学习.深度学习的知识! 手写数字识别 接下来将会以 MNIST 数据集为例,使用卷积层和池 ...
- 深度学习-使用cuda加速卷积神经网络-手写数字识别准确率99.7%
源码和运行结果 cuda:https://github.com/zhxfl/CUDA-CNN C语言版本参考自:http://eric-yuan.me/ 针对著名手写数字识别的库mnist,准确率是9 ...
- 深度学习(一):Python神经网络——手写数字识别
声明:本文章为阅读书籍<Python神经网络编程>而来,代码与书中略有差异,书籍封面: 源码 若要本地运行,请更改源码中图片与数据集的位置,环境为 Python3.6x. 1 import ...
- Pytorch1.0入门实战一:LeNet神经网络实现 MNIST手写数字识别
记得第一次接触手写数字识别数据集还在学习TensorFlow,各种sess.run(),头都绕晕了.自从接触pytorch以来,一直想写点什么.曾经在2017年5月,Andrej Karpathy发表 ...
- 第二节,TensorFlow 使用前馈神经网络实现手写数字识别
一 感知器 感知器学习笔记:https://blog.csdn.net/liyuanbhu/article/details/51622695 感知器(Perceptron)是二分类的线性分类模型,其输 ...
- 卷积神经网络CNN 手写数字识别
1. 知识点准备 在了解 CNN 网络神经之前有两个概念要理解,第一是二维图像上卷积的概念,第二是 pooling 的概念. a. 卷积 关于卷积的概念和细节可以参考这里,卷积运算有两个非常重要特性, ...
- TensorFlow.NET机器学习入门【5】采用神经网络实现手写数字识别(MNIST)
从这篇文章开始,终于要干点正儿八经的工作了,前面都是准备工作.这次我们要解决机器学习的经典问题,MNIST手写数字识别. 首先介绍一下数据集.请首先解压:TF_Net\Asset\mnist_png. ...
- 利用c++编写bp神经网络实现手写数字识别详解
利用c++编写bp神经网络实现手写数字识别 写在前面 从大一入学开始,本菜菜就一直想学习一下神经网络算法,但由于时间和资源所限,一直未展开比较透彻的学习.大二下人工智能课的修习,给了我一个学习的契机. ...
随机推荐
- BZOJ 4129 Haruna’s Breakfast ( 树上带修莫队 )
题面 求树上某路径上最小的没出现过的权值,有单点修改 添加链接描述 分析 树上带修莫队板题,问题是怎么求最小的没出现过的权值. 因为只有nnn个点,所以没出现过的最小值一定在[0,n][0,n][0, ...
- MyBankgon功能
.帐户类 User 复制代码 using System; using System.Collections.Generic; using System.Linq; using System.Text; ...
- Android系统输入事件分发详解
什么是输入事件? 我们知道,运行android系统的设备本质上是一台计算机,使用者在和计算机进行交互的时候可以抽象成简单的对计算机的输入和输出(IO).那么对于运行在计算机上的操作系统来说,操作系统在 ...
- 008_STM32之_keil编译内存大小解析
Program Size: Code=28784 RO-data=6480 RW-data=60 ZI-data=3900 的含义 1. Code: 程序所占用的FLASH大小,存储在FLASH. ...
- 配置文件的属性ENC加密
转载:https://www.cnblogs.com/zqyx/p/9687136.html 在micro service体系中,有了config server,我们可以把配置存放在git.svn.数 ...
- [Luogu] 矩阵加速(数列)
题面:https://www.luogu.org/problemnew/show/P1939 题解:https://www.zybuluo.com/wsndy-xx/note/1153810
- (WA)BZOJ 1503: [NOI2004]郁闷的出纳员
二次联通门 : BZOJ 1503: [NOI2004]郁闷的出纳员 /* BZOJ 1503: [NOI2004]郁闷的出纳员 考虑这样一个事实 无论是加或减 都是针对全体人员的 那么只需要记录一个 ...
- MySQL数据分析-(11)表补充:数据类型
大家好,我是jacky,很高兴继续跟大家学习<Mysql 数据分析实战系列教程>,上次课程jacky讲解了表层面的增删改查,jacky说最重要的是增,增就是创建表,作为一个严谨的MySQL ...
- mysql建表问题
PUBLIC Stack Overflow Tags Users Jobs TeamsQ&A for workLearn More MySQL error: The maximum col ...
- webpack - 优化阻塞渲染的css
随着浏览器的日新月异,网页的性能和速度越来越好,并且对于用户体验来说也越来越重要. 现在有很多优化页面的办法,比如:静态资源的合并和压缩,code splitting,DNS预读取等等. 本文介绍的是 ...