神经网络手写数字识别numpy实现
本文摘自Michael Nielsen的Neural Network and Deep Learning,该书的github网址为:https://github.com/mnielsen/neural-networks-and-deep-learning
"""
network.py
~~~~~~~~~~
A module to implement the stochastic gradient descent learning
algorithm for a feedforward neural network. Gradients are calculated
using backpropagation. Note that I have focused on making the code
simple, easily readable, and easily modifiable. It is not optimized,
and omits many desirable features.
""" #### Libraries
# Standard library
import random # Third-party libraries
import numpy as np class Network(object): def __init__(self, sizes):
"""The list ``sizes`` contains the number of neurons in the
respective layers of the network. For example, if the list
was [2, 3, 1] then it would be a three-layer network, with the
first layer containing 2 neurons, the second layer 3 neurons,
and the third layer 1 neuron. The biases and weights for the
network are initialized randomly, using a Gaussian
distribution with mean 0, and variance 1. Note that the first
layer is assumed to be an input layer, and by convention we
won't set any biases for those neurons, since biases are only
ever used in computing the outputs from later layers."""
self.num_layers = len(sizes)
self.sizes = sizes
self.biases = [np.random.randn(y, 1) for y in sizes[1:]]
self.weights = [np.random.randn(y, x)
for x, y in zip(sizes[:-1], sizes[1:])] def feedforward(self, a):
"""Return the output of the network if ``a`` is input."""
for b, w in zip(self.biases, self.weights):
a = sigmoid(np.dot(w, a)+b)
return a def SGD(self, training_data, epochs, mini_batch_size, eta,
test_data=None):
"""Train the neural network using mini-batch stochastic
gradient descent. The ``training_data`` is a list of tuples
``(x, y)`` representing the training inputs and the desired
outputs. The other non-optional parameters are
self-explanatory. If ``test_data`` is provided then the
network will be evaluated against the test data after each
epoch, and partial progress printed out. This is useful for
tracking progress, but slows things down substantially."""
if test_data: n_test = len(test_data)
n = len(training_data)
for j in xrange(epochs):
random.shuffle(training_data)
mini_batches = [
training_data[k:k+mini_batch_size]
for k in xrange(0, n, mini_batch_size)]
for mini_batch in mini_batches:
self.update_mini_batch(mini_batch, eta)
if test_data:
print "Epoch {0}: {1} / {2}".format(
j, self.evaluate(test_data), n_test)
else:
print "Epoch {0} complete".format(j) def update_mini_batch(self, mini_batch, eta):
"""Update the network's weights and biases by applying
gradient descent using backpropagation to a single mini batch.
The ``mini_batch`` is a list of tuples ``(x, y)``, and ``eta``
is the learning rate."""
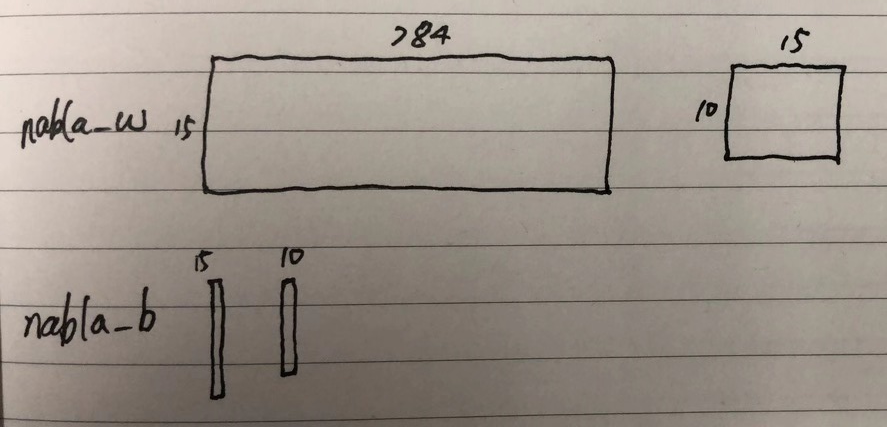
nabla_b = [np.zeros(b.shape) for b in self.biases]
nabla_w = [np.zeros(w.shape) for w in self.weights]
for x, y in mini_batch:
delta_nabla_b, delta_nabla_w = self.backprop(x, y)
nabla_b = [nb+dnb for nb, dnb in zip(nabla_b, delta_nabla_b)]
nabla_w = [nw+dnw for nw, dnw in zip(nabla_w, delta_nabla_w)]
self.weights = [w-(eta/len(mini_batch))*nw
for w, nw in zip(self.weights, nabla_w)]
self.biases = [b-(eta/len(mini_batch))*nb
for b, nb in zip(self.biases, nabla_b)] def backprop(self, x, y):
"""Return a tuple ``(nabla_b, nabla_w)`` representing the
gradient for the cost function C_x. ``nabla_b`` and
``nabla_w`` are layer-by-layer lists of numpy arrays, similar
to ``self.biases`` and ``self.weights``."""
nabla_b = [np.zeros(b.shape) for b in self.biases]
nabla_w = [np.zeros(w.shape) for w in self.weights]
# feedforward
activation = x
activations = [x] # list to store all the activations, layer by layer
zs = [] # list to store all the z vectors, layer by layer
for b, w in zip(self.biases, self.weights):
z = np.dot(w, activation)+b
zs.append(z)
activation = sigmoid(z)
activations.append(activation)
# backward pass
delta = self.cost_derivative(activations[-1], y) * \
sigmoid_prime(zs[-1])
nabla_b[-1] = delta
nabla_w[-1] = np.dot(delta, activations[-2].transpose())
# Note that the variable l in the loop below is used a little
# differently to the notation in Chapter 2 of the book. Here,
# l = 1 means the last layer of neurons, l = 2 is the
# second-last layer, and so on. It's a renumbering of the
# scheme in the book, used here to take advantage of the fact
# that Python can use negative indices in lists.
for l in xrange(2, self.num_layers):
z = zs[-l]
sp = sigmoid_prime(z)
delta = np.dot(self.weights[-l+1].transpose(), delta) * sp
nabla_b[-l] = delta
nabla_w[-l] = np.dot(delta, activations[-l-1].transpose())
return (nabla_b, nabla_w) def evaluate(self, test_data):
"""Return the number of test inputs for which the neural
network outputs the correct result. Note that the neural
network's output is assumed to be the index of whichever
neuron in the final layer has the highest activation."""
test_results = [(np.argmax(self.feedforward(x)), y)
for (x, y) in test_data]
return sum(int(x == y) for (x, y) in test_results) def cost_derivative(self, output_activations, y):
"""Return the vector of partial derivatives \partial C_x /
\partial a for the output activations."""
return (output_activations-y) #### Miscellaneous functions
def sigmoid(z):
"""The sigmoid function."""
return 1.0/(1.0+np.exp(-z)) def sigmoid_prime(z):
"""Derivative of the sigmoid function."""
return sigmoid(z)*(1-sigmoid(z))
假设输入的sizes是[784, 15, 10],下图有助于理解数据结构:

神经网络手写数字识别numpy实现的更多相关文章
- 基于Numpy的神经网络+手写数字识别
基于Numpy的神经网络+手写数字识别 本文代码来自Tariq Rashid所著<Python神经网络编程> 代码分为三个部分,框架如下所示: # neural network class ...
- TensorFlow 卷积神经网络手写数字识别数据集介绍
欢迎大家关注我们的网站和系列教程:http://www.tensorflownews.com/,学习更多的机器学习.深度学习的知识! 手写数字识别 接下来将会以 MNIST 数据集为例,使用卷积层和池 ...
- 深度学习-使用cuda加速卷积神经网络-手写数字识别准确率99.7%
源码和运行结果 cuda:https://github.com/zhxfl/CUDA-CNN C语言版本参考自:http://eric-yuan.me/ 针对著名手写数字识别的库mnist,准确率是9 ...
- 深度学习(一):Python神经网络——手写数字识别
声明:本文章为阅读书籍<Python神经网络编程>而来,代码与书中略有差异,书籍封面: 源码 若要本地运行,请更改源码中图片与数据集的位置,环境为 Python3.6x. 1 import ...
- Pytorch1.0入门实战一:LeNet神经网络实现 MNIST手写数字识别
记得第一次接触手写数字识别数据集还在学习TensorFlow,各种sess.run(),头都绕晕了.自从接触pytorch以来,一直想写点什么.曾经在2017年5月,Andrej Karpathy发表 ...
- 第二节,TensorFlow 使用前馈神经网络实现手写数字识别
一 感知器 感知器学习笔记:https://blog.csdn.net/liyuanbhu/article/details/51622695 感知器(Perceptron)是二分类的线性分类模型,其输 ...
- 卷积神经网络CNN 手写数字识别
1. 知识点准备 在了解 CNN 网络神经之前有两个概念要理解,第一是二维图像上卷积的概念,第二是 pooling 的概念. a. 卷积 关于卷积的概念和细节可以参考这里,卷积运算有两个非常重要特性, ...
- TensorFlow.NET机器学习入门【5】采用神经网络实现手写数字识别(MNIST)
从这篇文章开始,终于要干点正儿八经的工作了,前面都是准备工作.这次我们要解决机器学习的经典问题,MNIST手写数字识别. 首先介绍一下数据集.请首先解压:TF_Net\Asset\mnist_png. ...
- 利用c++编写bp神经网络实现手写数字识别详解
利用c++编写bp神经网络实现手写数字识别 写在前面 从大一入学开始,本菜菜就一直想学习一下神经网络算法,但由于时间和资源所限,一直未展开比较透彻的学习.大二下人工智能课的修习,给了我一个学习的契机. ...
随机推荐
- linux实操_shell系统函数
basename函数: 功能:返回完整路径最后/的后面部分,常用于获取文件名. 基本语法: basename 路径 后缀 不加后缀:运行后 加后缀:运行后 dirname函数: 功能:返回完整路径最后 ...
- C# 截图不失真
Bitmap bmp = new Bitmap(@"E:\2222.jpg"); Bitmap bmp2 = bmp.Clone(new Rectangle(10 + 80, 15 ...
- pandas处理json脱坑(一)--JsonError: Expecting property name enclosed in double quotes
python执行json.loads(…)时遇到的错误json格式的文本中应该用双引号,而不是单引号,如: brief=json.loads(row["brief"].replac ...
- mybatis配置和映射文件
配置: <?xml version="1.0" encoding="UTF-8"?><!DOCTYPE configurationPUBLIC ...
- jQuery和原生JS的对比
原生JS的缺点: 不能添加多个入口函数(window.onload),如果添加了多个,后面的会把前面的覆盖掉 原生js的api名字太长,难以书写,不易记住 原生js有的代码冗余 原生js中的属性或者方 ...
- 查找、AVL树、散列表
插值查找是二分查找的改进,斐波那契查找是插值查找的改进. 二分查找:mid=(low+high)/ 2 插值查找:mid=(key-a[low])*(high-low)/ (a[high]-a[l ...
- Appium自动化测试教程-自学网-SDK
SDK:软件开发工具包,被软件开发工程师用于特定的软件包.软件框架.硬件平台.操作系统等建立应用软件的开发工具的集合. 因此,Android SDK指的是Android专属的软件开发工具包. 1,安装 ...
- 下载、配置全新的eclipse
1.https://www.eclipse.org/downloads/ 2.确保安装配置了JDK,打开eclipse-inst-win64.exe,让eclipse installer程序UPDAT ...
- SpringMVC--DispatcherServlet
DispatcherServlet 是前端控制器设计模式的实现,提供 Spring Web MVC 的集中访问点,而且负责职责的分派,而且与 Spring IoC 容器无缝集成,从而可以获得 Spri ...
- reGeorg(不需要外网ip的代理)
reGeorg _____ ______ __|___ |__ ______ _____ _____ ______ | | | ___|| ___| || ___|/ \| | | ___| | \ ...