Android开发之创建App Widget和更新Widget内容
App Widgets
App Widgets are miniature application views that can be embedded in other applications (such as the Home screen) and receive periodic updates. These views are referred to as Widgets in the user interface, and you can publish one with an App Widget provider. An application component that is able to hold other App Widgets is called an App Widget host.
翻译:App Widgets是一个显示在别的application中(比如显示在桌面程序)的微型application views,并且定期接受更新。这个views在用户界面被叫Widgets,你可以发布一个自己应用的Widget。Widget的application称为App Widget host。
1、AppWidget 框架类
2、AppWidget 框架的主要类介绍
3、创建步骤和代码
1、AppWidget 框架类
- 1、AppWidgetProvider :继承自 BroadcastRecevier , 在AppWidget 应用 update、enable、disable 和 delete 时接收通知。其中,onUpdate、onReceive 是最常用到的方法,它们接收更新通知。
- 2、 AppWidgetProvderInfo:描述 AppWidget 的大小、更新频率和初始界面等信息,以XML 文件形式存在于应用的 res/xml/目录下。
- 3、AppWidgetManger :负责管理 AppWidget ,向 AppwidgetProvider 发送通知。
- 4、RemoteViews :一个可以在其他应用进程中运行的类,向 AppWidgetProvider 发送通知。
2、AppWidget 框架的主要类介绍
1) AppWidgetManger 类
- bindAppWidgetId(int appWidgetId, ComponentName provider)
通过给定的ComponentName 绑定appWidgetId - getAppWidgetIds(ComponentName provider)
通过给定的ComponentName 获取AppWidgetId - getAppWidgetInfo(int appWidgetId)
通过AppWidgetId 获取 AppWidget 信息 - getInstalledProviders()
返回一个List<AppWidgetProviderInfo>的信息 - getInstance(Context context)
获取 AppWidgetManger 实例使用的上下文对象 - updateAppWidget(int[] appWidgetIds, RemoteViews views)
通过appWidgetId 对传进来的 RemoteView 进行修改,并重新刷新AppWidget 组件 - updateAppWidget(ComponentName provider, RemoteViews views)
通过 ComponentName 对传进来的 RemoeteView 进行修改,并重新刷新AppWidget 组件 - updateAppWidget(int appWidgetId, RemoteViews views)
通过appWidgetId 对传进来的 RemoteView 进行修改,并重新刷新AppWidget 组件
2) 继承自 AppWidgetProvider 可实现的方法为如下:
- 1、onDeleted(Context context, int[] appWidgetIds)
- 2、onDisabled(Context context)
- 3、onEnabled(Context context)
- 4、onReceive(Context context, Intent intent)
Tip:因为 AppWidgetProvider 是继承自BroadcastReceiver 所以可以重写onRecevie 方法,当然必须在后台注册Receiver - 5、onUpdate(Context context, AppWidgetManager appWidgetManager, int[] appWidgetIds)
- 一般来说都是重写onUpdate就够了
3.应用创建Widget步骤如下:
1.创建一个继承了AppWidgetProvider的类,AppWidgetProvider是BroadcastReceiver。所以创建的类也是BroadcastReceiver
2.在清单文件中注册该类,需要注意的是该类的action为:android.appwidget.action.APPWIDGET_UPDATE。
         <receiver android:name=".receiver.MyWidget">

             <intent-filter>

                 <action android:name="android.appwidget.action.APPWIDGET_UPDATE"/>

             </intent-filter>

             <meta-data

                 android:name="android.appwidget.provider"

                 android:resource="@xml/myappwidget_info"/>

         </receiver>
在清单文件中,该类需要meta-data,
name为:android.appwidget.provider
resource为:在res/xml下定义的一个xml文件
3.创建清单文件中的resource文件
在res/xml下创建一个根节点为appwidget-provider的XML文件
 <?xml version="1.0" encoding="utf-8"?>

 <appwidget-provider xmlns:android="http://schemas.android.com/apk/res/android"

                     android:initialLayout="@layout/appwidget_view"

                     android:minWidth="250dp"

                     android:minHeight="40dp"

                     android:previewImage="@drawable/ic_launcher"

                     android:updatePeriodMillis="1800000">

 </appwidget-provider>
initialLayout:Widget的布局文件,确定Widget中有哪些组件,怎么排列
minWidth:最小宽度 计算公式为:(70XN)-30,N为打算在屏幕上占几格,高度也是这么计算的
minHeight:最小高度
previewImage:选择部件时 展示的图像
updatePeriodMillis:更新时间间隔,单位毫秒。系统为了省电,默认是30分钟更新一次,如果你设置的值比30分钟小,系统也是30分钟才会更新一次。因为需要频繁更新的Widget,需要自己起一个service进行更新了。
只需要以上内容就可以使用Widget了,下面还有一些参数:
label: 选择部件时看到标签
icon: 选择部件时看到图标
resizeMode :调整size模式
configure: 如果需要在启动前先启动一个Activity进行设置,在这里给出Activity的完整类名
widgetCategory="keyguard|home_screen" widget:可添加的位置 锁屏界面|桌面
这样就可以完成一个Widget。在组件中就可以看到定义的Widget了,可以放在桌面程序上。
更新Widget需要用的AppWidgetManger类
以下为实现的代码和更新Widget的代码:
1.MyWidget.java
 public class MyWidget extends AppWidgetProvider {

     //当把桌面上的Widget全部都删掉的时候,调用该方法

     @Override

     public void onDisabled(Context context) {

         super.onDisabled(context);

         Intent stopUpdateIntent = new Intent(context, UpdateWidgetService.class);

         context.stopService(stopUpdateIntent);

     }

     //当Widget第一次创建的时候,该方法调用,然后启动后台的服务

     @Override

     public void onEnabled(Context context) {

         super.onEnabled(context);

         Intent startUpdateIntent = new Intent(context, UpdateWidgetService.class);

         context.startService(startUpdateIntent);

     }

     @Override

     public void onUpdate(Context context, AppWidgetManager appWidgetManager, int[] appWidgetIds) {

         super.onUpdate(context, appWidgetManager, appWidgetIds);

     }

     //在Widget使用中,会多次调用该方法

     @Override

     public void onReceive(Context context, Intent intent) {

         super.onReceive(context, intent);

         Intent startUpdateIntent = new Intent(context, UpdateWidgetService.class);

         context.startService(startUpdateIntent);

     }

 }
2.清单文件:
         //桌面widget

         <receiver android:name=".receiver.MyWidget">

             <intent-filter>

                 <action android:name="android.appwidget.action.APPWIDGET_UPDATE"/>

             </intent-filter>

             <meta-data

                 android:name="android.appwidget.provider"

                 android:resource="@xml/myappwidget_info"/>

         </receiver>
3.myappwidget_info.xml,resource文件,定义在res/xml下
 <?xml version="1.0" encoding="utf-8"?>

 <appwidget-provider xmlns:android="http://schemas.android.com/apk/res/android"

                     android:initialLayout="@layout/appwidget_view"

                     android:minWidth="294dp"

                     android:minHeight="40dp"

                     android:previewImage="@drawable/ic_launcher"

                     android:updatePeriodMillis="1800000">

 </appwidget-provider>
4.appwidget_view.xml,Widget布局文件
 <?xml version="1.0" encoding="utf-8"?>

 <LinearLayout xmlns:android="http://schemas.android.com/apk/res/android"

               android:layout_width="match_parent"

               android:layout_height="wrap_content"

               android:background="@drawable/widget_bg_portrait"

               android:gravity="center_vertical"

               android:orientation="horizontal">

     <LinearLayout

         android:id="@+id/ll_processinfo"

         android:layout_width="0dp"

         android:layout_height="match_parent"

         android:layout_marginLeft="5dp"

         android:layout_weight="1"

         android:background="@drawable/widget_bg_portrait_child"

         android:gravity="center_vertical"

         android:orientation="vertical"

         android:paddingBottom="1dp"

         android:paddingTop="1dp">

         <TextView

             android:id="@+id/tv_runprocessnumber"

             android:layout_width="wrap_content"

             android:layout_height="wrap_content"

             android:layout_marginLeft="15dp"

             android:text="正在运行软件:14"

             android:textColor="@color/black"

             android:textSize="16sp"/>

         <ImageView

             android:layout_width="match_parent"

             android:layout_height="wrap_content"

             android:layout_marginBottom="1dp"

             android:layout_marginTop="1dp"

             android:src="@drawable/widget_bg_portrait_child_divider"/>

         <TextView

             android:id="@+id/tv_avalimem"

             android:layout_width="match_parent"

             android:layout_height="wrap_content"

             android:layout_marginLeft="15dp"

             android:text="可用内存:300.52MB"

             android:textColor="@color/black"

             android:textSize="16sp"/>

     </LinearLayout>

     <LinearLayout

         android:layout_width="wrap_content"

         android:layout_height="wrap_content"

         android:gravity="center_vertical"

         android:orientation="vertical">

         <LinearLayout

             android:layout_width="wrap_content"

             android:layout_height="wrap_content"

             android:gravity="center_vertical"

             android:orientation="horizontal"

             >

             <ImageView

                 android:layout_width="20dp"

                 android:layout_height="20dp"

                 android:src="@drawable/ic_launcher"/>

             <TextView

                 android:layout_width="wrap_content"

                 android:layout_height="wrap_content"

                 android:text="手机安全卫士"

                 android:textColor="@color/white"/>

         </LinearLayout>

         <Button

             android:id="@+id/btn_killall"

             android:layout_width="wrap_content"

             android:layout_height="wrap_content"

             android:layout_centerVertical="true"

             android:layout_marginTop="3dp"

             android:background="@drawable/function_greenbutton_selector"

             android:gravity="center_vertical"

             android:text="一键清理"

             android:textColor="@color/function_greenbutton_textcolor_selector"/>

     </LinearLayout>

 </LinearLayout>
5.UpdateWidgetService.java,后台更新Widget的服务
public class UpdateWidgetService extends Service {
private Timer timer;
private TimerTask task;
public UpdateWidgetService() {
}
@Override
public IBinder onBind(Intent intent) {
throw new UnsupportedOperationException("Not yet implemented");
}
@Override
public void onCreate() {
timer = new Timer();
task = new TimerTask() {
@Override
public void run() {
int runningTaskCount = SystemInfoUtils.getRunningTaskCount(UpdateWidgetService.this);
long avaliMem = SystemInfoUtils.getAvaliMem(UpdateWidgetService.this);
ComponentName componentName = new ComponentName(UpdateWidgetService.this, MyWidget.class);
RemoteViews remoteViews = new RemoteViews(getPackageName(), R.layout.appwidget_view);
//设置Widget中Textview的显示内容
remoteViews.setTextViewText(R.id.tv_runprocessnumber, "正在运行软件:" + runningTaskCount);
remoteViews.setTextViewText(R.id.tv_avalimem, "可用内存:" + Formatter.formatFileSize(UpdateWidgetService.this, avaliMem));
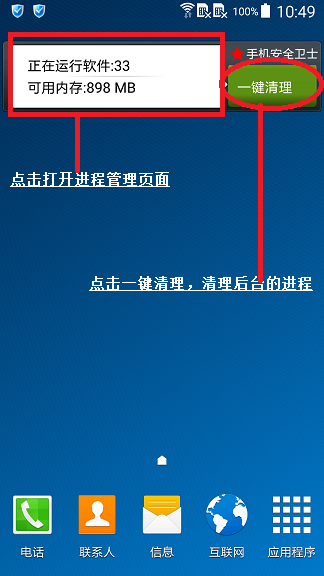
//点击widget的一键清理按钮,发送广播,在AutoKillTaskReceiver广播中杀掉所有的进程。
Intent intent = new Intent(UpdateWidgetService.this, AutoKillTaskReceiver.class);
PendingIntent pendingIntent = PendingIntent.getBroadcast(UpdateWidgetService.this, 0, intent, PendingIntent.FLAG_UPDATE_CURRENT);
remoteViews.setOnClickPendingIntent(R.id.btn_killall, pendingIntent);
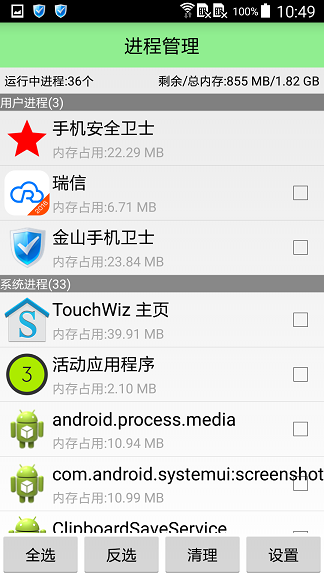
//点击widget显示信息部分,跳到程序管理页面
Intent startActivityIntent = new Intent(UpdateWidgetService.this, TaskManagerActivity.class);
startActivityIntent.setFlags(Intent.FLAG_ACTIVITY_NEW_TASK);
PendingIntent processInfoIntent = PendingIntent.getActivity(UpdateWidgetService.this, 0, startActivityIntent, PendingIntent.FLAG_ONE_SHOT);
remoteViews.setOnClickPendingIntent(R.id.ll_processinfo, processInfoIntent);
//由AppWidgetManager处理Wiget。
AppWidgetManager awm = AppWidgetManager.getInstance(getApplicationContext());
awm.updateAppWidget(componentName, remoteViews);
}
};
timer.schedule(task, 0, 3000);
super.onCreate();
}
@Override
public void onDestroy() {
super.onDestroy();
timer.cancel();
task.cancel();
timer = null;
task = null;
}
}
6.实现效果图:
Android开发之创建App Widget和更新Widget内容的更多相关文章
- 基于Android开发的天气预报app(源码下载)
原文:基于Android开发的天气预报app(源码下载) 基于AndroidStudio环境开发的天气app -系统总体介绍:本天气app使用AndroidStudio这个IDE工具在Windows1 ...
- Android开发2——创建测试项目
一.创建普通Android项目 二.在AndroidManifest.xml添加两个配置 <?xml version="1.0" encoding="utf-8 ...
- Android开发走过的坑(持续更新)
1 华为 nova真机 打印不出Log 参考资料:http://www.apkbus.com/thread-585228-1-1.html 解决:针对权限问题,我们当然也可以解决的,华为手机在你的拨号 ...
- Android开发 ---代码创建选项菜单、隐藏菜单项、菜单的生命周期,菜单按钮图标设置、搜索框、xml中设置子菜单
1.activity_main.xml 描述: 定义了一个按钮 <?xml version="1.0" encoding="utf-8"?> < ...
- android 开发 实现一个app的引导查看页面(使用ViewPager组件)
我们安装完app后第一次打开app,通常都会有一个翻页图片形式的app引导简介说明.下面我们来实现这个功能.ViewPager这个组件与ListView和RecyclerView在使用上有很高的相似处 ...
- 【Android开发】创建你的第一个Android项目
原文:http://android.eoe.cn/topic/summary 本文中你将了解到: 1. 使用Eclipse创建项目 2. 使用命令行创建项目 你还应该阅读: 1. 安装SDK(官网页面 ...
- (转)Android开发出来的APP在手机的安装路径是?
一.安装路径在哪? Android应用安装涉及到如下几个目录: system/app系统自带的应用程序,无法删除.data/app用户程序安装的目录,有删除权限.安装时把apk文件复制到此目录.dat ...
- android 开发 实现一个app的引导页面,使用ViewPager组件(此引导的最后一页的Button会直接写在最后一页布局里,跟随布局滑进滑出)
基本ViewPager组件使用方式与我之前写的https://blog.csdn.net/qq_37217804/article/details/80332634 这篇博客一致. 下面我们将重点详细解 ...
- 入门移动端混合开发 实战京东 APP(完整更新)
课程资料获取链接:点击这里 混合开发入门 主流开发方案实战京东移动端APP 无需原生开发基础,也能完美呈现京东商城.本课程融合vue.Android.IOS等目前流行的前端和移动端技术,混合开发经典电 ...
随机推荐
- 发现一个很好的android开发笔记库
http://linux.linuxidc.com/ 密码和用户名都是www.linuxidc.com android基础教程到高手进阶,游戏开发,数据存储,android架构等.谢谢网站主分享!
- Eclipse中创建标准web工程以及标准目录结构说明
最近公司有个Web项目,项目结构如下: 虽然运行没有错,但是实在是别扭,标准的web应用一般不采用这种结构: 因此总结一下: 1.如何在Eclipse中创建一个标准的Web应用. 2. ...
- 设置配置文件信息时的classpath
首先 classpath是指 WEB-INF文件夹下的classes目录 其中:lib和classes下文件访问优先级的问题: lib>classes classpath 和 classpa ...
- PHP读取xml方法讲解
一,什么是xml,xml有什么用途 XML(Extensible Markup Language)即可扩展标记语言,它与HTML一样,都是SGML(Standard Generalized Marku ...
- RedHat Linux下注册Apache为系统服务并设为开机启动
1.系统环境: 操作系统:Red Hat Enterprise Linux Server release 5.4 Apache版本:httpd-2.2.19 2.注册服务 #将apachectl复制到 ...
- POJ 1258 Agri-Net(最小生成树,基础)
题目 #define _CRT_SECURE_NO_WARNINGS #include<stdio.h> #include<string.h> #include<math ...
- C# 面向对象之概念理解(3)
多态 多态是指两个或多个属于不同类的对象,对同一个消息(方法调用)做出不同响应的能力. 多态(<韦氏大词典>)中定义:可以呈现不同形式的能力或状态. C#如何实现多态的知识——即继承上覆载 ...
- WPF / Win Form:多线程去修改或访问UI线程数据的方法( winform 跨线程访问UI控件 )
WPF:谈谈各种多线程去修改或访问UI线程数据的方法http://www.cnblogs.com/mgen/archive/2012/03/10/2389509.html 子线程非法访问UI线程的数据 ...
- 2013 ACM-ICPC长沙赛区全国邀请赛—Special equations
……但是没仔细看,直接跳过了 这题直接枚举就可以过了 ;}
- cast——java类型转换
以下例说之: byte b = 3; //??? 3是一个int常量,但是会自动判断3是不是在byte类型的范围内 b = b + 2; //Type mismatch: cannot convert ...