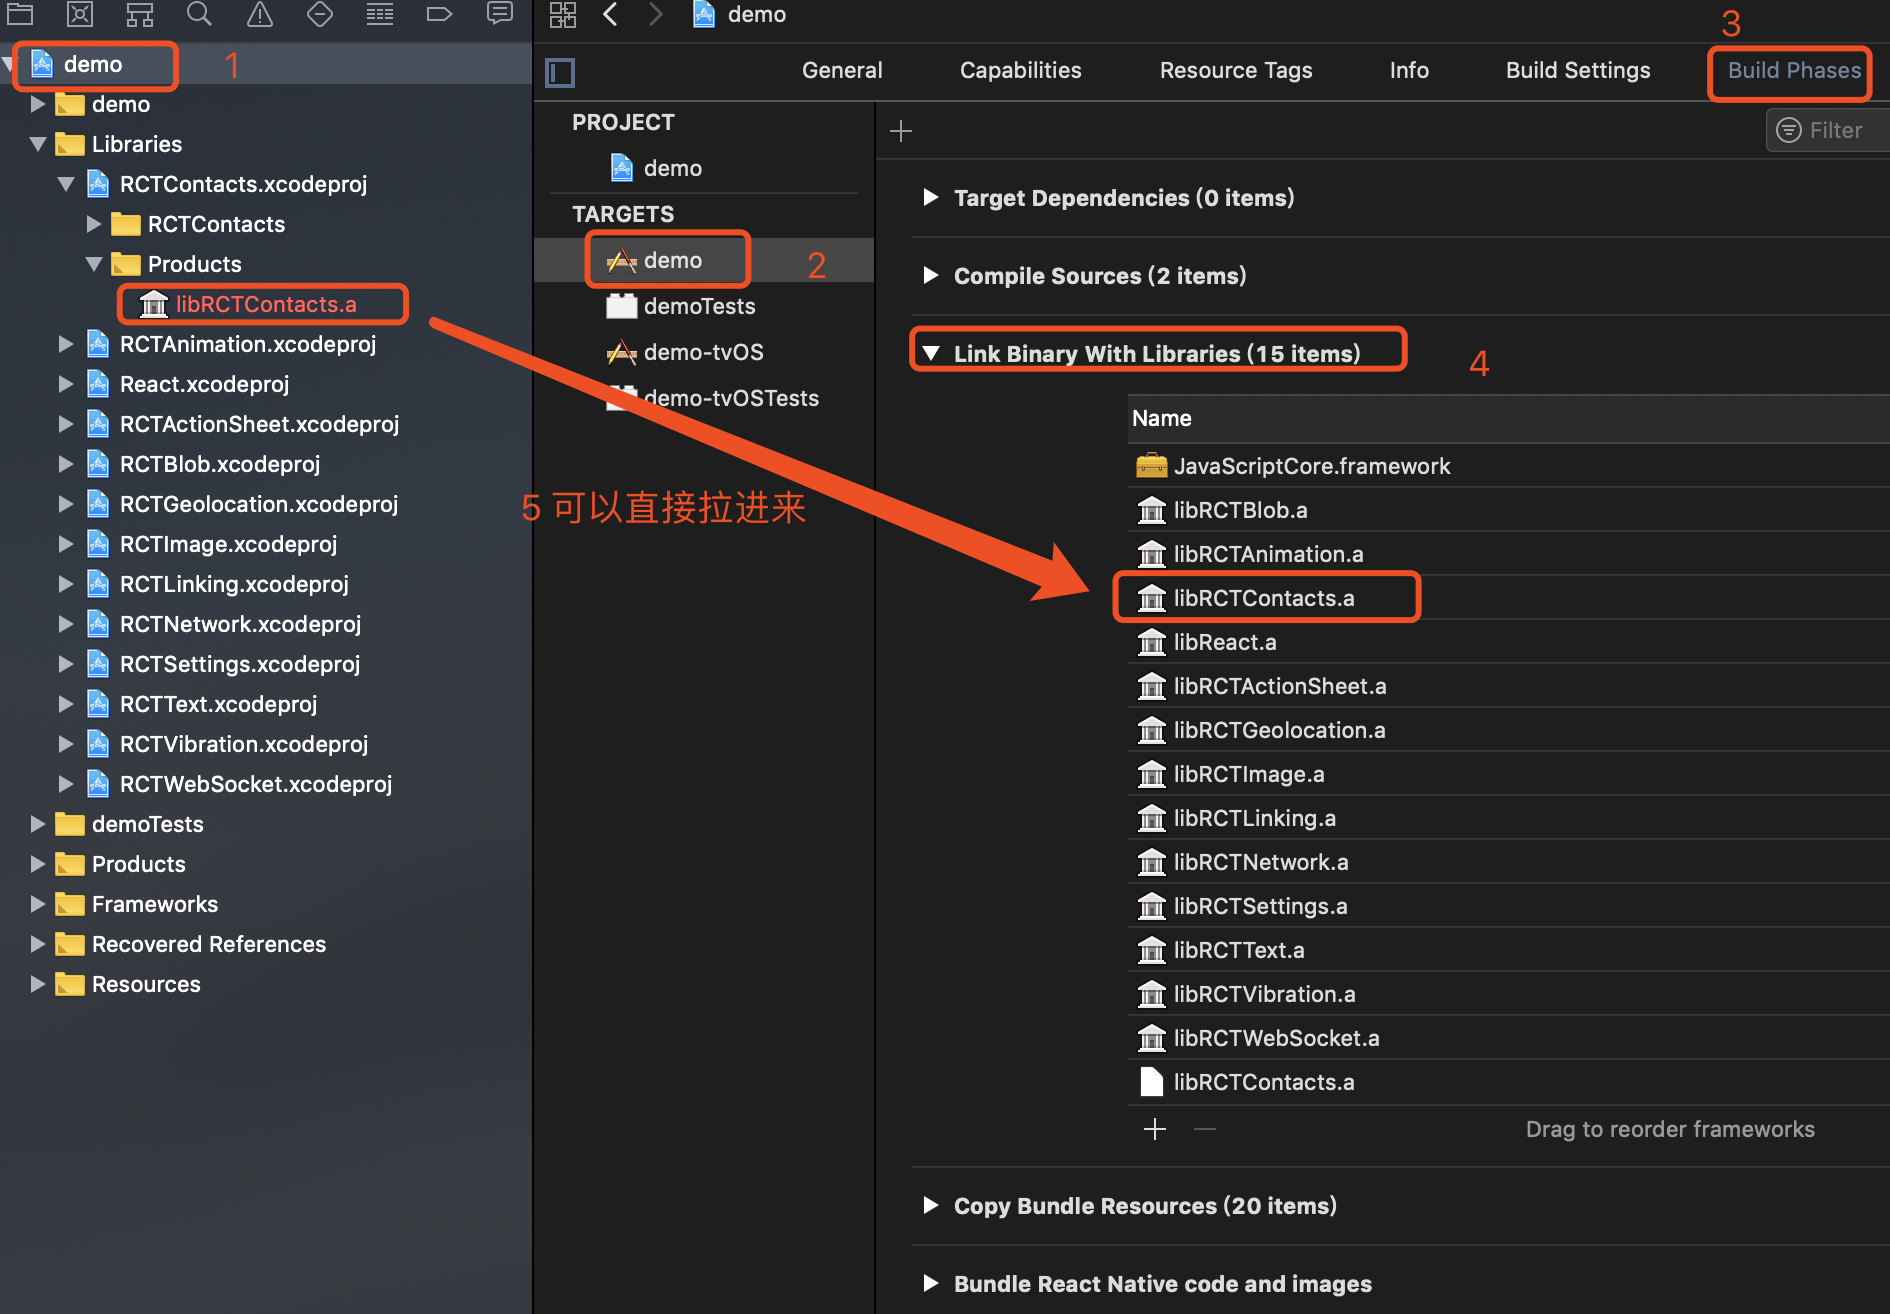
react-native-contact 安卓已测试,
1. 下载模块 npm install react-native-contacts --save
2.安卓配置:
a.在android/settings.gradle
b.在android/app/build.gradle
<uses-permission android:name="android.permission.READ_PROFILE" />
<uses-permission android:name="android.permission.READ_CONTACTS" />
<uses-permission android:name="android.permission.WRITE_CONTACTS" />
-keep class com.rt2zz.reactnativecontacts.** {*;}

-keepclassmembers class com.rt2zz.reactnativecontacts.** {*;}


b.
Info.plist中. 添加 Privacy - Contacts Usage Description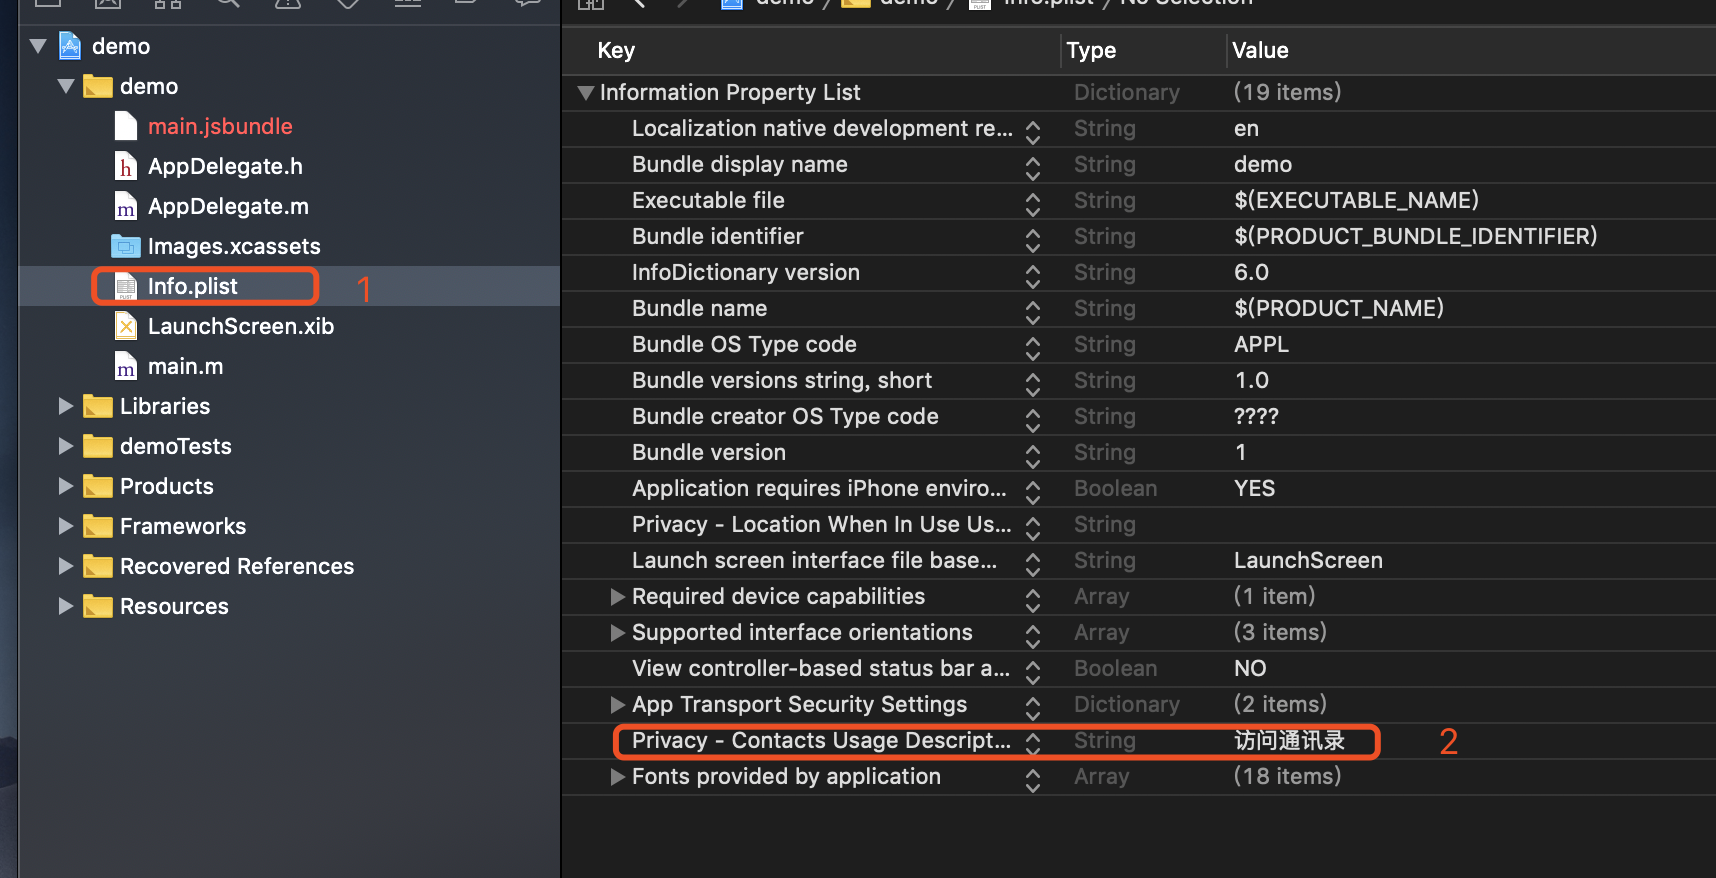
/**

 * Sample React Native App

 * https://github.com/facebook/react-native

 *

 * @format

 * @flow

 */

import React, {Component} from 'react';

import {TouchableOpacity, PermissionsAndroid, Platform, SectionList, StyleSheet, Text, View, ScrollView, Image, PixelRatio} from 'react-native';

import {Actions, Router, Scene,} from 'react-native-router-flux';

import Contacts from 'react-native-contacts';

import { Container, Header, Content, List, ListItem, } from 'native-base';

export default class Contact extends Component {

    constructor(props) {

        super (props);

        this.state = {

            contactData: [], // 通讯录列表

        }

    }

    componentDidMount() {

        // this.requestCONTACTS()

    }

    requestCONTACTS = () => {

        let self = this;

        if (Platform.OS === 'android') {

            PermissionsAndroid.check(PermissionsAndroid.PERMISSIONS.READ_CONTACTS).then(res => {

                if (!res || res !== 'granted') {

                    console.log('我走进11')

                    PermissionsAndroid.request(PermissionsAndroid.PERMISSIONS.READ_CONTACTS, {

                        'title': '申请读取通讯录权限',

                        'message': '获取通讯录权限,' +

                            '

                    })

                        .then(res => {

                            console.log('我走进22')

                            console.log(res, '数组吗')

                            if (res !== 'granted') {

                                console.log('我走进33')

                                Alert.alert('访问通讯录权限没打开', '请在iPhone的“设置-隐私”选项中,允许访问您的通讯录')

                            }

                            else {

                                console.log('我走进44')

                                self.onButtonPressed()

                            };

                        });

                }

                else {

                    console.log('我走进55')

                    self.onButtonPressed()

                };

            });

        } else {

            console.log('我走进66,ios')

            console.log(Contacts, 'Contacts')

            if (Contacts) {

                Contacts.checkPermission((err, permission) => {

                    console.log('我走进77,ios')

                    if (err) throw err;

                    // Contacts.PERMISSION_AUTHORIZED || Contacts.PERMISSION_UNDEFINED || Contacts.PERMISSION_DENIED

                    if (permission === 'undefined') {

                        Contacts.requestPermission((err, permission) => {

                            console.log('我走进88,ios')

                            if (err) throw err;

                            if (permission === 'authorized') {

                                console.log('我走进99,ios')

                                // 同意!

                                self.onButtonPressed()

                            }

                            if (permission === 'denied') {

                                console.log('我走进100,ios')

                                // 拒绝

                                Alert.alert('访问通讯录权限没打开', '请在iPhone的“设置-隐私”选项中,允许访问您的通讯录')

                            }

                        })

                    }

                    if (permission === 'authorized') {

                        console.log('我走进110,ios')

                        // 同意!

                        self.onButtonPressed()

                    }

                    if (permission === 'denied') {

                        console.log('我走进120,ios')

                        // 已经拒绝

                        Alert.alert('访问通讯录权限没打开', '请在iPhone的“设置-隐私”选项中,允许访问您的通讯录')

                    }

                })

            }

        }

    }

    // 获取通讯录列表

    onButtonPressed() {

        let self = this;

        Contacts.getAll((err, contacts) => {

            console.log('我点击了')

            if (err) throw err;

            this.setState({

                contactData: contacts

            })

            console.log(contacts instanceof Array);//通讯录列表

        })

    }

    // 修改通讯录信息

    updateContact(contacts){

        let someRecord = contacts

        someRecord.phoneNumbers.push({

            label: "mobile",

            number: "12345678901",

        })

        someRecord.givenName = '李四'

        Contacts.updateContact(someRecord, (err) => {

            if (err) throw err;

            // record updated

        })

    }

    // 添加通讯录信息

    updateContact(contacts){

        let someRecord = contacts

        someRecord.phoneNumbers.push({

            label: "mobile",

            number: "12345678901",

        })

        someRecord.givenName = '李四'

        Contacts.updateContact(someRecord, (err) => {

            if (err) throw err;

            // record updated

        })

    }

    // 删除通讯录

    deleteContact(contacts){

//delete the second record

        Contacts.deleteContact(contacts, (err, recordId) => {

            if (err) throw err;

            // contact deleted

        })

    }

    // 拨打电话

    onDialingAction = (telephone) => {

        let url = 'tel: ' + telephone

        Linking.canOpenURL(url).then(supported => {

            if (!supported) {

                Toast.show('您的系统不支持打电话!')

            } else {

                return Linking.openURL(url);

            }

        }).catch(err => { });

    }

    // 发送短信

    onSendMessage = (telephone) => {

        let url = 'smsto: ' + telephone

        Linking.canOpenURL(url).then(supported => {

            if (!supported) {

                Toast.show('您的系统不支持发送短信!')

            } else {

                return Linking.openURL(url);

            }

        }).catch(err => { });

    }

    sel = (val) => {

        for (let i = 0; i < val.phoneNumbers.length; i++) {

            if (val.phoneNumbers[i].label !== "other") {

                alert(val.phoneNumbers[i].number, '这个是联系方式')

            }

        }

    }

    render() {

        let {contactData} = this.state;

        // console.log(contactData.splice(1, 10))

        console.log( contactData.splice(1, 10))

        return (

            <View style={styles.container}>

                <Text onPress={this.requestCONTACTS}>11</Text>

                <View style={{height: '80%'}}>

                    <Content>

                        {/*<List>*/}

                            {

                                contactData.length > 0 ? contactData.splice(1, 10).map((val, i) => {

                                    return (

                                        <List key={i}>

                                            <ListItem itemDivider>

                                                <Text>A</Text>

                                            </ListItem>

                                            <ListItem>

                                                <Text onPress={() => this.sel(val)}>{val.familyName}</Text>

                                            </ListItem>

                                        </List>

                                    )

                                 }) : <Text>通讯录为空</Text>

                             }

                    </Content>

                </View>

            </View>

        );

    }

}

const styles = StyleSheet.create({

    container: {

        // flex: 1,

        // backgroundColor: 'red',

        padding: 20,

        marginTop: 20,

    },

    flex: {

        flexDirection: 'row',

        alignItems: 'center',

    },

});
react-native-contact 安卓已测试,的更多相关文章
- React Native解决安卓图片被挤压
Bug如下图所示: iOS显示正常,而安卓出现图片被挤压上去. 最后的解决方法: 比如你的 图片 是 750 x 513 那么 你设置样式的时候 width 为 屏幕的宽 ,高度为 屏幕的 宽 / ( ...
- React Native区分安卓/iOS平台
import { Platform, } from 'react-native'; alert(JSON.stringify(Platform)): android手机弹出:{"OS&quo ...
- React Native运行安卓报错解决记录
1>Error:Configuration with name ‘default’ not found. 解决链接: http://blog.csdn.net/u011240877/articl ...
- 使用React Native来撰写跨平台的App
React Native 是一个 JavaScript 的框架,用来撰写实时的.可原生呈现 iOS 和 Android 的应用.其是基于 React的,而 React 是 Facebook 的用于构建 ...
- 一个资深iOS开发者对于React Native的看法
一个资深iOS开发者对于React Native的看法 当我第一次尝试ReactNative的时候,我觉得这只是网页开发者涉足原生移动应用领域的歪门邪道. 我认为一个js开发者可以使用javasc ...
- [转] 一个资深iOS开发者对于React Native的看法
当我第一次尝试ReactNative的时候,我觉得这只是网页开发者涉足原生移动应用领域的歪门邪道. 我认为一个js开发者可以使用javascript来构建iPhone应用确实是一件很酷的事情,但是我很 ...
- 《React Native 精解与实战》书籍连载「React Native 底层原理」
此文是我的出版书籍<React Native 精解与实战>连载分享,此书由机械工业出版社出版,书中详解了 React Native 框架底层原理.React Native 组件布局.组件与 ...
- 选择 React Native 的理由
转载:选择 React Native 的理由 从开始知道 React Native 到现在已经过了5个月,真实的试用也经历了三个月的时间.阅读文档开始,了解是什么,到简单的理解为什么,都是在聆听不同的 ...
- react native 中的ReadableMap和WritableMap的使用
react native跟安卓原生交互的数据类型中,有两个比较陌生的类型,ReadableMap和WritableMap. ReadableMap和WritableMap,顾名思义,反正是map. W ...
随机推荐
- 畅游HttpCore
欢迎 非常欢迎阅读本文,本文主要介绍HttpCore是如何工作的. 你应该知道HTTP是一种用于在客户端与服务端进行消息交换的协议.它使用的特别广泛,它通常运行在TCP/IP或者安全的TLS/SSL之 ...
- uboot 从sd卡加载文件并烧写到nand flash
uboot下可以从用tftp和nfs加载文件. 但是现在有个开发板配套uboot网络功能出现异常,执行ping命令就会导致开发板重启,只能选择先从sd卡加载文件 启动开发板,任意键进入uboot,然后 ...
- easyui datagrid行合并
easyui datagrid行合并 合并方法 /** * EasyUI DataGrid根据字段动态合并单元格 * 参数 tableID 要合并table的id * 参数 colList 要合并的列 ...
- 使用pip安装第三方库报错记录
今天在使用pycharm导入第三方库的时候,报了好多超时错误,还有标题中的找不到版本,应该是网络的原因,记录下解决的办法: raise ReadTimeoutError(self._pool, Non ...
- UEditor上传文件的默认地址修改
using System;using System.Collections.Generic;using System.IO;using System.Linq;using System.Text.Re ...
- 关于RabbitMQ简介
RabbitMQ是一个由erlang开发的AMQP(Advanced Message Queue )的开源实现.AMQP 的出现其实也是应了广大人民群众的需求,虽然在同步消息通讯的世界里有很多公开标准 ...
- 一篇文章教你如何用R进行数据挖掘
一篇文章教你如何用R进行数据挖掘 引言 R是一种广泛用于数据分析和统计计算的强大语言,于上世纪90年代开始发展起来.得益于全世界众多 爱好者的无尽努力,大家继而开发出了一种基于R但优于R基本文本编辑器 ...
- BZOJ 1607 [Usaco2008 Dec]Patting Heads 轻拍牛头:统计 + 筛法【调和级数】
题目链接:http://www.lydsy.com/JudgeOnline/problem.php?id=1607 题意: 给你n个数,问你除a[i]之外,有多少个数是a[i]的约数. 题解: ans ...
- POSTGRESQL 导入导出
安装postgresql yum install postgresql postgresql-server mysql占用端口3306 pgsql是5432 2 导入整个数据库 psql -U pos ...
- xpath normalize-sapce 函数的Java实现
normalize-space函数实现的功能是:删除字符串前后空格,中间的空格有多个只保留一个. 1. 用Java正则表达式 public static String normalizeSpace(S ...