
用NPOI、C#操作Excel表格生成班级成绩单
在C#中利用NPOI操作Excel表格非常方便,几乎上支持所有的Excel表格本身所有的功能,如字体设置、颜色设置、单元格合并、数值计算、页眉页脚等等。
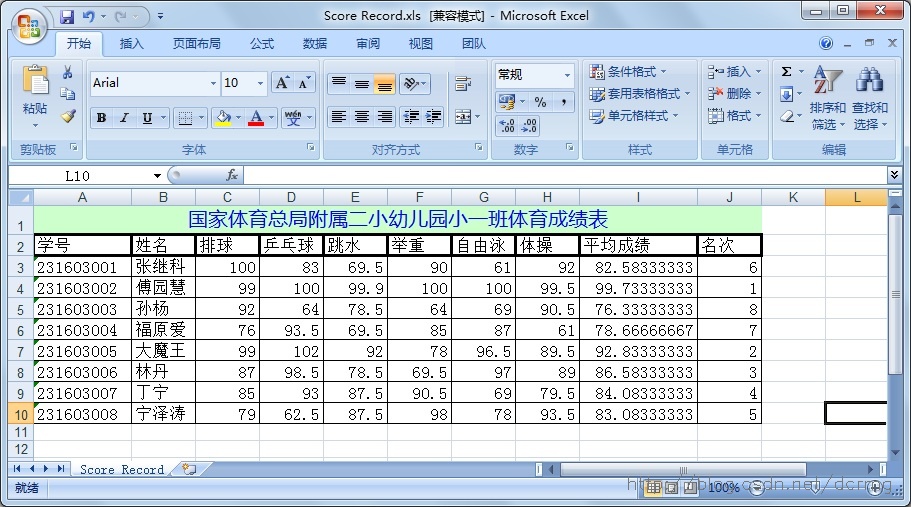
这里准备使用NPOI生成一个班级成绩单Excel表格,表格中包含的信息包括学号、姓名、各科成绩、平均成绩、排名等。
实现原理很简单,主要是NPOI的一些操作,具体实现的功能包括下边几个:
- 单元格合并
- 字体大小、颜色设置
- 背景颜色设置
- 边框粗细设置
- 多个单元格SUM求和
- 数据写入和读取
完整C#代码:
using System;

using System.Collections.Generic;

using System.Linq;

using System.Text;

using System.Threading.Tasks;

using NPOI.HSSF.UserModel;

using NPOI.XSSF.UserModel;

using NPOI.SS.UserModel;

using System.IO;

using System.Data;

namespace Score_Excel

{

    class Program

    {

        static void Main(string[] args)

        {

            IWorkbook workbook = new HSSFWorkbook();//声明工作簿对象,可以创建xls或xlsx Excel文件

            ISheet sheet1 = workbook.CreateSheet("Score Record"); //创建工作表

            ICell sheet1Title = sheet1.CreateRow(0).CreateCell(0); //创建第一行第一个单元格

            sheet1Title.SetCellValue("国家体育总局附属二小幼儿园小一班体育成绩表"); //表头

            sheet1Title.CellStyle = GetTitleCellStyle(workbook);

            sheet1.AddMergedRegion(new NPOI.SS.Util.CellRangeAddress(0, 0, 0, 9));  //合并单元格

            DataTable dt = GetData();

            IRow row;

            ICell cell;

            ICellStyle cellStyle1 = GetCellStyle(workbook, 2);

            ICellStyle cellStyle2 = GetCellStyle(workbook, 0);

            double[] aveScore = new double[8]; //平均成绩数组

            int[] rankNum = new int[8];  //名次数组

            //表头数据

            row = sheet1.CreateRow(1);

            cell = row.CreateCell(0);

            cell.SetCellValue("学号");

            cell.CellStyle = cellStyle1;

            cell = row.CreateCell(1);

            cell.SetCellValue("姓名");

            cell.CellStyle = cellStyle1;

            cell = row.CreateCell(2);

            cell.SetCellValue("排球");

            cell.CellStyle = cellStyle1;

            cell = row.CreateCell(3);

            cell.SetCellValue("乒乓球");

            cell.CellStyle = cellStyle1;

            cell = row.CreateCell(4);

            cell.SetCellValue("跳水");

            cell.CellStyle = cellStyle1;

            cell = row.CreateCell(5);

            cell.SetCellValue("举重");

            cell.CellStyle = cellStyle1;

            cell = row.CreateCell(6);

            cell.SetCellValue("自由泳");

            cell.CellStyle = cellStyle1;

            cell = row.CreateCell(7);

            cell.SetCellValue("体操");

            cell.CellStyle = cellStyle1;

            cell = row.CreateCell(8);

            cell.SetCellValue("平均成绩");

            cell.CellStyle = cellStyle1;

            cell = row.CreateCell(9);

            cell.SetCellValue("名次");

            cell.CellStyle = cellStyle1;

            // 写入数据

            for (int i = 0; i < dt.Rows.Count; i++)

            {

                DataRow dataR = dt.Rows[i];

                row = sheet1.CreateRow(i + 2);

                cell = row.CreateCell(0);

                cell.SetCellValue(dataR["学号"].ToString());

                cell.CellStyle = cellStyle2;

                cell = row.CreateCell(1);

                cell.SetCellValue(dataR["姓名"].ToString());

                cell.CellStyle = cellStyle2;

                cell = row.CreateCell(2);

                cell.SetCellValue((Double)dataR["排球"]);

                cell.CellStyle = cellStyle2;

                cell = row.CreateCell(3);

                cell.SetCellValue((Double)dataR["乒乓球"]);

                cell.CellStyle = cellStyle2;

                cell = row.CreateCell(4);

                cell.SetCellValue((Double)dataR["跳水"]);

                cell.CellStyle = cellStyle2;

                cell = row.CreateCell(5);

                cell.SetCellValue((Double)dataR["举重"]);

                cell.CellStyle = cellStyle2;

                cell = row.CreateCell(6);

                cell.SetCellValue((Double)dataR["自由泳"]);

                cell.CellStyle = cellStyle2;

                cell = row.CreateCell(7);

                cell.SetCellValue((Double)dataR["体操"]);

                cell.CellStyle = cellStyle2;

                cell = row.CreateCell(8);

                cell.SetCellFormula(String.Format("SUM($C{0}:$H{0})/6", i + 3));

                cell.CellStyle = cellStyle2;

                for (int j = 2; j < 8; j++)

                {

                    aveScore[i] += row.Cells[j].NumericCellValue;

                }

                aveScore[i] /= 6;  //每个人平均成绩

            }

            //以下for循环实现对每个人的成绩进行排名

            for (int i = 0; i < 8; i++)

            {

                rankNum[i] = 1;

                for (int j = 0; j < 8; j++)

                {

                    if (aveScore[i] < aveScore[j])

                    {

                        rankNum[i]++;

                    }

                }

            }

            //排名写入“名次”列

            for (int i = 0; i < 8; i++)

            {

                row = sheet1.GetRow(i + 2);

                cell = row.CreateCell(9);

                cell.SetCellValue(rankNum[i]);

                cell.CellStyle = cellStyle2;

            }

            if (!Directory.Exists(@"E:\Score Excel"))  //检查是否存在文件夹,不存在则新建

            {

                Directory.CreateDirectory(@"E:\Score Excel");

            }

            FileStream file = new FileStream(@"E:\Score Excel\Score Record.xls", FileMode.Create);

            workbook.Write(file);

            file.Close();

            workbook.Close();

        }

        static DataTable GetData()   //原始数据

        {

            DataTable dt = new DataTable();

            dt.Columns.Add("学号", typeof(System.Int32));

            dt.Columns.Add("姓名", typeof(System.String));

            dt.Columns.Add("排球", typeof(System.Double));

            dt.Columns.Add("乒乓球", typeof(System.Double));

            dt.Columns.Add("跳水", typeof(System.Double));

            dt.Columns.Add("举重", typeof(System.Double));

            dt.Columns.Add("自由泳", typeof(System.Double));

            dt.Columns.Add("体操", typeof(System.Double));

            dt.Rows.Add("231603001", "张继科", 100, 83, 69.5, 90, 61, 92);

            dt.Rows.Add("231603002", "傅园慧", 99, 100, 99.9, 100, 100, 99.5);

            dt.Rows.Add("231603003", "孙杨", 92, 64, 78.5, 64, 69, 90.5);

            dt.Rows.Add("231603004", "福原爱", 76, 93.5, 69.5, 85, 87, 61);

            dt.Rows.Add("231603005", "大魔王", 99, 102, 92, 78, 96.5, 89.5);

            dt.Rows.Add("231603006", "林丹", 87, 98.5, 78.5, 69.5, 97, 89);

            dt.Rows.Add("231603007", "丁宁", 85, 93, 87.5, 90.5, 69, 79.5);

            dt.Rows.Add("231603008", "宁泽涛", 79, 62.5, 87.5, 98, 78, 93.5);

            return dt;

        }

        //设置单元格格式函数,边框粗细3个可选

        static ICellStyle GetCellStyle(IWorkbook workbook, int borderThickness)

        {

            ICellStyle cellStyle = workbook.CreateCellStyle();

            NPOI.SS.UserModel.BorderStyle borderType;

            switch (borderThickness)

            {

                case 0:

                    borderType = NPOI.SS.UserModel.BorderStyle.Thin;

                    break;

                case 1:

                    borderType = NPOI.SS.UserModel.BorderStyle.Medium;

                    break;

                case 2:

                    borderType = NPOI.SS.UserModel.BorderStyle.Thick;

                    break;

                default:

                    borderType = NPOI.SS.UserModel.BorderStyle.Thin;

                    break;

            }

            cellStyle.BorderBottom = borderType;

            cellStyle.BorderTop = borderType;

            cellStyle.BorderLeft = borderType;

            cellStyle.BorderRight = borderType;

            IFont font = workbook.CreateFont();//设置字体大小和颜色

            font.FontName = "宋体";

            font.FontHeightInPoints = 13;

            cellStyle.SetFont(font);

            return cellStyle;

        }

        //设置表头格式函数

        static ICellStyle GetTitleCellStyle(IWorkbook workbook)

        {

            ICellStyle cell1Style = workbook.CreateCellStyle();

            cell1Style.Alignment = NPOI.SS.UserModel.HorizontalAlignment.Center;

            cell1Style.VerticalAlignment = NPOI.SS.UserModel.VerticalAlignment.Center;

            cell1Style.BorderBottom = NPOI.SS.UserModel.BorderStyle.Thin;

            cell1Style.BorderTop = NPOI.SS.UserModel.BorderStyle.Thin;

            cell1Style.BorderLeft = NPOI.SS.UserModel.BorderStyle.Thin;

            cell1Style.BorderRight = NPOI.SS.UserModel.BorderStyle.Thin;

            IFont font = workbook.CreateFont(); //设置字体大小和颜色

            font.FontName = "微软雅黑";

            font.FontHeightInPoints = 13;

            font.Color = NPOI.HSSF.Util.HSSFColor.Blue.Index;

            cell1Style.SetFont(font);

            cell1Style.FillForegroundColor = NPOI.HSSF.Util.HSSFColor.LightGreen.Index;

            cell1Style.FillPattern = FillPattern.SolidForeground;

            return cell1Style;

        }

    }

}
执行后,在E盘指定目录下生成了名字是“Score Excel”的表格:
“名次”列的排名实现:
先声明了一个大小为8的Int数组,默认值设为1,依次拿当前的平均成绩和其他7个的平均成绩对比,有几个大于当前平均成绩的元素,就在当前数组值上加上几,最后得到的就是每个人的排名,实现如下:
//以下for循环实现对每个人的成绩进行排名

            for (int i = 0; i < 8; i++)

            {

                rankNum[i] = 1;

                for (int j = 0; j < 8; j++)

                {

                    if (aveScore[i] < aveScore[j])

                    {

                        rankNum[i]++;

                    }

                }

            }
用NPOI、C#操作Excel表格生成班级成绩单的更多相关文章
- Python 利用Python操作excel表格之openyxl介绍Part2
利用Python操作excel表格之openyxl介绍 by:授客 QQ:1033553122 欢迎加入全国软件测试交流qq群(群号:7156436) ## 绘图 c = LineChart() ...
- 【转】python操作excel表格(xlrd/xlwt)
[转]python操作excel表格(xlrd/xlwt) 最近遇到一个情景,就是定期生成并发送服务器使用情况报表,按照不同维度统计,涉及python对excel的操作,上网搜罗了一番,大多大同小异, ...
- 转载:python操作excel表格(xlrd/xlwt)
python操作excel表格(xlrd/xlwt) 最近遇到一个情景,就是定期生成并发送服务器使用情况报表,按照不同维度统计,涉及python对excel的操作,上网搜罗了一番,大多大同小异,而 ...
- qt 操作excel表格
自己编写的一个Qt C++类,用于操作excel表格,在Qt中操作excel需在.pro中增加CONFIG+=qaxcontainer配置. 1.打开Excel:objExcel = new QAx ...
- Python 利用Python操作excel表格之openyxl介绍Part1
利用Python操作excel表格之openyxl介绍 by:授客 QQ:1033553122 欢迎加入全国软件测试交流qq群(群号:7156436),免费获取以下性能监控工具(类似Nmon精简版) ...
- Python 利用Python操作excel表格之xlwt介绍
利用Python操作excel表格之xlwt介绍 by:授客 QQ:1033553122 直接上代码 案例1 #!/usr/bin/env python # -*- coding:utf-8 ...
- python - 操作excel表格
说明:由于公司oa暂缺,人事妹子在做考勤的时候,需要通过几个excel表格去交叉比对员工是否有旷工或迟到,工作量大而且容易出错. 这时候it屌丝的机会来啦,花了一天时间给妹子撸了一个自动化脚本. 1. ...
- 使用Java操作Excel表格
目录 一.配置第三方库 二.使用Apache POI API 1. 打开Excel文件 2. 选择对应的sheet 3. Sheet接口的基本使用 3.1 获取开头行和结束行 3.2 获取Row对象 ...
- python操作excel表格(xlrd/xlwt)
最近遇到一个情景,就是定期生成并发送服务器使用情况报表,按照不同维度统计,涉及python对excel的操作,上网搜罗了一番,大多大同小异,而且不太能满足需求,不过经过一番对源码的"研究&q ...
随机推荐
- 如何配置MySQL?(三)
要进行mysql配置,首先要找到mysql的配置向导文件,这个配置向导文件就在我们安装目录下的一个bin的子目录下. 刚才我们是选择典型安装MySQL,一般windows是默认存储在C:\Progra ...
- ScrollView嵌套GridView不显示顶部
/* * scrollView中嵌套GridView不能显示头部 * * 方案①:scrollView.smoothScrollTo(0, 0); * * ...
- 关于概率算法的问题,不知道逻辑错在哪里,求debug
做个骰子成功几率的分析,投n颗骰子,第一次投成功的几率是a,然后投成功的骰子,需要再投1次,这次成功的几率是b.第二次成功的骰子才算最终成功. 要分析出n颗骰子,最终成功0到n颗的概率. 我写了个算法 ...
- 爬虫--BeautifulSoup使用
解析库 解析器 使用方法 优势 劣势 Python标准库 BeautifulSoup(markup, "html.parser") Python的内置标准库.执行速度适中 .文档容 ...
- tensorflow 1 - 起步
使用图 (graph) 来表示计算任务. 在被称之为 会话 (Session) 的上下文 (context) 中执行图. 使用 tensor 表示数据. 通过 变量 (Variable) 维护状态. ...
- [LNOI2014]LCA 树链剖分 离线 前缀和 思维题
题目描述:给出一个n个节点的有根树(编号为0到n-1,根节点为0).一个点的深度定义为这个节点到根的距离+1. 设dep[i]表示点i的深度,LCA(i,j)表示i与j的最近公共祖先. 有q次询问,每 ...
- Hadoop集群配置搭建
环境:Centos 6.9,Hadoop 2.7.1,JDK 1.8.0_161,Maven 3.3.9 前言: 1.配置一台master服务器,两台或多台slave服务器. 2.master可 ...
- linux下python3源码安装及卸载
Linux下Python3的源码编译安装和卸载方法 [日期:2019-06-21] 来源:博客园 作者:wuli潇萧 [字体:大 中 小] (一)Linux下软件的源码编译安装和卸载方法 L ...
- 昼猫笔记 JavaScript -- 异步执行 | 定时器真的定时执行?
本篇主要内容:异步.定时器引发的思考 预计阅读时间:8分钟 了解 我们都知道在js中定时器有两种 setInterval() . setTimeout() setInterval() :按 ...
- CF817F MEX Queries(线段树上二分)
题意 维护一个01串,一开始全部都是0 3种操作 1.把一个区间都变为1 2.把一个区间都变为0 3.把一个区间的所有数字翻转过来 每次操作完成之后询问区间最小的0的位置 l,r<=10^18 ...