AngularJS:一行JS代码实现控件验证效果
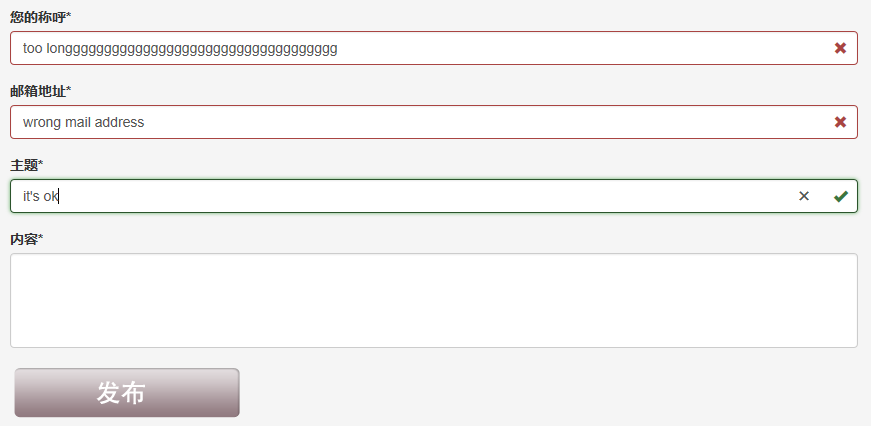
如上图所示,我们需要实现如下这些验证功能:
- 控件都是必输控件
- 都需要控制最大长度
- 第一次打开页面,控件不能显示为错误状态
- 输入内容再清空后,必输控件需要显示为错误状态
- 只有所有输入合法后,发布按钮才能变为可用状态
通过AngularJS,我们可以很轻松的实现这些要求,只需要1行JS代码。UI样式这里采用的是Bootstrap。先上示例代码:
HTML
 <!DOCTYPE html>

 <html lang="zh-cn" ng-app="ftitApp">

 <head>

     <meta charset="utf-8" />

     <title>Demo</title>

     <link href="/Content/bootstrap.css" rel="stylesheet"/>

     <script src="/Scripts/angular.js"></script>

 </head>

 <body>

     <div class="container body-content">

         <!-- 主要内容区域 -->

         <div class="row main-content">

             <div class="col-md-9">

                 <!-- 联系我们表单区域 -->

                 <form action="/Contact/Create" method="post" role="form" name="createContactForm" ng-controller="ContactCreateController">

                     <!-- UserName 您的称呼 -->

                     <div class="form-group has-feedback" ng-class="{'has-success' : !createContactForm.UserName.$pristine && createContactForm.UserName.$valid, 'has-error' : !createContactForm.UserName.$pristine && createContactForm.UserName.$invalid }">

                         <label for="UserName">您的称呼*</label>

                         <input type="text" class="form-control" ng-model="userName" name="UserName" autofocus="" required ng-maxlength=30>

                         <div ng-show="!createContactForm.UserName.$pristine && createContactForm.UserName.$valid">

                             <span class="glyphicon glyphicon-ok form-control-feedback"></span>

                         </div>

                         <div ng-show="!createContactForm.UserName.$pristine && createContactForm.UserName.$invalid">

                             <span class="glyphicon glyphicon-remove form-control-feedback"></span>

                         </div>

                     </div>

                     <!-- UserMail 邮箱地址 -->

                     <div class="form-group has-feedback" ng-class="{'has-success' : !createContactForm.UserMail.$pristine && createContactForm.UserMail.$valid, 'has-error' : !createContactForm.UserMail.$pristine && createContactForm.UserMail.$invalid }">

                         <label for="UserMail">邮箱地址*</label>

                         <input type="email" class="form-control" ng-model="userMail" name="UserMail" required ng-maxlength=30>

                         <div ng-show="!createContactForm.UserMail.$pristine && createContactForm.UserMail.$valid">

                             <span class="glyphicon glyphicon-ok form-control-feedback"></span>

                         </div>

                         <div ng-show="!createContactForm.UserMail.$pristine && createContactForm.UserMail.$invalid">

                             <span class="glyphicon glyphicon-remove form-control-feedback"></span>

                         </div>

                     </div>

                     <!-- Subject 主题 -->

                     <div class="form-group has-feedback" ng-class="{'has-success' : !createContactForm.Subject.$pristine && createContactForm.Subject.$valid, 'has-error' : !createContactForm.Subject.$pristine && createContactForm.Subject.$invalid }">

                         <label for="Subject">主题*</label>

                         <input type="text" class="form-control" ng-model="subject" name="Subject" required ng-maxlength=100>

                         <div ng-show="!createContactForm.Subject.$pristine && createContactForm.Subject.$valid">

                             <span class="glyphicon glyphicon-ok form-control-feedback"></span>

                         </div>

                         <div ng-show="!createContactForm.Subject.$pristine && createContactForm.Subject.$invalid">

                             <span class="glyphicon glyphicon-remove form-control-feedback"></span>

                         </div>

                     </div>

                     <!-- Content 内容 -->

                     <div class="form-group has-feedback" ng-class="{'has-success' : !createContactForm.Content.$pristine && createContactForm.Content.$valid, 'has-error' : !createContactForm.Content.$pristine && createContactForm.Content.$invalid }">

                         <label for="Content">内容*</label>

                         <textarea cols="4" rows="5" class="form-control" ng-model="content" name="Content" required ng-maxlength=1000></textarea>

                         <div ng-show="!createContactForm.Content.$pristine && createContactForm.Content.$valid">

                             <span class="glyphicon glyphicon-ok form-control-feedback"></span>

                         </div>

                         <div ng-show="!createContactForm.Content.$pristine && createContactForm.Content.$invalid">

                             <span class="glyphicon glyphicon-remove form-control-feedback"></span>

                         </div>

                     </div>

                     <!-- 提交按钮 -->

                     <div class="form-group">

                         <div ng-show="createContactForm.$valid">

                             <input type="image" src="/Content/images/comment_publish_button.png" onsubmit="submit();" value="发布" ng-disabled='!createContactForm.$valid' />

                         </div>

                         <div ng-show="!createContactForm.$valid">

                             <img src="/Content/images/invalid_publish_button.png" />

                         </div>

                     </div>

                 </form>

             </div>

         </div>

     </div>

     <script src="/Scripts/ftit/ContactCreateController.js"></script>

 </body>

 </html>
JS代码(真的只有一行哟)
ContractCreateController.js
var ftitAppModule = angular.module('ftitApp', []);
这样就好啦。几个关键的地方解释一下:
- ng-class:这个标签用来控制class的值。例如ng-class="{'has-success' : !createContactForm.Content.$pristine}的意思就是,如果!createContactForm.Content.$pristine的值为true,class的值就为has-success。
- ng-show:控制是否显示该控件。
- createContactForm.$valid:全部验证通过后,值为true,否则为false
- createContactForm.Content.$valid:标识Content控件是否通过验证,通过为true,否则为false
- createContactForm.Content.$pristine:标识Content控件是否从未输入过。从未输入为true,否则为false
更细节的技术问题请查看AngularJS的技术文档。
AngularJS:一行JS代码实现控件验证效果的更多相关文章
- 每日学习心得:CustomValidator验证控件验证用户输入的字符长度、Linq 多字段分组统计、ASP.NET后台弹出confirm对话框,然后点击确定,执行一段代码
2013-9-15 1. CustomValidator验证控件验证用户输入的字符长度 在实际的开发中通常会遇到验证用户输入的字符长度的问题,通常的情况下,可以写一个js的脚本或者函数,在ASP ...
- 2.23 js处理日历控件(修改readonly属性)
2.23 js处理日历控件(修改readonly属性) 前言 日历控件是web网站上经常会遇到的一个场景,有些输入框是可以直接输入日期的,有些不能,以我们经常抢票的12306网站为例,详细讲解如 ...
- JS数量输入控件
JS数量输入控件 很早看到kissy首页 有数量输入控件,就随便看了下功能 感觉也不怎么难 所以也就试着自己也做了一个, 当然基本的功能和他们的一样,只是用了自己的编码思想来解决这么一个问题.特此给大 ...
- offline页面开发常用方法及页面控件验证
offline页面开发常用方法及页面控件验证,对一些CheckBoxList操作进行封装,新人可以直接使用该代码. 1.返回上一页网址 /// <summary> /// Descript ...
- vs2010开发activex(MFC)控件/ie插件(三),js调用ocx控件的接口函数
原文:http://blog.csdn.net/yhhyhhyhhyhh/article/details/50802280 js调用ocx控件的接口函数,先看demo效果: 简单测试过程 ...
- js操作select控件大全(包含新增、修改、删除、选中、清空、判断存在等)
原文:js操作select控件大全(包含新增.修改.删除.选中.清空.判断存在等) js操作select控件大全(包含新增.修改.删除.选中.清空.判断存在等) js 代码// 1.判断select选 ...
- 基于MFC的网页ActiveX控件开发全程实录2(js向ActiveX控件传递参数)
原文转自 https://blog.csdn.net/qianbin3200896/article/details/81452822 1.ActiveX控件部分(JS到ActiveX控件)继续上一篇博 ...
- Auto.js 特殊定位控件方法 不能在ui线程执行阻塞操作,请使用setTimeout代替
本文所有教程及源码.软件仅为技术研究.不涉及计算机信息系统功能的删除.修改.增加.干扰,更不会影响计算机信息系统的正常运行.不得将代码用于非法用途,如侵立删! Auto.js 特殊定位控件方法 操作环 ...
- 轻量、强大的代码编辑器控件-WinForm完美版
前段时间做个小项目需要用到一个代码编辑器控件,但网上搜了半天,居然没发现一个完全满意的编辑器.现有的一些编辑器有: FastedTextBox 优点:1. 轻量. 2. 样式美观. 3. DEMO完 ...
随机推荐
- C语言编译器为什么能够用C语言编写?
不知道大家有没有想过一个问题:C语言编译器为什么能够用C语言编写? 所谓C语言编译器,就是把编程得到的文件,比如.c,.h的文件,进行读取,并对内容进行分析,按照C语言的规则,将其转换成cpu可以执行 ...
- cookie和seesion区别
cookie 和session 的区别详解 这些都是基础知识,不过有必要做深入了解.先简单介绍一下. 二者的定义: 当你在浏览网站的时候,WEB 服务器会先送一小小资料放在你的计算机上,Cookie ...
- 24Pointgame-----24点游戏
题意简单 第一行是 测试数据有几组 然后分别有 几行 第一个数字是 有几个数字 第二个是 需要配出来的数字 下面附上我的代码 --- 我感觉 我这个代码 和其他人的都不一 ...
- ACM_ZHANGZHANG喜欢手表
ZHANGZHANG喜欢手表 Time Limit: 2000/1000ms (Java/Others) Problem Description: ZHANGZHANG刚过生日,收到了好朋友NENGN ...
- Java引用jar的优化
一般java的类文件开头都是各种引用: 如 上图的引用可以写成
- Java—将文件夹压缩为zip文件
import java.io.BufferedInputStream; import java.io.File; import java.io.FileInputStream; import java ...
- 关于华为手机Log.d打印不出来log的问题
http://blog.csdn.net/picasso_l/article/details/52489560 拨号,进入后台设置,进行操作.
- webstorm进行VisualSVN配置及上传项目到项目库
以前建站一直都是自己一个人,最近要做一个比较大的网站,寻思着利用svn在整个开发过程中会比较快,于是摸索着配置了一下. 首先,下载VisualSVN这个软件,官网链接 https://www.visu ...
- oracle for linux服务器磁盘空间不足,通过过期的文件释放磁盘空间
--2013-09-16截取的数据-- 使用df-h命令查看系统磁盘空间 [root@erpdbs PROD]# df -h Filesystem Size Used Avail Use% Mount ...
- C# 学习——静态(第四天)
一.命名空间 类似于文件夹,而类就是文件夹中的文件: 作用:明确的指向我们所需要的类的 所在的位置: 统一命名空间下,类名不能重复. 二.类 概念:具有相同属性和功能的对象的抽象的集合. 三.静态与实 ...