cesium地形瓦片(Quantized-mesh)格式
参考资料:
- quantized-mesh-1.0 terrain format(用于三维可视化的流式海量地形数据集规范)
- Tile Map Service Specification
- 国内主要地图瓦片坐标系定义及计算原理
- QuantizedMeshTerrainData
- cesium地形瓦片(HeightMap)格式
- Index compression follow-up
1、切片规则
量化网格-1.0格式的地形图瓦片的切分规则和HeightMap的一样,也是Tile Map Service (TMS) 的global-geodetic规则,详情可见cesium地形瓦片(HeightMap)格式中的描述。
如果瓦片集的URL是如下形式:
http://assets.agi.com/stk-terrain/world/tiles
则金字塔根部两个瓦片文件的URL:
- (-180 deg, -90 deg) - (0 deg, 90 deg) - http://assets.agi.com/stk-terrain/world/tiles/0/0/0.terrain
- (0 deg, -90 deg) - (180 deg, 90 deg) - http://assets.agi.com/stk-terrain/world/tiles/0/1/0.terrain
再下一级的8个瓦片文件的URL:
- (-180 deg, -90 deg) - (-90 deg, 0 deg) - http://assets.agi.com/stk-terrain/world/tiles/1/0/0.terrain
- (-90 deg, -90 deg) - (0 deg, 0 deg) - http://assets.agi.com/stk-terrain/world/tiles/1/1/0.terrain
- (0 deg, -90 deg) - (90 deg, 0 deg) - http://assets.agi.com/stk-terrain/world/tiles/1/2/0.terrain
- (90 deg, -90 deg) - (180 deg, 0 deg) - http://assets.agi.com/stk-terrain/world/tiles/1/3/0.terrain
- (-180 deg, 0 deg) - (-90 deg, 90 deg) - http://assets.agi.com/stk-terrain/world/tiles/1/0/1.terrain
- (-90 deg, 0 deg) - (0 deg, 90 deg) - http://assets.agi.com/stk-terrain/world/tiles/1/1/1.terrain
- (0 deg, 0 deg) - (90 deg, 90 deg) - http://assets.agi.com/stk-terrain/world/tiles/1/2/1.terrain
- (90 deg, 0 deg) - (180 deg, 90 deg) - http://assets.agi.com/stk-terrain/world/tiles/1/3/1.terrain
请求瓦片时,请确保在请求中包含以下HTTP标头:
Accept: application/vnd.quantized-mesh,application/octet-stream;q=0.9
否则,某些服务器可能会返回与此处描述的不同的瓦片数据。
2、瓦片格式分析
每个图块是一个特殊编码的三角形网格,其中顶点与图块边缘处的相邻网格重叠。换句话说,在根部,西部瓦片中最东部的顶点与东部瓦片中最西部的顶点具有相同的经度。
地形瓦片是gzip压缩的。解压缩后,tile是小端序(little-endian)的二进制数据。
2.1、数据头部
该文件的第一部分是具有以下格式的数据头。double是IEEE 754 64位浮点数,float是IEEE 754 32位浮点数。
struct QuantizedMeshHeader

{

    // 瓦片中心在地心坐标系下的坐标

    double CenterX;

    double CenterY;

    double CenterZ;

    // 该瓦片覆盖区域的最小和最大高度值

    // 最小值可以低于所有顶点,最大值也可以高于任何顶点

    // 因为在网格简化(simplificatipn)的过程中可能会有移除最小或最大顶点的情况

    // 但是这些是适用于用于分析或可视化的的值

    float MinimumHeight;

    float MaximumHeight;

    // 瓦片的球面边界.

    // X,Y,Z 坐标是地心坐标系下的坐标, 半径的单位为米

    double BoundingSphereCenterX;

    double BoundingSphereCenterY;

    double BoundingSphereCenterZ;

    double BoundingSphereRadius;

    // 地平线遮挡点,以椭球体缩放的地心坐标系表示

    // 如果此点低于地平线,则整个图块位于地平线下方。

    // 有关更多信息,请参见http://cesiumjs.org/2013/04/25/Horizon-culling/。

    double HorizonOcclusionPointX;

    double HorizonOcclusionPointY;

    double HorizonOcclusionPointZ;

};
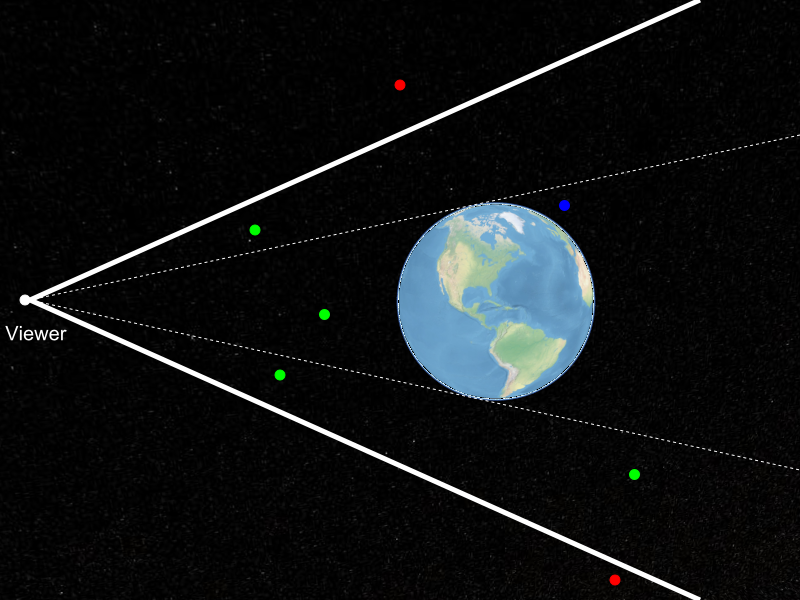
在上图中,绿色点对观察者可见, 红点不可见,因为它们位于视锥体之外,表示为粗白线。 蓝点位于视锥体内,但观察者看不到它,因为它被地球遮挡。 换句话说,它低于地平线。 地平线剔除是一种直截了当的想法,即从当前观察者位置看,您不需要渲染位于地平线下方的物体。 听起来很简单,细节变得棘手,特别是因为它需要非常快。cesium每个渲染帧将进行数百次测试,以测试地形图块的可见性。 不过,这是一项重要的考验。 在上图中的配置中,覆盖整个地球的地形瓦片位于视锥体内。 然而,其中一半以上是低于地平线而不需要渲染。
2、顶点数据
头部数据后面紧跟着顶点数据,unsigned int是32位无符号整数,unsigned short是16位无符号整数。
struct VertexData

{

    unsigned int vertexCount;           // 顶点个数

    unsigned short u[vertexCount];      // 顶点横坐标

    unsigned short v[vertexCount];      // 顶点纵坐标

    unsigned short height[vertexCount]; // 顶点高程值

};
vertexCount字段指示后面三个数组的大小。 这三个数组包含来自前一个值的增量,然后进行zig-zag编码,以便使小整数(无论其符号如何)使用较少比特位。
解码值的过程很简单:
var u = 0;

var v = 0;

var height = 0;

// zig-zag 编码

function zigZagEncode (value) {

  return (value >> 31) ^ (value << 1);

}

// zig-zag 解码

function zigZagDecode(value) {

    return (value >> 1) ^ (-(value & 1));

}

for (i = 0; i < vertexCount; ++i) {

    u += zigZagDecode(uBuffer[i]);

    v += zigZagDecode(vBuffer[i]);

    height += zigZagDecode(heightBuffer[i]);

    uBuffer[i] = u;

    vBuffer[i] = v;

    heightBuffer[i] = height;

}
解码后,每个数组中值的含义如下:
| 数组 | 含义 |
|---|---|
| u | 图块中顶点的水平坐标。 当u值为0时,顶点位于图块的西边缘。 当值为32767时,顶点位于图块的东边缘。 对于其他值,顶点的经度是在图块的西边和东边的经度之间的线性插值。 即: 经度= 最西 + (u/32767) * (最东-最西) |
| v | 图块中顶点的水平坐标。 当u值为0时,顶点位于图块的南边缘。 当值为32767时,顶点位于图块的北边缘。 对于其他值,顶点的纬度是在图块的南边和北边的经度之间的线性插值。 即: 纬度= 最南 + (v/32767) * (最北-最南) |
| height | 图块中顶点的高度。 当高度值为0时,顶点的高度等于图块内最小高度,如图块标题中指定的那样。 当值为32767时,顶点的高度等于图块内的最大高度。 对于其他值,顶点的高度是最小和最大高度之间的线性插值。 即: 高度= 最低 + (h/32767) * (最高-最低) |
2.3、索引数据
紧跟在顶点数据之后的是索引数据。指数指定顶点如何链接在一起成三角形。如果tile具有超过65536个顶点,则tile使用IndexData32结构对索引进行编码。否则,它使用IndexData16结构。
为了对索引数据强制进行字节对齐,在IndexData之前添加填充字节,以确保IndexData16为2字节对齐和IndexData32为4字节对齐。
struct IndexData16

{

    unsigned int triangleCount;                // 三角形个数

    unsigned short indices[triangleCount * 3]; // 三角形顶点索引

}

struct IndexData32

{

    unsigned int triangleCount;

    unsigned int indices[triangleCount * 3];

}
索引使用来自 webgl-loader 的 高水位标记(high water mark)编码进行编码。
索引解码如下:
var highest = 0;

for (var i = 0; i < indices.length; ++i) {

    var code = indices[i];

    indices[i] = highest - code;

    if (code === 0) {

        ++highest;

    }

}
索引的每个三元组以逆时针顺序指定要渲染的一个三角形。
“High watermark encoding”
I really like this idea. Previously I’d been using simple delta encoding on the resulting index lists; that works, but the problem with delta coding is that a single outlier will produce two large steps – one to go from the current region to the outlier, then another one to get back. The high watermark scheme is almost as straightforward as straight delta coding and avoids this case completely.
Now, if you have an index list straight out of vertex cache optimization and vertex renumbering, the idea works as described. However, with the hybrid tri/paired-tri encoding I described last time, we have to be a bit more careful. While the original index list will indeed have each index be at most 1 larger than the highest index we’ve seen so far, our use of “A ≥ B” to encode whether the next set of indices describes a single triangle or a pair means that we might end up having to start from the second or third vertex of a triangle, and consequently see a larger jump than just 1. Luckily, the fix for this is simple – rather than keeping the high watermark always 1 higher than the largest vertex index we’ve seen so far, we keep it N higher where N is the largest possible “step” we can have in the index list. With that, the transform is really easy, so I’m just going to post my code in full:
static void watermark_transform(std::vector<int>& out_inds,

   const std::vector<int>& in_inds, int max_step)

{

   int hi = max_step - 1; // high watermark

   out_inds.clear();

   out_inds.reserve(in_inds.size());

   for (int v : in_inds)

   {

       assert(v <= hi);

       out_inds.push_back(hi - v);

       hi = std::max(hi, v + max_step);

   }

}
and the inverse is exactly the same, with the
push_backin the middle replaced by the two linesv = hi - v;
out_inds.push_back(v);
So what’s the value of N (aka
max_stepin the code), the largest step that a new index can be from the highest index we’ve seen so far? Well, for the encoding described last time, it turns out to be 3:
- When encoding a single triangle, the worst case is a triangle with all-new verts. Suppose the highest index we’ve seen so far is k, and the next triangle has indices (k+1,k+2,k+3). Our encoding for single triangles requires that the first index be larger than the second one, so we would send this triangle as (k+3,k+1,k+2). That’s a step of 3.
- For a pair of triangles, we get 4 new indices. So it might seem like we might get a worst-case step of 4. However, we know that the two triangles share an edge; and for that to be the case, the shared edge must have been present in the first triangle. Furthermore, we require that the smaller of the two indices be sent first (that’s what flags this as a paired tri). So the worst cases we can have for the first two indices are (k+2,k+3) and (k+1,k+3), both of which have a largest step size of 2. After the first two indices, we only have another two indices to send; worst-case, they are both new, and the third index is larger than the fourth. This corresponds to a step size of 2. All other configurations have step sizes ≤1.
三角索引之后还有四个(边缘)索引列表,这些索引列表保存了tile所有边缘上的顶点。 知道哪些顶点在边缘上以添加裙边以隐藏相邻细节层之间的裂缝是有帮助的。
struct EdgeIndices16

{

    unsigned int westVertexCount;

    unsigned short westIndices[westVertexCount];

    unsigned int southVertexCount;

    unsigned short southIndices[southVertexCount];

    unsigned int eastVertexCount;

    unsigned short eastIndices[eastVertexCount];

    unsigned int northVertexCount;

    unsigned short northIndices[northVertexCount];

}

struct EdgeIndices32

{

    unsigned int westVertexCount;

    unsigned int westIndices[westVertexCount];

    unsigned int southVertexCount;

    unsigned int southIndices[southVertexCount];

    unsigned int eastVertexCount;

    unsigned int eastIndices[eastVertexCount];

    unsigned int northVertexCount;

    unsigned int northIndices[northVertexCount];

}
2.4、扩展数据
随后可以使用扩展数据来补充具有附加信息的量化网格。 每个扩展都以ExtensionHeader结构开头,包含唯一标识符和扩展数据的大小(以字节为单位)。 unsigned char是一个8位无符号整数。
struct ExtensionHeader

{

    unsigned char extensionId;     // 扩展ID

    unsigned int  extensionLength; // 扩展长度

}
在定义新扩展时,将为它们分配唯一标识符。 如果没有为tileset定义扩展,则ExtensionanEeader将不包含在quanitzed-mesh中。 可以将多个扩展附加到量化网格数据,其中每个扩展的排序由服务器确定。
客户端可以通过使用-分隔扩展名来请求多个扩展。 例如,客户端可以使用以下Accept标头请求顶点法线和watermask:
Accept : 'application/vnd.quantized-mesh;extensions=octvertexnormals-watermask'
可以为量化网格定义以下扩展:
地形光照(Terrain Lighting)
名称(Name):
Oct-Encoded Per-Vertex Normals标识(id): 1
描述(Description):将每个顶点光照属性添加到量化网格。 每个顶点法线使用
oct编码将传统的x,y,z96位浮点单位向量压缩为x,y16位表示。oct编码在介绍在”A Survey of Efficient Representations of Independent Unit Vectors“, Cigolle et al 2014: http://jcgt.org/published/0003/02/01/数据定义(Data Definition):
struct OctEncodedVertexNormals

{

    unsigned char xy[vertexCount * 2];

}
请求(Requesting):对于要包含在量化网格中的oct编码的每顶点法线,客户端必须使用以下HTTP标头请求此扩展:
Accept : 'application/vnd.quantized-mesh;extensions=octvertexnormals'
附注(Comments):使用扩展名vertexnormals请求此扩展的原始实现。 不推荐使用vertexnormals的扩展标识符,并且实现现在必须通过在请求标头扩展参数中添加octvertexnormal来请求顶点法线,如上所示。
水面掩码(Water Mask)
名称(Name):
Water Mask标识(id): 2
描述(Description):添加用于渲染水效果的海岸线数据。如果图块区域全部是水面或者陆地,则为1字节,否则是
256*256*1=65536字节。掩码值0表示陆地,255表示水面。掩码中的值是从西向东、从北到南定义的,第一个字节是西北角的watermask值。允许0-255之间的值,以便支持海岸线的抗锯齿。数据定义(Data Definition):
完全由陆地或水覆盖的地形瓦片由单个字节定义。
struct WaterMask

{

    unsigned char mask;

}
包含陆地和水混合的地形瓦片定义了256 x 256高度值网格。
struct WaterMask

{

    unsigned char mask[256 * 256];

}
请求(Requesting):要使watermask包含在量化网格中,客户端必须使用以下HTTP标头请求此扩展:
Accept : 'application/vnd.quantized-mesh;extensions=watermask'
元数据(Metadata)
名称(Name):
Metadata标识(id): 4
描述(Description):向每个瓦片添加一个JSON对象,可以存储有关瓦片的额外信息。 潜在用途包括存储瓦片中的土地类型(例如森林,沙漠等)或子级瓦片的可用性。
数据定义(Data Definition):
struct Metadata

{

    unsigned int jsonLength;

    char json[jsonLength];

}
包含陆地和水混合的地形瓦片定义了256 x 256高度值网格。
struct WaterMask

{

    unsigned char mask[256 * 256];

}
请求(Requesting):要使metadata包含在量化网格中,客户端必须使用以下HTTP标头请求此扩展:
Accept : 'application/vnd.quantized-mesh;extensions=metadata'
cesium地形瓦片(Quantized-mesh)格式的更多相关文章
- cesium地形瓦片(HeightMap)格式
目录 1.瓦片切分规则 2..terrain瓦片格式分析 参考资料: heightmap 1.0 Tile Map Service Specification 国内主要地图瓦片坐标系定义及计算原理 H ...
- 还原堆栈信息,分析地形系统使用ASTC格式的纹理导致Crash的问题
0x00 前言 在这篇文章中,我们选择了过去一周Unity官方社区交流群中比较有代表性的几个问题,总结在这里和大家进行分享.主要涵盖了IL2CPP.Scripting.Virtual Reality. ...
- WorldWind源码剖析系列:地形瓦片类TerrainTile和地形瓦片服务类TerrainTileService
地形瓦片类TerrainTile 用来抽象封装用户漫游中所请求的地形瓦片数据类型. 地形瓦片服务类TerrainTileService提供了从BIL(Binary Interleaved by Lin ...
- Cesium中的地形和坐标转换说明
1 Cesium中的地形 Cesium中的地形系统是一种由流式瓦片数据生成地形mesh的技术,厉害指出在于其可以自动模拟出地面.海洋的三维效果.创建地形图层的方式如下: var terrainProv ...
- Cesium加载地形数据只显示半个地球
Cesium第0级地形包括两个瓦片:0/0/0.terrain,0/1/0.terrain,分别为左半球和右半球(具体参考:https://blog.csdn.net/u013929284/artic ...
- geotrellis使用(三十五)Cesium加载geotrellis TMS瓦片
前言 做任何事情都不是想象中的那么简单.好久没有更新技术博客了,跟最近瞎忙有很大关系,虽说是瞎忙也抽空研究了些技术. 主要是前端渲染,像原生的WebGL和Cesium.WebGL写了几篇博客,自我感觉 ...
- Cesium入门7 - Adding Terrain - 添加地形
Cesium入门7 - Adding Terrain - 添加地形 Cesium中文网:http://cesiumcn.org/ | 国内快速访问:http://cesium.coinidea.com ...
- Cesium原理篇:3最长的一帧之地形(2:高度图)
这一篇,接着上一篇,内容集中在高度图方式构建地球网格的细节方面. 此时,Globe对每一个切片(GlobeSurfaceTile)创建对应的TileTerrain类,用来维 ...
- cesium模型加载-加载fbx格式模型
整体思路: fbx格式→dae格式→gltf格式→cesium加载gltf格式模型 具体方法: 1. fbx格式→dae格式 工具:3dsMax, 3dsMax插件:OpenCOLLADA, 下载地址 ...
随机推荐
- Android编译系统中的Android.bp
https://www.cnblogs.com/bluestorm/p/10895005.html Android.bp,是用来替换Android.mk的配置文件. 它使用Blueprint框架来解析 ...
- React 性能优化之组件动态加载(react-loadable)
React 项目打包时,如果不进行异步组件的处理,那么所有页面所需要的 js 都在同一文件中(bundle.js),整个js文件很大,从而导致首屏加载时间过长. 所有,可以对组件进行异步加载处理,通常 ...
- 解决在页面中无法获取qrcode.js生成的base64的图片
应用场景 生成带二维码的推广海报图片 旧方法: 将用户自己的推广连接先通过qrcode.js生成二维码,然后再用后台返回的一张背景图片和二维码通过canvas绘制成一张海报. 问题 在部分安卓手机上获 ...
- springboot2.1.3 配置前后端跨域问题
很简单,创建一个配置类即可,如下: package com.app.gateway.common.config; import org.springframework.context.annotati ...
- 【异常】java.lang.ArithmeticException: Non-terminating decimal expansion; no exact representable decimal result.
异常原因:没有指定数据精度导致数据运算无法正常结算 如执行下面的除法: ).divide(BigDecimal.valueOf()).intValue(); 指定精度后就可以了: ).divide(B ...
- python导入模块被加横线
2018-07-03 04:20:41 bluelilyfly 阅读数 1238 版权声明:本文为博主原创文章,遵循CC 4.0 BY-SA版权协议,转载请附上原文出处链接和本声明. 本文链接:h ...
- The Preliminary Contest for ICPC Asia Nanjing 2019 H. Holy Grail
题目链接:https://nanti.jisuanke.com/t/41305 题目说的很明白...只需要反向跑spfa然后输入-dis,然后添-dis的一条边就好了... #include < ...
- deployment:声明式的升级应用
9.1.使用RC实现滚动升级 #kubectl rolling-update kubia-v1 kubia-v2 --image=luksa/kubia:v2 使用kubia-v2版本应用来替换运行着 ...
- 关于TCP/IP
一.网络模型 计算机网络的两种模型:OSI 模型和 TCP/IP 模型 由于 OSI 模型过于复杂难以实现,导致 TCP/IP 模型更早地应用在现实中,这也使得 TCP/IP 模型成为标准 在 OSI ...
- Spring Boot 缓存 知识点
每次调用需要缓存功能的方法时,Spring会检查指定参数的指定的目标方法是否已经被调用过:如果有就直接从缓存中获取方法调用后的结果,如果没有就调用方法并缓存结果后返回给用户.下次调用直接从缓存中获取. ...