
Kubernetes 控制器之 Deployment 介绍(六)
一、Deployment、ReplicaSet、Pod之间的关系
我们接着前面的文章说,如果不清楚的请查看之前的博文:http://blog.51cto.com/wzlinux/2322616
前面我们已经了解到,Kubernetes 通过各种 Controller 来管理 Pod 的生命周期。为了满足不同业务场景,Kubernetes 开发了 Deployment、ReplicaSet、DaemonSet、StatefuleSet、Job 等多种 Controller。我们首先学习最常用的 Deployment。
1、运行 Deployment
先从例子开始,运行一个 Deployment:
kubectl run nginx-deployment --image=nginx:1.7.9 --replicas=2
上面的命令将部署包含两个副本的 Deployment nginx-deployment,容器的 image 为 nginx:1.7.9。
2、查看 Deployment(deploy)
查看刚刚创建的 deployment,其可以简写为deploy。
[root@master ~]# kubectl get deploy

NAME               DESIRED   CURRENT   UP-TO-DATE   AVAILABLE   AGE

nginx-deployment   2         2         2            2           4m56s
使用命令kubectl describe deploy查看内部内容。
kubectl describe deploy nginx-deployment
Name:                   nginx-deployment

Namespace:              default

CreationTimestamp:      Thu, 29 Nov 2018 17:47:16 +0800

Labels:                 run=nginx-deployment

Annotations:            deployment.kubernetes.io/revision: 1

Selector:               run=nginx-deployment

Replicas:               2 desired | 2 updated | 2 total | 2 available | 0 unavailable

StrategyType:           RollingUpdate

MinReadySeconds:        0

RollingUpdateStrategy:  25% max unavailable, 25% max surge

Pod Template:

  Labels:  run=nginx-deployment

  Containers:

   nginx-deployment:

    Image:        nginx:1.7.9

    Port:         <none>

    Host Port:    <none>

    Environment:  <none>

    Mounts:       <none>

  Volumes:        <none>

Conditions:

  Type           Status  Reason

  ----           ------  ------

  Available      True    MinimumReplicasAvailable

  Progressing    True    NewReplicaSetAvailable

OldReplicaSets:  <none>

NewReplicaSet:   nginx-deployment-5fd98dbf5f (2/2 replicas created)

Events:

  Type    Reason             Age    From                   Message

  ----    ------             ----   ----                   -------

  Normal  ScalingReplicaSet  6m11s  deployment-controller  Scaled up replica set nginx-deployment-5fd98dbf5f to 2
展示的内容大部分都是描述信息,我们看最后一行,这里告诉我们创建了一个 ReplicaSet nginx-deployment-5fd98dbf5f,Events 是 Deployment 的日志,记录了 ReplicaSet 的启动过程。
通过上面的分析,也验证了 Deployment 通过 ReplicaSet 来管理 Pod 的事实。
3、查看 ReplicaSet(rs)
查看我们有哪些 rs。
[root@master ~]# kubectl get rs

NAME                          DESIRED   CURRENT   READY   AGE

nginx-deployment-5fd98dbf5f   2         2         2       12m
使用命令kubectl describe rs查看其详细信息。
kubectl describe rs nginx-deployment-5fd98dbf5f
Name:           nginx-deployment-5fd98dbf5f

Namespace:      default

Selector:       pod-template-hash=5fd98dbf5f,run=nginx-deployment

Labels:         pod-template-hash=5fd98dbf5f

                run=nginx-deployment

Annotations:    deployment.kubernetes.io/desired-replicas: 2

                deployment.kubernetes.io/max-replicas: 3

                deployment.kubernetes.io/revision: 1

Controlled By:  Deployment/nginx-deployment

Replicas:       2 current / 2 desired

Pods Status:    2 Running / 0 Waiting / 0 Succeeded / 0 Failed

Pod Template:

  Labels:  pod-template-hash=5fd98dbf5f

           run=nginx-deployment

  Containers:

   nginx-deployment:

    Image:        nginx:1.7.9

    Port:         <none>

    Host Port:    <none>

    Environment:  <none>

    Mounts:       <none>

  Volumes:        <none>

Events:

  Type    Reason            Age   From                   Message

  ----    ------            ----  ----                   -------

  Normal  SuccessfulCreate  13m   replicaset-controller  Created pod: nginx-deployment-5fd98dbf5f-8g7nm

  Normal  SuccessfulCreate  13m   replicaset-controller  Created pod: nginx-deployment-5fd98dbf5f-58c4z
我们可以看到Controlled By: Deployment/nginx-deployment,说明此 ReplicaSet 由 Deployment nginx-deployment。
在Events记录了两个副本 Pod 的创建,那我们查看一下 Pod。
4、查看 Pod
查看目前的 Pod。
[root@master ~]# kubectl get pods

NAME                                READY   STATUS    RESTARTS   AGE

nginx-deployment-5fd98dbf5f-58c4z   1/1     Running   0          19m

nginx-deployment-5fd98dbf5f-8g7nm   1/1     Running   0          19m
随便选择一个 Pod,查看其详细信息。
kubectl describe pod nginx-deployment-5fd98dbf5f-58c4z
Name:               nginx-deployment-5fd98dbf5f-58c4z

Namespace:          default

Priority:           0

PriorityClassName:  <none>

Node:               node02.wzlinux.com/172.18.8.202

Start Time:         Thu, 29 Nov 2018 17:47:16 +0800

Labels:             pod-template-hash=5fd98dbf5f

                    run=nginx-deployment

Annotations:        <none>

Status:             Running

IP:                 10.244.2.3

Controlled By:      ReplicaSet/nginx-deployment-5fd98dbf5f

Containers:

  nginx-deployment:

    Container ID:   docker://69fa73ed16d634627b69b8968915d9a5704f159206ac0d3b2f1179fa99acd56f

    Image:          nginx:1.7.9

    Image ID:       docker-pullable://nginx@sha256:e3456c851a152494c3e4ff5fcc26f240206abac0c9d794affb40e0714846c451

    Port:           <none>

    Host Port:      <none>

    State:          Running

      Started:      Thu, 29 Nov 2018 17:47:28 +0800

    Ready:          True

    Restart Count:  0

    Environment:    <none>

    Mounts:

      /var/run/secrets/kubernetes.io/serviceaccount from default-token-sm664 (ro)

Conditions:

  Type              Status

  Initialized       True

  Ready             True

  ContainersReady   True

  PodScheduled      True

Volumes:

  default-token-sm664:

    Type:        Secret (a volume populated by a Secret)

    SecretName:  default-token-sm664

    Optional:    false

QoS Class:       BestEffort

Node-Selectors:  <none>

Tolerations:     node.kubernetes.io/not-ready:NoExecute for 300s

                 node.kubernetes.io/unreachable:NoExecute for 300s

Events:

  Type    Reason     Age   From                         Message

  ----    ------     ----  ----                         -------

  Normal  Scheduled  20m   default-scheduler            Successfully assigned default/nginx-deployment-5fd98dbf5f-58c4z to node02.wzlinux.com

  Normal  Pulling    20m   kubelet, node02.wzlinux.com  pulling image "nginx:1.7.9"

  Normal  Pulled     20m   kubelet, node02.wzlinux.com  Successfully pulled image "nginx:1.7.9"

  Normal  Created    20m   kubelet, node02.wzlinux.com  Created container

  Normal  Started    20m   kubelet, node02.wzlinux.com  Started container
我们可以看到Controlled By: ReplicaSet/nginx-deployment-5fd98dbf5f,说明此 Pod 是由 ReplicaSet nginx-deployment-5fd98dbf5f 创建的。
Events记录了 Pod 的启动过程。
5、总结
- 用户通过 kubectl 创建 Deployment。
- Deployment 创建 ReplicaSet。
- ReplicaSet 创建 Pod。
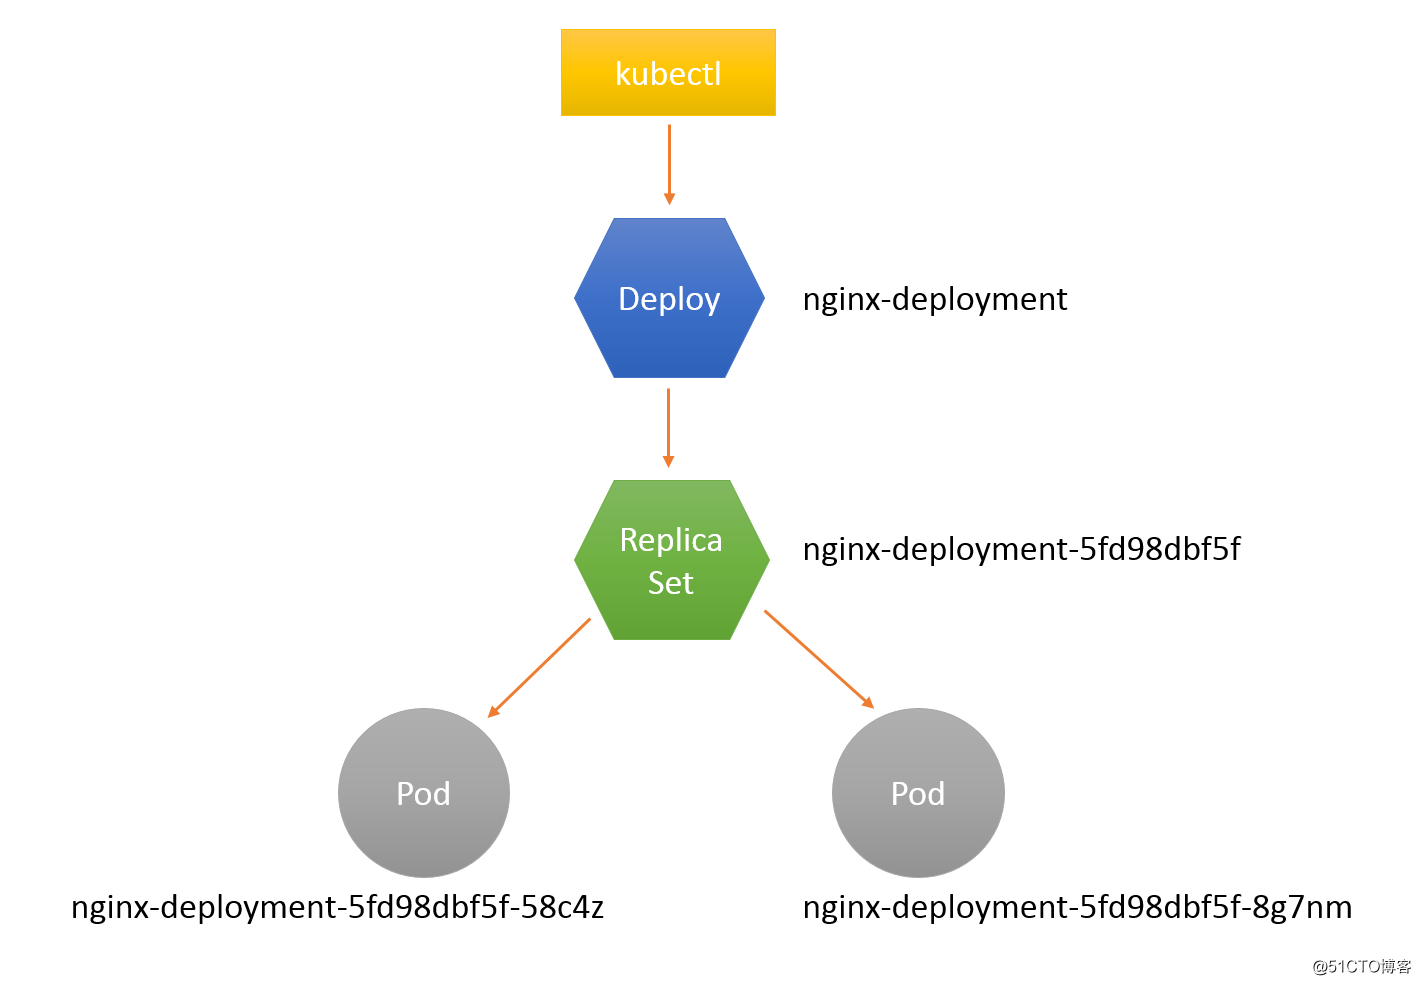
从上图也可以看出,对象的命名方式是:子对象的名字 = 父对象名字 + 随机字符串或数字。
二、伸缩
伸缩(Scale Up/Down)是指在线增加或减少 Pod 的副本数。
我们重新创建一下。
[root@master ~]# kubectl run nginx --image=nginx:1.7.9 --replicas=2

deployment.apps/nginx created
[root@master ~]# kubectl get pod -o wide

NAME                    READY   STATUS    RESTARTS   AGE   IP            NODE                 NOMINATED NODE

nginx-699ff78c9-2xxnj   1/1     Running   0          51s   10.244.1.11   node01.wzlinux.com   <none>

nginx-699ff78c9-j5w6c   1/1     Running   0          51s   10.244.3.6    node02.wzlinux.com   <none>
我们把副本数量修改为5个,查看一下。
[root@master ~]# kubectl scale --replicas=5 deploy/nginx

deployment.extensions/nginx scaled
[root@master ~]# kubectl get pod -o wide

NAME                    READY   STATUS    RESTARTS   AGE     IP            NODE                 NOMINATED NODE

nginx-699ff78c9-2xxnj   1/1     Running   0          2m21s   10.244.1.11   node01.wzlinux.com   <none>

nginx-699ff78c9-4qq9h   1/1     Running   0          18s     10.244.1.12   node01.wzlinux.com   <none>

nginx-699ff78c9-b6dt4   1/1     Running   0          18s     10.244.3.7    node02.wzlinux.com   <none>

nginx-699ff78c9-j5w6c   1/1     Running   0          2m21s   10.244.3.6    node02.wzlinux.com   <none>

nginx-699ff78c9-zhwsz   1/1     Running   0          18s     10.244.3.8    node02.wzlinux.com   <none>
三个新副本被创建并调度到 node01 和 node02 上,出于安全考虑,默认配置下 Kubernetes 不会将 Pod 调度到 Master 节点。如果希望将 master 也当作 Node 使用,可以执行如下命令:
kubectl taint node master node-role.kubernetes.io/master-
如果要恢复 Master Only 状态,执行如下命令:
kubectl taint node master node-role.kubernetes.io/master="":NoSchedule
想要减少副本数量也是同样的方法,指定数量即可,那我们减少到3个副本。
[root@master ~]# kubectl get pod -o wide

NAME                    READY   STATUS    RESTARTS   AGE     IP            NODE                 NOMINATED NODE

nginx-699ff78c9-2xxnj   1/1     Running   0          2m55s   10.244.1.11   node01.wzlinux.com   <none>

nginx-699ff78c9-4qq9h   1/1     Running   0          52s     10.244.1.12   node01.wzlinux.com   <none>

nginx-699ff78c9-j5w6c   1/1     Running   0          2m55s   10.244.3.6    node02.wzlinux.com   <none>
三、故障转移
目前是五个应用分别运行在两台机器上面,我们把 node02 关闭,造成 node02 出现问题,然后再查看一下 Pod 的情况。
[root@master ~]# kubectl get pod -o wide

NAME                    READY   STATUS    RESTARTS   AGE     IP            NODE                 NOMINATED NODE

nginx-699ff78c9-2xxnj   1/1     Running   0          8m49s   10.244.1.11   node01.wzlinux.com   <none>

nginx-699ff78c9-4qq9h   1/1     Running   0          6m46s   10.244.1.12   node01.wzlinux.com   <none>

nginx-699ff78c9-j5w6c   1/1     Unknown   0          8m49s   10.244.3.6    node02.wzlinux.com   <none>

nginx-699ff78c9-wqd5k   1/1     Running   0          32s     10.244.1.13   node01.wzlinux.com   <none>
等待一段时间之后,我们看到 node02 上的 Pod 标记为 Unknown 状态,并在 node01 上面新建三个 Pod,维持总副本数为3。
那我们重启把服务器启动起来,正常情况下,如果配置没有问题,服务会自动添加到集群中,我们启动查看状态。
[root@master ~]# kubectl get pod -o wide

NAME                    READY   STATUS    RESTARTS   AGE     IP            NODE                 NOMINATED NODE

nginx-699ff78c9-2xxnj   1/1     Running   0          14m     10.244.1.11   node01.wzlinux.com   <none>

nginx-699ff78c9-4qq9h   1/1     Running   0          12m     10.244.1.12   node01.wzlinux.com   <none>

nginx-699ff78c9-wqd5k   1/1     Running   0          6m37s   10.244.1.13   node01.wzlinux.com   <none>
当 node02 恢复后,Unknown 的 Pod 会被删除,不过已经运行的 Pod 不会重新调度回 node02。
四、标签
默认配置下,Scheduler 会将 Pod 调度到所有可用的 Node。不过有些情况我们希望将 Pod 部署到指定的 Node,比如将有大量磁盘 I/O 的 Pod 部署到配置了 SSD 的 Node;或者 Pod 需要 GPU,需要运行在配置了 GPU 的节点上。
我们使用mytest.yaml文件创建一个Deployment,内容如下:
apiVersion: extensions/v1beta1

kind: Deployment

metadata:

  name: mytest

  namespace: default

spec:

  replicas: 5

  template:

    metadata:

      labels:

        run: mytest

    spec:

      containers:

      - image: wangzan18/mytest:v1

        imagePullPolicy: IfNotPresent

        name: mytest
使用下面命令创建应用。
[root@master ~]# kubectl create -f mytest.yaml

deployment.extensions/mytest created
Kubernetes 是通过 label 来实现这个功能的。label 是 key-value 对,各种资源都可以设置 label,灵活添加各种自定义属性。比如执行如下命令标注 node01 是配置了 SSD 的节点。
kubectl label node node01.wzlinux.com disktype=ssd
然后使用命令kubectl get node --show-labels我们查看。
NAME                 STATUS   ROLES    AGE   VERSION   LABELS

master.wzlinux.com   Ready    master   26h   v1.12.3   beta.kubernetes.io/arch=amd64,beta.kubernetes.io/os=linux,kubernetes.io/hostname=master.wzlinux.com,node-role.kubernetes.io/master=

node01.wzlinux.com   Ready    <none>   25h   v1.12.3   beta.kubernetes.io/arch=amd64,beta.kubernetes.io/os=linux,disktype=ssd,kubernetes.io/hostname=node01.wzlinux.com

node02.wzlinux.com   Ready    <none>   91m   v1.12.3   beta.kubernetes.io/arch=amd64,beta.kubernetes.io/os=linux,kubernetes.io/hostname=node02.wzlinux.com
disktype=ssd 已经成功添加到 node01,除了 disktype,Node 还有几个 Kubernetes 自己维护的 label。
有了disktype这个自定义 label,接下来就可以指定将 Pod 部署到 node01。编辑 mytest.yaml:
apiVersion: extensions/v1beta1

kind: Deployment

metadata:

  name: mytest

  namespace: default

spec:

  replicas: 5

  template:

    metadata:

      labels:

        run: mytest

    spec:

      containers:

      - image: wangzan18/mytest:v1

        imagePullPolicy: IfNotPresent

        name: mytest

      nodeSelector:

        disktype: ssd
在 Pod 模板的spec里通过nodeSelector指定将此 Pod 部署到具有 label disktype=ssd 的 Node 上。
重新部署 Deployment 并查看 Pod 的运行节点:
[root@master ~]# kubectl apply -f mytest.yaml

Warning: kubectl apply should be used on resource created by either kubectl create --save-config or kubectl apply

deployment.extensions/mytest configured

[root@master ~]# kubectl get pod -o wide

NAME                      READY   STATUS    RESTARTS   AGE   IP            NODE                 NOMINATED NODE

mytest-6f7fbbfdc7-2tr6s   1/1     Running   0          63s   10.244.1.19   node01.wzlinux.com   <none>

mytest-6f7fbbfdc7-5g9tj   1/1     Running   0          61s   10.244.1.21   node01.wzlinux.com   <none>

mytest-6f7fbbfdc7-bnfxv   1/1     Running   0          61s   10.244.1.22   node01.wzlinux.com   <none>

mytest-6f7fbbfdc7-bqzqq   1/1     Running   0          60s   10.244.1.23   node01.wzlinux.com   <none>

mytest-6f7fbbfdc7-v6cqk   1/1     Running   0          63s   10.244.1.20   node01.wzlinux.com   <none>
全部 6 个副本都运行在 node01 上,符合我们的预期。
要删除 label disktype,执行如下命令:
[root@master ~]# kubectl label node node01.wzlinux.com disktype-

node/node01.wzlinux.com labeled
不过此时 Pod 并不会重新部署,依然在 node01 上运行。
除非在mytest.yaml中删除nodeSelector设置,然后通过kubectl apply重新部署。
关于对象资源的设定,大家可以使用命令kubectl explain,比如查看pod中nodeSelector的参数设定,我们可以使用命令
kubectl explain pod.spec.nodeSelector
小问题:手动重新添加到集群
如果因为某些问题,服务不能自动添加到集群中,我们就需要手动重新初始化添加一次。
在 master 节点上面先删除 node02节点。
kubectl delete node node02.wzlinux.com
在 node02 上面 reset。
kubeadm reset
重新使用kubeadm init初始化,但是发现token过期了,我们需要在master节点重新生成token。
[root@master ~]# kubeadm token create

v269qh.2mylwtmc96kd28sq
生成ca-cert-hash sha256的值。
[root@master ~]# openssl x509 -pubkey -in /etc/kubernetes/pki/ca.crt | openssl rsa -pubin -outform der 2>/dev/null | \

>    openssl dgst -sha256 -hex | sed 's/^.* //'

84e50f7beaa4d3296532ae1350330aaf79f3f0d45ec8623fae6cd9fe9a804635
然后在node节点上面重新使用kubeadm init进行添加集群中。
Kubernetes 控制器之 Deployment 介绍(六)的更多相关文章
- Kubernetes的控制器之Deployment的定义
Deploy 的控制器定义参数介绍 [root@master manifests]# kubectl explain deploy KIND: Deployment VERSION: extensio ...
- Kubernetes 控制器之 Service 讲解(七)
一.背景介绍 我们这里准备三台机器,一台master,两台node,采用kubeadm的方式进行安装的,安装过程大家可以参照我之前的博文. IP 角色 版本 192.168.1.200 master ...
- kubernetes控制器之DaemonSet
转载于https://blog.csdn.net/bbwangj/article/details/82867472 什么是 DaemonSet? DaemonSet 确保全部(或者一些)Node 上运 ...
- 十五、资源控制之Deployment
资源控制器之Deployment Deployment 为 Pod 和 ReplicaSet 提供了一个声明式定义(declarative)方法,用来替代以前的ReplicationControlle ...
- Kubernetes---资源控制器之ReplicationController、ReplicaSet和Deployment
1.ReplicationController和ReplicaSet介绍 RC(ReplicationController)主要的作用就是用来确保容器应用的副本数始终保持在用户定义的副本数.即如果有容 ...
- 十六、资源控制器之DaemonSet
资源控制器之DaemonSet DaemonSet 确保全部(或者一些) Node上运行一个 Pod 的副本,当有 Node 加入集群时,也会为他们新增一个 Pod,当有 Node 从集群移除时,这些 ...
- k8s运行容器之deployment(三)--技术流ken
deployment 我们已经知道k8s是通过各种controller来管理pod的生命周期.为了满足不同业务场景,k8s开发了Deployment.ReplicaSet.DaemonSet.Stat ...
- Kubernetes 的层级命名空间介绍
原文链接:https://fuckcloudnative.io/posts/introducing-hierarchical-namespaces/ 在单个 Kubernetes 集群上安全托管大量用 ...
- Kubernetes学习之路(六)之创建K8S应用
一.Deployment的概念 K8S本身并不提供网络的功能,所以需要借助第三方网络插件进行部署K8S中的网络,以打通各个节点中容器的互通. POD,是K8S中的一个逻辑概念,K8S管理的是POD,一 ...
随机推荐
- Mac在zsh环境安装Maven
Mac OS先安装了oh-my-zsh和iterm2,设置系统的默认语言为zsh.再安装Maven的时候,发现添加profile文件,关闭iterm后,mvn的环境变量一直没有生效. 折腾了好久,突然 ...
- 8、Python简单数据类型(int、float、complex、bool、str)
一.数据类型分类 1.按存值个数区分 单个值:数字,字符串 多个值(容器):列表,元组,字典,集合 2.按可变不可变区分 可变:列表[],字典{},集合{} 不可变:数字,字符串,元组().bool, ...
- shell部分面试题
1.用Shell编程,判断一文件是不是块或字符设备文件,如果是将其拷贝到 /dev 目录下. #!/bin/bash#1.sh#判断一文件是不是字符或块设备文件,如果是将其拷贝到 /dev 目录下#f ...
- MySQL 日期格式化,取年月日等相关操作
日期取年.月.日 select id, phone,time,year(time),month(time), DAY(time),TIME(time) from user where phone='x ...
- 含-SH的ACE抑制药的青霉胺样反应
关于 含-SH的血管紧张素转化酶(ACE)抑制药如卡托普利具有青霉胺样反应.而依那普利则不含-SH. 青霉胺样反应 青霉胺样反应,指应用含-SH的ACE抑制药产生的皮疹.嗜酸性粒细胞(E)增多.味觉异 ...
- 数据库服务器和web服务器磁盘占用查询
对于Oracle数据库而言磁盘空间主要体现在表空间上,可使用sql语句进行查看Oracle 表空间的大小及使用情况: select sum(bytes)/1024/1024/1024 "Gb ...
- CSP2019 J组 游记
结果 分数出来了.100+100+10+35=245. 一等线230,擦着边进一等. (点击图片放大) 期待明年s组的表现. 第一轮 不就是初赛吗?擦边轻松水过去! 第二轮 Day -14 停两周晚自 ...
- WinDbg常用命令系列---?*
? (Command Help) 问号(?)字符显示所有命令和运算符的列表.问号本身显示命令帮助. 环境 模式 用户模式下,内核模式 目标 实时. 崩溃转储 平台 全部 0:000> ? Ope ...
- JMX脚本在某些机器上报错,有的运行超时
运行超时的 是因为在server端运行命令执行脚本,是server给agent下达的指定,但是server端到agent的10050端口没开,所以或一致堵死在那,知道执行超时, 解决:开通server ...
- 玩家属性同步优化-脏数据标记(位运算、数组、stl之bitset)
把大神的帖子中一部分摘抄出来,结合自己写的位运算代码和循环代码(数组遍历)进行性能测试分析并给出结果. 摘自: https://www.gameres.com/827195.html 本文适用于所有脏 ...