隧道6in4 和隧道6to4(GNS3)
隧道6in4实验配置
拓扑图
|
Device |
Interface |
IP Address(IPv6) |
|
R1 |
F 0/0 |
10.1.81.1 |
|
F 0/1 |
2001:db8:cafe:81::10 |
|
|
R2 |
F 0/0 |
10.81.1.2 |
|
F 0/1 |
172.81.1.2 |
|
|
R3 |
F 0/0 |
172.81.1.3 |
|
F 0/1 |
2001:DB8:ACE:81::20 |
|
|
R4 |
F 0/0 |
2001:db8:cafe:81::40 |
|
R5 |
F 0/0 |
2001:DB8:ACE:81::50 |
手工隧道是双向点到点隧道,但两台边界路由器之间的纯IPv4网络不必是点到点网络,且IPv4网络一定要ping通,手工隧道可以用静态路由或者动态路由,我这里使用ospf动态路由配置。
R1与R3同理
R1(config)#int f 0/0
R1(config-if)#ip add 10.81.1.1 255.255.255.0
R1(config-if)#ip ospf 1 area 0
R1(config-if)#no shut
R1(config-if)#int lo0
R1(config-if)#ip add 1.1.1.1 255.255.255.255
R1(config-if)#ip ospf 1 area 0
R1(config-if)#ex
R1(config)#router ospf 1
R1(config-rtr)#router-id 1.1.1.1
R1(config-rtr)#network 1.1.1.1 0.0.0.0 area 0
R1(config-rtr)#network 10.81.1.0 0.0.0.255 area 0
R2(config)#int f 0/0
R2(config-if)#ip add 10.81.1.2 255.255.255.0
R2(config-if)#ip ospf 1 area 0
R2(config-if)#no shut
R2(config-if)#int f 0/1
R2(config-if)#ip add 172.81.1.2 255.255.255.0
R2(config-if)#ip ospf 1 area 0
R2(config-if)#no shut
R2(config-if)#int lo0
R2(config-if)#ip add 2.2.2.2 255.255.255.255
R2(config-if)#ip ospf 1 area 0
R2(config-if)#ex
R2(config)#router ospf 1
R2(config-rtr)#router-id 2.2.2.2
R2(config-rtr)#network 2.2.2.2 0.0.0.0 area 0
R2(config-rtr)#network 10.81.1.0 0.0.0.255 area 0
R2(config-rtr)#network 172.81.1.0 0.0.0.255 area 0
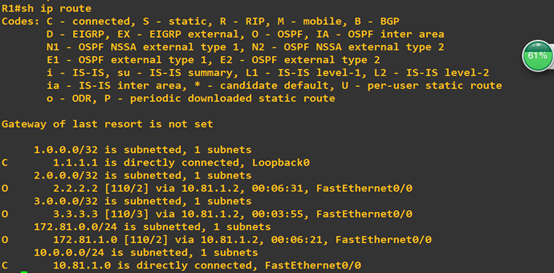
查看R1路由表,验证ospf是否配置成功
Ospf配置完成后去边界路由配置隧道
R1与R3同理
R1(config)#ipv6 unicast-routing
R1(config)#int f 0/1
R1(config-if)#ipv6 enable
R1(config-if)#ipv6 add 2001:db8:café:81::10/64
R1(config-if)#no shut
R1(config-if)#int tunnel 0
R1(config-if)#ipv6 enable
R1(config-if)#tunnel source f 0/0
R1(config-if)#tunnel mode ipv6ip
R1(config-if)#tunnel destination 172.81.1.3
R1(config-if)#exit
R1(config)#ipv6 route 2001:db8:cafe::/48 tunnel 0
配置完R3后试ping R1 f0/1接口

最后配置R4(R5同理)
R4(config)#ipv6 unicast-routing
R4(config)#int f 0/0
R4(config-if)#ipv6 enable
R4(config-if)#ipv6 add 2001:db8:cafe:81::40/64
R4(config-if)#no shut
R4(config-if)#ex
R4(config)#ipv6 route ::0/0 2001:db8:café:81::10
配置完R5后,从R4ping到 R5

从R5 ping 到 R4

隧道配置完成。
6to4隧道配置
拓扑图
|
Device |
Interface |
IP Address(IPv6) |
|
R1 |
F 0/0 |
172.10.81.1 |
|
F 0/1 |
2002:AC0A:5101::1 |
|
|
R2 |
F 0/0 |
10.81.1.1 |
|
F 0/1 |
2002:A01:5101::1 |
|
|
R3 |
F 0/0 |
218.224.81.1 |
|
F 0/1 |
2002:DAE0:5101::1 |
|
|
R4 |
F 0/0 |
172.10.81.4 |
|
F 0/1 |
10.1.81.4 |
|
|
F 1/0 |
218.224.81.4 |
|
|
R5 |
F 0/0 |
2002:AC0A:5101::5 |
|
R6 |
F 0/0 |
2002:A01:5101::6 |
|
R5 |
F 0/0 |
2002:DAE0:5101::7 |
6to4隧道内部路由只能配置静态路由
R1(config)#int f 0/0
R1(config-if)#ip add 172.10.81.1 255.255.255.0
R1(config-if)#no shut
R1(config-if)#ex
R1(config)#ip route 10.1.81.0 255.255.255.0 172.10.81.4
R1(config)#ip route 218.224.81.0 255.255.255.0 172.10.81.4
R2(config)#int f 0/0
R2(config-if)#ip add 10.1.81.1 255.255.255.0
R2(config-if)#no shut
R2(config-if)#ex
R2(config)#ip route 172.10.81.0 255.255.255.0 10.1.81.4
R2(config)#ip route 218.224.81.0 255.255.255.0 10.1.81.4
R3(config)#int f 0/0
R3(config-if)#ip add 218.224.81.1 255.255.255.0
R3(config-if)#no shut
R3(config-if)#ex
R3(config)#ip route 10.1.81.0 255.255.255.0 218.224.81.4
R3(config)#ip route 172.10.81.0 255.255.255.0 218.224.81.4
R4(config)#int f 0/0
R4(config-if)#ip add 172.10.81.4 255.255.255.0
R4(config-if)#no shut
R4(config-if)#int f 0/1
R4(config-if)#ip add 10.1.81.4 255.255.255.0
R4(config-if)#no shut
R4(config-if)#int f 1/0
R4(config-if)#ip add 218.224.81.4 255.255.255.0
R4(config-if)#no shut
静态路由配置完成,show路由表验证

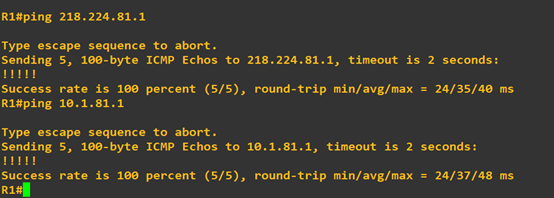
试从R1ping到R3、R4
继续配置隧道
R2、R3配置与R1同理
R1(config)#ipv6 unicast-routing
R1(config)#int f 0/1
R1(config-if)#ipv6 enable
R1(config-if)#ipv6 add 2002:ac0a:5101::1/48
R1(config-if)#no shut
R1(config-if)#int tunnel 0
R1(config-if)#ipv6 enable
R1(config-if)#tunnel source f 0/0
R1(config-if)#tunnel mode ipv6ip 6to 4
R1(config-if)#exit
R1(config)#ipv6 route 2002::/16 tunnel 0
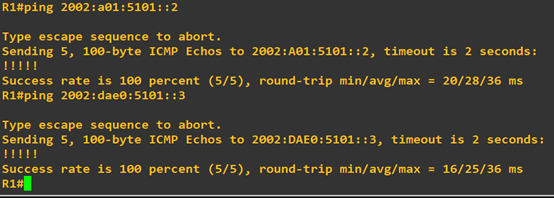
配置完后从R1ping到R2、R3
最后配置R5(R6、R7同理)
R5(config)#ipv6 unicast-routing
R5(config)#int f 0/0
R5(config-if)#ipv6 enable
R5(config-if)#ipv6 add 2002:ac0a:5101::5/48
R5(config-if)#no shut
R5(config-if)#ex
R5(config)#ipv6 route ::0/0 2002:ac0a:5101::1
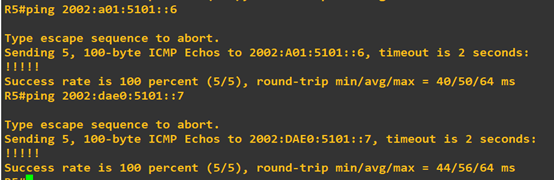
配置完成R6、R7后,试从R5ping 通 R6、R7
6to4隧道实验完成
隧道6in4 和隧道6to4(GNS3)的更多相关文章
- labview 移位寄存器、隧道、索引隧道的区别
Lab view区别:移位寄存器.隧道.索引隧道 最近研究Lab view的时候发现移位寄存器和隧道的功能非常相似但是又有区别 外部数据进入循环体是通过隧道进入的,有几种方式: 图1:For 循环结构 ...
- 内网安全---隐藏通信隧道基础&&网络通信隧道之一ICMP隧道
一,隐藏通信隧道基础知识 在完成信息收集之后,我们要判断流量是否出的去.进的来.隐藏通信隧道技术常用于在受限的网络环境中追踪数据流向和在非受信任的网络中实现安全的数据传输. 1.常见的隧道: .网络层 ...
- 绕过边界防火墙之ICMP隧道、HTTP隧道、UDP隧道
一.ICMP隧道 背景:已经通过某种手段拿到了园区网A主机的控制权,但是边界防火墙只放行该主机向外的ICMP流量,此时怎样才能让A主机和公网主机C建立TCP连接呢? 方案:将TCP包内容包裹在ICMP ...
- 在 Windows 7 中禁用IPv6协议/IPv6隧道
How to disable certain Internet Protocol version 6 (IPv6) components in Windows Vista, Windows 7 and ...
- Windows下使用Xshell建立反向隧道
反向隧道是一个进行内网穿透的简单而有用的方法.在Linux下通过OpenSSH和AutoSSH可以很容易地建立稳定的反向隧道.但是在Windows下,还能看到有人特意装个Cygwin来运行这些工具…… ...
- [置顶] lvs-tun隧道模式搭建
一.lvs直接路由原理 由于图片还要一张一张上传,可以到下面网站下载我的word版本: http://download.csdn.net/user/y0908105023 补充基础知识: OSI(Op ...
- 调试利器:SSH隧道
欢迎大家前往腾讯云社区,获取更多腾讯海量技术实践干货哦~ 本文作者:ivweb 吴浩麟 原文出处:IVWEB社区 未经同意,禁止转载 在开发微信公众号或小程序的时候,由于微信平台规则的限制,部分接口需 ...
- Linux ipip隧道及实现
一.IP隧道技术 IP隧道技术:是路由器把一种网络层协议封装到另一个协议中以跨过网络传送到另一个路由器的处理过程.IP 隧道(IP tunneling)是将一个IP报文封装在另一个IP报文的技术,这可 ...
- 内部办公网与IDC机房的GRE隧道配置实践
背景 公司内网与机房服务器为了实现用内网IP通信的功能,故使用了linux的IP gre隧道的方式.使得公司内部可以直接通过路由直连的方式访问机房服务器. 拓扑图如下: 注:拓扑中的外网IP为虚构的I ...
随机推荐
- 从0开始的Python学习012数据结构&对象与类
简介 数据结构是处理数据的结构,或者说,他们是用来存储一组相关数据的. 在Python中三种内建的数据结构--列表.元组和字典.学会了使用它们会使编程变得的简单. 列表 list是处理一组有序的数据结 ...
- 使用sftp操作文件并添加事务管理
本文主要针对文件操作的事务管理,即写文件和删除文件并且能保证事务的一致性,可与数据库联合使用,比如需要在服务器存文件,相应的记录存放在数据库,那么数据库的记录和服务器的文件数一定是要一一对应的,该部分 ...
- js坚持不懈之17:onmousedown、onmouseup 以及 onclick 事件
<!DOCTYPE html> <html> <body> <div onmouseover = "mOver(this)" onmous ...
- Java基础系列--03_Java中的方法描述
方法 (1)方法的定义:就是完成特定功能的代码块. 注意:在很多语言里面有函数的定义,而在Java中,函数被称为方法. (2)格式: 修饰符 返回值类型 方法名(参数类型 参数名1,参数类型 参数名2 ...
- spring【一】 学习
Spring 源码学习 通过注解的形式注入IOC 简单的创建一个maven的项目的 下载指定的spring的核心jar包(https://mvnrepository.com/artifact/org. ...
- tensorflow 训练之tensorboard使用
1.add saclar and histogram tf.summary.scalar('mean', mean) tf.summary.histogram('histogram', var) 2. ...
- mongoTemplate查询大数据过慢
先上两段代码 代码一 Query query = new Query();queryAfter.addCriteria(Criteria.where("id").in(idList ...
- python上下文管理
一.python上下文介绍: python中的上下文,指的就是代码所执行的环境状态,或者运行的场景 python上下文管理器规定了某个对象的使用范围,当进入或者离开了使用范围,会有相应的操作,多用于资 ...
- Vue 部署IIS 单页面刷新报404问题
参考地址: https://blog.csdn.net/yinjing8435/article/details/71274416
- Excel阅读模式/聚光灯开发技术之二 超级逐步录入提示功能开发原理简述—— 隐鹤 / HelloWorld
Excel阅读模式/聚光灯开发技术之二 超级逐步录入提示功能开发原理简述———— 隐鹤 / HelloWorld 1. 引言 自本人第一篇博文“Excel阅读模式/单元格行列指示/聚光灯开发技术要 ...