Tomcat8.0.11优化相关
Tomcat 8.0.11:
要了解tomcat的优化,我们先看看Tomcat的官方定义:The Apache Tomcat® software is an open source implementation of the Java Servlet, JavaServer Pages, Java Expression Language and Java WebSocket technologies. The Java Servlet, JavaServer Pages, Java Expression Language and Java WebSocket specifications are developed under the Java Community Process.
Apache Tomcat软件是一个开源的Java Servlet实现,JavaServer Pages,Java表达式语言和Java WebSocket技术。Java Servlet、JavaServer页面、Java表达式语言和Java WebSocket规范都是在Java Community Process下开发的。
Tomcat 系统架构:

Tomcat 的缺省配置是不能稳定长期运行的,也就是不适合生产环境,它会死机,让你不断重新启动,甚至在午夜时分唤醒你。对于操作系统优化来说,是尽可能的增大可使用的内存容量、提高CPU 的频率,保证文件系统的读写速率等。经过压力测试验证,在并发连接很多的情况下,CPU 的处理能力越强,系统运行速度越快。
从系统架构图再结合 conf/server.xml 中的标签配置来说,再结合tomcat的源码来看,每个组件都是对应Java中的一个类或者接口,先加载 server.xml 文件,解析文件中的标签组装成一个个的类,最后相互之间协同工作从而支撑起整个服务的运行,如果要对Tomcat本身进行优化的话,可以通过server.xml来改变相应组件的参数属性及行为方式来达到优化性能的目的,比如从架构图结合 server.xml我们可以得知其中比较重要的标签:Server,Services,Connector,Excutor,Engine,Host,Context等等。在官网中由如下介绍:
- Server:在Tomcat世界中,服务器代表整个容器。Tomcat提供了一个服务器接口的默认实现,很少由用户自定义。
- Service:Service是一个中间组件,它位于服务器内部并绑定一个或多个更多的连接器到一个引擎。服务元素很少由用户,作为默认的实现简单而充分:Service interface.Engine
- Connector:Connector处理与客户机的通信。有多个连接器使用Tomcat。其中包括用于大多数HTTP的HTTP连接器流量,特别是在将Tomcat作为独立服务器和AJP连接器运行时哪个实现了将Tomcat连接到诸如此类的web服务器时使用的AJP协议Apache HTTPD服务器。创建一个定制的连接器是一项重要的工作。
- Engine:Engine表示特定服务的请求处理管道。作为服务可能有多个连接器,引擎接收和处理所有请求将响应返回给相应的连接器传输到客户端。可以实现引擎接口来提供定制引擎,虽然这是不常见的。注意,该引擎可以通过jvmRoute用于Tomcat服务器集群参数。
- Host:Host是一个网络名称(如www.yourcompany.com)与Tomcat的关联服务器。一个引擎可以包含多个Host,并且主机元素也支持网络别名,如yourcompany.com和abc.yourcompany.com。用户很少创建自定义主机,因为标准主机实现提供了重要的附加功能功能。
- Context:Context表示web应用程序。一个主机可以包含多个上下文有唯一的路径。可以实现上下文接口来创建自定义但是这种情况很少发生,因为StandardContext提供了重要的信息额外的功能。Context中的Manager对象,查看Manager中的方法,可以发现有跟Session相关的。Session 的核心原理是通过 Filter 拦截 Servlet 请求,将标准的 ServletRequest 包装一下,换成 Spring 的Request 对象,这样当我们调用 Request 对象的 getSession 方法时,Spring 在背后为我们创建和管理Session。
两个核心组件:
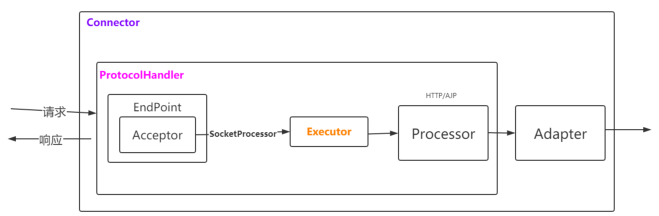
Connector:主要负责处理Socket连接,以及Request与Response的转化。设计思想 :高内聚、低耦合,其中涉及到的三个对象如下:
- EndPoint:提供字节流给Processor,监听通信端口,是对传输层的抽象,用来实现 TCP/IP 协议的。对应的抽象类为AbstractEndPoint,有很多实现类,比如NioEndPoint,JIoEndPoint等。在其中有两个组件,一个是Acceptor,另外一个是SocketProcessor。Acceptor用于监听Socket连接请求,SocketProcessor用于处理接收到的Socket请求。
- Processor:提供Tomcat Request对象给Adapter。Processor是用于实现HTTP协议的,也就是说Processor是针对应用层协议的抽象。Processor接受来自EndPoint的Socket,然后解析成Tomcat Request和Tomcat Response对象,最后通过Adapter提交给容器。对应的抽象类为AbstractProcessor,有很多实现类,比如AjpProcessor、Http11Processor等。
- Adapter:提供ServletRequest给容器。ProtocolHandler接口负责解析请求并生成 Tomcat Request 类。需要把这个 Request 对象转换成 ServletRequest。Tomcat 引入CoyoteAdapter,这是适配器模式的经典运用,连接器调用 CoyoteAdapter 的 sevice 方法,传入的是Tomcat Request 对象,CoyoteAdapter 负责将 Tomcat Request 转成 ServletRequest,再调用容器的 service 方法。
Endpoint接收Socket连接,生成一个SocketProcessor任务提交到线程池去处理。SocketProcessor的run方法会调用Processor组件去解析应用层协议,Processor通过解析生成Request对象后,会调用Adapter的service方法。
Container:包括Engine、Host、Context和Wrapper,主要负责内部的处理以及Servlet的管理。
初始化及启动:
接下去可以通过源码的方式来看看 tomcat 的初始化及启动的主流程。官网下载地址:https://archive.apache.org/dist/tomcat

Tomcat 的入口类是 BootStrap 类的 main 方法:
public static void main(String args[]) {

        if (daemon == null) {

            // Don't set daemon until init() has completed

            Bootstrap bootstrap = new Bootstrap();

            try {

                bootstrap.init();

            } catch (Throwable t) {

                handleThrowable(t);

                t.printStackTrace();

                return;

            }

            daemon = bootstrap;

        } else {

            // When running as a service the call to stop will be on a new

            // thread so make sure the correct class loader is used to prevent

            // a range of class not found exceptions.

            Thread.currentThread().setContextClassLoader(daemon.catalinaLoader);

        }

        try {

            String command = "start";

            if (args.length > ) {

                command = args[args.length - ];

            }

            if (command.equals("startd")) {

                args[args.length - ] = "start";

                daemon.load(args);

                daemon.start();

            } else if (command.equals("stopd")) {

                args[args.length - ] = "stop";

                daemon.stop();

            } else if (command.equals("start")) {

                daemon.setAwait(true);

                daemon.load(args);

                daemon.start();

            } else if (command.equals("stop")) {

                daemon.stopServer(args);

            } else if (command.equals("configtest")) {

                daemon.load(args);

                if (null==daemon.getServer()) {

                    System.exit();

                }

                System.exit();

            } else {

                log.warn("Bootstrap: command \"" + command + "\" does not exist.");

            }

        } catch (Throwable t) {

            // Unwrap the Exception for clearer error reporting

            if (t instanceof InvocationTargetException &&

                    t.getCause() != null) {

                t = t.getCause();

            }

            handleThrowable(t);

            t.printStackTrace();

            System.exit();

        }

    }
启动的时候会走 bootstrap.init() :
public void init() throws Exception {

        initClassLoaders();

        Thread.currentThread().setContextClassLoader(catalinaLoader);

        SecurityClassLoad.securityClassLoad(catalinaLoader);

        // Load our startup class and call its process() method

        if (log.isDebugEnabled())

            log.debug("Loading startup class");

        Class<?> startupClass =

            catalinaLoader.loadClass

            ("org.apache.catalina.startup.Catalina");

        Object startupInstance = startupClass.newInstance();

        // Set the shared extensions class loader

        if (log.isDebugEnabled())

            log.debug("Setting startup class properties");

        String methodName = "setParentClassLoader";

        Class<?> paramTypes[] = new Class[];

        paramTypes[] = Class.forName("java.lang.ClassLoader");

        Object paramValues[] = new Object[];

        paramValues[] = sharedLoader;

        Method method =

            startupInstance.getClass().getMethod(methodName, paramTypes);

        method.invoke(startupInstance, paramValues);

        catalinaDaemon = startupInstance;

    }
这里的主要操作是初始化自定义的ClassLoader ,然后反射调用 Catalina 的 setParentClassLoader 方法设置父加载类。值得注意的是,tomcat 定义的类加载器是WebAppClassLoader,打破了双亲委派模型:先自己尝试去加载这个类,找不到再委托给父类加载器。通过复写findClass和loadClass实现。初始化完成后会进入daemon.load(args),daemon.start(); 两个方法,也就是加载及启动,加载还是很好理解的,就是读取 Tomcat 的 server.xml 进行解析,加载成对应的类对象.然后启动。这里的 load 方法又通过反射调用 Catalina 的 load 方法,其中的一段代码如下:
InputSource inputSource = null;

InputStream inputStream = null;

File file = null;

try {

    file = configFile();

    inputStream = new FileInputStream(file);

    inputSource = new InputSource(file.toURI().toURL().toString());

} catch (Exception e) {

    if (log.isDebugEnabled()) {

        log.debug(sm.getString("catalina.configFail", file), e);

    }

}
可以发现这里有个文件,我们进入 configFile() 发现这个 File 就是server.xml
/**

* Pathname to the server configuration file.

*/

protected String configFile = "conf/server.xml";

protected File configFile() {

    File file = new File(configFile);

    if (!file.isAbsolute()) {

        file = new File(Bootstrap.getCatalinaBase(), configFile);

    }

    return (file);

}
然后进行解析初始化,然后调用 getServer().init() ,从Tomcat 系统架构图来看,各个组件的初始化理应从外圈开始,合理的流程应该是 server -> service ->Connector ->container .继续跟进到 LifecycleBase 的 init() 方法,然后调用本类的抽象方法 initInternal()。在这里所有的组件的生命周期是超级接口类 Lifecycle 来管理的。我们这里很显然会先走 Server。
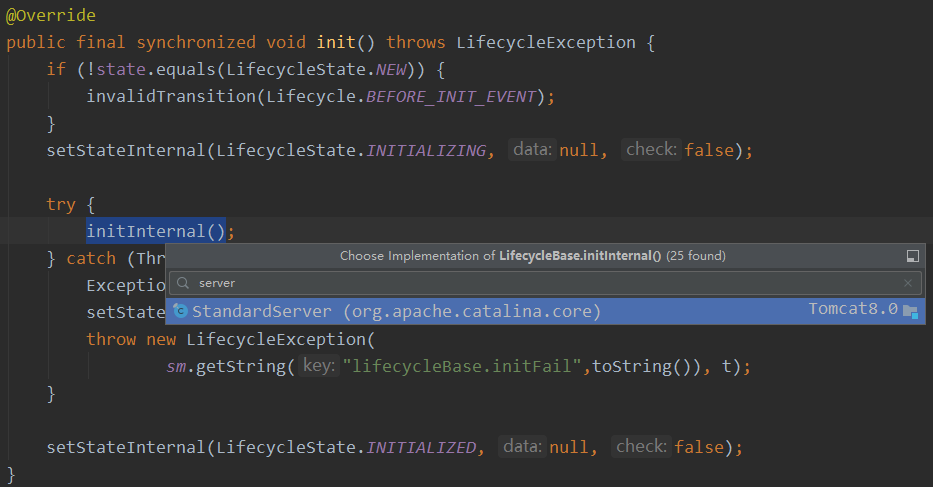
在 StandardServer 的 initInternal() 方法的最后会循环调用 Service 的初始化:
// Initialize our defined Services

for (int i = ; i < services.length; i++) {

    services[i].init();

}
在StandardService 的 initInternal() 方法中我们可以看到会初始化 container ,executor ,connector 三个组件,这里的 container 就是 Engine、Host、Context和 servlet。
@Override

    protected void initInternal() throws LifecycleException {

        super.initInternal();

        if (container != null) {

            container.init();

        }

        // Initialize any Executors

        for (Executor executor : findExecutors()) {

            if (executor instanceof JmxEnabled) {

                ((JmxEnabled) executor).setDomain(getDomain());

            }

            executor.init();

        }

        // Initialize mapper listener

        mapperListener.init();

        // Initialize our defined Connectors

        synchronized (connectorsLock) {

            for (Connector connector : connectors) {

                try {

                    connector.init();

                } catch (Exception e) {

                    String message = sm.getString(

                            "standardService.connector.initFailed", connector);

                    log.error(message, e);

                    if (Boolean.getBoolean("org.apache.catalina.startup.EXIT_ON_INIT_FAILURE"))

                        throw new LifecycleException(message);

                }

            }

        }

    }
也就是这样,一步步的由外到内的一个初始化,daemon.start() 也是这么个流程,其中有一条线路是 Catalina#start() --> LifecycleBase#start() ---> Connector#startInternal() :
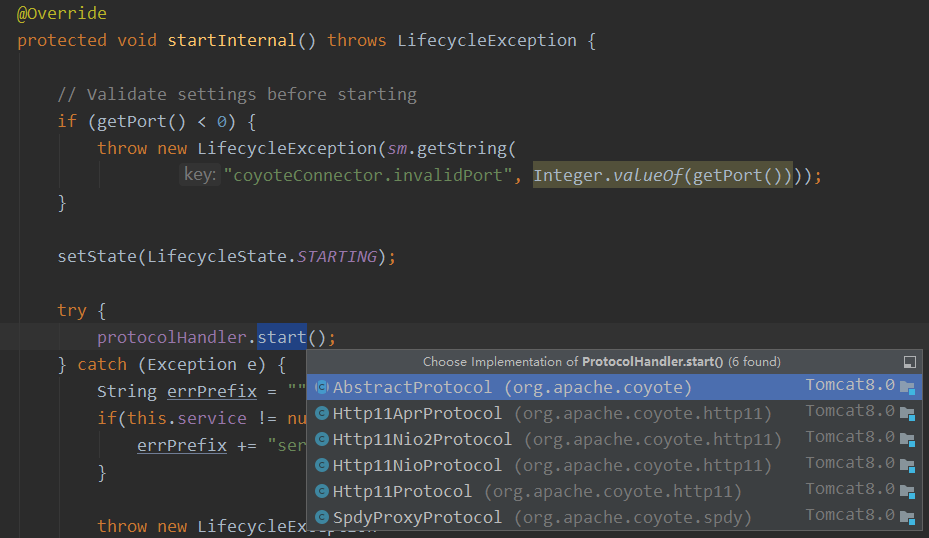
这里涉及到的采用什么协议取决去 server.xml 的配置。本版本8.0.11 默认采用org.apache.coyote.http11.Http11NioProtocol,可以在 Connector 的构造函数中找到:Connector(String protocol) ---> setProtocol(protocol):
public void setProtocol(String protocol) {

        if (AprLifecycleListener.isAprAvailable()) {

            if ("HTTP/1.1".equals(protocol)) {

                setProtocolHandlerClassName

                    ("org.apache.coyote.http11.Http11AprProtocol");

            } else if ("AJP/1.3".equals(protocol)) {

                setProtocolHandlerClassName

                    ("org.apache.coyote.ajp.AjpAprProtocol");

            } else if (protocol != null) {

                setProtocolHandlerClassName(protocol);

            } else {

                setProtocolHandlerClassName

                    ("org.apache.coyote.http11.Http11AprProtocol");

            }

        } else {

            if ("HTTP/1.1".equals(protocol)) {

                setProtocolHandlerClassName

                    ("org.apache.coyote.http11.Http11NioProtocol");

            } else if ("AJP/1.3".equals(protocol)) {

                setProtocolHandlerClassName

                    ("org.apache.coyote.ajp.AjpNioProtocol");

            } else if (protocol != null) {

                setProtocolHandlerClassName(protocol);

            }

        }

    }
关注到上述图解中的ContainerBase.startInternal()方法
// Start our child containers, if any

Container children[] = findChildren();

List<Future<Void>> results = new ArrayList<>();

for (int i = ; i < children.length; i++) {

 // 这句代码就是会调用ContainerBase下的一个个子容器的call方法

 results.add(startStopExecutor.submit(new StartChild(children[i])));

}
查看new StartChild要执行的call方法
@Override

        public Void call() throws LifecycleException {

            child.start();

            return null;

        }
StandardHost 将一个个web项目部署起来, StandardHost#startInternal() ---> ContainerBase#startInternal() --> ContainerBase#threadStart() ---> ContainerBackgroundProcessor#run() ---> ContainerBase#backgroundProcess() --->HostConfig#lifecycleEvent(event)
public void lifecycleEvent(LifecycleEvent event) {

        // Identify the host we are associated with

        try {

            host = (Host) event.getLifecycle();

            if (host instanceof StandardHost) {

                setCopyXML(((StandardHost) host).isCopyXML());

                setDeployXML(((StandardHost) host).isDeployXML());

                setUnpackWARs(((StandardHost) host).isUnpackWARs());

                setContextClass(((StandardHost) host).getContextClass());

            }

        } catch (ClassCastException e) {

            log.error(sm.getString("hostConfig.cce", event.getLifecycle()), e);

            return;

        }

        // Process the event that has occurred

        if (event.getType().equals(Lifecycle.PERIODIC_EVENT)) {

            check();

        } else if (event.getType().equals(Lifecycle.START_EVENT)) {

            start();

        } else if (event.getType().equals(Lifecycle.STOP_EVENT)) {

            stop();

        }

    }
根据事件类型去处理,这里是 check() :
protected void check() {

        if (host.getAutoDeploy()) {

            // Check for resources modification to trigger redeployment

       // 检查资源修改以触发重新部署

            DeployedApplication[] apps =

                deployed.values().toArray(new DeployedApplication[]);

            for (int i = ; i < apps.length; i++) {

                if (!isServiced(apps[i].name))

                    checkResources(apps[i]);

            }

            // Check for old versions of applications that can now be undeployed

        // 检查现在可以取消部署的应用程序的旧版本

            if (host.getUndeployOldVersions()) {

                checkUndeploy();

            }

            // Hotdeploy applications 部署应用

            deployApps();

        }

}
deployApps() :
protected void deployApps() {

        File appBase = host.getAppBaseFile();

        File configBase = host.getConfigBaseFile();

        String[] filteredAppPaths = filterAppPaths(appBase.list());

        // Deploy XML descriptors from configBase

        deployDescriptors(configBase, configBase.list());

        // Deploy WARs

        deployWARs(appBase, filteredAppPaths);

        // Deploy expanded folders

        deployDirectories(appBase, filteredAppPaths);

}
StandardContext.startInternal()解析web.xml和添加wrapper 。StandardContext#startInternal() ---> ContainerBase#startInternal() --> ContainerBase#threadStart() ---> ContainerBackgroundProcessor#run() ---> ContainerBase#backgroundProcess() --->ContextConfig#lifecycleEvent(event)
public void lifecycleEvent(LifecycleEvent event) {

        // Identify the context we are associated with

        try {

            context = (Context) event.getLifecycle();

        } catch (ClassCastException e) {

            log.error(sm.getString("contextConfig.cce", event.getLifecycle()), e);

            return;

        }

        // Process the event that has occurred

        if (event.getType().equals(Lifecycle.CONFIGURE_START_EVENT)) {

            configureStart();

        } else if (event.getType().equals(Lifecycle.BEFORE_START_EVENT)) {

            beforeStart();

        } else if (event.getType().equals(Lifecycle.AFTER_START_EVENT)) {

            // Restore docBase for management tools

            if (originalDocBase != null) {

                context.setDocBase(originalDocBase);

            }

        } else if (event.getType().equals(Lifecycle.CONFIGURE_STOP_EVENT)) {

            configureStop();

        } else if (event.getType().equals(Lifecycle.AFTER_INIT_EVENT)) {

            init();

        } else if (event.getType().equals(Lifecycle.AFTER_DESTROY_EVENT)) {

            destroy();

        }

    }
configureStart() ---> ContextConfig#webConfig() ---> ContextConfig#getContextWebXmlSource() 进行解析对应应用的 web.xml:
protected InputSource getContextWebXmlSource() {

        InputStream stream = null;

        InputSource source = null;

        URL url = null;

        String altDDName = null;

        // Open the application web.xml file, if it exists

        ServletContext servletContext = context.getServletContext();

        if (servletContext != null) {

            altDDName = (String)servletContext.getAttribute(Globals.ALT_DD_ATTR);

            if (altDDName != null) {

                try {

                    stream = new FileInputStream(altDDName);

                    url = new File(altDDName).toURI().toURL();

                } catch (FileNotFoundException e) {

                    log.error(sm.getString("contextConfig.altDDNotFound",

                                           altDDName));

                } catch (MalformedURLException e) {

                    log.error(sm.getString("contextConfig.applicationUrl"));

                }

            }

            else {//public static final String ApplicationWebXml = "/WEB-INF/web.xml";

                stream = servletContext.getResourceAsStream

                    (Constants.ApplicationWebXml);

                try {

                    url = servletContext.getResource(

                            Constants.ApplicationWebXml);

                } catch (MalformedURLException e) {

                    log.error(sm.getString("contextConfig.applicationUrl"));

                }

            }

        }

        if (stream == null || url == null) {

            if (log.isDebugEnabled()) {

                log.debug(sm.getString("contextConfig.applicationMissing") + " " + context);

            }

            if (stream != null) {

                try {

                    stream.close();

                } catch (IOException e) {

                    // Ignore

                }

            }

        } else {

            source = new InputSource(url.toExternalForm());

            source.setByteStream(stream);

        }

        return source;

    }
ContextConfig.webConfig()的step9解析到servlets包装成wrapper对象:ContextConfig.webConfig()—>configureContext(webXml) :
for (ServletDef servlet : webxml.getServlets().values()) {

            Wrapper wrapper = context.createWrapper();

            // Description is ignored

            // Display name is ignored

            // Icons are ignored

            // jsp-file gets passed to the JSP Servlet as an init-param

            if (servlet.getLoadOnStartup() != null) {

                wrapper.setLoadOnStartup(servlet.getLoadOnStartup().intValue());

            }

            if (servlet.getEnabled() != null) {

                wrapper.setEnabled(servlet.getEnabled().booleanValue());

            }

            wrapper.setName(servlet.getServletName());

            Map<String,String> params = servlet.getParameterMap();

            for (Entry<String, String> entry : params.entrySet()) {

                wrapper.addInitParameter(entry.getKey(), entry.getValue());

            }

            wrapper.setRunAs(servlet.getRunAs());

            Set<SecurityRoleRef> roleRefs = servlet.getSecurityRoleRefs();

            for (SecurityRoleRef roleRef : roleRefs) {

                wrapper.addSecurityReference(

                        roleRef.getName(), roleRef.getLink());

            }

            wrapper.setServletClass(servlet.getServletClass());

            MultipartDef multipartdef = servlet.getMultipartDef();

            if (multipartdef != null) {

                if (multipartdef.getMaxFileSize() != null &&

                        multipartdef.getMaxRequestSize()!= null &&

                        multipartdef.getFileSizeThreshold() != null) {

                    wrapper.setMultipartConfigElement(new MultipartConfigElement(

                            multipartdef.getLocation(),

                            Long.parseLong(multipartdef.getMaxFileSize()),

                            Long.parseLong(multipartdef.getMaxRequestSize()),

                            Integer.parseInt(

                                    multipartdef.getFileSizeThreshold())));

                } else {

                    wrapper.setMultipartConfigElement(new MultipartConfigElement(

                            multipartdef.getLocation()));

                }

            }

            if (servlet.getAsyncSupported() != null) {

                wrapper.setAsyncSupported(

                        servlet.getAsyncSupported().booleanValue());

            }

            wrapper.setOverridable(servlet.isOverridable());

            context.addChild(wrapper);

        }
StandardContext.startInternal()->最终会调用 StandardContext#loadOnStartup(findChildren())) ----> wrapper.load()
详细流程请查阅官网:https://tomcat.apache.org/tomcat-8.0-doc/architecture/startup/serverStartup.pdf
Tomcat8.0.11优化相关的更多相关文章
- Kafka 0.11.0.0 实现 producer的Exactly-once 语义(中文)
很高兴地告诉大家,具备新的里程碑意义的功能的Kafka 0.11.x版本(对应 Confluent Platform 3.3)已经release,该版本引入了exactly-once语义,本文阐述的内 ...
- Redis-4.0.11集群配置
版本:redis-3.0.5 redis-3.2.0 redis-3.2.9 redis-4.0.11 参考:http://redis.io/topics/cluster-tutorial. 集群 ...
- tomcat8.0 基本参数调优配置
1.优化内核及TCP连接: fs.file-max = 655350 # 系统文件描述符总量 net.ipv4.ip_local_port_range = 1024 65535 # 打开端口范围 ...
- Apache Kafka 0.11版本新功能简介
Apache Kafka近日推出0.11版本.这是一个里程碑式的大版本,特别是Kafka从这个版本开始支持“exactly-once”语义(下称EOS, exactly-once semantics) ...
- Web 前端性能优化相关内容解析
Web 前端性能优化相关内容,来源于<Google官方网页载入速度检测工具PageSpeed Insights 使用教程>一文中PageSpeed Insights 的相关说明.大家可以对 ...
- Web 前端性能优化相关内容解析[转]
Web 前端性能优化相关内容,来源于<Google官方网页载入速度检测工具PageSpeed Insights 使用教程>一文中PageSpeed Insights 的相关说明.大家可以对 ...
- Mysql8.0.11简介,新特性
MySQL 8.0 正式版 8.0.11 已发布,官方表示 MySQL 8 要比 MySQL 5.7 快 2 倍,还带来了大量的改进和更快的性能! 注意:从 MySQL 5.7 升级到 MySQL 8 ...
- 【 Tomcat 】tomcat8.0 基本参数调优配置-----(1)
Tomcat 的缺省配置是不能稳定长期运行的,也就是不适合生产环境,它会死机,让你不断重新启动,甚至在午夜时分唤醒你.对于操作系统优化来说,是尽可能的增大可使用的内存容量.提高CPU 的频率,保证文件 ...
- CentOS 7.2.1511编译安装Nginx1.10.1+MySQL5.7.14+PHP7.0.11
准备篇 一.防火墙配置 CentOS 7.x默认使用的是firewall作为防火墙,这里改为iptables防火墙. 1.关闭firewall: systemctl stop firewalld.se ...
随机推荐
- ES6 对象增强
对象字面量语法扩展: 1, 属性初始化语法简写:给一个属性赋一个变量值,如果变量名和属性名相同,可以省略变量名和冒号,直接写属性名,js引擎在执行代码的时候,自动查找 和属性命名相同的变量并赋值. l ...
- BZOJ 2730 矿场搭建
割点 割点以外的点坍塌不影响其他人逃生,因为假设我们任取两个个非割点s建立救援站,非割点的任意点坍塌,我们都可以从割点走到一个救援出口. 所以我们只考虑割点坍塌的情况. 我们可以先找出图中所有的割点. ...
- 「NOIp2018」 游记
作为一个蒟蒻要去考tg了,心理还是有点慌的.初赛70,心惊胆战很长时间,后来降分到68了,居然卡线了(震惊……) $Day \ 0$ 今天请假在家复习了,打了几个数据结构模板.希望明天考场能++rp啊 ...
- Quartus16.1布线优化选择,重编译可能会满足时序
流程 (1)在默认的优化编译下,时序违例. (2)在assignments中选择setting. (3)根据需求,选择不同的优化方式,目前选择性能优先. (4)可以发现时序满足要求. 以上.
- 拆系数FFT
学习内容:国家集训队2016论文 - 再谈快速傅里叶变换 模板题:http://uoj.ac/problem/34 1.基本介绍 对长度为L的\(A(x),B(x)\)进行DFT,可以利用 \[ \b ...
- eclipse JVM 性能调优
最近因项目存在内存泄漏,故进行大规模的JVM性能调优 , 现把经验做一记录. 一.JVM内存模型及垃圾收集算法 1.根据Java虚拟机规范,JVM将内存划分为: New(年轻代) Tenured(年老 ...
- 观察者模式 vs 发布-订阅模式
我曾经在面试中被问道,_“观察者模式和发布订阅模式的有什么区别?” _我迅速回忆起“Head First设计模式”那本书: 发布 + 订阅 = 观察者模式 “我知道了,我知道了,别想骗我” 我微笑着回 ...
- 数组的处理方法,filter的用法
在数组的使用中,我们通常会有数组的过滤的需求,比如值 在某个范围内的数字,用来组成一个新的数组,这就用到了数组的过滤 例: var number=[23,3,51,65,13,45,65,23,63] ...
- Hadoop-2.7.3-src 源码编译
Hadoop-2.7.3 编译 1.需要环境梳理 BUILDING JDK1.7+ maven 3.0 or later findbugs 1.3.9 protocolBuffer 2.5.0 cma ...
- 重装了Devexpress后项目报Dll引用找不到问题解决办法
最近将我的开发环境从VS2015升级到VS2017,升级完后报如下错误,找不到Dev的引用,明明是重新装了dev为什么找不到呢? 经过查看dll引用地址,发现我的dev一开始是安装在C盘,dll引用路 ...