
win10 caffe GPU环境搭建
一、准备
系统:win10
显卡:gtx1050Ti
前期的一些必要软件安装,包括python3.5、matlab2016、vs2015、git,
可参考:win10+vs2015编译caffe的cpu debug版本、部署matcaffe - tingpan - 博客园 http://www.cnblogs.com/smbx-ztbz/p/9195243.html
二、安装
1、安装显卡驱动388.13-desktop-win10-64bit-international-whql.exe
http://www.nvidia.com/Download/index.aspx?lang=en-us
2、安装cuda_8.0.61_win10.exe,注意安装的时候要自定义安装,只选上cuda就好了,其他的不要安装,否则会将之前的显卡驱动覆盖掉,导致电脑黑屏。
https://developer.nvidia.com/cuda-toolkit-archive
3、安装补丁cuda_8.0.61.2_windows.exe
4、下载cudnn-8.0-windows10-x64-v5.1-zip后解压到 D:\Projects\caffe_gpu\cuda
三、编译
1、进入文件夹 D:\Projects\caffe_gpu,下载源码
git clone:git clone https://github.com/BVLC/caffe.git
2、进入caffe文件夹
cd caffe
3、切换分支
git checkout windows
4、修改scripts\build_win.cmd ,高亮为修改内容
@echo off

@setlocal EnableDelayedExpansion

:: Default values

if DEFINED APPVEYOR (

    echo Setting Appveyor defaults

    if NOT DEFINED MSVC_VERSION set MSVC_VERSION=14

    if NOT DEFINED WITH_NINJA set WITH_NINJA=1

    if NOT DEFINED CPU_ONLY set CPU_ONLY=1

    if NOT DEFINED CUDA_ARCH_NAME set CUDA_ARCH_NAME=Auto

    if NOT DEFINED CMAKE_CONFIG set CMAKE_CONFIG=Release

    if NOT DEFINED USE_NCCL set USE_NCCL=0

    if NOT DEFINED CMAKE_BUILD_SHARED_LIBS set CMAKE_BUILD_SHARED_LIBS=0

    if NOT DEFINED PYTHON_VERSION set PYTHON_VERSION=2

    if NOT DEFINED BUILD_PYTHON set BUILD_PYTHON=1

    if NOT DEFINED BUILD_PYTHON_LAYER set BUILD_PYTHON_LAYER=1

    if NOT DEFINED BUILD_MATLAB set BUILD_MATLAB=0

    if NOT DEFINED PYTHON_EXE set PYTHON_EXE=python

    if NOT DEFINED RUN_TESTS set RUN_TESTS=1

    if NOT DEFINED RUN_LINT set RUN_LINT=1

    if NOT DEFINED RUN_INSTALL set RUN_INSTALL=1

    :: Set python 2.7 with conda as the default python

    if !PYTHON_VERSION! EQU 2 (

        set CONDA_ROOT=C:\Miniconda-x64

    )

    :: Set python 3.5 with conda as the default python

    if !PYTHON_VERSION! EQU 3 (

        set CONDA_ROOT=C:\Miniconda35-x64

    )

    set PATH=!CONDA_ROOT!;!CONDA_ROOT!\Scripts;!CONDA_ROOT!\Library\bin;!PATH!

    :: Check that we have the right python version

    !PYTHON_EXE! --version

    :: Add the required channels

    conda config --add channels conda-forge

    conda config --add channels willyd

    :: Update conda

    conda update conda -y

    :: Download other required packages

    conda install --yes cmake ninja numpy scipy protobuf==3.1.0 six scikit-image pyyaml pydotplus graphviz

    if ERRORLEVEL 1  (

      echo ERROR: Conda update or install failed

      exit /b 1

    )

    :: Install cuda and disable tests if needed

    if !WITH_CUDA! == 1 (

        call %~dp0\appveyor\appveyor_install_cuda.cmd

        set CPU_ONLY=0

        set RUN_TESTS=0

        set USE_NCCL=1

    ) else (

        set CPU_ONLY=1

    )

    :: Disable the tests in debug config

    if "%CMAKE_CONFIG%" == "Debug" (

        echo Disabling tests on appveyor with config == %CMAKE_CONFIG%

        set RUN_TESTS=0

    )

    :: Disable linting with python 3 until we find why the script fails

    if !PYTHON_VERSION! EQU 3 (

        set RUN_LINT=0

    )

) else (

    :: Change the settings here to match your setup

    :: Change MSVC_VERSION to 12 to use VS 2013

    if NOT DEFINED MSVC_VERSION set MSVC_VERSION=14

    :: Change to 1 to use Ninja generator (builds much faster)

    if NOT DEFINED WITH_NINJA set WITH_NINJA=0

    :: Change to 1 to build caffe without CUDA support

    if NOT DEFINED CPU_ONLY set CPU_ONLY=0

    :: Change to generate CUDA code for one of the following GPU architectures

    :: [Fermi  Kepler  Maxwell  Pascal  All]

    if NOT DEFINED CUDA_ARCH_NAME set CUDA_ARCH_NAME=Auto

    :: Change to Debug to build Debug. This is only relevant for the Ninja generator the Visual Studio generator will generate both Debug and Release configs

    if NOT DEFINED CMAKE_CONFIG set CMAKE_CONFIG=Release

    :: Set to 1 to use NCCL

    if NOT DEFINED USE_NCCL set USE_NCCL=0

    :: Change to 1 to build a caffe.dll

    if NOT DEFINED CMAKE_BUILD_SHARED_LIBS set CMAKE_BUILD_SHARED_LIBS=0

    :: Change to 3 if using python 3.5 (only 2.7 and 3.5 are supported)

    if NOT DEFINED PYTHON_VERSION set PYTHON_VERSION=3

    :: Change these options for your needs.

    if NOT DEFINED BUILD_PYTHON set BUILD_PYTHON=1

    if NOT DEFINED BUILD_PYTHON_LAYER set BUILD_PYTHON_LAYER=1

    if NOT DEFINED BUILD_MATLAB set BUILD_MATLAB=1

    :: If python is on your path leave this alone

    if NOT DEFINED PYTHON_EXE set PYTHON_EXE=python

    :: Run the tests

    if NOT DEFINED RUN_TESTS set RUN_TESTS=0

    :: Run lint

    if NOT DEFINED RUN_LINT set RUN_LINT=0

    :: Build the install target

    if NOT DEFINED RUN_INSTALL set RUN_INSTALL=1

)

:: Set the appropriate CMake generator

:: Use the exclamation mark ! below to delay the

:: expansion of CMAKE_GENERATOR

if %WITH_NINJA% EQU 0 (

    if "%MSVC_VERSION%"=="14" (

        set CMAKE_GENERATOR=Visual Studio 14 2015 Win64

    )

    if "%MSVC_VERSION%"=="12" (

        set CMAKE_GENERATOR=Visual Studio 12 2013 Win64

    )

    if "!CMAKE_GENERATOR!"=="" (

        echo ERROR: Unsupported MSVC version

        exit /B 1

    )

) else (

    set CMAKE_GENERATOR=Ninja

)

echo INFO: ============================================================

echo INFO: Summary:

echo INFO: ============================================================

echo INFO: MSVC_VERSION               = !MSVC_VERSION!

echo INFO: WITH_NINJA                 = !WITH_NINJA!

echo INFO: CMAKE_GENERATOR            = "!CMAKE_GENERATOR!"

echo INFO: CPU_ONLY                   = !CPU_ONLY!

echo INFO: CUDA_ARCH_NAME             = !CUDA_ARCH_NAME!

echo INFO: CMAKE_CONFIG               = !CMAKE_CONFIG!

echo INFO: USE_NCCL                   = !USE_NCCL!

echo INFO: CMAKE_BUILD_SHARED_LIBS    = !CMAKE_BUILD_SHARED_LIBS!

echo INFO: PYTHON_VERSION             = !PYTHON_VERSION!

echo INFO: BUILD_PYTHON               = !BUILD_PYTHON!

echo INFO: BUILD_PYTHON_LAYER         = !BUILD_PYTHON_LAYER!

echo INFO: BUILD_MATLAB               = !BUILD_MATLAB!

echo INFO: PYTHON_EXE                 = "!PYTHON_EXE!"

echo INFO: RUN_TESTS                  = !RUN_TESTS!

echo INFO: RUN_LINT                   = !RUN_LINT!

echo INFO: RUN_INSTALL                = !RUN_INSTALL!

echo INFO: ============================================================

:: Build and exectute the tests

:: Do not run the tests with shared library

if !RUN_TESTS! EQU 1 (

    if %CMAKE_BUILD_SHARED_LIBS% EQU 1 (

        echo WARNING: Disabling tests with shared library build

        set RUN_TESTS=0

    )

)

if NOT EXIST build mkdir build

pushd build

:: Setup the environement for VS x64

set batch_file=!VS%MSVC_VERSION%0COMNTOOLS!..\..\VC\vcvarsall.bat

call "%batch_file%" amd64

:: Configure using cmake and using the caffe-builder dependencies

:: Add -DCUDNN_ROOT=D:/Projects/caffe_gpu/cuda ^

:: below to use cuDNN

cmake -G"!CMAKE_GENERATOR!" ^

      -DBLAS=Open ^

      -DCMAKE_BUILD_TYPE:STRING=%CMAKE_CONFIG% ^

      -DBUILD_SHARED_LIBS:BOOL=%CMAKE_BUILD_SHARED_LIBS% ^

      -DBUILD_python:BOOL=%BUILD_PYTHON% ^

      -DBUILD_python_layer:BOOL=%BUILD_PYTHON_LAYER% ^

      -DBUILD_matlab:BOOL=%BUILD_MATLAB% ^

      -DCPU_ONLY:BOOL=%CPU_ONLY% ^

      -DCOPY_PREREQUISITES:BOOL=1 ^

      -DINSTALL_PREREQUISITES:BOOL=1 ^

      -DUSE_NCCL:BOOL=!USE_NCCL! ^

      -DCUDA_ARCH_NAME:STRING=%CUDA_ARCH_NAME% ^

      "%~dp0\.."

if ERRORLEVEL 1 (

  echo ERROR: Configure failed

  exit /b 1

)

:: Lint

if %RUN_LINT% EQU 1 (

    cmake --build . --target lint  --config %CMAKE_CONFIG%

)

if ERRORLEVEL 1 (

  echo ERROR: Lint failed

  exit /b 1

)

:: Build the library and tools

cmake --build . --config %CMAKE_CONFIG%

if ERRORLEVEL 1 (

  echo ERROR: Build failed

  exit /b 1

)

:: Build and exectute the tests

if !RUN_TESTS! EQU 1 (

    cmake --build . --target runtest --config %CMAKE_CONFIG%

    if ERRORLEVEL 1 (

        echo ERROR: Tests failed

        exit /b 1

    )

    if %BUILD_PYTHON% EQU 1 (

        if %BUILD_PYTHON_LAYER% EQU 1 (

            :: Run python tests only in Release build since

            :: the _caffe module is _caffe-d is debug

            if "%CMAKE_CONFIG%"=="Release" (

                :: Run the python tests

                cmake --build . --target pytest

                if ERRORLEVEL 1 (

                    echo ERROR: Python tests failed

                    exit /b 1

                )

            )

        )

    )

)

if %RUN_INSTALL% EQU 1 (

    cmake --build . --target install --config %CMAKE_CONFIG%

)

popd

@endlocal
5、编译caffe
scripts\build_win.cmd
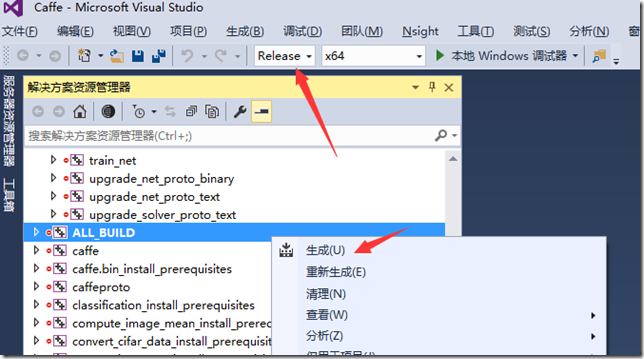
6、用vs2015打开build\Caffe.sln,设置为Release,对着ALL_BUILD,点击生成。
end
win10 caffe GPU环境搭建的更多相关文章
- Caffe+Windows 环境搭建收集
Caffe+Anconda3+VS2015+Win10(64位)环境搭建 Caffe on Windows (Visual Studio 2015+CUDA8.0+cuDNNv5) Win10+VS2 ...
- [Odoo12基础教程]之win10中odoo12环境搭建
所需材料 1.python3.7 2.pycharm社区版及以上 3.postgresSQL10 下载链接:https://www.enterprisedb.com/thank-you-downloa ...
- caffe 无GPU 环境搭建
root@k-Lenovo:/home/k# sudo apt-get install libprotobuf-dev libleveldb-dev libsnappy-dev libopencv-d ...
- win10+caffe+GPU
由于学习需要,决定安装caffe,之前用的都是基于theano的keras.听说win下caffe很难配置,经过一个下午和晚上的配置终于成功,以此记录. 我的电脑:win10 64位,N卡GTX950 ...
- win10 solidity开发环境搭建
1. 软件安装 1) 安装nodejs 安装完成后将node.exe所在路径加入环境变量PATH中,以便在cmd命令行中直接使用node和npm命令 下面的操作在git bash下进行 2) 安装so ...
- win10下tomcat环境搭建
一.下载tomcat 用浏览器打开tomcat官网:http://tomcat.apache.org/ 在左侧的导航栏Download下方选择最新的Tomcat 9,点击页面下方的“ 64-bit W ...
- Ubuntu16.04 + caffe + cuda 环境搭建
1. sudo apt-get install libprotobuf-dev libleveldb-dev libsnappy-dev libopencv-dev libhdf5-serial-de ...
- Win10下JDK环境搭建的两种方法
jdk1.8--64位官网下载的百度网盘 https://pan.baidu.com/s/1A7jYfupwMWZawb5z_RSdJg 提取码: 92eu 第一种方法(建议) 变量名: ...
- 【神经网络与深度学习】Win10+VS2015 caffe环境搭建(极其详细)
caffe是好用,可是配置其环境实在是太痛苦了,依赖的库很多不说,在VS上编译还各种报错,你能想象那种被一百多个红色提示所笼罩的恐惧. 且网上很多教程是VS2013环境下编译的,问人很多也说让我把1 ...
随机推荐
- cocos-lua3.17 Lua tablrView工具类
local MyTableView = class("MyTableView") MyTableView.__index = MyTableView MyTableView.pro ...
- tensorFlow入门实践(二)模块化
实现过一个例子之后,对TensorFlow运行机制有了初步的了解,但脑海中还没有一个如何实现神经网络的一个架构模型.下面我们来探讨如何模块化搭建神经网络,完成数据训练和预测. 首先我们将整体架构分为两 ...
- 《多线程操作之生产者消费者》(单生产单消费&多生产多消费)
说明1:假设有一个放商品的盘子(此盘子只能放下一个商品).生产者每次生产一个商品之后,放到这个盘子里,然后唤醒消费者来消费这个面包.消费者消费完这个商品之后,就唤醒生产者生产下一个商品.前提是,只有盘 ...
- SQL Server DDL
1:向表中添加字段 Alter table [表名] add [列名] 类型 2: 删除字段 Alter table [表名] drop column [列名] 3: 修改表中字段类型 (可以修 ...
- python爬虫教程实践1——安装scrapy
系统:macOS Sierra 10.12.6 python版本:3.6 1.安装homebrew(以前的环境配置中有介绍过) 官网:http://brew.sh/index_zh-cn.html 2 ...
- 今日bug:error: invalid array assignment
错误代码: struct STUD { int ID;//学号 ]; float score; }stud; STUD SS[]; student.open("student.dat&quo ...
- 消息 xxx,级别 16,状态 x,过程 sp_executesql,第 x 行 过程需要类型为 'ntext/nchar/nvarchar' 的参数 '@statement'。
消息 xxx,级别 16,状态 x,过程 sp_executesql,第 x 行 过程需要类型为 'ntext/nchar/nvarchar' 的参数 '@statement'. 原来的语句: ) s ...
- org.springframework.beans.factory.BeanCreationException 解决异常错误
一月 18, 2017 10:18:51 上午 org.apache.coyote.http11.Http11Protocol initINFO: Initializing Coyote HTTP/1 ...
- 如何使用idea给系统平台添加子应用和应用的模块
1.添加模块smartcity-portal,由于模块是在smartcity-framework工程下的,所以按照图片所示添加 2.smartcity-portal模块添加完成后,由于portal-d ...
- Spring框架:@ResponseBody 中文乱码----------我的主题站内单点登录
问题背景 本文并不是介绍@ResponseBody注解,也不是中文乱码问题的大汇总笔记,这些网上都有很多内容了.这边仅对几年前,一个卡壳了挺久时间的问题的解决过程做一个记录,以警惕自己,达到自醒得目的 ...