Windows FFMPEG开发环境配置
2.把Dev库里解压出来的东西拷贝到工程中,Shared库中解压出来的东西拷贝到生成的bin文件目录(如release)

G:\source\FFmpegDemo\FFmpegDemo\ffmpeg>

├─inc

│  ├─libavcodec

│  ├─libavdevice

│  ├─libavfilter

│  ├─libavformat

│  ├─libavutil

│  ├─libpostproc

│  ├─libswresample

│  └─libswscale

└─libs

        avcodec.lib

        avdevice.lib

        avfilter.lib

        avformat.lib

        avutil.lib

        postproc.lib

        swresample.lib

        swscale.lib
3.右击工程“属性”,“C/C++”——>“附加包含目录”——>加入我们添加进来的头文件的路径

4.在源码中链接lib文件
#pragma comment(lib,"ffmpeg\\libs\\avutil.lib")

#pragma comment(lib,"ffmpeg\\libs\\avformat.lib")

#pragma comment(lib,"ffmpeg\\libs\\avcodec.lib")

#pragma comment(lib,"ffmpeg\\libs\\swscale.lib")
源码如下:
//main.cpp

#include <stdio.h>

#include <stdlib.h>

#pragma comment(lib,"ffmpeg\\libs\\avutil.lib")

#pragma comment(lib,"ffmpeg\\libs\\avformat.lib")

#pragma comment(lib,"ffmpeg\\libs\\avcodec.lib")

#pragma comment(lib,"ffmpeg\\libs\\swscale.lib")

extern "C"

{

//编码

#include "libavcodec/avcodec.h"

//封装格式处理

#include "libavformat/avformat.h"

//像素处理

#include "libswscale/swscale.h"

};

int main(int argc, char* argv[])

{

    //获取输入输出文件名

    const char *input = "test.mp4";

    const char *output = "test.yuv";

    //1.注册所有组件

    av_register_all();

    //封装格式上下文,统领全局的结构体,保存了视频文件封装格式的相关信息

    AVFormatContext *pFormatCtx = avformat_alloc_context();

    //2.打开输入视频文件

    if (avformat_open_input(&pFormatCtx, input, NULL, NULL) != 0)

    {

        printf("%s", "无法打开输入视频文件");

        return -1;

    }

    //3.获取视频文件信息

    if (avformat_find_stream_info(pFormatCtx, NULL) < 0)

    {

        printf("%s", "无法获取视频文件信息");

        return -1;

    }

    //获取视频流的索引位置

    //遍历所有类型的流(音频流、视频流、字幕流),找到视频流

    int v_stream_idx = -1;

    int i = 0;

    //number of streams

    for (; i < pFormatCtx->nb_streams; i++)

    {

        //流的类型

        if (pFormatCtx->streams[i]->codec->codec_type == AVMEDIA_TYPE_VIDEO)

        {

            v_stream_idx = i;

            break;

        }

    }

    if (v_stream_idx == -1)

    {

        printf("%s", "找不到视频流\n");

        return -1;

    }

    //只有知道视频的编码方式,才能够根据编码方式去找到解码器

    //获取视频流中的编解码上下文

    AVCodecContext *pCodecCtx = pFormatCtx->streams[v_stream_idx]->codec;

    //4.根据编解码上下文中的编码id查找对应的解码

    AVCodec *pCodec = avcodec_find_decoder(pCodecCtx->codec_id);

    if (pCodec == NULL)

    {

        printf("%s", "找不到解码器\n");

        return -1;

    }

    //5.打开解码器

    if (avcodec_open2(pCodecCtx, pCodec, NULL) < 0)

    {

        printf("%s", "解码器无法打开\n");

        return -1;

    }

    //输出视频信息

    printf("视频的文件格式:%s", pFormatCtx->iformat->name);

    printf("视频时长:%d", (pFormatCtx->duration) / 1000000);

    printf("视频的宽高:%d,%d", pCodecCtx->width, pCodecCtx->height);

    printf("解码器的名称:%s", pCodec->name);

    //准备读取

    //AVPacket用于存储一帧一帧的压缩数据(H264)

    //缓冲区,开辟空间

    AVPacket *packet = (AVPacket*)av_malloc(sizeof(AVPacket));

    //AVFrame用于存储解码后的像素数据(YUV)

    //内存分配

    AVFrame *pFrame = av_frame_alloc();

    //YUV420

    AVFrame *pFrameYUV = av_frame_alloc();

    //只有指定了AVFrame的像素格式、画面大小才能真正分配内存

    //缓冲区分配内存

    uint8_t *out_buffer = (uint8_t *)av_malloc(avpicture_get_size(AV_PIX_FMT_YUV420P, pCodecCtx->width, pCodecCtx->height));

    //初始化缓冲区

    avpicture_fill((AVPicture *)pFrameYUV, out_buffer, AV_PIX_FMT_YUV420P, pCodecCtx->width, pCodecCtx->height);

    //用于转码(缩放)的参数,转之前的宽高,转之后的宽高,格式等

    struct SwsContext *sws_ctx = sws_getContext(pCodecCtx->width, pCodecCtx->height, pCodecCtx->pix_fmt,

        pCodecCtx->width, pCodecCtx->height, AV_PIX_FMT_YUV420P,

        SWS_BICUBIC, NULL, NULL, NULL);

    int got_picture, ret;

    FILE *fp_yuv = fopen(output, "wb+");

    int frame_count = 0;

    //6.一帧一帧的读取压缩数据

    while (av_read_frame(pFormatCtx, packet) >= 0)

    {

        //只要视频压缩数据(根据流的索引位置判断)

        if (packet->stream_index == v_stream_idx)

        {

            //7.解码一帧视频压缩数据,得到视频像素数据

            ret = avcodec_decode_video2(pCodecCtx, pFrame, &got_picture, packet);

            if (ret < 0)

            {

                printf("%s", "解码错误");

                return -1;

            }

            //为0说明解码完成,非0正在解码

            if (got_picture)

            {

                //AVFrame转为像素格式YUV420,宽高

                //2 6输入、输出数据

                //3 7输入、输出画面一行的数据的大小 AVFrame 转换是一行一行转换的

                //4 输入数据第一列要转码的位置 从0开始

                //5 输入画面的高度

                sws_scale(sws_ctx, pFrame->data, pFrame->linesize, 0, pCodecCtx->height,

                    pFrameYUV->data, pFrameYUV->linesize);

                //输出到YUV文件

                //AVFrame像素帧写入文件

                //data解码后的图像像素数据(音频采样数据)

                //Y 亮度 UV 色度(压缩了) 人对亮度更加敏感

                //U V 个数是Y的1/4

                int y_size = pCodecCtx->width * pCodecCtx->height;

                fwrite(pFrameYUV->data[0], 1, y_size, fp_yuv);

                fwrite(pFrameYUV->data[1], 1, y_size / 4, fp_yuv);

                fwrite(pFrameYUV->data[2], 1, y_size / 4, fp_yuv);

                frame_count++;

                printf("解码第%d帧\n", frame_count);

            }

        }

        //释放资源

        av_free_packet(packet);

    }

    fclose(fp_yuv);

    av_frame_free(&pFrame);

    avcodec_close(pCodecCtx);

    avformat_free_context(pFormatCtx);

    return 0;

}
Windows FFMPEG开发环境配置的更多相关文章
- windows phone7开发环境配置错误
遇到下面这样一个问题:在配置windows phoe7开发环境的时候出现如下错误,以及相应的解决方案,希望对大家有所帮助. 装完环境后出现下面错误: [caption id="attachm ...
- QT creator+OpenCV2.4.2+MinGW 在windows下开发环境配置
由于项目开发的原因,需要配置QT creator+OpenCV2.4.2+MinGW开发环境,现对配置方法做如下总结: 1. 下载必备软件 QT SDK for Open Source C++ de ...
- Windows高效开发环境配置(一)
更多精彩内容,欢迎关注公众号:逻魔代码 前言 用了多年的 MacOS 做开发,一系列诸如 Alfred.Item2.Oh-my-zsh 之类的工具,大大地提升了工作的效率和使用舒适度.新工作不给配 M ...
- wxWidgets 在 Windows 下开发环境配置
本文基于 CodeBlocks (16.01) 和 wxWidgets (3.0.2) 搭建 Windows 环境下 GUI 开发环境. 1. CodeBlocks 官网,下载最新版安装包 code ...
- VS2013 FFmpeg开发环境配置
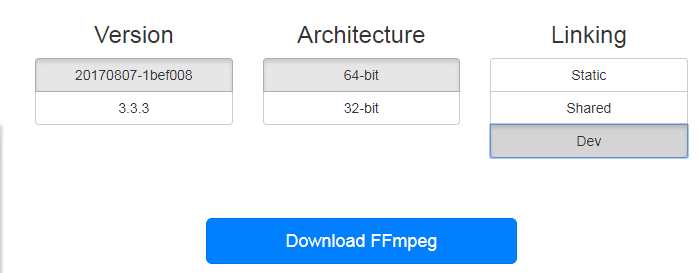
1.下载ffmpeg包(dll.include.lib) https://ffmpeg.zeranoe.com/builds/ 有3个版本:Static.Shared和Dev St ...
- Python在Windows下开发环境配置汇总
最近比较关注学习Python方面的资料和课程,由于Python本身基本都是在Linux下开发,本人windows用习惯了初用Linux各种别扭啊. 下面将我在配置Windows环境下的禁言写出来,与大 ...
- (OpenCV) VS2013 + opencv-2.4.10.exe + Windows 10 开发环境配置
主要配置2点: - Windows 环境变量. - VC++ 配置. STEP BY STEP: 1. 双击 ”opencv-2.4.10.exe“,解压到本地文件夹 “C:\ ". 2. ...
- OpenCV 学习笔记(7)vs2015+ffmpeg开发环境配置
参考教程 https://blog.csdn.net/HUSTLX/article/details/51014307 1.在http://ffmpeg.zeranoe.com/builds/ 下载最 ...
- vs2015+ffmpeg开发环境配置【转】
本文转载自:http://blog.csdn.net/hustlx/article/details/51014307 1.在http://ffmpeg.zeranoe.com/builds/ 下载最新 ...
随机推荐
- C语言---指针变量详解1
数据在内存中的地址也称为指针,如果一个变量存储了一份数据的指针,我们就称它为指针变量.在C语言中,允许用一个变量来存放指针,这种变量称为指针变量.指针变量的值就是某份数据的地址,这样的一份数据可以是数 ...
- 番外篇1:在Windows环境中安装JDK
他山之石,可以攻玉!欢迎关注我的微信公众号 本文作为构建第一个Java程序的番外篇一,跟大家探讨下在Windows下怎么安装JDK.由于本人没有Mac,因此如果是Mac的同学,请自行百度哦! 读前预览 ...
- java中,字符串类型的时间数据怎样转换成date类型。
将字符串类型的时间转换成date类型可以使用SimpleDateFormat来转换,具体方法如下:1.定义一个字符串类型的时间:2.创建一个SimpleDateFormat对象并设置格式:3.最后使用 ...
- python 启动shell报错 Subprocess Startup Error
如图所示启动python的IDLE以后,按F5启动module或者启动shell的时候就会启动失败提示上面错误,刚开始百度知道解决方案不靠谱,最后找到原因是我之前看小甲鱼的教学视频时,新建了一个pic ...
- 嵌入页面的几种方法(转载自萤火虫小Q)
一.应用框架技术 ---- 要在宿主页面中嵌入外部页面的方法是,在宿主页面中包含外部页面的位置插入“< IFRAME name="XXX" width=X height=X ...
- HTML5制作网页(2)
<!DOCTYPE html><html> <head> <meta charset="UTF-8"> <title> ...
- 常见JS倒计时
https://www.jb51.net/Special/356.htm //JS倒计时 <button onclick="resetTime(60)">启动倒计时 ...
- 自适应reset.js布局 用于手机端页面编写
以下是reset.js具体内容,是从淘宝网站拔下来的.把它存为js文件引入html里,它的默认尺寸是iphone4的分辨率也就是320*480,美工给你的图不管多少尺寸用ps量图后像素值(px)除以4 ...
- [经验分享] MySQL Innodb表导致死锁日志情况分析与归纳【转,纯学习】
在定时脚本运行过程中,发现当备份表格的sql语句与删除该表部分数据的sql语句同时运行时,mysql会检测出死锁,并打印出日志. 两个sql语句如下: (1)insert into backup_ta ...
- IntelliJ IDEA 实用快捷键
psvm--------------主(main)-----------------public staitc void main(String[] args) sout--------------- ...