APP自动化框架-ATX原理解析及JAVA版客户端
作为网易开源的ATX APP自动化测试框架,对比现有的macaca自动化框架/Appium自动化框架,最大的特别就是在于可远程进行自动化测试
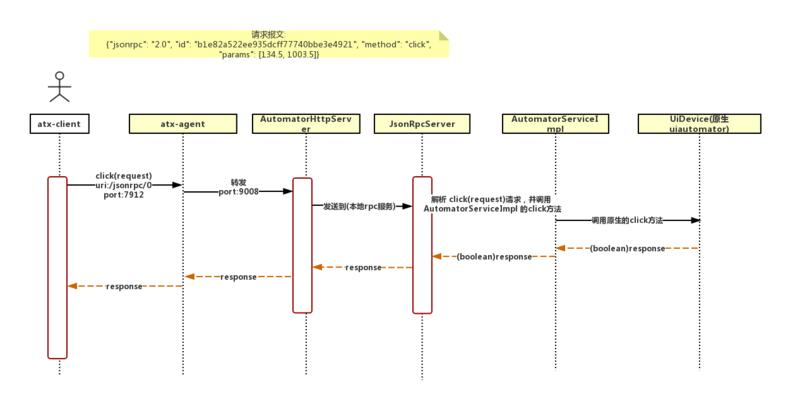
先给大家看一张我自己梳理的框架架构图
框架巧妙点:
1. 使用golang作为server端运行在Android手机上,免root运行
2. AutomatorHttpService使用NanoHTTPD框架,也自己运行一个server,专门监听及处理过来的http jsonRpc请求
public class AutomatorHttpServer extends NanoHTTPD {

    public AutomatorHttpServer(int port) {

        super(port);

    }

    private Map<String, JsonRpcServer> router = new HashMap<String, JsonRpcServer>();

    public void route(String uri, JsonRpcServer rpc) {

        router.put(uri, rpc);

    }

    @Override

    public Response serve(String uri, Method method,

                          Map<String, String> headers, Map<String, String> params,

                          Map<String, String> files) {

        Log.d(String.format("URI: %s, Method: %s, params, %s, files: %s", uri, method, params, files));

        if ("/stop".equals(uri)) {

            stop();

            return newFixedLengthResponse("Server stopped!!!");

        } else if ("/ping".equals(uri)) {

            return newFixedLengthResponse("pong");

        } else if ("/screenshot/0".equals(uri)) {

            float scale = 1.0f;

            if (params.containsKey("scale")) {

                try {

                    scale = Float.parseFloat(params.get("scale"));

                } catch (NumberFormatException e) {

                }

            }

            int quality = 100;

            if (params.containsKey("quality")) {

                try {

                    quality = Integer.parseInt(params.get("quality"));

                } catch (NumberFormatException e) {

                }

            }

            File f = new File(InstrumentationRegistry.getTargetContext().getFilesDir(), "screenshot.png");

            UiDevice.getInstance(InstrumentationRegistry.getInstrumentation()).takeScreenshot(f, scale, quality);

            try {

                return newChunkedResponse(Response.Status.OK, "image/png", new FileInputStream(f));

            } catch (FileNotFoundException e) {

                Log.e(e.getMessage());

                return newFixedLengthResponse(Response.Status.INTERNAL_ERROR, MIME_PLAINTEXT, "Internal Server Error!!!");

            }

        } else if (router.containsKey(uri)) {

            JsonRpcServer jsonRpcServer = router.get(uri);

            ByteArrayInputStream is = null;

            if (params.get("NanoHttpd.QUERY_STRING") != null)

                is = new ByteArrayInputStream(params.get("NanoHttpd.QUERY_STRING").getBytes());

            else if (files.get("postData") != null)

                is = new ByteArrayInputStream(files.get("postData").getBytes());

            else

                return newFixedLengthResponse(Response.Status.INTERNAL_ERROR, MIME_PLAINTEXT, "Invalid http post data!");

            ByteArrayOutputStream os = new ByteArrayOutputStream();

            try {

                jsonRpcServer.handleRequest(is, os);

                return newFixedLengthResponse(Response.Status.OK, "application/json", new ByteArrayInputStream(os.toByteArray()), os.size());

            } catch (IOException e) {

                return newFixedLengthResponse(Response.Status.INTERNAL_ERROR, MIME_PLAINTEXT, "Internal Server Error!!!");

            }

        } else

            return newFixedLengthResponse(Response.Status.NOT_FOUND, MIME_PLAINTEXT, "Not Found!!!");

    }

}
3. 使用jsonRpc反射反射形式对外提供 uiautomator方式
package com.github.uiautomator.stub;

import android.content.Context;

import android.content.Intent;

import android.os.RemoteException;

import android.support.test.InstrumentationRegistry;

import android.support.test.filters.LargeTest;

import android.support.test.filters.SdkSuppress;

import android.support.test.runner.AndroidJUnit4;

import android.support.test.uiautomator.By;

import android.support.test.uiautomator.Configurator;

import android.support.test.uiautomator.UiDevice;

import android.support.test.uiautomator.Until;

import com.fasterxml.jackson.databind.ObjectMapper;

import com.googlecode.jsonrpc4j.JsonRpcServer;

import org.junit.After;

import org.junit.Before;

import org.junit.Test;

import org.junit.runner.RunWith;

/**

 * Use JUnit test to start the uiautomator jsonrpc server.

 *

 * @author xiaocong@gmail.com

 */

@RunWith(AndroidJUnit4.class)

@SdkSuppress(minSdkVersion = 18)

public class Stub {

    private final String TAG = "UIAUTOMATOR";

    private static final int LAUNCH_TIMEOUT = 5000;

    int PORT = 9008;

    AutomatorHttpServer server = new AutomatorHttpServer(PORT);

    @Before

    public void setUp() throws Exception {

        launchService();

        //这是关键核心代码,把AutomatorService使用jsonRpcServer进行反射处理

        server.route("/jsonrpc/0", new JsonRpcServer(new ObjectMapper(), new AutomatorServiceImpl(), AutomatorService.class));

        server.start();

    }

    private void launchPackage(String packageName) {

        Log.i(TAG, "Launch " + packageName);

        UiDevice device = UiDevice.getInstance(InstrumentationRegistry.getInstrumentation());

        Context context = InstrumentationRegistry.getContext();

        final Intent intent = context.getPackageManager()

                .getLaunchIntentForPackage(packageName);

        intent.addFlags(Intent.FLAG_ACTIVITY_NEW_TASK | Intent.FLAG_ACTIVITY_CLEAR_TASK);

        context.startActivity(intent);

        device.wait(Until.hasObject(By.pkg(packageName).depth(0)), LAUNCH_TIMEOUT);

        device.pressHome();

    }

    private void launchService() throws RemoteException {

        UiDevice device = UiDevice.getInstance(InstrumentationRegistry.getInstrumentation());

        Context context = InstrumentationRegistry.getContext();

        device.wakeUp();

        // Wait for launcher

        String launcherPackage = device.getLauncherPackageName();

        Boolean ready = device.wait(Until.hasObject(By.pkg(launcherPackage).depth(0)), LAUNCH_TIMEOUT);

        if (!ready) {

            Log.i(TAG, "Wait for launcher timeout");

            return;

        }

        Log.d("Launch service");

        context.startService(new Intent("com.github.uiautomator.ACTION_START"));

        // Reset Configurator Wait Timeout

        Configurator configurator = Configurator.getInstance();

        configurator.setWaitForSelectorTimeout(0L);

        // BUG(uiautomator): setWaitForIdleTimeout is useless

        // Refs: https://www.ydkf.me/archives/22

    }

    @After

    public void tearDown() {

        server.stop();

        Context context = InstrumentationRegistry.getContext();

        context.startService(new Intent("com.github.uiautomator.ACTION_STOP"));

    }

    @Test

    @LargeTest

    public void testUIAutomatorStub() throws InterruptedException {

        while (server.isAlive()) {

            Thread.sleep(100);

        }

    }

}
4. AutomatorServiceImpl把原生UiAutomation加了一定处理,重写了一遍,只要确保入参数保持一致
@Override

    public boolean click(int x, int y) {

        return device.click(x, y);

    }

    @Override

    public boolean drag(int startX, int startY, int endX, int endY, int steps) throws NotImplementedException {

        return device.drag(startX, startY, endX, endY, steps);

    }
从整体而言,代码简洁、可读性、代码解耦,在ATX上提现较为明显
附上我这边写的java版ATX客户端,原框架只提供了python版
https://github.com/tigerge000/atxuiautomatorclient
APP自动化框架-ATX原理解析及JAVA版客户端的更多相关文章
- App 自动化框架设计思路
最近在整理和学习Appium+Java 自动化框架,对APP自动化框架的部分设想参考了一些文章,先进行整理下: 框架的思路一: 思考引入:https://www.cnblogs.com/yunfeio ...
- APP自动化框架LazyAndroid使用手册(2)--元素自动抓取
作者:黄书力 概述 前面的一篇博文简要介绍了安卓自动化测试框架LazyAndroid的组成结构和基本功能,本文将详细描述此框架中元素自动抓取工具lazy-uiautomaterviewer的使用方法. ...
- Atitit.提升软件Web应用程序 app性能的方法原理 h5 js java c# php python android .net
Atitit.提升软件Web应用程序 app性能的方法原理 h5 js java c# php python android .net 1. 提升单例有能力的1 2. 减少工作数量2 2.1. 减少距 ...
- 【转】URL短地址压缩算法 微博短地址原理解析 (Java实现)
转自: URL短地址压缩算法 微博短地址原理解析 (Java实现) 最近,项目中需要用到短网址(ShortUrl)的算法,于是在网上搜索一番,发现有C#的算法,有.Net的算法,有PHP的算法,就是没 ...
- [置顶]
滴滴插件化框架VirtualAPK原理解析(一)之插件Activity管理
上周末,滴滴与360都开源了各自的插件化框架,VirtualAPK与RePlugin,作为一个插件化方面的狂热研究者,在周末就迫不及待的下载了Virtualapk框架来进行研究,本篇博客带来的是Vir ...
- Android中免root的hook框架Legend原理解析
一.前言 Android中hook框架已经非常多了,最优秀的当属Xposed和Substrate了,这两个框架我在之前的文章都详细介绍过了,不了解的同学,可以转战这里:http://www.wjdia ...
- APP自动化框架LazyAndroid使用手册(1)--框架简介
作者:cryanimal QQ:164166060 APP自动化简介 APP自动化,即通过自动化的方式,对APP施行一系列的仿按键输入.触摸屏输入.手势输入等操作,以达到对APP的功能进行自动化测试 ...
- URL短地址压缩算法 微博短地址原理解析 (Java实现)
原博客地址:http://blog.csdn.net/xyz_lmn/article/details/8057270 最近,项目中需要用到短网址(ShortUrl)的算法,于是在网上搜索一番,发现有C ...
- APP自动化框架LazyAndroid使用手册(4)--测试模板工程详解
概述 前面的3篇博文分别对lazyAndroid的框架简介.元素抓取和核心API进行了说明,本文将基于框架给出的测试模板工程,详细阐述下使用该框架进行安卓UI自动化测试的步骤. 模板工程 先来看一下模 ...
随机推荐
- 华为的云计算基于openstack #stackalytics#
华为的云计算基于openstack,具体实力可以参考openstack 社区提供的stackalytics http://stackalytics.com/
- 使用Microsoft SyncToy 文件同步/备份 自动化处理
SyncToy 是由 微软 推出的一款免费的文件夹同步工具.百度搜索Microsoft SyncToy,官网可以直接下载 安装完成后 操作也非常简单,主要有三种模式 synchronize :在这个模 ...
- 安卓开发创建活动,布局,添加按钮,she使用Toast,设菜单,使菜单相关联等操作
---恢复内容开始--- 创建一个新活动在app/src/main/java/com.example.activitytest ,然后右击com.example.activitytest包→New→A ...
- xaf 如何添加logo信息
https://documentation.devexpress.com/eXpressAppFramework/113156/Task-Based-Help/Miscellaneous-UI-Cus ...
- java 分布式id生成算法
import java.lang.management.ManagementFactory; import java.net.InetAddress; import java.net.NetworkI ...
- weblogic安装部署ODM下jrules-res-xu-WL10.rar出现Can't find com.ibm.rules.res.xu.messages bundle异常
Windows: weblogic用户新建域文件夹里面,bin目录下找到setDomainEnv.cmd文件 在set JAVA_OPTIONS=%JAVA_OPTIONS% 后面添加: " ...
- Java使用RSA加密解密签名及校验
RSA加密解密类: 1 2 3 4 5 6 7 8 9 10 11 12 13 14 15 16 17 18 19 20 21 22 23 24 25 26 27 28 29 30 31 32 33 ...
- 洛谷P1439 【模板】最长公共子序列
题目描述 给出1-n的两个排列P1和P2,求它们的最长公共子序列. 输入输出格式 输入格式: 第一行是一个数n, 接下来两行,每行为n个数,为自然数1-n的一个排列. 输出格式: 一个数,即最长公共子 ...
- 刷题upupup【Java中Queue、Stack、Heap用法总结】
[Queue] 先进先出(First-In-First-Out),LinkedList实现了Queue接口.它只允许在表的前端进行删除操作,而在表的后端进行插入操作. add() 增加一个 ...
- [LeetCode] 26. Remove Duplicates from Sorted Array ☆(从有序数组中删除重复项)
[LeetCode] Remove Duplicates from Sorted Array 有序数组中去除重复项 描述 Given a sorted array nums, remove the d ...