
SpringMVC的入门示例---基于注解的配置
注解版的配置,主要的修改就是将原来使用<bean>创建的业务控制器对象,修改为是扫描标签扫描到容器.
1、导入包
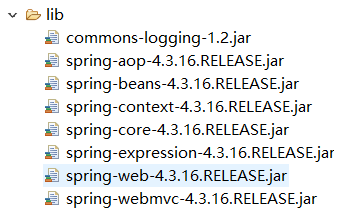
2、在 web.xml 配置核心控制器
 <?xml version="1.0" encoding="UTF-8"?>

 <web-app xmlns:xsi="http://www.w3.org/2001/XMLSchema-instance" xmlns="http://java.sun.com/xml/ns/javaee" xsi:schemaLocation="http://java.sun.com/xml/ns/javaee http://java.sun.com/xml/ns/javaee/web-app_3_0.xsd" id="WebApp_ID" version="3.0">

   <display-name>springmvc-demo-01-start</display-name>

   <welcome-file-list>

     <welcome-file>index.html</welcome-file>

     <welcome-file>index.htm</welcome-file>

     <welcome-file>index.jsp</welcome-file>

     <welcome-file>default.html</welcome-file>

     <welcome-file>default.htm</welcome-file>

     <welcome-file>default.jsp</welcome-file>

   </welcome-file-list>

   <!-- 配置核心控制器 -->

   <servlet>

       <servlet-name>dispatcherServlet</servlet-name>

       <servlet-class>org.springframework.web.servlet.DispatcherServlet</servlet-class>

       <!-- 指定配置文件的路径   默认情况下:配置文件的路径为:/WEB-INF/dispatcherServlet.xml -->

       <init-param>

           <!-- 注意:任何框架的参数名都可以在代码里面找到 -->

           <param-name>contextConfigLocation</param-name>

           <param-value>classpath:spring-mvc.xml</param-value>

       </init-param>

       <load-on-startup>1</load-on-startup>

   </servlet>

   <servlet-mapping>

       <servlet-name>dispatcherServlet</servlet-name>

       <url-pattern>*.do</url-pattern>

   </servlet-mapping>

 </web-app>
3、创建一个 Spring 的配置文件
 <?xml version="1.0" encoding="UTF-8"?>

 <beans xmlns="http://www.springframework.org/schema/beans"

     xmlns:xsi="http://www.w3.org/2001/XMLSchema-instance"

     xmlns:context="http://www.springframework.org/schema/context"

     xmlns:mvc="http://www.springframework.org/schema/mvc"

     xsi:schemaLocation="http://www.springframework.org/schema/mvc http://www.springframework.org/schema/mvc/spring-mvc-4.3.xsd

         http://www.springframework.org/schema/beans http://www.springframework.org/schema/beans/spring-beans.xsd

         http://www.springframework.org/schema/context http://www.springframework.org/schema/context/spring-context-4.3.xsd">

     <!-- 启动注解默认配置 -->

     <!-- 如果不加这句话,就会将注解有的,而 xml 配置没有的功能失效 -->

     <!-- 1. json 的自动转换 -->

     <!-- 2. 上传组件不能用 -->

     <!-- 3. mvc:开头的部分组件不用 -->

     <mvc:annotation-driven></mvc:annotation-driven>

     <!-- 扫描包以及其子包下的所有组件 -->

     <context:component-scan base-package="cn.mgy"></context:component-scan>

     <!-- 2. 视图解释器,不用配置,默认已经配置了 jsp 视图解释器了 -->

 </beans>
4、创建一个业务控制器
 package cn.mgy.controller;

 import org.springframework.stereotype.Controller;

 import org.springframework.web.bind.annotation.RequestMapping;

 /**

  * 业务控制层

  * 必须要加上存储类型注解@Controller,<context:component-scan> 才可以将该类扫描到容器

  * @author Administrator

  *

  */

 @Controller

 public class UserController {

     /**

      * 将映射路径配置在执行方法的上面

      * @return

      */

 //    @RequestMapping(value="/say.do")

 //    public ModelAndView say(){

 //        ModelAndView modelAndView = new ModelAndView();

 //        // 设置返回视图

 //        modelAndView.setViewName("/hello.jsp");

 //        return modelAndView;

 //    }

     /**

      * 将映射路径配置在执行方法的上面,返回也可以是一个字符串

      * @return

      */

     @RequestMapping(value="/say.do")

     public String say(){

         return "/hello.jsp";

     }

 }
5、创建一个请求的发送页面
 <%@ page language="java" contentType="text/html; charset=UTF-8"

     pageEncoding="UTF-8"%>

 <!DOCTYPE html>

 <html>

 <head>

 <meta charset="UTF-8">

 <title>Insert title here</title>

 </head>

 <body>

     <a href="${pageContext.request.contextPath }/say.do">say</a>

 </body>

 </html>
6、创建一个返回的视图页面
 <%@ page language="java" contentType="text/html; charset=UTF-8"

     pageEncoding="UTF-8"%>

 <!DOCTYPE html>

 <html>

 <head>

 <meta charset="UTF-8">

 <title>Insert title here</title>

 </head>

 <body>

     <h3>你好世界!!!!</h3>

 </body>

 </html>
SpringMVC的入门示例---基于注解的配置的更多相关文章
- SpringMVC入门(基于注解方式实现)
---------------------siwuxie095 SpringMVC 入门(基于注解方式实现) SpringMVC ...
- Spring boot 基于注解方式配置datasource
Spring boot 基于注解方式配置datasource 编辑 Xml配置 我们先来回顾下,使用xml配置数据源. 步骤: 先加载数据库相关配置文件; 配置数据源; 配置sqlSessionF ...
- Spring基于注解@Required配置
基于注解的配置 从 Spring 2.5 开始就可以使用注解来配置依赖注入.而不是采用 XML 来描述一个 bean 连线,你可以使用相关类,方法或字段声明的注解,将 bean 配置移动到组件类本身. ...
- Spring框架bean的配置(3):基于注解的配置
1.基于注解的配置: @Component: 基本注解, 标识了一个受 Spring 管理的组件 @Respository: 标识持久层组件 @Service: 标识服务层(业务层)组件 @Contr ...
- (spring-第4回【IoC基础篇】)spring基于注解的配置
基于XML的bean属性配置:bean的定义信息与bean的实现类是分离的. 基于注解的配置:bean的定义信息是通过在bean实现类上标注注解实现. 也就是说,加了注解,相当于在XML中配置了,一样 ...
- Spring IoC — 基于注解的配置
基于XML的配置,Bean定义信息和Bean实现类本身是分离的,而采用基于注解的配置方式时,Bean定义信息即通过在Bean实现类上标注注解实现. @Component:对类进行标注,Spring容器 ...
- Spring 基于注解零配置开发
本文是转载文章,感觉比较好,如有侵权,请联系本人,我将及时删除. 原文网址:< Spring 基于注解零配置开发 > 一:搜索Bean 再也不用在XML文件里写什么配置信息了. Sprin ...
- Spring 基于注解的配置 简介
基于注解的配置 从 Spring 2.5 开始就可以使用注解来配置依赖注入.而不是采用 XML 来描述一个 bean 连线,你可以使用相关类,方法或字段声明的注解,将 bean 配置移动到组件类本身. ...
- SpringMVC札集(03)——基于注解的SpringMVC入门完整详细示例
自定义View系列教程00–推翻自己和过往,重学自定义View 自定义View系列教程01–常用工具介绍 自定义View系列教程02–onMeasure源码详尽分析 自定义View系列教程03–onL ...
随机推荐
- wince单实例启动
static class Program { [DllImport("Toolhelp.dll")] public static extern IntPtr CreateToolh ...
- JS 字符串处理相关(持续更新)
一.JS判断字符串中是否包含某个字符串 indexOf() indexOf()方法可返回某个指定的字符串值在字符串中首次出现的位置.如果要检索的字符串值没有出现,则该方法返回 -1. var str ...
- spring异常Unsatisfied dependency expressed through constructor parameter 0
异常信息: org.springframework.beans.factory.UnsatisfiedDependencyException: Error creating bean with nam ...
- DIV正确打开方式 ~~~~哈哈哈
<div style='margin-left:25px;margin-right:25px;margin-top:10px;height:350px;min-height:50px;backg ...
- 【ARC101F】Robots and Exits 树状数组
题目大意 有 \(n\) 个机器人和 \(m\) 个出口. 这 \(n\) 个机器人的初始位置是 \(a_1,a_2,\ldots,a_n\),这 \(m\) 个出口的位置是 \(b_1,b_2,\l ...
- 【XSY3139】预言家 数位DP NFA
题目描述 有一个定义在 \(\{0,1,2,3,4,5,6,7,8,9\}\) 上的合规表达式,包含三种基本的操作: 结合:\(E_1E_2\) 分配:\((E_1|E_2|\ldots|E_n),n ...
- poj 1015 Jury Compromise(背包变形dp)
In Frobnia, a far-away country, the verdicts in court trials are determined by a jury consisting of ...
- Eclipse 添加 Source 源代码、Javadoc 文档
源代码 Source 按住 Ctrl 键,鼠标放到对应的类.方法上,出现 Open Declaration,Open Implementation ,可查看对应的实现.声明源代码. 也可以在[Proj ...
- 机器学习 - 正则化L1 L2
L1 L2 Regularization 表示方式: $L_2\text{ regularization term} = ||\boldsymbol w||_2^2 = {w_1^2 + w_2^2 ...
- ZooKeeper-配置 zoo.cfg
官方说明:https://zookeeper.apache.org/doc/r3.4.14/zookeeperAdmin.html#sc_configuration # 通信心跳数,Zookeeper ...