Lab 9-3
Analyze the malware found in the file Lab09-03.exe using OllyDbg and IDA Pro. This malware loads three included DLLs (DLL1.dll, DLL2.dll, and DLL3.dll) that are all built to request the same memory load location. Therefore, when viewing these DLLs in OllyDbg versus IDA Pro, code may appear at different memory locations. The purpose of this lab is to make you comfortable with finding the correct location of code within IDA Pro when you are looking at code in OllyDbg.
Questions and Short Answers
What DLLs are imported by Lab09-03.exe?
A: The import table contains kernel32.dll, NetAPI32.dll, DLL1.dll, and DLL2.dll. The malware dynamically loads user32.dll and DLL3.dll.
What is the base address requested by DLL1.dll, DLL2.dll, and DLL3.dll?
A: All three DLLs request the same base address: 0x10000000.
When you use OllyDbg to debug Lab09-03.exe, what is the assigned based address for: DLL1.dll, DLL2.dll, and DLL3.dll?
A: DLL1.dll is loaded at 0x10000000, DLL2.dll is loaded at 0x320000, and DLL3.dll is loaded at 0x380000 (this may be slightly different on your machine).
When Lab09-03.exe calls an import function from DLL1.dll, what does this import function do?
A:
DLL1Printis called, and it prints “DLL 1 mystery data,” followed by the contents of a global variable.When Lab09-03.exe calls
WriteFile, what is the filename it writes to?A:
DLL2ReturnJreturns a filename of temp.txt which is passed to the call toWriteFile.When Lab09-03.exe creates a job using
NetScheduleJobAdd, where does it get the data for the second parameter?A: Lab09-03.exe gets the buffer for the call to
NetScheduleJobAddfromDLL3GetStructure, which it dynamically resolves.While running or debugging the program, you will see that it prints out three pieces of mystery data. What are the following: DLL 1 mystery data 1, DLL 2 mystery data 2, and DLL 3 mystery data 3?
A: Mystery data 1 is the current process identifier, mystery data 2 is the handle to the open temp.txt file, and mystery data 3 is the location in memory of the string
ping www.malwareanalysisbook.com.How can you load DLL2.dll into IDA Pro so that it matches the load address used by OllyDbg?
A: Select Manual Load when loading the DLL with IDA Pro, and then type the new image base address when prompted. In this case, the address is 0x320000.
Detailed Analysis
We start by examining the import table of Lab09-03.exe and it contains kernel32.dll, NetAPI32.dll, DLL1.dll, and DLL2.dll. Next, we load Lab09-03.exe into IDA Pro. We look for calls to LoadLibrary and check which strings are pushed on the stack before the call. We see two cross-references to LoadLibrary that push user32.dll and DLL3.dll respectively, so that these DLLs may be loaded dynamically during runtime.


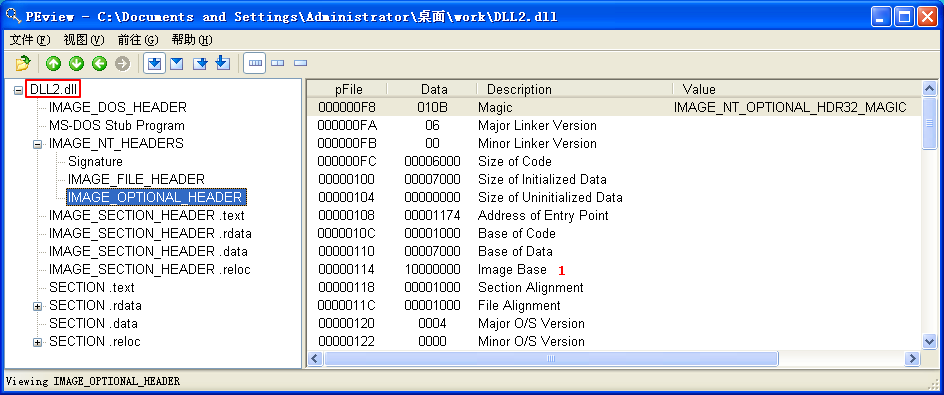
We can check the base address requested by the DLLs by using PEview, as shown in Figure 9-10L. After loading DLL1.dll into PEview, click the IMAGE_OPTIONAL_HEADER and look at the value of Image Base, as shown at \({\color {red} 1}\) in the figure. We repeat this process with DLL2.dll and DLL3.dll, and see that they all request a base address of 0x10000000.

Figure 9-10L: Finding the requested base address with PEview

Using the Memory Map to Locate DLLs
Next, we want to figure out at which memory address the three DLLs are loaded during runtime. DLL1.dll and DLL2.dll are loaded immediately because they’re in the import table. Since DLL3.dll is loaded dynamically, we will need to run the LoadLibrary function located at 0x401041. We can do this by loading Lab09-03.exe into OllyDbg, setting a breakpoint at 0x401041, and clicking play. Once the breakpoint hits, we can step over(F8, 步过) the call to LoadLibrary. At this point, all three DLLs are loaded into Lab09-03.exe.

We bring up the memory map by selecting View -> Memory. The memory map is shown in Figure 9-11L (it may appear slightly different on your machine). At \({\color{red} 1}\), we see that DLL1.dll gets its preferred base address of 0x10000000. At \({\color{red} 2}\), we see that DLL2.dll didn’t get its preferred base address because DLL1.dll was already loaded at that location, so DLL2.dll is loaded at 0x380000. Finally, at \({\color{red} 3}\), we see that DLL3.dll is loaded at 0x3E0000.
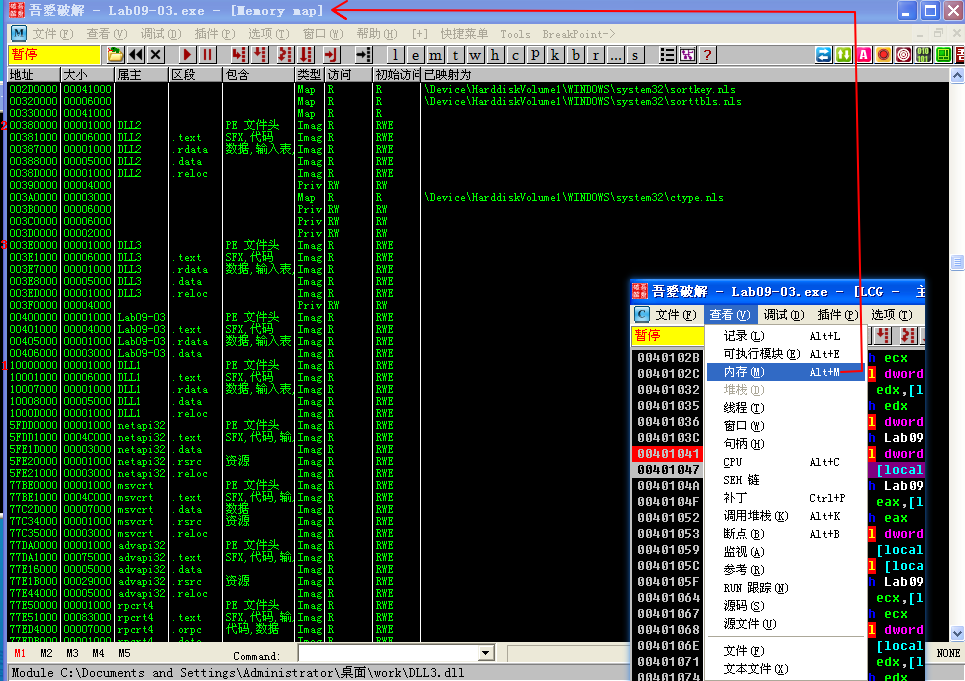
Figure 9-11L: Using the OllyDbg memory map to examine DLL load locations
Listing 9-9L shows the calls to the exports of DLL1.dll and DLL2.dll.


Listing 9-9L: Calls to the exports of DLL1.dll and DLL2.dll from Lab09-03.exe
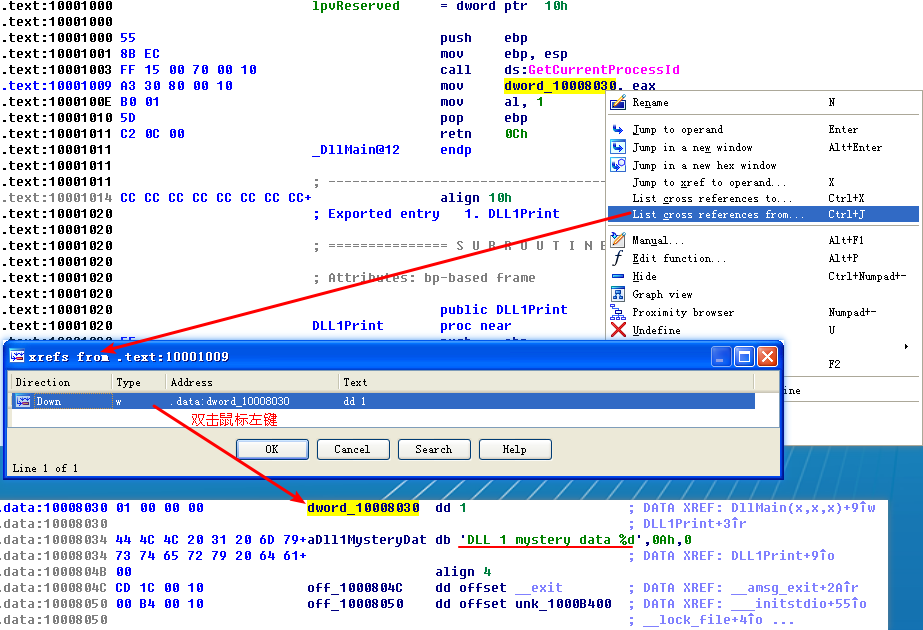
At the start of Listing 9-9L, we see a call to DLL1Print, which is an export of DLL1.dll. We disassemble DLL1.dll with IDA Pro and see that the function prints “DLL 1 mystery data,” followed by the contents of a global variable, dword_10008030. If we examine the cross-references to dword_10008030, we see that it is accessed in DllMain when the return value from the call GetCurrentProcessId is moved into it. Therefore, we can conclude that DLL1Print prints the current process ID, which it determines when the DLL is first loaded into the process.
In Listing 9-9L, we see calls to two exports from DLL2.dll: DLL2Print and DLL2ReturnJ. We can disassemble DLL2.dll with IDA Pro and examine DLL2Print to see that it prints “DLL 2 mystery data,” followed by the contents of a global variable, dword_1000B078. If we examine the cross-references to dword_1000B078, we see that it is accessed in DllMain when the handle to CreateFileA is moved into it. The CreateFileA function opens a file handle to temp.txt, which the function creates if it doesn’t already exist. DLL2Print apparently prints the value of the handle for temp.txt. We can look at the DLL2ReturnJ export and find that it returns the same handle that DLL2Print prints. Further in Listing 9-9L, at \({\color{red} 1}\), the handle is moved into hObject, which is passed to WriteFile at \({\color{red} 2}\) defining where malwareanalysisbook.com is written.

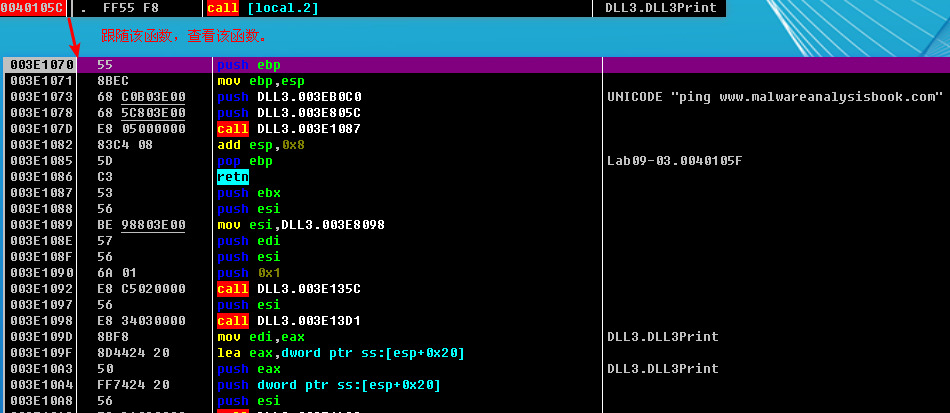
After the WriteFile in Lab09-03.exe, DLL3.dll is loaded with a call to LoadLibrary, followed by the dynamic resolution of DLL3Print and DLL3GetStructure using GetProcAddress. First, it calls DLL3Print, which prints “DLL 3 mystery data,” followed by the contents of a global variable found at 0x1000B0C0. When we check the cross-references for the global variable, we see that it is initialized in DllMain to the string ping www.malwareanalysisbook.com, so the memory location of the string will again be printed. DLL3GetStructure appears to return a pointer to the global dword_1000B0A0, but it is unclear what data is in that location. DllMain appears to initialize some sort of structure at this location using data and the string. Since DLL3GetStructure sets a pointer to this structure, we will need to see how Lab09-03.exe uses the data to figure out the contents of the structure. Listing 9-10L shows the call to DLL3GetStructure at \({\color {red} 1}\).
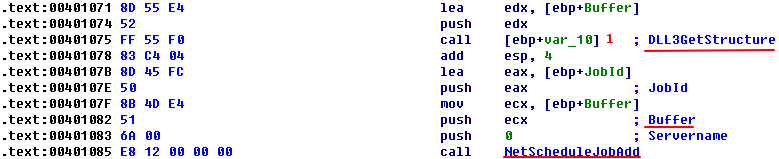
Listing 9-10L: Calls to DLL3GetStructure followed by NetScheduleJobAdd in Lab09-03.exe

It appears that the result of that call is the structure pointed to by Buffer, which is subsequently passed to NetScheduleJobAdd. Viewing the MSDN page for NetScheduleJobAdd tells us that Buffer is a pointer to an AT_INFO structure.
Applying a Structure in IDA Pro
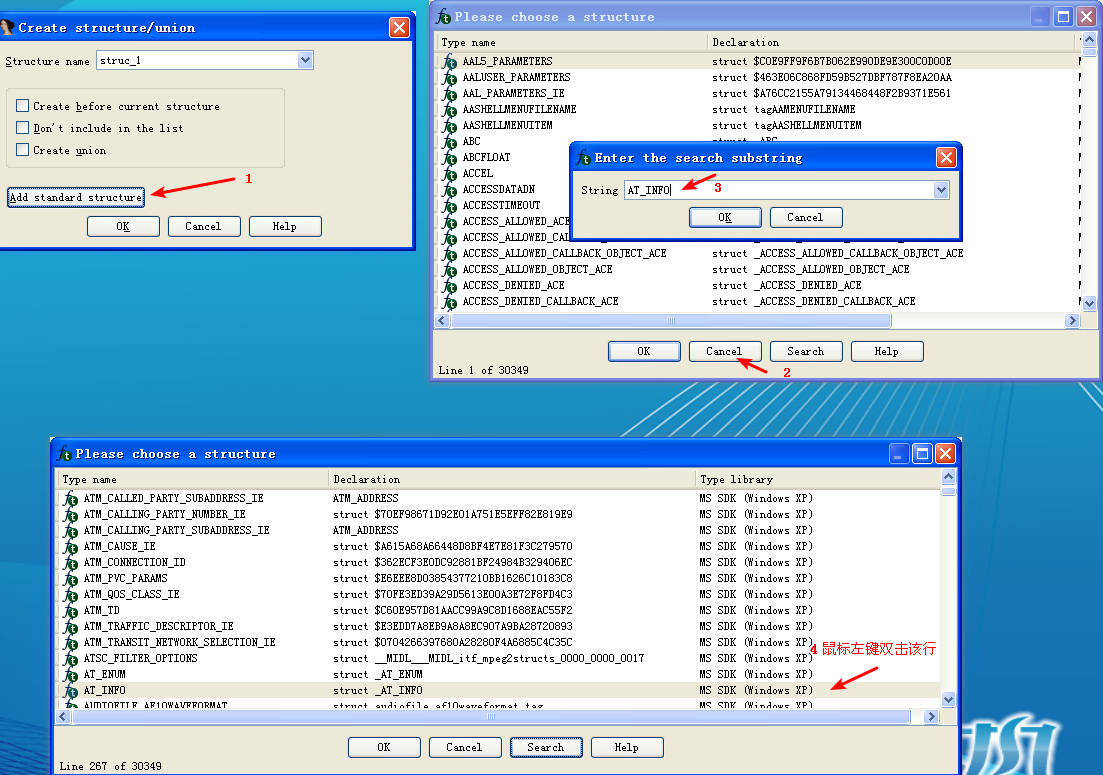
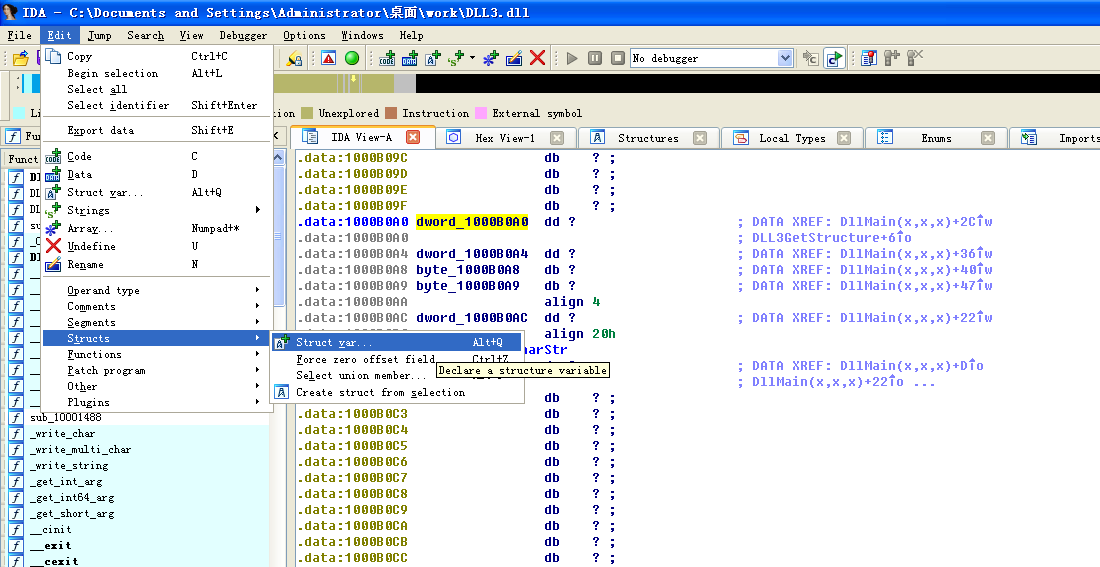
The AT_INFO structure can be applied to the data in DLL3.dll. First, load DLL3.dll into IDA Pro, press the INSERT key within the Structures window, and add the standard structure AT_INFO. Next, go to dword_1000B0A0 in memory and select Edit -> Struct Var and click AT_INFO. This will cause the data to be more readable, as shown in Listing 9-11L. We can see that the scheduled job will be set to ping malwareanalysisbook.com every day of the week at 1:00 AM.

Listing 9-11L: AT_INFO Structure


然后键盘按 G 字母键,输入地址 10001022,就能看到效果了:

附一张未修改前的:

Specifying a New Image Base with IDA Pro
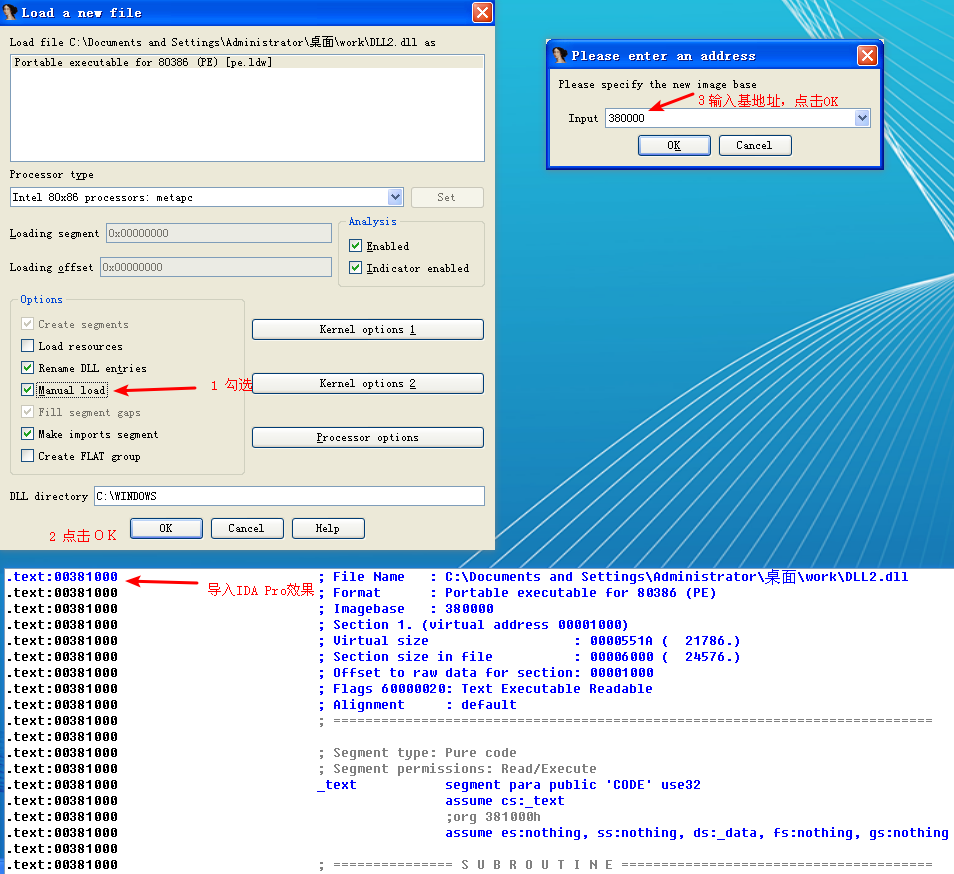
We can load DLL2.dll into IDA Pro in a different location by checking the Manual Load box when loading the DLL. In the field that says Please specify the new image base, we type 380000. IDA Pro will do the rest to adjust all of the offsets, just as OllyDbg did when loading the DLL.
附一张 DLL2.dll 导入 IDA Pro 时没有勾选 Manual Load 的效果:
Malware Summary
This lab demonstrated how to determine where three DLLs are loaded into Lab09-03.exe using OllyDbg. We loaded these DLLs into IDA Pro to perform full analysis, and then figured out the mystery data printed by the malware: mystery data 1 is the current process identifier, mystery data 2 is the handle to the open temp.txt, and mystery data 3 is the location in memory of the string ping www.malwareanalysisbook.com. Finally, we applied the Windows AT_INFO structure within IDA Pro to aid our analysis of DLL3.dll.
Preference
Lab 9-3的更多相关文章
- MIT 6.828 JOS学习笔记18. Lab 3.2 Part B: Page Faults, Breakpoints Exceptions, and System Calls
现在你的操作系统内核已经具备一定的异常处理能力了,在这部分实验中,我们将会进一步完善它,使它能够处理不同类型的中断/异常. Handling Page Fault 缺页中断是一个非常重要的中断,因为我 ...
- MIT 6.828 JOS学习笔记17. Lab 3.1 Part A User Environments
Introduction 在这个实验中,我们将实现操作系统的一些基本功能,来实现用户环境下的进程的正常运行.你将会加强JOS内核的功能,为它增添一些重要的数据结构,用来记录用户进程环境的一些信息:创建 ...
- MIT 6.828 JOS学习笔记16. Lab 2.2
Part 3 Kernel Address Space JOS把32位线性地址虚拟空间划分成两个部分.其中用户环境(进程运行环境)通常占据低地址的那部分,叫用户地址空间.而操作系统内核总是占据高地址的 ...
- MIT 6.828 JOS学习笔记15. Lab 2.1
Lab 2: Memory Management lab2中多出来的几个文件: inc/memlayout.h kern/pmap.c kern/pmap.h kern/kclock.h kern/k ...
- MIT 6.828 JOS学习笔记10. Lab 1 Part 3: The kernel
Lab 1 Part 3: The kernel 现在我们将开始具体讨论一下JOS内核了.就像boot loader一样,内核开始的时候也是一些汇编语句,用于设置一些东西,来保证C语言的程序能够正确的 ...
- MIT 6.828 JOS学习笔记7. Lab 1 Part 2.2: The Boot Loader
Lab 1 Part 2 The Boot Loader Loading the Kernel 我们现在可以进一步的讨论一下boot loader中的C语言的部分,即boot/main.c.但是在我们 ...
- python opencv 利用Lab空间把春天的场景改为秋天
前一段时间实现了Reinhard颜色迁移算法,感觉挺有意思的,然后在代码上随意做了一些更改,有了一些发现,把Lab通道的a通道值改为127左右,可以将绿色改为黄色,而对其他颜色的改动非常小,因此可以将 ...
- Acadia Lab 228 + Lab 222
又是一对串烧实验,布好线后非常方便就可以一起完成. 连线方案一模一样: Lab 228 数码管骰子 核心代码如下: def loop() : global cnt global btn_read,se ...
- Acadia Lab 203 + Lab 231
在做完 Lab 6 之后,惊觉选做实验缺口很大,于是遍历了一遍夏任务,找到了一条最省力的路线. 做完 Lab 6 的连线不用拆,可以接下来做以下两个实验: Lab 203 网络时钟 核心代码如下: v ...
- GJM : 【技术干货】给The Lab Renderer for Unity中地形添加阴影
感谢您的阅读.喜欢的.有用的就请大哥大嫂们高抬贵手"推荐一下"吧!你的精神支持是博主强大的写作动力以及转载收藏动力.欢迎转载! 版权声明:本文原创发表于 [请点击连接前往] ,未经 ...
随机推荐
- EF性能检测工具MiniProfilerEF6的使用
一.在VS项目中分别安装包MiniProfiler.MiniProfiler.EF6.MiniProfiler.MVC4 二.在Global.asax文件的Application_BeginReque ...
- PeopleSoft translate value 排序
这个function 可以对record.field 的dropdownlist 排序,也可以把描述前边加个数字.但是有时候用户不接受.所以调用这个方法是比较好的选择. Function Order_ ...
- 记录Django学习1
一.Django 1.首先安装好django模块 pip3 install django 2.然后配置好相应的环境变量 C:\Python35\Scripts 3. 创建Django工程,首先可以使用 ...
- windows10的普通用户使用Task Scheduler的问题
在Create Task 窗口的General选项卡中,在Security options 里有几个单选项,分别是 Run only when user is logged on ,Run wheth ...
- windows之电脑开机出现 this product is covered by one or more of the following prtents
电脑开机出现 this product is covered by one or more of the following prtents 有次意外断电后就每次都出现这个提示,然后要等检查完才能进入 ...
- Linux交换Esc和Caps
使用过 .xmodmap,重启后就失效,添加到rc.local也不管用,后来通过在xorg里配置成功. 更改xorg里的键盘配置,增加Option "XkbOptions" &qu ...
- linux上的图片查看器FEH_image_view
Linux上的图片查看器, 简单,没有多余功能,打开快速,体积小 在终端用feh # 直接执行feh显示当前目录所有图片 feh # 或者指定图片名 feh pic1 pic2 pic3 # 显示一个 ...
- VMware复制CentOS7,网络配置问题处理
问题: vm安装CentOS7,静态IP配置完毕后,关闭虚机1,克隆虚拟机为2.克隆出来的虚拟机使用ip addr命令,发现网卡但和之前名称完全不一样变成ens33,也没有ip地址,但/etc/sys ...
- STS4 add spring bean configuration file
转自:https://blog.csdn.net/asc_123456/article/details/83216577
- 在dotnetcore的MVC项目中,创建支持 vue.js 的最小工程模板
网上Vue模板不是最新的,我自己做了一个最新的支持 Vue.js 的最小工程模板,方便大家从 Hello world. 入门, 在 VS2017 里学习,并扩展出自己的项目. 下面是创建步骤: 1.在 ...