
window 安装 Protobuf
环境安装
1:下载CMake
2:打开VS Command Prompt
3:修改工作目录到目标目录
cd C:\Path\to
4:创建编译完后 protobuf headers/libraries/binaries 将要安装的文件夹
C:\Path\to>mkdir install
5:确保 'cmake' 命令可用,(如果不可用确保 把它加入到 path 环境变量中)
set PATH=%PATH%;D:\Program Files\cmake-3.5.2-win32-x86\bin
6:确保Git命令可用(如果不可用,添加到到 path 环境变量)
set PATH=%PATH%;D:\Program Files\Git\cmd
源设置
下载 packages https://github.com/google/protobuf/releases
把protobuf 放入 C:\Path\to 目标
cd C:\Path\to\protobuf\cmake
CMake 配置
参考: Visual Studio Generators
注意:64位请用对应的 64位VS命令行
1:创建一个 build 目录,并且改变当前工作目录到build
mkdir build & cd build
------创建Release配置
C:\Path\to\protobuf\cmake\build>mkdir release & cd release
C:\Path\to\protobuf\cmake\build\release>cmake -G "NMake Makefiles" ^
-DCMAKE_BUILD_TYPE=Release ^
-DCMAKE_INSTALL_PREFIX=../../../../install ^
../..
------创建Debug 配置
C:\Path\to\protobuf\cmake\build>mkdir debug & cd debug
C:\Path\to\protobuf\cmake\build\debug>cmake -G "NMake Makefiles" ^
-DCMAKE_BUILD_TYPE=Debug ^
-DCMAKE_INSTALL_PREFIX=../../../../install ^
../..
-----创建Visual Studio 解决方案文件
C:\Path\to\protobuf\cmake\build>mkdir solution & cd solution
C:\Path\to\protobuf\cmake\build\solution>cmake -G "Visual Studio 11 2012 Win64" ^
-DCMAKE_INSTALL_PREFIX=../../../../install ^
-Dprotobuf_BUILD_TESTS=OFF ^
../..
备注
Generates Visual Studio 11 (VS 2012) project files.
Visual Studio 11 2012 Win64 --Specify target platform x64.
Visual Studio 11 2012 ARM --Specify target platform ARM.
Visual Studio 11 2012 <WinCE-SDK> --Specify target platform matching a Windows CE SDK name.
Generates Visual Studio 12 (VS 2013) project files:
Visual Studio 12 2013 Win64 --Specify target platform x64.
Visual Studio 12 2013 ARM --Specify target platform ARM.
Generates Visual Studio 14 (VS 2015) project files:
Visual Studio 11 2012 Win64 --Specify target platform x64.
Visual Studio 11 2012 ARM --Specify target platform ARM.
Visual Studio 11 2012 <WinCE-SDK> --Specify target platform matching a Windows CE SDK name.
编译
To compile protobuf:
C:\Path\to\protobuf\cmake\build\release>nmake
或者
C:\Path\to\protobuf\cmake\build\debug>nmake
或者
VS:打开生成的.sln 文件 即可。
如果出现如下错误:

修改Platform Toolset 即可

安装
To install protobuf to the specified *install* folder:
C:\Path\to\protobuf\cmake\build\release>nmake install
or
C:\Path\to\protobuf\cmake\build\debug>nmake install
或者编译VS解决方案中的“INSTALL”。
如果出现编译错误,尝试用管理员权限打开VS重新试试

定义消息体
package tutorial;

message Person {

  required string name = ;

  required int32 id = ;

  optional string email = ;

  enum PhoneType {

    MOBILE = ;

    HOME = ;

    WORK = ;

  }

  message PhoneNumber {

    required string number = ;

    optional PhoneType type =  [default = HOME];

  }

  repeated PhoneNumber phone = ;

}

message AddressBook {

  repeated Person person = ;

}
编译生成对应library
c++:(protoc -I=$SRC_DIR --cpp_out=$DST_DIR $SRC_DIR/addressbook.proto)
protoc -I=. --cpp_out=. HookMessage.proto
生成对应的 .h 和.cpp 文件
c#:(protoc -I=$SRC_DIR --csharp_out=$DST_DIR $SRC_DIR/addressbook.proto)
生成.cs 文件
c++项目使用
1:添加protobuf头文件: protobuf下的Src (protobuf-3.0.0-beta-2\src)
Property-->Configuration Properties-->c/c++-->General:Additional Include Directories
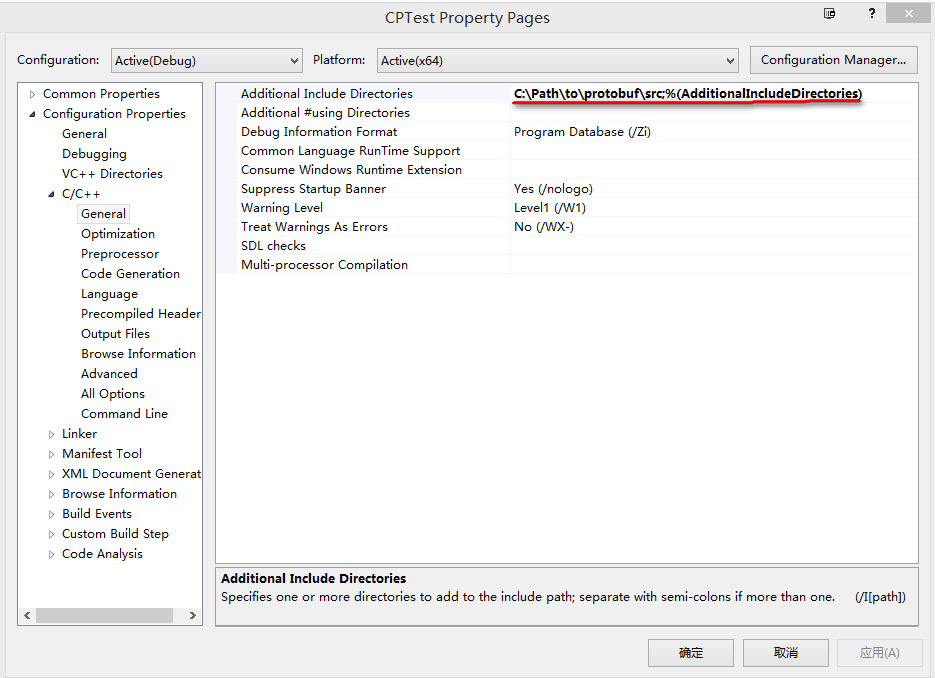
2:添加类库文件 (上面build出来的类库,如上例:C:\Path\to\protobuf\cmake\build\debug)
Property-->Configuration Properties-->Linker-->General-->Additional Library Directories

在使用cpp文件顶部加上
#pragma comment(lib, "libprotobufd.lib")
#pragma comment(lib, "libprotocd.lib")
build项目:
可能提示错误

该错误又由于 生成的类库和当前的项目使用的是不一样的 Runtime Library
修改如下配置即可: Property-->Configuration Properties-->c/c++-->Cide Generation-->Runtime Library( Multi-threaded DLL (/MD) | Multi-threaded Debug (/MTd) 等)
C#项目使用
引用Google.Protobuf.dll protobuf 源包中C#项目生成的DLL(需要打开项目自己编译生成)
window 安装 Protobuf的更多相关文章
- 解决Bash On Ubuntu On Window安装Zsh无效问题附安装说明
前言 Zsh是一款非常棒的Shell,使用Linux和Mac系统的人,基本上都知道zsh的存在. 问题 在安装完Zsh后,zsh是可以使用的,但是重启之后,又恢复至默认的bash. 我在安装好之后,使 ...
- MAC 安装 Protobuf
1.确认MAC装有g++.make.vim工具 2.安装make工具使用 brew install make 3.安装protobuf brew install protobuf 4.安装 ...
- Linux下安装protobuf并实现简单的客户端服务器端通信
http://code.google.com/p/protobuf/downloads/list上可以下载Protobuf的源代码. 安装步骤如下所示: 1>tar -xzf protobuf- ...
- mac 安装protobuf,并编译
因公司接口协议是PB文件,需要将 PB 编译成JAVA文件,且MAC 电脑,故整理并分享MAC安装 google 下的protobuf 文件 MAC 安装protobuf 流程 1.下载 http ...
- python3.4学习笔记(二十四) Python pycharm window安装redis MySQL-python相关方法
python3.4学习笔记(二十四) Python pycharm window安装redis MySQL-python相关方法window安装redis,下载Redis的压缩包https://git ...
- MOTT介绍(2)window安装MQTT服务器和client
MQTT目录: MQTT简单介绍 window安装MQTT服务器和client java模拟MQTT的发布,订阅 window安装MQTT服务器,我这里下载了一个apache-apollo-1.7.1 ...
- RabbitMQ(一):Window安装RabbitMQ
原文:RabbitMQ(一):Window安装RabbitMQ 1.安装ERLANG语言环境 由于RabbitMQ是采用Erlang编写的,因此我们需要先安装该语言库,以便运行代理服务器.从Erlan ...
- MySQL Community Server 5.5.56 ZIP Archive 绿色解压版 window安装步骤
MySQL Community Server 5.5.56 ZIP Archive 绿色解压版 window安装步骤 首先 准备好启动配置文件my.ini [mysqld] #设置字符集为utf8 ...
- linux下安装protobuf及cmake编译
一.protobuf 安装 protobuf版本:2.6.1 下载地址:https://github.com/google/protobuf/archive/v2.6.1.zip 解压之后进入目录 修 ...
随机推荐
- c#调用js,以及js调用C#里的函数, c#自己生成js代码,实现对web的控制
using mshtml;using System;using System.Collections.Generic;using System.Linq;using System.Security.P ...
- Android日期时间格式国际化
公共类 的DateFormatSymbols 扩展对象 实现 Serializable接口 Cloneable接口 java.lang.Object的 ↳ java.text.DateForma ...
- WCF - net.pipe vs. net.tcp vs. http Bindings
WCF - net.pipe vs. net.tcp vs. http Bindings 问题: I'm new to WCF and would like to know the differenc ...
- BZOJ3210: 花神的浇花集会
3210: 花神的浇花集会 Time Limit: 1 Sec Memory Limit: 128 MBSubmit: 238 Solved: 119[Submit][Status] Descri ...
- UITextView 动态高度计算(iOS7版)
NSDictionary *attrsDictionary = [NSDictionarydictionaryWithObject:[UIFontsystemFontOfSize:kCellConte ...
- The server is temporarily unable to service your request due to maintenance downtime or capacity problems. Please try again later.
The server is temporarily unable to service your request due to maintenance downtime or capacity pro ...
- android学习之BUG——The connection to adb is down, and a severe error has occured.
开始--运行--cmd 进入命令提示符 输入netstat -ano 即可看到所有连接的PID 之后在任务管理器中找到这个PID所对应的程序如果任务管理器中没有PID这一项,可以在任务管理器中选&qu ...
- 是C太傻逼?还是C++不够傻逼;
1,类对象宏object-like macro,类函数宏macro中不允许有空格,名称遵循变量名命名规则; 同样是笔记,顺序条理无,看管随意,意在与神会,不解释则会意此为深,随意则会意此乃为度...望 ...
- weekend110(Hadoop)的 第四天笔记
(2015年1月18日) 课程目录 01-复习 02-hadoop中的序列化机制 03-流量求和mr程序开发 04-hadoop的自定义排序实现 05-mr程序中自定义分组的实现 06-shuffle ...
- 【转】漫谈ANN(2):BP神经网络
上一次我们讲了M-P模型,它实际上就是对单个神经元的一种建模,还不足以模拟人脑神经系统的功能.由这些人工神经元构建出来的网络,才能够具有学习.联想.记忆和模式识别的能力.BP网络就是一种简单的人工神经 ...