nim_duilib(11)之menu(1)
introduction
xml文件添加代码
基于上一篇, 继续向basic.xml中添加下面的代码。 xml完整源码在文末。
这段代码添加到最小化按钮的上面
    <HBox width="stretch" height="35" bkcolor="bk_wnd_lightcolor">

      <Control />

        <!--设置按钮-->

        <Button class="btn_wnd_settings" name="settings" margin="4,6,0,0"/>

        <Button class="btn_wnd_min" name="minbtn" margin="4,6,0,0" />

        <Box width="21" margin="4,6,0,0">

          <Button class="btn_wnd_max" name="maxbtn"/>

          <Button class="btn_wnd_restore" name="restorebtn" visible="false"/>

        </Box>

        <Button class="btn_wnd_close" name="closebtn" margin="4,6,8,0"/>

    </HBox>
核心代码是
<!--设置按钮-->

<Button class="btn_wnd_settings" name="settings" margin="4,6,0,0"/>
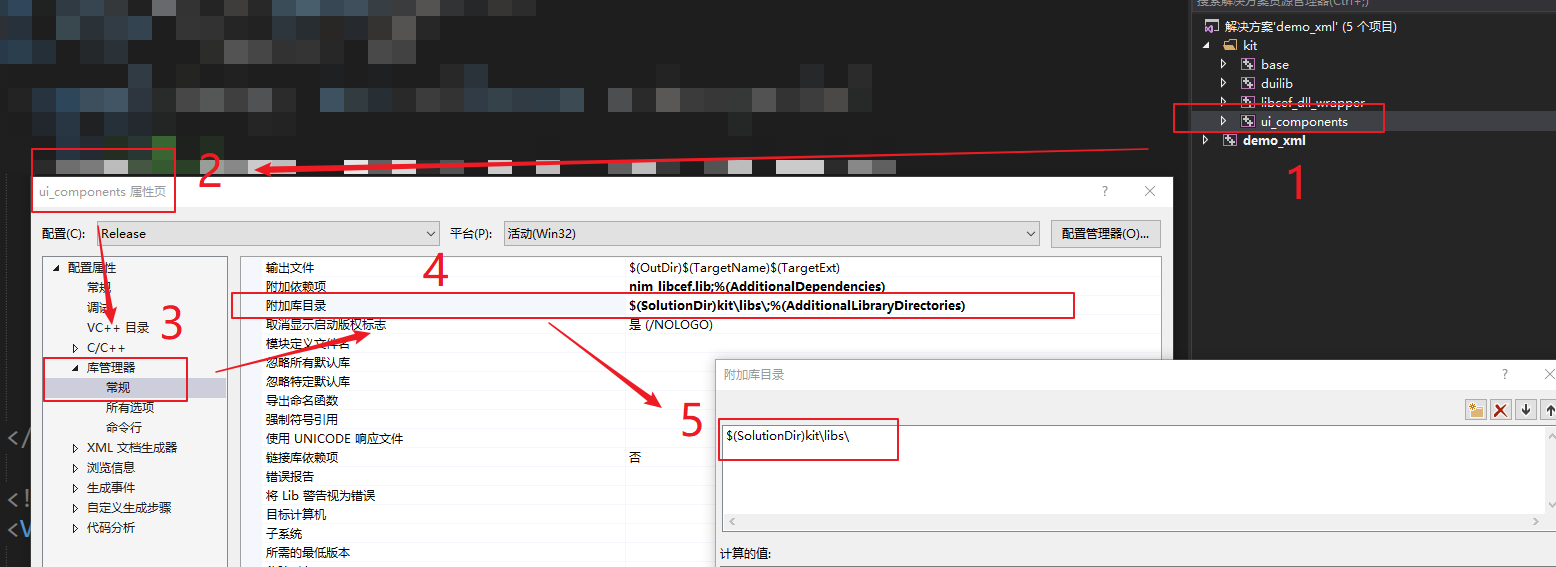
项目文件配置
menu控件来自另一个项目ui_components, 而ui_component又依赖项目libcef_dll_wrapper。libcef_dll_wrapper位于文件夹third_party下。
stage 1
从源码目录拷贝ui_component和libcef_dll_wrapper和libs文件夹到先前创建好的kit的文件夹下,此时目录结构如下:
.kit

├─base

├─build

├─duilib

├─libs

├─third_party

└─ui_components
stage 2
习惯将项目输出到VS默认输出的目录Debug, 所以将项目ui_components、libcef_dll_wrapper的输出目录和中间目录改为如下:
| name | value |
|---|---|
| 输出目录 | $(SolutionDir)$(Configuration)| |
| 中间目录 | $(Configuration)| |
stage 3
设置ui_components项目链接lib目录指向 kit\libs\。 打开ui_components属性->库管理器->常规->附加库目录->编辑,改为下面的值:
$(SolutionDir)kit\libs\
Note: 注意Release和Debug需要都修改。效果图
stage 4
为什么要做上面的配置? 因为 项目ui_components需要依赖libs目录下的nim_libcef库
代码中关联
BasicForm.h
- 打开BasicForm.h,类中添加下面的代码用于关联界面控件。
	// settings按钮

	ui::Button*	psettings_;
监听选择子项事件
类中继续添加下面的代码,用于监听滑块的值发生变化
	// settings按钮点击事件

	bool OnSettingsBtnClicked(ui::EventArgs* msg);
BasicForm.cpp
InitWindow函数
- 转到BasicForm.cpp,找到 InitWindow 函数,向其增加下面的代码
void BasicForm::InitWindow()

{

  	......

	// 12.关联设置按钮

	//----------------------------------------------------------------------------------------

	psettings_ = dynamic_cast<ui::Button*>(FindControl(L"settings"));

	// 关联点击事件

	if (psettings_)

	{

		psettings_->AttachClick(nbase::Bind(&BasicForm::OnSettingsBtnClicked, this, std::placeholders::_1));

	}

}
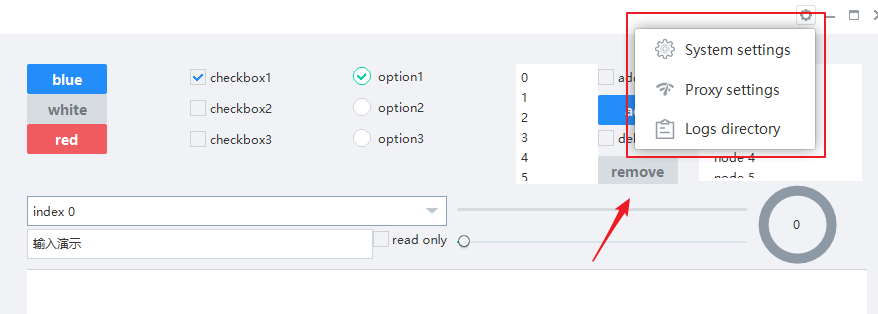
OnSettingsBtnClicked
OnSettingsBtnClicked函数源码如下:
bool BasicForm::OnSettingsBtnClicked(ui::EventArgs* msg)

{

	// 点击设置按钮,弹出菜单

	RECT rect = msg->pSender->GetPos();

	ui::CPoint point;

	point.x = rect.left - 175;

	point.y = rect.top + 10;

	ClientToScreen(m_hWnd, &point);

	nim_comp::CMenuWnd* pmenu = new(std::nothrow) nim_comp::CMenuWnd(NULL);

	if (pmenu)

	{

		ui::STRINGorID xml(L"settings_menu.xml");

		pmenu->Init(xml, _T("xml"), point);

	}

	return false;

}
运行结果
xml完整源码
<?xml version="1.0" encoding="UTF-8"?>

<Window size="900,600" caption="0,0,0,35">

  <VBox bkcolor="bk_wnd_darkcolor">

    <HBox width="stretch" height="35" bkcolor="bk_wnd_lightcolor">

      <Control />

        <!--设置按钮-->

        <Button class="btn_wnd_settings" name="settings" margin="4,6,0,0"/>

        <Button class="btn_wnd_min" name="minbtn" margin="4,6,0,0" />

        <Box width="21" margin="4,6,0,0">

          <Button class="btn_wnd_max" name="maxbtn"/>

          <Button class="btn_wnd_restore" name="restorebtn" visible="false"/>

        </Box>

        <Button class="btn_wnd_close" name="closebtn" margin="4,6,8,0"/>

    </HBox>

    <!--下面是中间的控件-->

    <VBox padding="30, 30, 30, 30" >

      <HBox height="120">

        <VBox>

          <!-- Buttons -->

          <Button class="btn_global_blue_80x30" name="btn_blue" text="blue" />

          <Button class="btn_global_white_80x30" name="btn_white" text="white"/>

          <Button class="btn_global_red_80x30" name="btn_red" text="red"/>

        </VBox>

        <!--checkbox-->

        <VBox>

          <CheckBox class="checkbox_font12" name="checkbox1" text="checkbox1" margin="0,5,0,10" selected="true"/>

          <CheckBox class="checkbox_font12" name="checkbox2" text="checkbox2" margin="0,5,0,10"/>

          <CheckBox class="checkbox_font12" name="checkbox3" text="checkbox3" margin="0,5,0,10"/>

        </VBox>

        <!-- option-->

        <VBox>

          <Option class="circle_option_2" name="option1" group="option_group" text="option1" margin="0,3,0,10" selected="true"/>

          <Option class="circle_option_2" name="option2" group="option_group" text="option2" margin="0,3,0,10"/>

          <Option class="circle_option_2" name="option3" group="option_group" text="option3" margin="0,3,0,10"/>

        </VBox>

        <HBox>

          <!-- List -->

          <VListBox class="list" name="list" padding="5,3,5,3">

          </VListBox>

          <VBox>

            <!-- Buttons -->

            <CheckBox class="checkbox_font12" name="list_checkbox_add_to_top" text="add to top" margin="0,5,0,10"/>

            <Button class="btn_global_blue_80x30" name="list_btn_add" text="add" />

            <CheckBox class="checkbox_font12" name="list_checkbox_remove_all" text="del all?" margin="0,5,0,10"/>

            <Button class="btn_global_white_80x30" name="list_btn_remove" text="remove"/>

          </VBox>

        </HBox>

        <!-- TreeView -->

        <TreeView class="list" name="tree" padding="5,3,5,3" margin="20">

        </TreeView>

      </HBox>

      <!--第二行控件开始-->

      <HBox height="85">

        <VBox>

          <!--combobox-->

          <Combo class="list" name="combo" height="30" margin="0,12,0,0" padding="6" bkimage="file='../public/combo/normal.png' corner='5,5,30,5'"/>

          <HBox>

            <RichEdit class="simple input" name="rich_edit_1" text="输入演示" height="30" margin="0,3" padding="6,6,6" promptmode="true" prompttext="Single line text control" promptcolor="lightcolor"/>

            <CheckBox class="checkbox_font12" name="rich_edit_readonly" text="read only" margin="0,5,0,10"/>

          </HBox>

        </VBox>

        <HBox>

          <VBox>

            <!-- Progress -->

            <HBox margin="0,10" height="32">

              <Progress class="progress_blue" name="progress" value="0" margin="10"/>

            </HBox>

            <!-- Slider -->

            <HBox margin="0,0,0,10" height="32">

              <Slider class="slider_green" name="slider" value="0" margin="10"/>

            </HBox>

          </VBox>

          <VBox width="120">

            <CircleProgress name="circle_progress" circular="true"  height="80" width="80"

            circlewidth="10" bgcolor="gray" fgcolor="green" value="0"  clockwise="true"  min="1" max="100" margin="10"

            textpadding="10,32,10,10" normaltextcolor="darkcolor" indicator="logo_18x18.png"/>

          </VBox>

        </HBox>

      </HBox>

    </VBox> <!--下面是中间的控件 结束-->

  </VBox>

</Window>
nim_duilib(11)之menu(1)的更多相关文章
- nim_duilib(12)之menu(2)
introduction 更多控件用法,请参考 here 和 源码. 本文将介绍menu的选项注册回调 before starting 本文的代码基于上一篇 stage1 回到项目demo_xml, ...
- 自动化安装smokeping-2.6.11脚本
自动化安装Smokeping-2.6.11脚本 一.目的 1.1 监控目的 为方便监测各数据中心网络状况,自定义全国各节点,从而发现网络异常,判断网络故障. 1.2 本文目的 快速部署Smokepin ...
- Python Tkinter Menu
本人想开发一个简易的搜图GUI,基于此,选择用Tkinter模块开发. 需要开发出菜单栏 1 from Tkinter import * 2 3 4 root = Tk() 5 root.title( ...
- Jquery学习笔记--性能优化建议
一.选择器性能优化建议 1. 总是从#id选择器来继承 这是jQuery选择器的一条黄金法则.jQuery选择一个元素最快的方法就是用ID来选择了. 1 $('#content').hide(); 或 ...
- 云盘WEB资料下载链接
入门三板斧:http://www.cnblogs.com/jikey/p/3613082.html 入门看这个:http://pan.baidu.com/s/1pJqJvAV 入门JS视频:http: ...
- 【转载】Linux系统启动流程
原文:Linux系统启动流程 POST(Power On Self Test/上电自检)-->BootLoader(MBR)-->Kernel(硬件探测.加载驱动.挂载根文件系统./sbi ...
- 课程设计(部分代码)之java版(记事本)
/* *java课程设计之记事本(coder @Gxjun) * 编写一个记事本程序 * 要求: * 用图形用户界面实现. * 能实现编辑.保存.另存为.查找替换等功能. * 提示:使用文件输入输出流 ...
- CentOS6.4安装Smokeping节点监控软件
Smokeping:它是rrdtool的作者制作的,在图形显示方面很漂亮,可以用来很好的检测网络状态和稳定性,下面简单说一下Smokeping的安装以及配置方法. 0.首先关闭selinux和防火墙 ...
- Android知识思维导图
注:图片来源于网络,谢谢分享. 一. 项目目录结构: 布局控件 ListVIew控件 Widget:(窗口小部件) Activity Manager 二. 应用程序的5个模块构成: Activit ...
随机推荐
- 端口TCP——简介
cmd命令:telnet 如果需要搭建外网可访问的网站,可以顺便勾选HTTP,HTTPS端口:
- 爬虫动态渲染页面爬取之Splash的介绍和使用
Splash是一个JavaScript渲染服务,是一个带有HTTP API的轻量级浏览器,同时它对接了Python中的Twisted和QT库.利用它,我们同样可以实现动态渲染页面的抓取. 1. 功能介 ...
- Identity Server 4 从入门到落地(七)—— 控制台客户端
前面的部分: Identity Server 4 从入门到落地(一)-- 从IdentityServer4.Admin开始 Identity Server 4 从入门到落地(二)-- 理解授权码模式 ...
- day05 连表查询与子查询
day05 连表查询与子查询 昨日内容回顾 表关系之一对一 换位思考之后得出两边都是不可以 要么是没有关系,要么是一对一 一对一的表关系外键虽然建在哪个都可以,但是建议建在查询频率多的表上 # 外键其 ...
- 数仓day01
1. 该项目适用哪些行业? 主营业务在线上进行的一些公司,比如外卖公司,各类app(比如:下厨房,头条,安居客,斗鱼,每日优鲜,淘宝网等等) 这类公司通常要针对用户的线上访问行为.消费行为.业务操作行 ...
- PS只能各个工具使用的注意知识点
1.图章工具 <仿制图章工具>使用方法:按住alt点击吸取干净的地方,然后松开alt键,按住鼠标左键拖动或左击 擦拭 图章区域放大缩小,是按住alt键+鼠标右键左右滑动 当图片中多个图 ...
- gitlab之数据备份恢复
备份#备份的时候,先通知相关人员服务要听 ,停止两个服务,并影响访问 root@ubuntu:/opt/web1# gitlab-ctl stop unicorn ok: down: unicorn: ...
- Can we access global variable if there is a local variable with same name?
In C, we cannot access a global variable if we have a local variable with same name, but it is possi ...
- ClassLoader.loadClass()与Class.forName()的区别《 转》
ClassLoader.loadClass()与Class.forName()区别: ClassLoader.loadClass()与Class.forName()大家都知道是反射用来构造类的方法,但 ...
- 利用Windbg分析Magicodes.IE一次错误编写导致内存剧增
由于这近一年时间一直忙于写书和工作,一直没有水文,但是近期有几位朋友使用我们的Magicodes.IE反馈在导出过程中内存暴涨...好吧,不管怎样,不能苦了我们朋友,接下来我们通过windbg来看一下 ...