
21个项目玩转深度学习:基于TensorFlow的实践详解02—CIFAR10图像识别
cifar10数据集
CIFAR-10 是由 Hinton 的学生 Alex Krizhevsky 和 Ilya Sutskever 整理的一个用于识别普适物体的小型数据集。一共包含 10 个类别的 RGB 彩色图片 :飞机( airplane )、汽车( automobile )、鸟类( bird )、猫( cat )、鹿( deer )、 狗( dog )、蛙类( frog )、马( horse )、船( ship )和卡车( truck )。图片的尺寸为 32 × 32 ,数据集中一共有 50000 张训练图片和 10000 张测试图片。本文训练过程可见官方示例:https://www.tensorflow.org/tutorials/images/deep_cnn
下载脚本内容如下:
# coding:utf-8

import tensorflow as tf

from six.moves import urllib

import os

import sys

import tarfile

# tf.app.flags.FLAGS是TensorFlow内部的一个全局变量存储器,同时可以用于命令行参数的处理

FLAGS = tf.app.flags.FLAGS

# 定义tf.app.flags.FLAGS.data_dir为CIFAR-10的数据路径

tf.app.flags.DEFINE_string('data_dir', '/tmp/cifar10_data', """Path to the CIFAR-10 data directory.""")

# 我们把这个路径改为cifar10_data

FLAGS.data_dir = 'cifar10_data/'

DATA_URL = 'http://www.cs.toronto.edu/~kriz/cifar-10-binary.tar.gz'

# 如果不存在数据文件,就会执行下载

def maybe_download_and_extract():

    """Download and extract the tarball from Alex's website."""

    dest_directory = FLAGS.data_dir

    if not os.path.exists(dest_directory):

        os.makedirs(dest_directory)

    filename = DATA_URL.split('/')[-1]

    filepath = os.path.join(dest_directory, filename)

    if not os.path.exists(filepath):

        def _progress(count, block_size, total_size):

            sys.stdout.write('\r>> Downloading %s %.1f%%' % (filename,float(count * block_size) / float(total_size) * 100.0))

            sys.stdout.flush()

        filepath, _ = urllib.request.urlretrieve(DATA_URL, filepath, _progress)

        print()

        statinfo = os.stat(filepath)

        print('Successfully downloaded', filename, statinfo.st_size, 'bytes.')

    extracted_dir_path = os.path.join(dest_directory, 'cifar-10-batches-bin')

    if not os.path.exists(extracted_dir_path):

        tarfile.open(filepath, 'r:gz').extractall(dest_directory)

if __name__=='__main__':

    maybe_download_and_extract()
 txt文本文件中存储了每个类别的英文名称,每个bin文件有1w张图像
数据读取
TensorFlow程序读取数据方式可查看官方中文文档:http://tensorfly.cn/tfdoc/how_tos/reading_data.html
一般情况是将数据读入内存,再交由GPU或CPU进行运算。假设读入用时0.1s ,计算用时 0.9s ,那么就意昧着每过1s, GPU 都会有0.1s无事可做,这大大降低了运算的效率。
解决方法: 将读入数据和计算分别放在两个线程中,将数据读入内存的一个队列
读取线程源源不断地将文件系统中的图片读入一个内存的队列中,而负责计算的是另一个线程,计算需要数据肘,直接从内存队列中取就可以了 。这样可以解决 GPU 因为 I/O而空闲的问题!
在机器学习中有个概念:epoch。一次epoch相当于将整个训练集中的图片计算一次,考虑到epoch的情况,在内存队列前添加了“文件名队列”
TensorFlow 使用“文件名队列+内存队列”双队列的形式读入文件 ,可以很好地管理 epoch 。
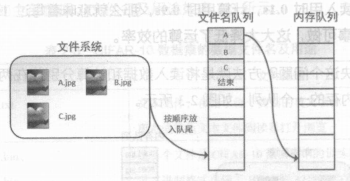 以A,B,C三张图片,epoch=1为例展示,内存队列会从文件名队列中取
- 文件名队列:tf.train.string_input_producer 传入文件列表[A.jpg, B.jpg, C.jpg],两个重要参数num_epochs(相当于epoch),shuffle(一个epoch进文件名队列是否打乱,默认为True)
- 内存队列:无须自己建立,使用reader对象从文件名队列中读取即可
- 真正执行:tf.train.start_ queue_runners 只有运行完此步,才会向文件名队列中装东西,启动填充队列的线程
测试代码如下:
# coding:utf-8

import os

if not os.path.exists('read'):

    os.makedirs('read/')

# 导入TensorFlow

import tensorflow as tf

# 新建一个Session

with tf.Session() as sess:

    # 我们要读三幅图片A.jpg, B.jpg, C.jpg

    filename = ['A.jpg', 'B.jpg', 'C.jpg']

    # string_input_producer会产生一个文件名队列

    filename_queue = tf.train.string_input_producer(filename, shuffle=False, num_epochs=5)

    # reader从文件名队列中读数据。对应的方法是reader.read

    reader = tf.WholeFileReader()

    key, value = reader.read(filename_queue)

    # tf.train.string_input_producer定义了一个epoch变量,要对它进行初始化

    tf.local_variables_initializer().run()

    # 使用start_queue_runners之后,才会开始填充队列

    threads = tf.train.start_queue_runners(sess=sess)

    i = 0

    while True:

        i += 1

        # 获取图片数据并保存

        image_data = sess.run(value)

        with open('read/test_%d.jpg' % i, 'wb') as f:

            f.write(image_data)

# 程序最后会抛出一个OutOfRangeError,这是epoch跑完,队列关闭的标志
运行结果:
2018-10-30 16:28:09.015742: I tensorflow/core/platform/cpu_feature_guard.cc:137] Your CPU supports instructions that this TensorFlow binary was not compiled to use: SSE4.1 SSE4.2 AVX AVX2 FMA

Traceback (most recent call last):  File "test.py", line 26, in <module>

    image_data = sess.run(value)

  File "/usr/lib/python2.7/site-packages/tensorflow/python/client/session.py", line 889, in run    run_metadata_ptr)

  File "/usr/lib/python2.7/site-packages/tensorflow/python/client/session.py", line 1120, in _run

    feed_dict_tensor, options, run_metadata)

  File "/usr/lib/python2.7/site-packages/tensorflow/python/client/session.py", line 1317, in _do_run

[root@node5 chapter_02]# python test.py

2018-10-30 16:28:27.836579: I tensorflow/core/platform/cpu_feature_guard.cc:137] Your CPU supports ins

tructions that this TensorFlow binary was not compiled to use: SSE4.1 SSE4.2 AVX AVX2 FMA

Traceback (most recent call last):  File "test.py", line 26, in <module>

    image_data = sess.run(value)  File "/usr/lib/python2.7/site-packages/tensorflow/python/client/session.py", line 889, in run

    run_metadata_ptr)

  File "/usr/lib/python2.7/site-packages/tensorflow/python/client/session.py", line 1120, in _run

    feed_dict_tensor, options, run_metadata)

  File "/usr/lib/python2.7/site-packages/tensorflow/python/client/session.py", line 1317, in _do_run

    options, run_metadata)

  File "/usr/lib/python2.7/site-packages/tensorflow/python/client/session.py", line 1336, in _do_call

    raise type(e)(node_def, op, message)tensorflow.python.framework.errors_impl.OutOfRangeError: FIFOQueue '_0_input_producer' is closed and h

as insufficient elements (requested 1, current size 0)

         [[Node: ReaderReadV2 = ReaderReadV2[_device="/job:localhost/replica:0/task:0/device:CPU:0"](WholeFileReaderV2, input_producer)]]

Caused by op u'ReaderReadV2', defined at:

  File "test.py", line 17, in <module>

    key, value = reader.read(filename_queue)

  File "/usr/lib/python2.7/site-packages/tensorflow/python/ops/io_ops.py", line 195, in read

    return gen_io_ops._reader_read_v2(self._reader_ref, queue_ref, name=name)

  File "/usr/lib/python2.7/site-packages/tensorflow/python/ops/gen_io_ops.py", line 673, in _reader_read_v2

    queue_handle=queue_handle, name=name)  File "/usr/lib/python2.7/site-packages/tensorflow/python/framework/op_def_library.py", line 787, in

_apply_op_helper

    op_def=op_def)

  File "/usr/lib/python2.7/site-packages/tensorflow/python/framework/ops.py", line 2956, in create_op

    op_def=op_def)

  File "/usr/lib/python2.7/site-packages/tensorflow/python/framework/ops.py", line 1470, in __init__

    self._traceback = self._graph._extract_stack()  # pylint: disable=protected-access

OutOfRangeError (see above for traceback): FIFOQueue '_0_input_producer' is closed and has insufficient elements (requested 1, current size 0)

         [[Node: ReaderReadV2 = ReaderReadV2[_device="/job:localhost/replica:0/task:0/device:CPU:0"](WholeFileReaderV2, input_producer)]]
保存为图片
一个样本由 3073 个字节组成,第一个字节为标签( label ),剩下 3072 个字节为图像数据。样本和样本之间没有多余的字节分割,因此这几个二进制文件的大小都是 30730000 字节 。
如何用 TensorFlow 读取 CIFAR-10 数据呢?
- 第一步,用 tf.train.string_input_producer 建立队列。
- 第二步,通过 reader.read 读数据。在之前例子中,一个文件就是一张图片,因此用的 reader 是 tf.WholeFileReader()。CIFAR-10 数据是以固定字节存在文件中的,一个文件中含有多个样本。因此不能使用 tf.WholeFileReader(),而是用 tf.FixedLengthRecordReader()。
- 第三步,调用 tf.train.start_queue_runners。
- 最后,通过 sess.run()取出图片结果。
#coding: utf-8

import tensorflow as tf

import os

import scipy.misc

# 从queue中读取文件

def read_cifar10(filename_queue):

    """Reads and parses examples from CIFAR10 data files.

    Recommendation: if you want N-way read parallelism, call this function

    N times.  This will give you N independent Readers reading different

    files & positions within those files, which will give better mixing of

    examples.

    Args:

        filename_queue: A queue of strings with the filenames to read from.

    Returns:

        An object representing a single example, with the following fields:

        height: number of rows in the result (32)

        width: number of columns in the result (32)

        depth: number of color channels in the result (3)

        key: a scalar string Tensor describing the filename & record number

            for this example.

        label: an int32 Tensor with the label in the range 0..9.

        uint8image: a [height, width, depth] uint8 Tensor with the image data

    """

    class CIFAR10Record(object):

        pass

    result = CIFAR10Record()

    label_bytes = 1  # 2 for CIFAR-100

    result.height = 32

    result.width = 32

    result.depth = 3

    image_bytes = result.height * result.width * result.depth

    # Every record consists of a label followed by the image, with a fixed number of bytes for each.

    record_bytes = label_bytes + image_bytes

    # Read a record, getting filenames from the filename_queue.
   # No header or footer in the CIFAR-10 format, so we leave header_bytes and footer_bytes at their default of 0.

    reader = tf.FixedLengthRecordReader(record_bytes=record_bytes)

    result.key, value = reader.read(filename_queue)

    # Convert from a string to a vector of uint8 that is record_bytes long.

    record_bytes = tf.decode_raw(value, tf.uint8)

    # The first bytes represent the label, which we convert from uint8->int32.

    result.label = tf.cast(tf.strided_slice(record_bytes, [0], [label_bytes]), tf.int32)

    # The remaining bytes after the label represent the image, which we reshape

    # from [depth * height * width] to [depth, height, width].

    depth_major = tf.reshape(tf.strided_slice(record_bytes, [label_bytes],[label_bytes + image_bytes]),

                             [result.depth, result.height, result.width])

    # Convert from [depth, height, width] to [height, width, depth].

    result.uint8image = tf.transpose(depth_major, [1, 2, 0])

    return result

def inputs_origin(data_dir):

    # filenames一共5个,从data_batch_1.bin到data_batch_5.bin

    # 读入的都是训练图像

    filenames = [os.path.join(data_dir, 'data_batch_%d.bin' % i) for i in xrange(1, 6)]

    # 判断文件是否存在

    for f in filenames:

        if not tf.gfile.Exists(f):

            raise ValueError('Failed to find file: ' + f)

    # 将文件名的list包装成TensorFlow中queue的形式

    filename_queue = tf.train.string_input_producer(filenames)

    # 返回的结果read_input的属性uint8image就是图像的Tensor

    read_input = read_cifar10(filename_queue)

    # 将图片转换为实数形式

    reshaped_image = tf.cast(read_input.uint8image, tf.float32)

    # 返回的reshaped_image是一张图片的tensor

    # 我们应当这样理解reshaped_image:每次使用sess.run(reshaped_image),就会取出一张图片

    return reshaped_image

if __name__ == '__main__':

    # 创建一个会话sess,

    # 为什么不能用with tf.Session() as sess, 解答https://blog.csdn.net/chengqiuming/article/details/80293220

    sess = tf.Session()

    # 调用inputs_origin。cifar10_data/cifar-10-batches-bin是我们下载的数据的文件夹位置

    reshaped_image = inputs_origin('cifar10_data/cifar-10-batches-bin')

    # 这一步start_queue_runner很重要。

    # 我们之前有filename_queue = tf.train.string_input_producer(filenames)

    # 这个queue必须通过start_queue_runners才能启动    缺少start_queue_runners程序将不能执行

    threads = tf.train.start_queue_runners(sess=sess)

    # 变量初始化

    sess.run(tf.global_variables_initializer())

    # 创建文件夹cifar10_data/raw/

    if not os.path.exists('cifar10_data/raw/'):

        os.makedirs('cifar10_data/raw/')

    # 保存30张图片

    for i in range(30):

        # 每次sess.run(reshaped_image),都会取出一张图片

        image_array = sess.run(reshaped_image)

        # 将图片保存

        scipy.misc.toimage(image_array).save('cifar10_data/raw/%d.jpg' % i)
数据增强
对于图像类型的训练、数据,所谓的数据增强( Data Augmentation )方法是指利用平移 、 缩放、颜色等变躁,人工增大训练集样本的个数,从而获得更充足的训练数据,使模型训练的效果更好 。
常用的图像数据增强的方法如下。
- 平移 :将图像在一定尺度范围内平移。
- 旋转:将图像在一定角度范围内旋转。
- 翻转 :水平翻转或上下翻转图像。
- 裁剪 :在原有图像上裁剪出一块。
- 缩放 :将图像在一定尺度内放大或缩小。
- 颜色变换:对图像的 RGB 颜色空间进行一些变换。
- 噪声扰动:给图像加入一些人工生成的噪声。
使用数据增强方法的前提是,这些数据增强方法不会改变图像的原有标签。
  # 随机剪裁图片,从32*32到24*24

  distorted_image = tf.random_crop(reshaped_image, [height, width, 3])

  # 随机翻转图片,每张图片有50%的概率被水平左右翻转,另有50%的概率保持不变

  distorted_image = tf.image.random_flip_left_right(distorted_image)

  # 随机改变亮度和对比度

  distorted_image = tf.image.random_brightness(distorted_image, max_delta=63)

  distorted_image = tf.image.random_contrast(distorted_image,lower=0.2, upper=1.8)
原始的训练图片是 reshaped_image。最后会得到一个数据增强后的训练样本 distorted_image 。训练时,直接使用 distorted_image 进行训练即可。
训练
代码逻辑如下:
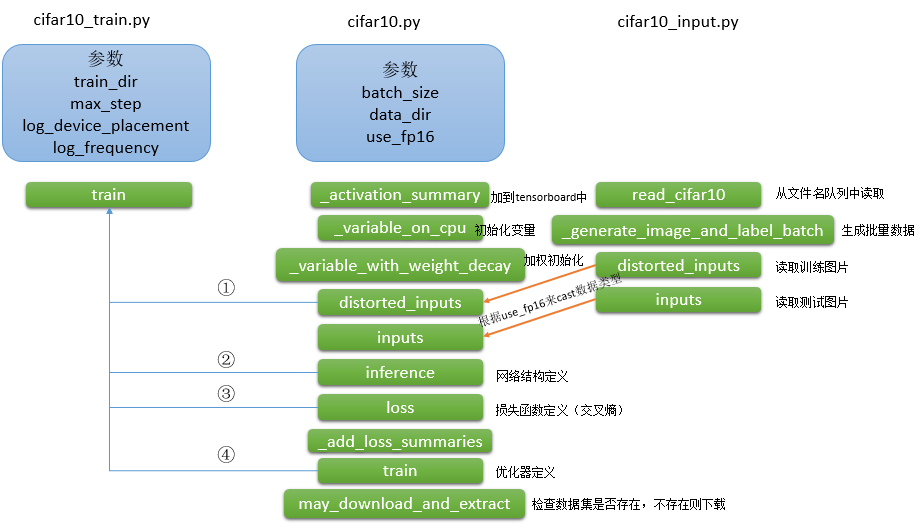
cifar10_input.py
该文件中包含三个和训练过程相关的函数: read_cifar10, _generate_image_and_label_batch, distorted_inputs三个函数,下面依次来看函数的实现
文件头的定义
#encoding=utf-8

from __future__ import absolute_import

from __future__ import division

from __future__ import print_function

import os

from six.moves import xrange  # pylint: disable=redefined-builtin

import tensorflow as tf

# 注意此处不是原图的size 32*32,因为后续会做剪裁,如果修改了此值,整个模型架构会被改变需要重新训练整个模型

IMAGE_SIZE = 24

# 全局常量

NUM_CLASSES = 10

NUM_EXAMPLES_PER_EPOCH_FOR_TRAIN = 50000

NUM_EXAMPLES_PER_EPOCH_FOR_EVAL = 10000
read_cifar10
从文件名队列中取图片,一次运行取到一张
def read_cifar10(filename_queue):

    '''

    从文件名队列中按字节读取图像数据

    返回值:一个对象 height,width,depth,key(filename),label(an int32 Tensor),uint8image(a [height, width, depth] uint8 Tensor with the image data)

    建议:if you want N-way read parallelism, call this function N times. This will give you N independent Readers reading different

          files & positions within those files, which will give better mixing of examples.

    '''

    class CIFAR10Record(object):

        pass

    result = CIFAR10Record()

    # CIFAR-10数据集中图片的各维. 详情见 http://www.cs.toronto.edu/~kriz/cifar.html

    label_bytes = 1  # 2 for CIFAR-100

    result.height = 32

    result.width = 32

    result.depth = 3

    image_bytes = result.height * result.width * result.depth

    # 每条记录的构成是<label><image>

    record_bytes = label_bytes + image_bytes

    # 读取固定字节的内容,key是文件名,value中包含label和image

    reader = tf.FixedLengthRecordReader(record_bytes=record_bytes)

    result.key, value = reader.read(filename_queue)

    # 编码转换 Convert from a string to a vector of uint8 that is record_bytes long.

    record_bytes = tf.decode_raw(value, tf.uint8)

    # 第一个/第二个字节表示label, 并做转换 uint8->int32.

    result.label = tf.cast(tf.strided_slice(record_bytes, [0], [label_bytes]), tf.int32)

    # 标签字节后面是图像相关字节[depth * height * width]重塑成[depth, height, width].

    depth_major = tf.reshape(tf.strided_slice(record_bytes, [label_bytes], [label_bytes + image_bytes]), [result.depth, result.height, result.width])

    # 转置 Convert from [depth, height, width] to [height, width, depth].

    result.uint8image = tf.transpose(depth_major, [1, 2, 0])

    return result
涉及不熟悉的tf操作:
- tf.decode_raw:https://blog.csdn.net/u012571510/article/details/82112452
- tf.strided_slice:https://blog.csdn.net/banana1006034246/article/details/75092388
_generate_image_and_label_batch
生成批次的训练数据
def _generate_image_and_label_batch(image, label, min_queue_examples, batch_size, shuffle):

    """

    生成一个batch的数据

    Args:

        image: 3-D Tensor of [height, width, 3] of type.float32.

        label: 1-D Tensor of type.int32

        min_queue_examples: int32, minimum number of samples to retain in the queue that provides of batches of examples.

        batch_size: 每批次数据数目

        shuffle: 是否打乱

    Returns:

        images: Images. 4D tensor of [batch_size, height, width, 3] size.

        labels: Labels. 1D tensor of [batch_size] size.

    """

    # Create a queue that shuffles the examples, and then read 'batch_size' images + labels from the example queue.

    num_preprocess_threads = 16

    if shuffle:

        images, label_batch = tf.train.shuffle_batch(

                [image, label], batch_size=batch_size,

                num_threads=num_preprocess_threads,

                capacity=min_queue_examples + 3 * batch_size,

                min_after_dequeue=min_queue_examples)

    else:

        images, label_batch = tf.train.batch(

                [image, label], batch_size=batch_size,

                num_threads=num_preprocess_threads,

                capacity=min_queue_examples + 3 * batch_size)

    # Display the training images in the visualizer.

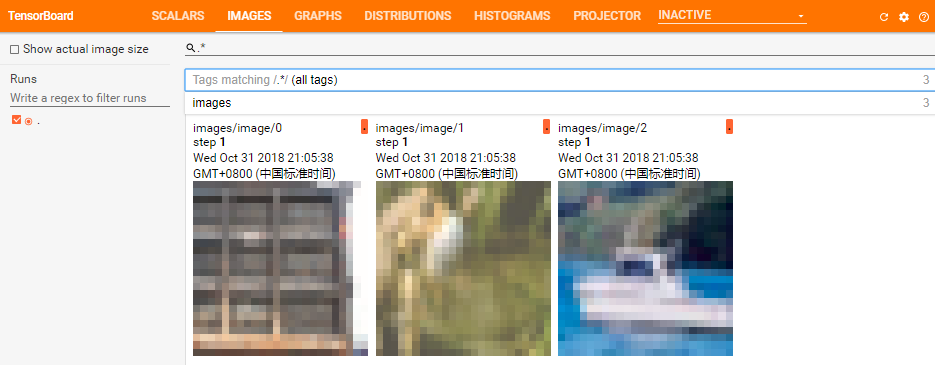
    tf.summary.image('images', images)

    return images, tf.reshape(label_batch, [batch_size])
涉及不熟悉的tf操作:
- tf.train.batch && tf.train.shuffle_batch:https://blog.csdn.net/ying86615791/article/details/73864381
- tf.summary.image:https://www.tensorflow.org/api_docs/python/tf/summary/image
效果如下:
distorted_inputs
利用上面两个函数生成要训练的数据
def distorted_inputs(data_dir, batch_size):

    '''

    调用read_cifar10读取图片并做数据增强,继而调用_generate_image_and_label_batch产生一个batch的数据

    返回值:

        images: Images. 4D tensor of [batch_size, IMAGE_SIZE, IMAGE_SIZE, 3] size.

        labels: Labels. 1D tensor of [batch_size] size.

    '''

    filenames = [os.path.join(data_dir, 'data_batch_%d.bin' % i) for i in xrange(1, 6)]

    for f in filenames:

        if not tf.gfile.Exists(f):

            raise ValueError('Failed to find file: ' + f)

    # 文件名队列

    filename_queue = tf.train.string_input_producer(filenames)

    # 从文件名队列中读取图片

    read_input = read_cifar10(filename_queue)

    reshaped_image = tf.cast(read_input.uint8image, tf.float32)

    height = IMAGE_SIZE

    width = IMAGE_SIZE

    # 数据增强

    distorted_image = tf.random_crop(reshaped_image, [height, width, 3])

    distorted_image = tf.image.random_flip_left_right(distorted_image)

    distorted_image = tf.image.random_brightness(distorted_image, max_delta=63)

    distorted_image = tf.image.random_contrast(distorted_image, lower=0.2, upper=1.8)

    # Subtract off the mean and divide by the variance of the pixels.

    float_image = tf.image.per_image_standardization(distorted_image)

    # Set the shapes of tensors.

    float_image.set_shape([height, width, 3])

    read_input.label.set_shape([1])

    # Ensure that the random shuffling has good mixing properties.

    min_fraction_of_examples_in_queue = 0.4

    min_queue_examples = int(NUM_EXAMPLES_PER_EPOCH_FOR_TRAIN * min_fraction_of_examples_in_queue)

    print('Filling queue with %d CIFAR images before starting to train. % min_queue_examples)

    # Generate a batch of images and labels by building up a queue of examples.

    return _generate_image_and_label_batch(float_image, read_input.label, min_queue_examples, batch_size, shuffle=True)
- tf.gfile:https://www.tensorflow.org/api_docs/python/tf/gfile https://zhuanlan.zhihu.com/p/31536538
- tf.image.per_image_standardization:https://www.tensorflow.org/api_docs/python/tf/image/per_image_standardization
cifar10_train.py
知道cifar10.py是真正的训练网络实现文件,先来看cifar10_train.py的调用,再进而学习每个步骤是如何实现的。
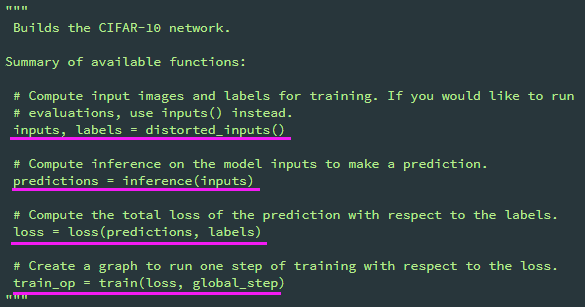
完整代码:
from __future__ import absolute_import

from __future__ import division

from __future__ import print_function

from datetime import datetime

import time

import tensorflow as tf

import cifar10

# tf.app.flags.FLAGS 是 TensorFlow 内部的一个全局变量存储器,同时可以用于命令行参数的处理

FLAGS = tf.app.flags.FLAGS

tf.app.flags.DEFINE_string('train_dir', '/tmp/cifar10_train', "Directory where to write event logs and checkpoint.")

tf.app.flags.DEFINE_integer('max_steps', 100000, "Number of batches to run.")

tf.app.flags.DEFINE_boolean('log_device_placement', False, "Whether to log device placement.")

tf.app.flags.DEFINE_integer('log_frequency', 100, "How often to log results to the console.")

def train():

    """Train CIFAR-10 for a number of steps."""

    with tf.Graph().as_default():

        global_step = tf.contrib.framework.get_or_create_global_step()

        # Get images and labels for CIFAR-10.

        images, labels = cifar10.distorted_inputs()

        # Build a Graph that computes the logits predictions from the inference model.

        logits = cifar10.inference(images)

        # Calculate loss.

        loss = cifar10.loss(logits, labels)

        # Build a Graph that trains the model with one batch of examples and updates the model parameters.

        train_op = cifar10.train(loss, global_step)

        class _LoggerHook(tf.train.SessionRunHook):

            """记录损失loss和运行时间"""

            def begin(self):

              self._step = -1

              self._start_time = time.time()

            def before_run(self, run_context):

              self._step += 1

              return tf.train.SessionRunArgs(loss)  # Asks for loss value.

            def after_run(self, run_context, run_values):

                if self._step % FLAGS.log_frequency == 0:

                    current_time = time.time()

                    duration = current_time - self._start_time

                    self._start_time = current_time

                    loss_value = run_values.results

                    examples_per_sec = FLAGS.log_frequency * FLAGS.batch_size / duration

                    sec_per_batch = float(duration / FLAGS.log_frequency)

                    format_str = ('%s: step %d, loss = %.2f (%.1f examples/sec; %.3f sec/batch)')

                    print(format_str % (datetime.now(), self._step, loss_value, examples_per_sec, sec_per_batch))

    with tf.train.MonitoredTrainingSession(

        checkpoint_dir=FLAGS.train_dir,

        hooks=[tf.train.StopAtStepHook(last_step=FLAGS.max_steps),

               tf.train.NanTensorHook(loss),

               _LoggerHook()],

        config=tf.ConfigProto(log_device_placement=FLAGS.log_device_placement)) as mon_sess:

        while not mon_sess.should_stop():

            mon_sess.run(train_op)

def main(argv=None):  # pylint: disable=unused-argument

    cifar10.maybe_download_and_extract()

    if tf.gfile.Exists(FLAGS.train_dir):

        tf.gfile.DeleteRecursively(FLAGS.train_dir)

    tf.gfile.MakeDirs(FLAGS.train_dir)

    train()

if __name__ == '__main__':

    tf.app.run()
cifar10_train.py
- tf.train.MonitoredTrainingSession:https://www.tensorflow.org/api_docs/python/tf/train/MonitoredTrainingSession
- tf.train.SessionRunHook:https://www.tensorflow.org/api_docs/python/tf/train/SessionRunHook
cifar10.py
该文件是关键,他实现了整个网络架构
#encoding=utf-8

# pylint: disable=missing-docstring

from __future__ import absolute_import

from __future__ import division

from __future__ import print_function

import os

import re

import sys

import tarfile

from six.moves import urllib

import tensorflow as tf

import cifar10_input

FLAGS = tf.app.flags.FLAGS

# Basic model parameters.

tf.app.flags.DEFINE_integer('batch_size', 128, "Number of images to process in a batch.")

tf.app.flags.DEFINE_string('data_dir', '/tmp/cifar10_data', "Path to the CIFAR-10 data directory.")

tf.app.flags.DEFINE_boolean('use_fp16', False, "Train the model using fp16.")

# Global constants describing the CIFAR-10 data set.

IMAGE_SIZE = cifar10_input.IMAGE_SIZE

NUM_CLASSES = cifar10_input.NUM_CLASSES

NUM_EXAMPLES_PER_EPOCH_FOR_TRAIN = cifar10_input.NUM_EXAMPLES_PER_EPOCH_FOR_TRAIN

NUM_EXAMPLES_PER_EPOCH_FOR_EVAL = cifar10_input.NUM_EXAMPLES_PER_EPOCH_FOR_EVAL

# Constants describing the training process.

MOVING_AVERAGE_DECAY = 0.9999     # The decay to use for the moving average.

NUM_EPOCHS_PER_DECAY = 350.0      # Epochs after which learning rate decays.

LEARNING_RATE_DECAY_FACTOR = 0.1  # Learning rate decay factor.

INITIAL_LEARNING_RATE = 0.1       # Initial learning rate.

# If a model is trained with multiple GPUs, prefix all Op names with tower_name

# to differentiate the operations. Note that this prefix is removed from the

# names of the summaries when visualizing a model.

TOWER_NAME = 'tower'

DATA_URL = 'http://www.cs.toronto.edu/~kriz/cifar-10-binary.tar.gz'
文件头
一些辅助函数:
def _activation_summary(x):

    """Helper to create summaries for activations.

    Creates a summary that provides a histogram of activations.

    Creates a summary that measures the sparsity of activations.

    Args:

        x: Tensor

    """

    # Remove 'tower_[0-9]/' from the name in case this is a multi-GPU training session.

    # This helps the clarity of presentation on tensorboard.

    tensor_name = re.sub('%s_[0-9]*/' % TOWER_NAME, '', x.op.name)

    tf.summary.histogram(tensor_name + '/activations', x)

    tf.summary.scalar(tensor_name + '/sparsity', tf.nn.zero_fraction(x))
在tensorboard中添加纪录(_activation_summary)
def _variable_on_cpu(name, shape, initializer):

    """Helper to create a Variable stored on CPU memory.

    Args:

      name: name of the variable

      shape: list of ints

      initializer: initializer for Variable

    Returns:

      Variable Tensor

    """

    with tf.device('/cpu:0'):

        dtype = tf.float16 if FLAGS.use_fp16 else tf.float32

        var = tf.get_variable(name, shape, initializer=initializer, dtype=dtype)

    return var
cpu上建立变量(_variable_on_cpu)
def _variable_with_weight_decay(name, shape, stddev, wd):

    """Helper to create an initialized Variable with weight decay.

    Note that the Variable is initialized with a truncated normal distribution.

    A weight decay is added only if one is specified.

    Args:

      name: name of the variable

      shape: list of ints

      stddev: standard deviation of a truncated Gaussian

      wd: add L2Loss weight decay multiplied by this float. If None, weight

        decay is not added for this Variable.

    Returns:

      Variable Tensor

    """

    dtype = tf.float16 if FLAGS.use_fp16 else tf.float32

    var = _variable_on_cpu(name,shape, tf.truncated_normal_initializer(stddev=stddev, dtype=dtype))

    if wd is not None:

        weight_decay = tf.multiply(tf.nn.l2_loss(var), wd, name='weight_loss')

        tf.add_to_collection('losses', weight_decay)

    return var
创建带权重衰减的初始化变量(_variable_with_weight_decay)
def maybe_download_and_extract():

    """Download and extract the tarball from Alex's website."""

    dest_directory = FLAGS.data_dir

    if not os.path.exists(dest_directory):

        os.makedirs(dest_directory)

    filename = DATA_URL.split('/')[-1]

    filepath = os.path.join(dest_directory, filename)

    if not os.path.exists(filepath):

        def _progress(count, block_size, total_size):

            sys.stdout.write('\r>> Downloading %s %.1f%%' % (filename,

          float(count * block_size) / float(total_size) * 100.0))

            sys.stdout.flush()

        filepath, _ = urllib.request.urlretrieve(DATA_URL, filepath, _progress)

        print()

        statinfo = os.stat(filepath)

        print('Successfully downloaded', filename, statinfo.st_size, 'bytes.')

    extracted_dir_path = os.path.join(dest_directory, 'cifar-10-batches-bin')

    if not os.path.exists(extracted_dir_path):

        tarfile.open(filepath, 'r:gz').extractall(dest_directory)
检查数据是否存在 maybe_download_and_extract
- tf.get_variable()和tf.Variable()的区别:https://blog.csdn.net/u012223913/article/details/78533910?locationNum=8&fps=1
distorted_inputs
把cifar10_input.py中distorted_inputs函数添加了一层,根据配置参数use_fp16决定是否采用float16的数据类型进行计算
def distorted_inputs():

    """Construct distorted input for CIFAR training using the Reader ops.

    Returns:

        images: Images. 4D tensor of [batch_size, IMAGE_SIZE, IMAGE_SIZE, 3] size.

        labels: Labels. 1D tensor of [batch_size] size.

    Raises:

        ValueError: If no data_dir

    """

    if not FLAGS.data_dir:

        raise ValueError('Please supply a data_dir')

    data_dir = os.path.join(FLAGS.data_dir, 'cifar-10-batches-bin')

    images, labels = cifar10_input.distorted_inputs(data_dir=data_dir, batch_size=FLAGS.batch_size)

    if FLAGS.use_fp16:

        images = tf.cast(images, tf.float16)

        labels = tf.cast(labels, tf.float16)

    return images, labels
distorted_inputs
inference
def inference(images):

    """Build the CIFAR-10 model.

    Args:

        images: Images returned from distorted_inputs() or inputs().

    Returns:

        Logits.

    """

    # We instantiate all variables using tf.get_variable() instead of tf.Variable() in order to share variables across multiple GPU training runs.

    # If we only ran this model on a single GPU, we could simplify this function by replacing all instances of tf.get_variable() with tf.Variable().

    # 卷积层

    with tf.variable_scope('conv1') as scope:

        kernel = _variable_with_weight_decay('weights', shape=[5, 5, 3, 64], stddev=5e-2, wd=0.0)

        conv = tf.nn.conv2d(images, kernel, [1, 1, 1, 1], padding='SAME')

        biases = _variable_on_cpu('biases', [64], tf.constant_initializer(0.0))

        pre_activation = tf.nn.bias_add(conv, biases)

        conv1 = tf.nn.relu(pre_activation, name=scope.name)

        _activation_summary(conv1)

    pool1 = tf.nn.max_pool(conv1, ksize=[1, 3, 3, 1], strides=[1, 2, 2, 1], padding='SAME', name='pool1')

    # 这是局部响应归一化层(LRN),现在的模型大多不采用

    norm1 = tf.nn.lrn(pool1, 4, bias=1.0, alpha=0.001 / 9.0, beta=0.75, name='norm1')

    with tf.variable_scope('conv2') as scope:

        kernel = _variable_with_weight_decay('weights', shape=[5, 5, 64, 64], stddev=5e-2, wd=0.0)

        conv = tf.nn.conv2d(norm1, kernel, [1, 1, 1, 1], padding='SAME')

        biases = _variable_on_cpu('biases', [64], tf.constant_initializer(0.1))

        pre_activation = tf.nn.bias_add(conv, biases)

        conv2 = tf.nn.relu(pre_activation, name=scope.name)

        _activation_summary(conv2)

    norm2 = tf.nn.lrn(conv2, 4, bias=1.0, alpha=0.001 / 9.0, beta=0.75, name='norm2')

    pool2 = tf.nn.max_pool(norm2, ksize=[1, 3, 3, 1], strides=[1, 2, 2, 1], padding='SAME', name='pool2')

    # 全连接层

    with tf.variable_scope('local3') as scope:

        # 后面不再做卷积了,所以把pool2进行reshape,方便做全连接

        reshape = tf.reshape(pool2, [FLAGS.batch_size, -1])

        dim = reshape.get_shape()[1].value

        weights = _variable_with_weight_decay('weights', shape=[dim, 384], stddev=0.04, wd=0.004)

        biases = _variable_on_cpu('biases', [384], tf.constant_initializer(0.1))

        local3 = tf.nn.relu(tf.matmul(reshape, weights) + biases, name=scope.name)

        _activation_summary(local3)

    with tf.variable_scope('local4') as scope:

        weights = _variable_with_weight_decay('weights', shape=[384, 192], stddev=0.04, wd=0.004)

        biases = _variable_on_cpu('biases', [192], tf.constant_initializer(0.1))

        local4 = tf.nn.relu(tf.matmul(local3, weights) + biases, name=scope.name)

        _activation_summary(local4)

    # 这里不显示i进行softmax变换,只输出变换前的Logit(即变量softmax_linear)

    # tf.nn.sparse_softmax_cross_entropy_with_logits accepts the unscaled logits and performs the softmax internally for efficiency.

    with tf.variable_scope('softmax_linear') as scope:

        weights = _variable_with_weight_decay('weights', [192, NUM_CLASSES], stddev=1/192.0, wd=0.0)

        biases = _variable_on_cpu('biases', [NUM_CLASSES], tf.constant_initializer(0.0))

        softmax_linear = tf.add(tf.matmul(local4, weights), biases, name=scope.name)

        _activation_summary(softmax_linear)

    return softmax_linear
模型主干
两层卷积,三层全连接
loss
def loss(logits, labels):

    """Add L2Loss to all the trainable variables. Add summary for "Loss" and "Loss/avg".

    Args:

        logits: Logits from inference().

        labels: Labels from distorted_inputs or inputs(). 1-D tensor of shape [batch_size]

    Returns:

        Loss tensor of type float.

  """

    # Calculate the average cross entropy loss across the batch.

    labels = tf.cast(labels, tf.int64)

    cross_entropy = tf.nn.sparse_softmax_cross_entropy_with_logits(

      labels=labels, logits=logits, name='cross_entropy_per_example')

    cross_entropy_mean = tf.reduce_mean(cross_entropy, name='cross_entropy')

    tf.add_to_collection('losses', cross_entropy_mean)

    # The total loss is defined as the cross entropy loss plus all of the weight decay terms (L2 loss).

    return tf.add_n(tf.get_collection('losses'), name='total_loss')
带L2损失的loss
def _add_loss_summaries(total_loss):

    """Add summaries for losses in CIFAR-10 model.

    Generates moving average for all losses and associated summaries for visualizing the performance of the network.

    Args:

        total_loss: Total loss from loss().

    Returns:

        loss_averages_op: op for generating moving averages of losses.

    """

    # Compute the moving average of all individual losses and the total loss.

    loss_averages = tf.train.ExponentialMovingAverage(0.9, name='avg')

    losses = tf.get_collection('losses')

    loss_averages_op = loss_averages.apply(losses + [total_loss])

    # Attach a scalar summary to all individual losses and the total loss; do the same for the averaged version of the losses.

    for l in losses + [total_loss]:

        # Name each loss as '(raw)' and name the moving average version of the loss as the original loss name.

        tf.summary.scalar(l.op.name + ' (raw)', l)

        tf.summary.scalar(l.op.name, loss_averages.average(l))

    return loss_averages_op
记录loss到tensorboard
train
def train(total_loss, global_step):

    """Train CIFAR-10 model.

    Create an optimizer and apply to all trainable variables. Add moving average for all trainable variables.

    Args:

        total_loss: Total loss from loss().

        global_step: Integer Variable counting the number of training steps processed.

    Returns:

        train_op: op for training.

    """

    # Variables that affect learning rate.

    num_batches_per_epoch = NUM_EXAMPLES_PER_EPOCH_FOR_TRAIN / FLAGS.batch_size

    decay_steps = int(num_batches_per_epoch * NUM_EPOCHS_PER_DECAY)

    # Decay the learning rate exponentially based on the number of steps.

    lr = tf.train.exponential_decay(INITIAL_LEARNING_RATE,

                                  global_step,

                                  decay_steps,

                                  LEARNING_RATE_DECAY_FACTOR,

                                  staircase=True)

    tf.summary.scalar('learning_rate', lr)

    # Generate moving averages of all losses and associated summaries.

    loss_averages_op = _add_loss_summaries(total_loss)

    # Compute gradients.

    with tf.control_dependencies([loss_averages_op]):

        opt = tf.train.GradientDescentOptimizer(lr)

        grads = opt.compute_gradients(total_loss)

    # Apply gradients.

    apply_gradient_op = opt.apply_gradients(grads, global_step=global_step)

    # Add histograms for trainable variables.

    for var in tf.trainable_variables():

        tf.summary.histogram(var.op.name, var)

    # Add histograms for gradients.

    for grad, var in grads:

        if grad is not None:

            tf.summary.histogram(var.op.name + '/gradients', grad)

    # Track the moving averages of all trainable variables.

    variable_averages = tf.train.ExponentialMovingAverage(MOVING_AVERAGE_DECAY, global_step)

    variables_averages_op = variable_averages.apply(tf.trainable_variables())

    with tf.control_dependencies([apply_gradient_op, variables_averages_op]):

        train_op = tf.no_op(name='train')

    return train_op
优化器
- tf.train.exponential_decay:https://www.jianshu.com/p/f9f66a89f6ba
- tf.control_dependencies:https://www.tensorflow.org/api_docs/python/tf/control_dependencies
- tf.train.ExponentialMovingAverage:https://www.tensorflow.org/api_docs/python/tf/train/ExponentialMovingAverage
以上是训练过程代码的学习,执行python cifar10_train.py --train_dir cifar10_train/ --data_dir cifar10_data/即可运行,运行tensorboard --logdir cifar10_train/即可在tensorboard中查看训练进度
我是100K steps (256 epochs of data) 训练的,差不多花了3.5h
测试
from __future__ import absolute_import

from __future__ import division

from __future__ import print_function

from datetime import datetime

import math

import time

import numpy as np

import tensorflow as tf

import cifar10

FLAGS = tf.app.flags.FLAGS

tf.app.flags.DEFINE_string('eval_dir', '/tmp/cifar10_eval', "Directory where to write event logs.")

tf.app.flags.DEFINE_string('eval_data', 'test', "Either 'test' or 'train_eval'.")

tf.app.flags.DEFINE_string('checkpoint_dir', '/tmp/cifar10_train', "Directory where to read model checkpoints.")

tf.app.flags.DEFINE_integer('eval_interval_secs', 60 * 5, "How often to run the eval.")

tf.app.flags.DEFINE_integer('num_examples', 10000, "Number of examples to run.")

tf.app.flags.DEFINE_boolean('run_once', False, "Whether to run eval only once.")

def eval_once(saver, summary_writer, top_k_op, summary_op):

    """Run Eval once.

    Args:

        saver: Saver.

        summary_writer: Summary writer.

        top_k_op: Top K op.

        summary_op: Summary op.

    """

    with tf.Session() as sess:

        ckpt = tf.train.get_checkpoint_state(FLAGS.checkpoint_dir)

        if ckpt and ckpt.model_checkpoint_path:

            # Restores from checkpoint

            saver.restore(sess, ckpt.model_checkpoint_path)

            # Assuming model_checkpoint_path looks something like: /my-favorite-path/cifar10_train/model.ckpt-0

            #extract global_step from it.

            global_step = ckpt.model_checkpoint_path.split('/')[-1].split('-')[-1]

        else:

            print('No checkpoint file found')

            return

        # Start the queue runners.

        coord = tf.train.Coordinator()

        try:

            threads = []

            for qr in tf.get_collection(tf.GraphKeys.QUEUE_RUNNERS):

                threads.extend(qr.create_threads(sess, coord=coord, daemon=True, start=True))

            num_iter = int(math.ceil(FLAGS.num_examples / FLAGS.batch_size))

            true_count = 0  # Counts the number of correct predictions.

            total_sample_count = num_iter * FLAGS.batch_size

            step = 0

            while step < num_iter and not coord.should_stop():

                predictions = sess.run([top_k_op])

                true_count += np.sum(predictions)

                step += 1

            # Compute precision @ 1.

            precision = true_count / total_sample_count

            print('%s: precision @ 1 = %.3f' % (datetime.now(), precision))

            summary = tf.Summary()

            summary.ParseFromString(sess.run(summary_op))

            summary.value.add(tag='Precision @ 1', simple_value=precision)

            summary_writer.add_summary(summary, global_step)

        except Exception as e:  # pylint: disable=broad-except

            coord.request_stop(e)

        coord.request_stop()

        coord.join(threads, stop_grace_period_secs=10)

def evaluate():

    """Eval CIFAR-10 for a number of steps."""

    with tf.Graph().as_default() as g:

        # Get images and labels for CIFAR-10.

        eval_data = FLAGS.eval_data == 'test'

        images, labels = cifar10.inputs(eval_data=eval_data)

        # Build a Graph that computes the logits predictions from the

        # inference model.

        logits = cifar10.inference(images)

        # Calculate predictions.

        top_k_op = tf.nn.in_top_k(logits, labels, 1)

        # Restore the moving average version of the learned variables for eval.

        variable_averages = tf.train.ExponentialMovingAverage(cifar10.MOVING_AVERAGE_DECAY)

        variables_to_restore = variable_averages.variables_to_restore()

        saver = tf.train.Saver(variables_to_restore)

        # Build the summary operation based on the TF collection of Summaries.

        summary_op = tf.summary.merge_all()

        summary_writer = tf.summary.FileWriter(FLAGS.eval_dir, g)

        while True:

            eval_once(saver, summary_writer, top_k_op, summary_op)

            if FLAGS.run_once:

                break

            time.sleep(FLAGS.eval_interval_secs)

def main(argv=None):  # pylint: disable=unused-argument

    cifar10.maybe_download_and_extract()

    if tf.gfile.Exists(FLAGS.eval_dir):

        tf.gfile.DeleteRecursively(FLAGS.eval_dir)

    tf.gfile.MakeDirs(FLAGS.eval_dir)

    evaluate()

if __name__ == '__main__':

    tf.app.run()
cifar_eval.py
运行命令:python cifar10_eval.py --data_dir cifar10_data/ --eval_dir cifar10_eval/ --checkpoint_dir cifar10_train/
可以通过tensorboard看:tensorboard --logdir cifar10_eval/ --port 6007
为什么测试的时候要再开一个tensorboard,可以根据步数观察测试效果。训练和测试同时进行,测试会去读取模型文件中最新的模型,实际上到 6 万步左右时,模型就有了 86%的准确率,到10万步时的准确率为 86.3%,到15万步后的准确率基本稳定在 86.6%左右。
多GPU训练
暂缓。。。。。。先把第三章的训练先学了,工作需要!!!再学习下tf操作的summary,衰减梯度下降部分函数。。。。。sad
21个项目玩转深度学习:基于TensorFlow的实践详解02—CIFAR10图像识别的更多相关文章
- 21个项目玩转深度学习:基于TensorFlow的实践详解03—打造自己的图像识别模型
书籍源码:https://github.com/hzy46/Deep-Learning-21-Examples CNN的发展已经很多了,ImageNet引发的一系列方法,LeNet,GoogLeNet ...
- 21个项目玩转深度学习:基于TensorFlow的实践详解01—MNIST机器学习入门
数据集 由Yann Le Cun建立,训练集55000,验证集5000,测试集10000,图片大小均为28*28 下载 # coding:utf-8 # 从tensorflow.examples.tu ...
- 21个项目玩转深度学习:基于TensorFlow的实践详解06—人脸检测和识别——项目集锦
摘自:https://github.com/azuredsky/mtcnn-2 mtcnn - Multi-task CNN library language dependencies comment ...
- 【原创 深度学习与TensorFlow 动手实践系列 - 4】第四课:卷积神经网络 - 高级篇
[原创 深度学习与TensorFlow 动手实践系列 - 4]第四课:卷积神经网络 - 高级篇 提纲: 1. AlexNet:现代神经网络起源 2. VGG:AlexNet增强版 3. GoogleN ...
- 【原创 深度学习与TensorFlow 动手实践系列 - 3】第三课:卷积神经网络 - 基础篇
[原创 深度学习与TensorFlow 动手实践系列 - 3]第三课:卷积神经网络 - 基础篇 提纲: 1. 链式反向梯度传到 2. 卷积神经网络 - 卷积层 3. 卷积神经网络 - 功能层 4. 实 ...
- 【原创 深度学习与TensorFlow 动手实践系列 - 1】第一课:深度学习总体介绍
最近一直在研究机器学习,看过两本机器学习的书,然后又看到深度学习,对深度学习产生了浓厚的兴趣,希望短时间内可以做到深度学习的入门和实践,因此写一个深度学习系列吧,通过实践来掌握<深度学习> ...
- faceswap深度学习AI实现视频换脸详解
给大家介绍最近超级火的黑科技应用deepfake,这是一个实现图片和视频换脸的app.前段时间神奇女侠加尔盖朵的脸被换到了爱情动作片上,233333.我们这里将会从github项目faceswap开始 ...
- 深度学习——优化器算法Optimizer详解(BGD、SGD、MBGD、Momentum、NAG、Adagrad、Adadelta、RMSprop、Adam)
在机器学习.深度学习中使用的优化算法除了常见的梯度下降,还有 Adadelta,Adagrad,RMSProp 等几种优化器,都是什么呢,又该怎么选择呢? 在 Sebastian Ruder 的这篇论 ...
- 深度学习之卷积神经网络(CNN)详解与代码实现(一)
卷积神经网络(CNN)详解与代码实现 本文系作者原创,转载请注明出处:https://www.cnblogs.com/further-further-further/p/10430073.html 目 ...
随机推荐
- Leetcode687.Longest Univalue Path最长同值路径
给定一个二叉树,找到最长的路径,这个路径中的每个节点具有相同值. 这条路径可以经过也可以不经过根节点. 注意:两个节点之间的路径长度由它们之间的边数表示. 示例 1: 输入: 5 / \ 4 5 / ...
- 【JZOJ4772】【NOIP2016提高A组模拟9.9】运输妹子
题目描述 小轩轩是一位非同一般的的大农(lao)场(si)主(ji),他有一大片非同一般的农田,并且坐落在一条公路旁(可以认为是数轴),在他的农田里种的东西也非同一般--不是什么水稻小麦,而是妹子. ...
- pl/sql基础知识—包
n 包 包用于在逻辑上组合过程和函数,它由包规范和包体两部分组成. 为什么需要包:使用包可以更好的管理自己写的函数.过程 ①我们可以使用create package命令来创建包: creat ...
- 外贸电子商务网站之Prestashop 语言包安装
prestashop添加语言-下载语言包 我们找到中文简体(Chinese-Simplified)一行,点击最后一栏的下载(Download)按钮,我们点击下载,可以下到一个以语言的 ISO为文件名, ...
- 最短路-Dijkstra算法整理
维基说的很全面:https://en.wikipedia.org/wiki/Dijkstra%27s_algorithm 理解: 先设置访问数组vis[]和距离数组dist[],开始时把源点(sour ...
- 使用UITextView的dataDetectorTypes实现超链接需要注意的事项!
项目中需要在UITextView上识别URL,手机号码.邮箱地址等等信息.那么就用到了它的dataDetectorTypes属性.我的UITextView加在UITableViewCell上面的,当单 ...
- phpstudy易犯的错误
- Python中的简单实现UDP协议没有粘包问题
服务端: import socket server=socket.socket(socket.AF_INET,socket.SOCK_DGRAM) #数据报协议->udp server.bind ...
- spoj SUBLEX (Lexicographical Substring Search) RE的欢迎来看看
SPOJ.com - Problem SUBLEX 这么裸的一个SAM,放在了死破OJ上面就是个坑. 注意用SAM做的时候输出要用一个数组存下来,然后再puts,不然一个一个字符输出会更慢. 还有一个 ...
- python 集合运算